

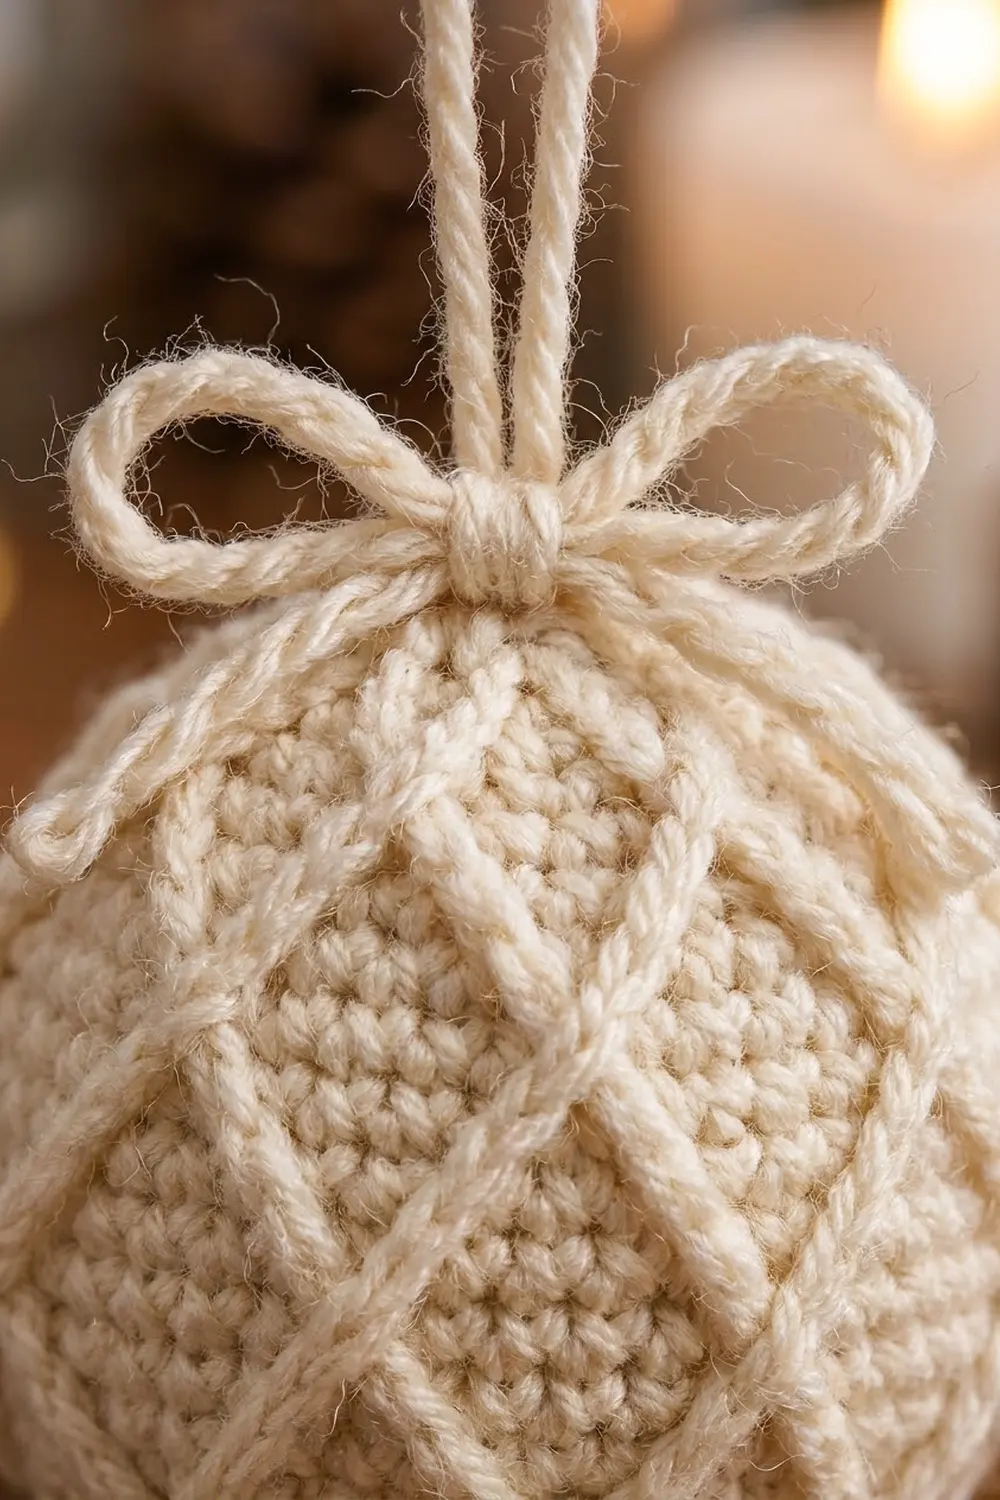
The Winter Lattice Ball is a small, stuffed Christmas ornament with a classic, cozy look. A smooth single crochet sphere is wrapped in a raised diamond lattice. A ridged collar, a hanging loop, and a little chain bow finish the top. It looks like a tiny cable-knit sweater turned into a bauble.
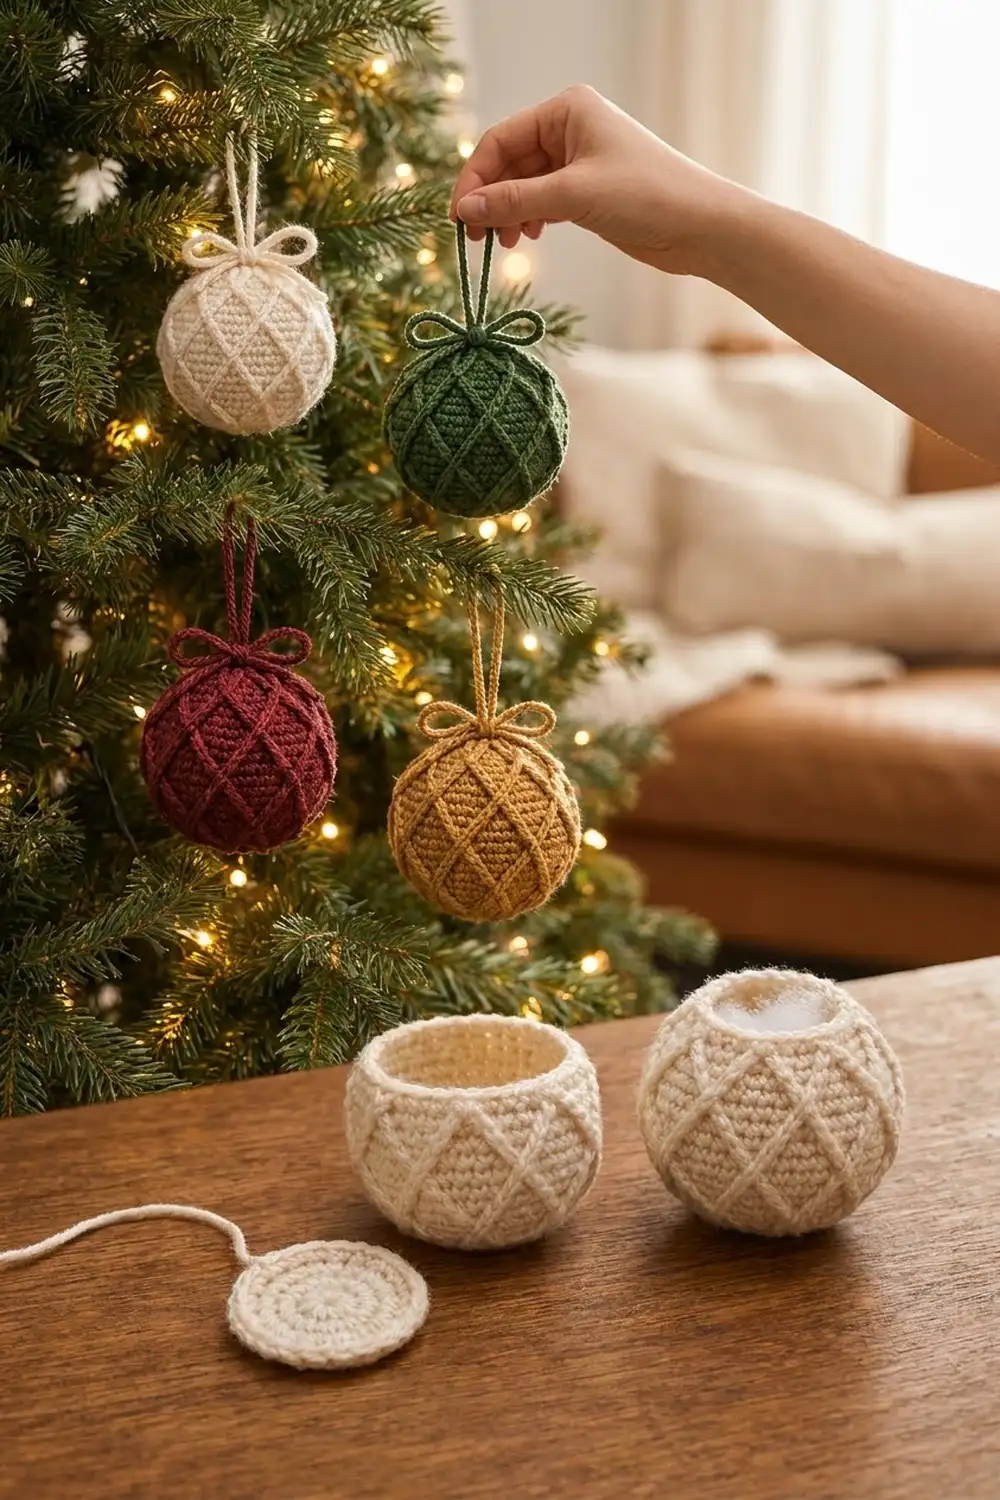
The sample is cream. It also looks great in forest green, burgundy, and mustard gold, so you can make a set for the tree, each ornament in one color. The raised lattice uses the same yarn as the body, so the texture does all the work.
This pattern uses US crochet terms. The finished ornament is about 3 in (7.6 cm) across, not counting the loop and bow.
Construction is simple. Crochet a flat spiral disc, then keep going straight to form a cup. Add the diamond lattice with surface slip stitches while the cup is still open. Then decrease, stuff, and close. The collar, loop, and bow go on last.
Finished Size and Construction
- Finished size: 3 in (7.6 cm) across; 9.3 in (23.6 cm) around the widest part
- Height with loop: about 5.5 in (14.0 cm)
- Skill level: Easy / Intermediate (amigurumi basics plus surface slip stitch)
- Terminology: US crochet terms
- Yarn weight: Worsted (#4)
- Hook: 3.5 mm (US E-4)
- Number of pieces: 1 (one continuous body, plus a separate chain loop and chain bow)
- Layout: single ornament, no joining of motifs
- Piece size: flat base disc 2.8 in (7.1 cm) across after Rnd 7
- Size before border: 3 in (7.6 cm) stuffed ball
- Border (collar) depth: about 0.2 in (0.5 cm), a raised ring 1.7 in (4.3 cm) across
Materials
Choose a smooth worsted weight yarn that shows stitches clearly. Wool blends and soft acrylic both work. Avoid fuzzy or very splitty yarn, because the lattice lines need to stand out against the background.
Yarn (one ornament, one color):
- Cream (sample): 15 g, about 30 m (33 yd)
- Optional colorways, per ornament: Forest Green 15 g / 30 m, Burgundy 15 g / 30 m, Mustard Gold 15 g / 30 m
Tools:
- 3.5 mm (US E-4) crochet hook
- 1 locking stitch marker for the rounds, plus 7 more for the lattice anchors
- Polyester fiberfill, about 10 g
- Tapestry needle
- Scissors
- Ruler or tape measure
The yarn amounts include about 20% extra for the gauge test, tails, the loop, and the bow.
Abbreviations (US Terms)
- ch – chain
- sc – single crochet
- inc – 2 sc in the same stitch
- dec – single crochet 2 together (invisible decrease recommended: insert hook in front loops of next 2 sts, yo, pull through both front loops, yo, pull through 2)
- sl st – slip stitch
- st(s) – stitch(es)
- Rnd – round
- MR – magic ring
- BLO – back loop only
- ( ) x6 – repeat the sequence 6 times in total
Special stitch – Surface slip stitch (surf sl st): Hold the working yarn inside the piece. From the outside, insert the hook into the center of the named stitch. Catch the yarn behind the fabric, then pull a loop through the fabric and through the loop on your hook. Each surf sl st lays a small “V” on the surface. A line of them makes the raised rope.
Gauge and Checkpoints
Gauge: 9 sc and 10 rnds = 2 in (5.1 cm) in sc worked in the round.
Amigurumi gauge should be tight so the stuffing doesn’t show. Make Rnds 1–7 first and use that disc as your test piece.
Checkpoint 1 – After Rnd 7 (42 sts): the flat disc should measure 2.8 in (7.1 cm) across. It should lie flat without ruffling or cupping.
Checkpoint 2 – After Rnd 16 (42 sts): the open cup should measure 9.3 in (23.6 cm) around and about 2.2 in (5.6 cm) tall.
Checkpoint 3 – Diamond size: each diamond spans 6 sts and 6 rnds, about 1.3 in (3.3 cm) wide and 1.2 in (3.0 cm) tall.
Checkpoint 4 – Finished ball: 3 in (7.6 cm) across when stuffed.
If your disc is too big: go down to a 3.25 mm hook or tighten your tension. Large stitches let fiberfill peek through.
If your disc is too small: go up to a 3.75 mm (US F-5) hook. If the ornament is a little small, the lattice will look crowded.
Body
Work in a continuous spiral. Put the marker in the first st of each round and move it up as you go. The lattice stitch numbers count from this marker, so keep it accurate.
Base Disc
Rnd 1: 6 sc in MR. (6 sts)
Rnd 2: inc in each st around. (12 sts)
Rnd 3: (sc 1, inc) x6. (18 sts)
Rnd 4: (sc 2, inc) x6. (24 sts)
Rnd 5: (sc 3, inc) x6. (30 sts)
Rnd 6: (sc 4, inc) x6. (36 sts)
Rnd 7: (sc 5, inc) x6. (42 sts)
Check Checkpoint 1: 2.8 in (7.1 cm) across.
Cup
Rnds 8–16: sc in each st around. (42 sts, 9 rnds)
Don’t fasten off. Pull up a long loop, take out the hook, and hold the live loop with a locking marker. Check Checkpoint 2.
Diamond Lattice
The lattice is one continuous zigzag line of surface slip stitches worked on Rnds 7 through 16, which all have 42 sts. Every round in this zone has the same count, so the diagonal lines stay even.
Mark the anchors: On Rnd 7, counting from the round marker, place markers in sts 3, 9, 15, 21, 27, 33, and 39. These 7 anchors are 6 sts apart (7 x 6 = 42).
How the line moves: each surf sl st moves either up 1 rnd and 1 st to the right (“up-right”) or down 1 rnd and 1 st to the right (“down-right”). One segment runs between Rnd 7 and Rnd 16, so it covers 9 rnds and moves 9 sts over.
Start: Cut 3 yd (2.7 m) of the same yarn and hold it inside the cup. From the outside, pull up a loop through st 3 of Rnd 7. Leave a 4 in (10.2 cm) tail inside.
Segment 1 (up-right): surf sl st in st 4 of Rnd 8, st 5 of Rnd 9, and so on, ending in st 12 of Rnd 16. (9 surf sl sts)
Segment 2 (down-right): surf sl st in st 13 of Rnd 15, st 14 of Rnd 14, and so on, ending in st 21 of Rnd 7, which is the next anchor you reach. (9 surf sl sts)
Segments 3–14: repeat Segments 1 and 2 six more times. Each pair moves you 18 sts to the right. After st 42, keep counting from st 1.
The up-right segments start at anchors 3, 21, 39, 15, 33, 9, and 27, so each anchor is used once. The down-right segments end at 21, 39, 15, 33, 9, 27, and finally 3. Your last surf sl st lands back in st 3 of Rnd 7 and closes the lattice.
Total: 14 segments x 9 surf sl sts = 126 surf sl sts.
Crossings: the lines cross on Rnds 10 and 13. When you reach a stitch the line has already used, work the new surf sl st into that same stitch, on top of the first one. That overlap makes the woven cross. There are 7 crossings on each of those rounds (14 in total). The line also makes 7 points on Rnd 7 and 7 points on Rnd 16.
This makes two staggered bands of 7 full diamonds. One band runs from Rnd 7 to Rnd 13 and the other from Rnd 10 to Rnd 16. The open V shapes at the top and bottom edges form the half-diamonds at each end of the lattice.
Keep the surf sl sts relaxed so each “V” sits on top of the fabric. If the cup puckers or narrows, the lattice is too tight. Pull the last loop to the inside and fasten off. Weave both tails into the wrong side and take out the anchor markers.
Shaping the Top
Put the live loop from Rnd 16 back on your hook.
Rnd 17: (sc 5, dec) x6. (36 sts)
Rnd 18: (sc 4, dec) x6. (30 sts)
Rnd 19: (sc 3, dec) x6. (24 sts)
Rnd 20: working in BLO, (sc 2, dec) x6. (18 sts)
Working Rnd 20 in BLO leaves the 24 front loops of Rnd 19 free for the collar.
Stuff the ball firmly now, shaping it into a round ball with your hands as you go. The lattice should stretch slightly and lie smooth, with no flat spots.
Rnd 21: (sc 1, dec) x6. (12 sts)
Add a little more fiberfill.
Rnd 22: dec x6. (6 sts)
Fasten off and leave a 6 in (15.2 cm) tail. Thread it through the front loops of the last 6 sts, pull it closed, and weave in. Check Checkpoint 4: 3 in (7.6 cm) across.
Border: Top Collar, Loop, and Bow
Border gauge: the collar is worked 1 sc in each free front loop of Rnd 19, one for one, with no increases or decreases. It is 1 rnd deep, about 0.2 in (0.5 cm).
Collar Rnd 1: With the top of the ball facing you, join yarn with a sl st in any free front loop of Rnd 19. Ch 1, then sc in the same loop and in each free front loop around. Join with sl st to the first sc. (24 sts)
Fasten off and weave in.
Why the math works: Rnd 19 has 24 sts, and Rnd 20 was worked in BLO, so exactly 24 front loops are free. One sc in each loop gives 24 sc. The collar has the same count as the round it sits on, so it lies flat as a raised ring 1.7 in (4.3 cm) across. Extra stitches would make it ruffle. Skipped stitches would pull it in and dent the top.
Hanging Loop: Ch 25, about 5 in (12.7 cm). Fasten off and leave 6 in (15.2 cm) tails at both ends. Thread both tails in through the center top of the ball (Rnd 22) and out about 0.4 in (1.0 cm) away. Knot them together securely and hide the ends inside. The folded loop stands about 2.5 in (6.4 cm) tall.
Bow: Ch 50, about 10 in (25.4 cm). Fasten off and trim the tails to 1 in (2.5 cm). Wrap the chain once around the base of the hanging loop, just above the collar. Tie a small bow with two loops about 0.8 in (2.0 cm) long, so the bow is about 2 in (5.1 cm) across. If the ornament will be handled a lot, secure the knot with a small stitch.
Final Blocking
- Roll the ball gently between your palms to even out the stuffing.
- Mist the surface with water until it is slightly damp. Don’t soak it.
- Press each diamond lightly with your fingertips so the lattice lines sit straight and the crossings lie flat.
- Pinch the collar into an even ring.
- Shape the bow loops and tails so they fall evenly to each side.
- Hang the ornament by its loop and let it air-dry completely, about 12 hours.
Final Quality-Control Checklist
- Rnd 7 has 42 sts, and the disc measured 2.8 in (7.1 cm).
- Rnds 8–16 each have 42 sts, and the cup measured 9.3 in (23.6 cm) around.
- The lattice has 126 surf sl sts and ends back at st 3 of Rnd 7.
- There are 14 full diamonds in two staggered bands of 7.
- Each diamond spans 6 sts and 6 rnds.
- The decrease rounds count 36, 30, 24, 18, 12, 6.
- The collar has 24 sc and lies flat.
- No fiberfill shows through the stitches.
- The loop is knotted securely and the bow is tied tight.
- The finished ball measures 3 in (7.6 cm) across.
Troubleshooting
Diagonal lines wobble or drift. Your round marker may have slipped. Recount from the marker before each segment, and check that each surf sl st moves exactly 1 st over.
The lattice doesn’t close at st 3. Count each segment; each must have exactly 9 surf sl sts. Pull back to the last correct anchor and work it again.
The cup puckers under the lattice. Your surface slip stitches are too tight. Work them with a looser loop, or go up one hook size just for the lattice.
Stuffing shows through. Your gauge is too loose. Go down a hook size for the body.
The ball looks lumpy. Add fiberfill in small pieces, and roll the ball between your hands before closing.
The collar ruffles or dents the top. Recount it. You need exactly 24 sc, one in each free front loop of Rnd 19.
Care
Spot clean with a damp cloth and mild soap, then reshape and let it air-dry. Store it in a box with tissue so the ball and bow keep their shape.
Final Notes
Here is the measurement chain in order:
- Base disc: 2.8 in (7.1 cm) across after 7 rounds, with 42 sts.
- Cup: 9.3 in (23.6 cm) around and 2.2 in (5.6 cm) tall after Rnd 16.
- Lattice: 126 surface slip stitches on Rnds 7–16. They make 14 diamonds, each 1.3 in (3.3 cm) wide and 1.2 in (3.0 cm) tall.
- Top shaping: decreases take the count from 42 down to 6.
- Finished ball: 3 in (7.6 cm) across, with a 24-st collar, a 2.5 in (6.4 cm) loop, and a 2 in (5.1 cm) bow.
Make one in cream, then try green, burgundy, and gold for a matching set.
Happy crocheting!