

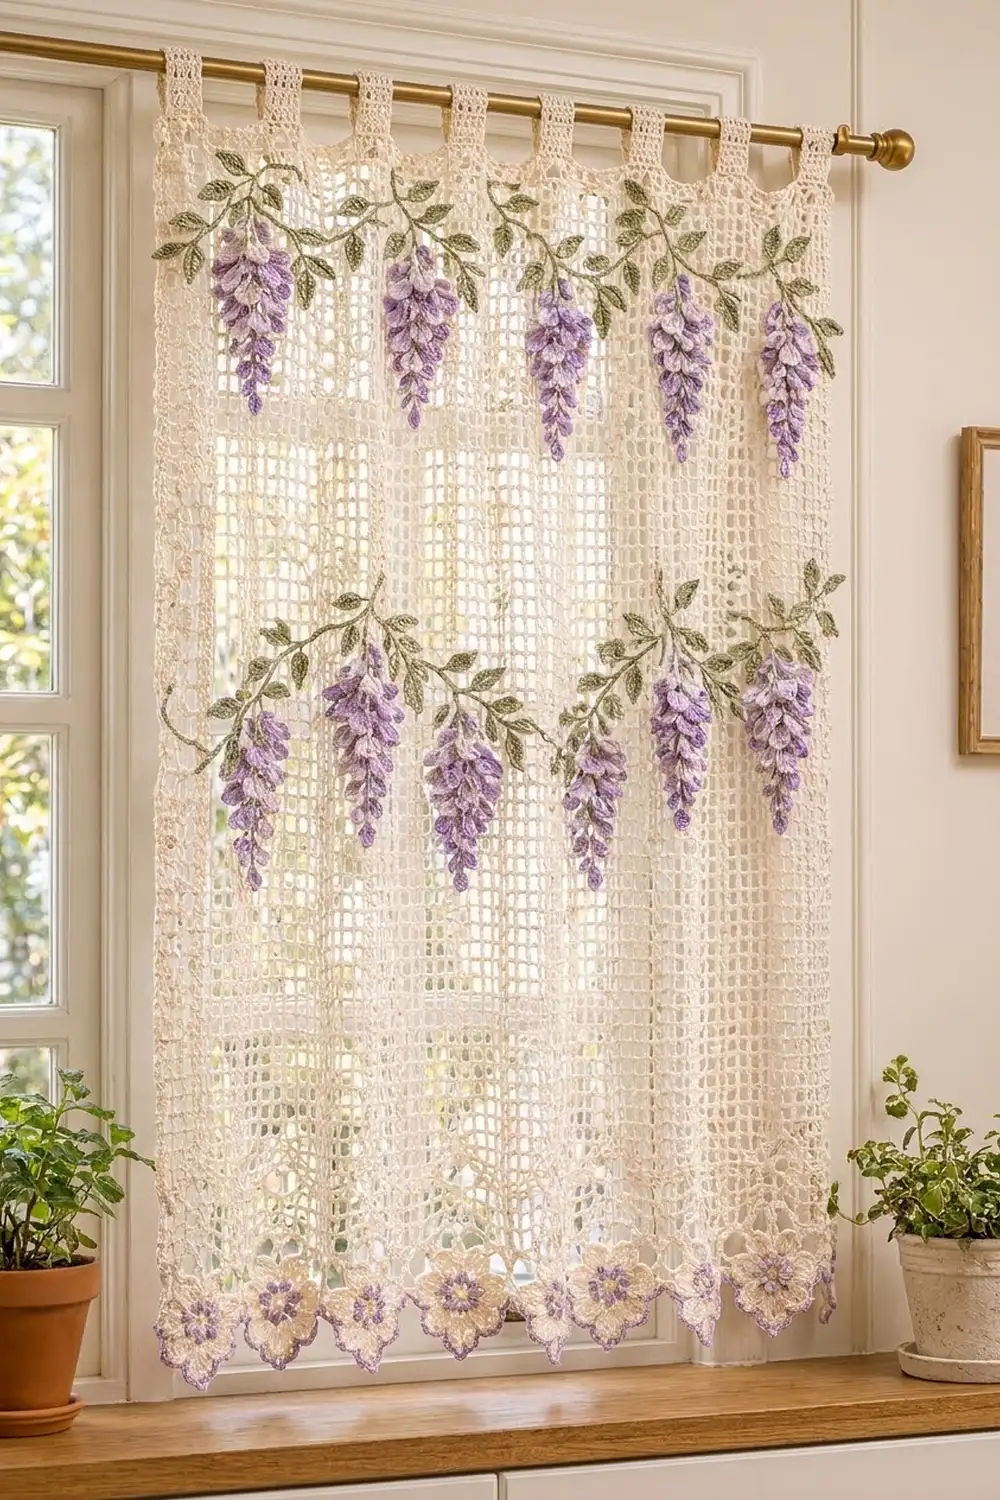
This curtain panel brings a spring garden indoors. A cream filet mesh body lets soft light through, and two tiers of lilac wisteria clusters hang from sage green vines across the upper section. Along the bottom is a row of pointed lace points. Each point has a little cream flower with a lilac center, and the whole hem is trimmed in lilac.
The palette is cream, medium lilac, light lilac and sage green. The style is cottage-romantic but clean: an open grid, narrow solid columns running down the panel, and texture where the eye lands first. The pattern uses US crochet terms throughout.
The finished panel is 36 in (91.4 cm) wide and 75 in (190.5 cm) long from the top edge to the tips of the points. The tab loops stand about 2.9 in (7.4 cm) above the top edge.
The construction is simple. You crochet one mesh panel from the bottom up, work the tabs straight off the last row, then add the hem border along the foundation edge and a plain edging on the sides. The wisteria clusters, leaves, vines and hem flowers are small separate appliqués that you sew on after blocking. These instructions make one panel, so make two for a pair.
Finished Size and Construction
- Finished size: 36 in (91.4 cm) wide x 75 in (190.5 cm) long, plus tab loops of 2.9 in (7.4 cm)
- Skill level: Intermediate
- Terminology: US
- Yarn weight: DK (light, weight 3) cotton
- Hook: 4.0 mm (US G-6)
- Number of pieces: 1 main panel, plus 44 sewn-on appliqués (9 wisteria clusters, 24 leaves, 2 vines, 9 hem flowers)
- Layout: single panel, with the appliqués in two tiers near the top
- Piece size: body 90 meshes wide x 162 rows
- Size before border: 36 in (91.4 cm) x 72 in (182.9 cm)
- Border depth: 3 in (7.6 cm) at the hem, with one sc row on each side
Materials
Use a smooth mercerized or matte DK cotton, about 120 m per 50 g. Cotton keeps the mesh crisp and holds its shape on a sunny window. Avoid fuzzy yarns, because they blur the grid.
- A, Cream: 525 g / 1,260 m
- B, Medium Lilac: 15 g / 36 m
- C, Light Lilac: 10 g / 24 m
- D, Sage Green: 15 g / 36 m
Tools:
– 4.0 mm (US G-6) hook
– Tapestry needle
– Locking stitch markers
– Rustproof pins and a large blocking surface (foam mats or a bed)
– Spray bottle
– Measuring tape
The quantities include a margin of roughly 15 percent for your gauge swatch and for tension differences.
Abbreviations (US Terms)
- ch – chain
- sl st – slip stitch
- sc – single crochet
- hdc – half double crochet
- dc – double crochet
- tr – treble crochet
- sk – skip
- sp – space
- st(s) – stitch(es)
- RS / WS – right side / wrong side
Special stitches:
– Mesh: ch 2, sk next 2 sts, dc in next dc.
– Block: dc in each of next 3 sts. Work these into the dc or ch sts below.
– Picot: ch 3, sl st in 3rd ch from hook.
Gauge and Checkpoints
Gauge: 10 meshes and 9 rows = 4 in (10.2 cm) in filet mesh. That works out to 3 sts per mesh, or 7.5 sts per inch.
Test first: Ch 33. For Row 1, dc in 4th ch from hook and in each ch across to get 31 dc. For Rows 2–9, ch 3, then work 10 meshes across. Block the swatch lightly and measure it. It should be 4 in (10.2 cm) square. Also make one leaf and one wisteria cluster to check the sizes in the appliqué sections.
Checkpoints:
– After Row 18: 36 in (91.4 cm) wide x 8 in (20.3 cm) tall
– After Row 81: 36 in (91.4 cm) x 36 in (91.4 cm)
– After Row 162: 36 in (91.4 cm) x 72 in (182.9 cm)
If your swatch is too big, go down a hook size (3.75 mm). If it is too small, go up (4.5 mm). Do not change the stitch counts, because the border and tab math depend on 271 sts.
Main Panel
The panel is worked flat from the bottom up. The ch-3 at the start of each row counts as a dc.
Foundation: With A, ch 273.
Row 1 (RS): Dc in 4th ch from hook and in each ch across. Turn. (271 dc)
Rows 2–161: Ch 3, [mesh] 7 times, block, [mesh] 14 times, block; rep from * to * 4 more times, [mesh] 7 times, working the last dc in the top of the turning ch. Turn. (90 units = 84 meshes + 6 blocks; 271 sts)
Check the sequence: 7 + 1 + (5 x 15) + 7 = 90 units. The sequence is symmetric, so every row reads the same in both directions. The blocks stack into six solid columns spaced 6 in (15.2 cm) apart. Their centers fall 3 in (7.6 cm), 9 in (22.9 cm), 15 in (38.1 cm), 21 in (53.3 cm), 27 in (68.6 cm) and 33 in (83.8 cm) from the right edge.
Row 162: Ch 3, dc in each dc, 2 dc in each ch-2 sp, and dc in each block st across. Do not fasten off. (271 dc)
Tabs
You work 8 tabs of 19 sts each, with 17 sts left unworked between neighboring tabs. Check the math: 8 x 19 + 7 x 17 = 152 + 119 = 271.
Tab 1, Row 1 (RS): Ch 3, dc in next 18 sts. Turn. (19 dc)
Rows 2–13: Ch 3, [mesh] 6 times. Turn. (6 meshes)
Row 14: Ch 3, dc in each st across. Fasten off. (19 dc)
Tabs 2–8: With RS facing, sk 17 sts on Row 162 after the previous tab. Join A in the next st and repeat Rows 1–14. The last tab ends exactly at the left edge.
Each tab is about 2.4 in (6.1 cm) wide and 6.2 in (15.7 cm) long. Each gap is also 2.4 in (6.1 cm), because both a tab and a gap span 18 stitch-widths.
Wisteria Clusters (make 9)
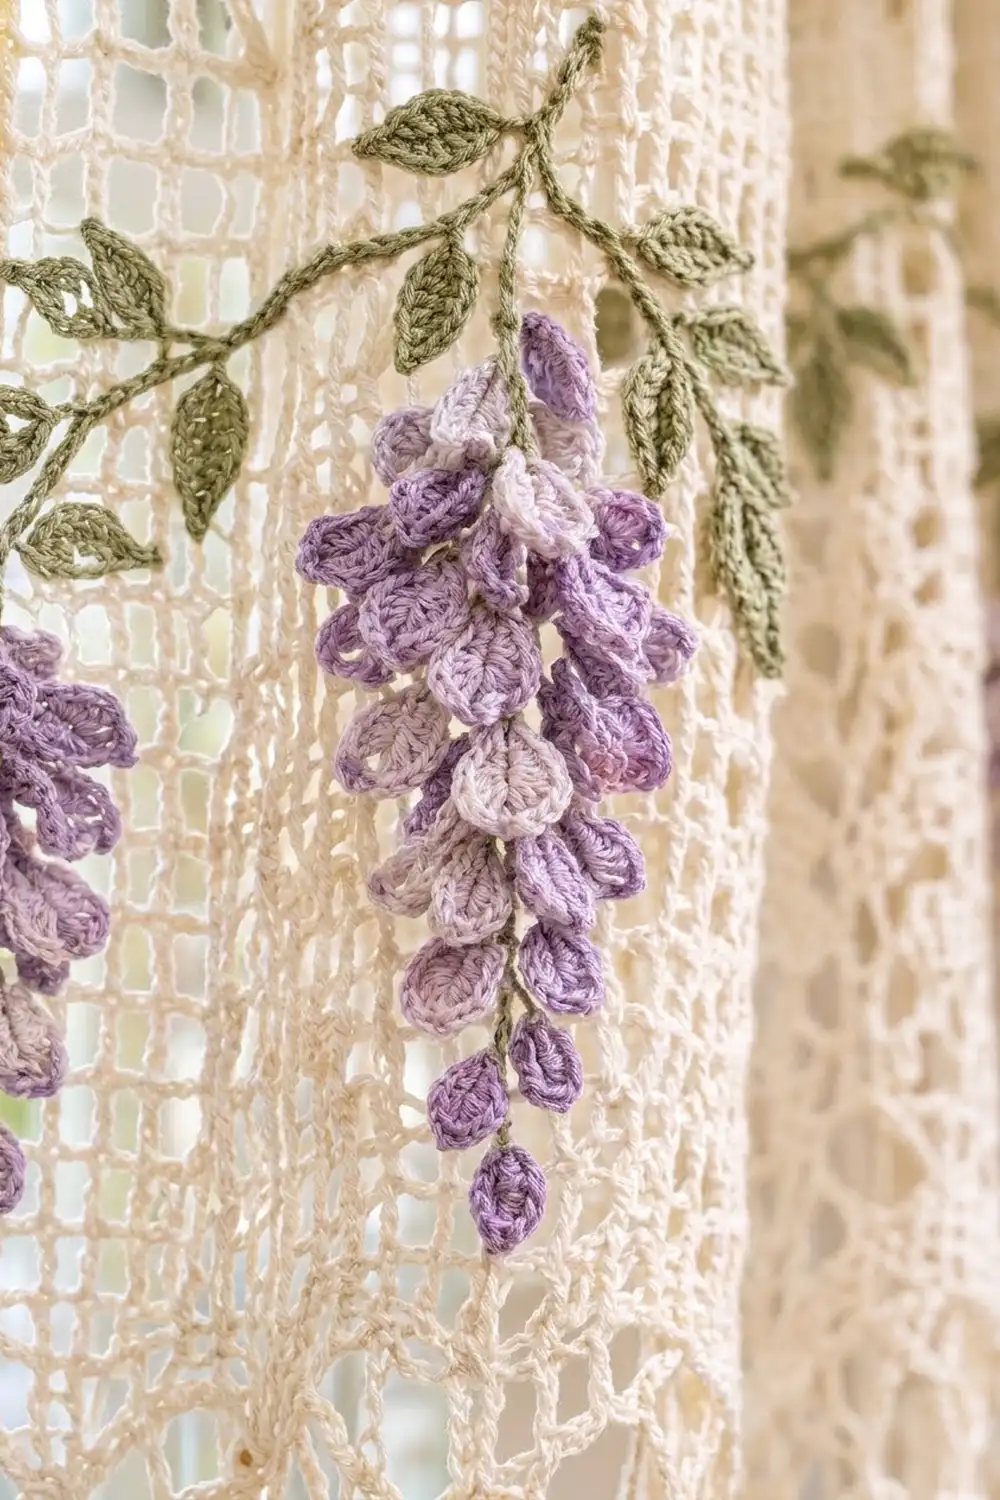
Each cluster is one chain spine with 24 cupped petals worked along it. You then coil the strip into a tapering bunch.
With B, ch 26. Work into the back bump of each ch.
- Tip section: (sc, hdc, sc) in 2nd ch from hook and in each of next 5 ch. (6 small petals)
- Middle section: (hdc, dc, hdc) in each of next 8 ch. Change to C in the last st. (8 medium petals)
- Top section: With C, (dc, tr, dc) in each of next 10 ch. (10 large petals)
- Finish: Sl st in the last ch, the slip-knot end. (24 petals total)
Fasten off and leave a 12 in (30.5 cm) tail. The chain is used as 1 + 6 + 8 + 10 + 1 = 26 ch.
Shaping: Hold the slip-knot end at the top. Coil the strip loosely in a spiral around its own spine so that the large light-lilac petals ring the top and the small medium-lilac petals taper to a point. Tack the spine every 3–4 petals with the tail. The finished cluster is about 2 in (5.1 cm) wide x 6 in (15.2 cm) long.
Leaves (make 24)
With D, ch 8.
- Side 1: Starting in 2nd ch from hook: sl st, sc, hdc, dc, dc, hdc. (6 sts)
- Tip: (sc, ch 2, sc) in the last ch.
- Side 2: Working along the other side of the foundation ch: hdc, dc, dc, hdc, sc, sl st. (6 sts)
Fasten off and leave an 8 in (20.3 cm) tail. The leaf is a pointed oval about 1.75 in (4.4 cm) long.
Vines (make 2)
Upper vine: With D, ch 140. Sl st in the back bump of 2nd ch from hook and of each ch across. (139 sl st) The vine is about 42 in (106.7 cm) long.
Lower vine: With D, ch 70. Sl st in the back bump of 2nd ch from hook and of each ch across. (69 sl st) The vine is about 21 in (53.3 cm) long.
Hem Flowers (make 9)
Rnd 1: With B, make a magic ring. Ch 1, then work 10 sc in the ring. Join with a sl st to the first sc. Fasten off B. (10 sc)
Rnd 2: Join A in any sc. (hdc, 2 dc, hdc) in next st, sl st in next st; rep 5 times. (5 petals)
Fasten off. The flower is about 1.75 in (4.4 cm) across.
Border
Border gauge: Sc along an edge works at 2 sc per dc row-end, or about 4.5 sc per inch. Mesh in the hem matches the body gauge.
Hem (bottom edge)
Row 1 (RS): Turn the panel upside down. Join A at the right corner, then ch 1 and sc in each foundation ch. Turn. (271 sc)
Row 2 (WS): Ch 3, [mesh] 90 times. Fasten off. (90 meshes; 91 dc posts)
Points (make 9 across): Each point sits on 10 meshes, or 11 posts, and shares its end posts with its neighbors: 9 x 10 = 90 meshes.
- Point Row 1 (RS): Join A in post 2 of the point. Ch 3, [ch 2, dc in next dc] 8 times. Turn. (8 meshes)
- Point Row 2: Sl st in next 2 ch and next dc, ch 3, [ch 2, dc in next dc] 6 times. Turn. (6 meshes)
- Point Row 3: As Row 2, working 4 times. Turn. (4 meshes)
- Point Row 4: As Row 2, working 2 times. Turn. (2 meshes)
- Point Row 5: Sl st in next 2 ch and the center dc. Ch 5, then sl st in the same dc to form the tip loop. Fasten off.
Posts 1 and 11 of each point stay unworked, and they become the valleys between points.
Edging (RS): Join B at the right corner. Sc in post 1. For each point, work 12 sc evenly up the stepped side, (2 sc, picot, 2 sc) in the tip loop, and 12 sc evenly down the other side. Then sc in the valley post. Repeat across, and end with sc in post 91. Fasten off.
The count is 9 x 28 + 10 = 262 sc, plus 9 picots.
Side Edges
With RS facing and A, work up each side from the hem. Work 1 sc in the row-end of hem Row 1, 2 sc in the row-end of hem Row 2, and 2 sc in each of the 162 body row-ends. That gives 1 + 2 + 324 = 327 sc per side.
Why the math works: 271 = 9 x 30 + 1, so the hem divides evenly into nine 4 in (10.2 cm) points with one shared post at each end. The sides use 2 sc per dc row, which matches the row height, so the edges stay flat without ruffling or pulling.
Assembly
Tabs: Fold each tab to the WS. Sew Row 14 of the tab to the WS of the panel just below Row 162, overlapping about 0.4 in (1.0 cm). The loop stands about 2.9 in (7.4 cm) high and fits rods up to 1.5 in (3.8 cm) across.
Lay the blocked panel RS up and pin everything before you sew.
Upper vine: Pin it in three shallow swags. The high points sit 5 in (12.7 cm) below the top edge and the low points 7 in (17.8 cm) below. Keep the ends 1 in (2.5 cm) in from the sides. Hang 6 clusters from it, centered over the six block columns.
Lower vine: Pin it 16 in (40.6 cm) below the top edge, running from 9 in (22.9 cm) to 27 in (68.6 cm) from the right edge. Hang 3 clusters at 12 in (30.5 cm), 18 in (45.7 cm) and 24 in (61.0 cm).
Leaves: Place 16 on the upper vine and 8 on the lower vine, singly and in pairs, with the stems touching the vine. Tuck 1–2 leaves over the top of each cluster.
Hem flowers: Sew one flower centered on each point, over Point Rows 1–2.
Use matching yarn and small stitches through the dc posts only. Weave every end through stitches of the same color.
Final Blocking
- Block the panel before sewing on the appliqués. Lay it flat on mats or a bed, with RS up.
- Pin the body to 36 in (91.4 cm) x 72 in (182.9 cm). Work in sections from the center outward.
- Pin each hem point to a sharp tip, so the border measures 3 in (7.6 cm) deep.
- Run a measuring tape along the block columns to keep them straight.
- Mist the panel until it is damp, not soaked. Let it dry completely.
- Sew on the appliqués. Then steam them lightly from above, without pressing, to set the petals.
Final Quality-Control Checklist
- Every body row has 271 sts, and the 6 block columns run straight.
- The width is 36 in (91.4 cm) at the top, middle and bottom.
- There are 8 tabs of 19 sts each, with 17-st gaps.
- There are 9 points, each ending in a tip loop with a picot.
- Each side edge has 327 sc and hangs flat.
- All 9 clusters taper from light lilac to medium lilac.
- No ends show on the RS.
Troubleshooting
The panel narrows as you go. You are probably missing the last dc in the turning ch. Count the posts every 10 rows; there should be 91.
The block columns drift. Place a marker in each block and move it up as you work.
The points curl. Ease the edging tension or go up a hook size for the B round, then block the tips firmly.
The clusters look flat. Coil the strip more tightly and tack it more often.
The tabs are too tight for your rod. Add 2 mesh rows to each tab before Row 14.
The sides ripple. Use 3 sc over every 2 row-ends instead of 2 sc per row-end.
Care
Hand wash cool with mild soap. Roll the panel in towels to remove the water, then dry it flat and re-pin the points.
Final Notes
The measurement chain is simple to follow. A swatch of 10 meshes and 9 rows at 4 in (10.2 cm) gives a 271-st, 90-unit row 36 in (91.4 cm) wide. That row, worked for 162 rows, makes a body 72 in (182.9 cm) long. Nine 4 in (10.2 cm) points add 3 in (7.6 cm), for 75 in (190.5 cm) overall, and the 8 tabs carry the weight evenly. If your gauge matches, everything else falls into place.
Happy crocheting!