

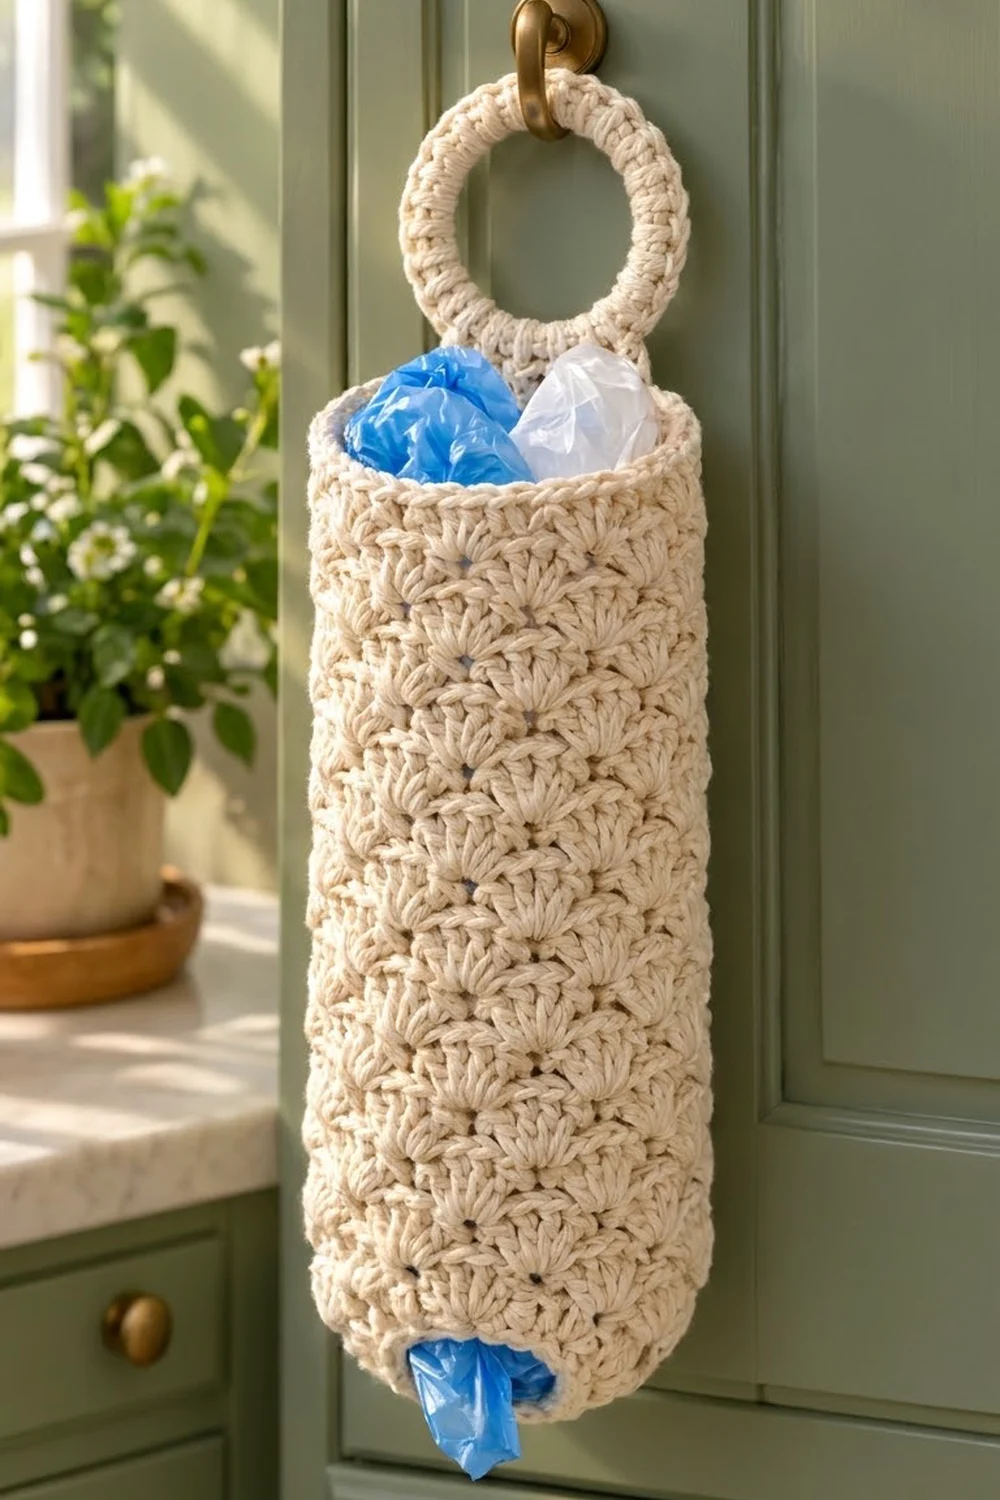
This holder hides a pile of grocery bags in a tidy cream cylinder. You stuff bags in through the open top and pull them out one at a time through the round hole in the base. A covered ring at the top slips over a cabinet hook, a towel bar or a door knob.
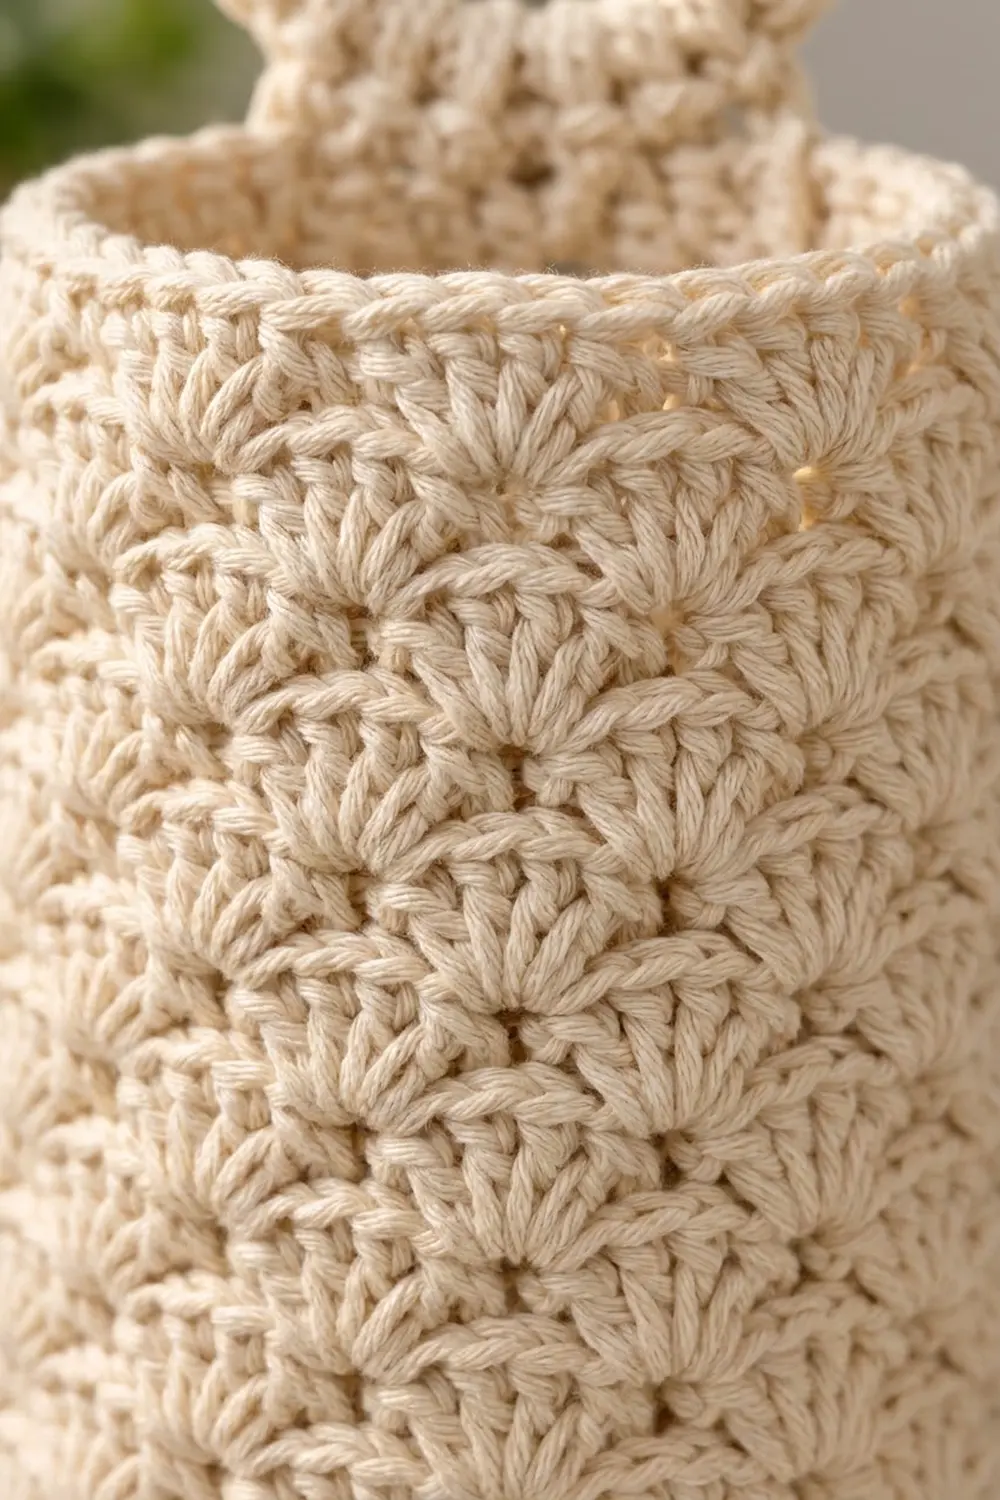
The whole holder is worked in one cream cotton. Offset rows of shell stitch cover the body, and that texture works well with farmhouse and cottage kitchens. The design uses US crochet terms throughout.
The finished body is about 4.5 in (11.4 cm) across and 13.5 in (34.3 cm) tall. With the hanging ring it measures about 17.5 in (44.5 cm) from the bottom to the top of the ring.
Construction is simple. You start with a chain ring that becomes the dispensing hole, then work flat double-crochet rounds out to the base size. A back-loop round turns the edge upward. From there the wall is worked in joined shell rounds, finished with a smoothing round and a single-crochet rim. Last, you crochet a short tab, cover a ring with single crochet and sew the two together.
Finished Size and Construction
- Finished size: 4.5 in (11.4 cm) diameter × 13.5 in (34.3 cm) tall body; about 17.5 in (44.5 cm) long with ring
- Skill level: Easy
- Terminology: US crochet terms
- Yarn weight: Worsted (#4) cotton
- Hook: 5.0 mm (H-8)
- Number of pieces: 2 components, the body (base and wall in one piece) and the covered ring, sewn together
- Layout: Single vertical cylinder hanging from a ring
- Circumference: 48 stitches, 14 in (35.6 cm)
- Height before rim (border): 12.75 in (32.4 cm)
- Rim (border) depth: 0.75 in (1.9 cm)
Materials
Yarn: Use a smooth worsted-weight cotton or cotton blend. Cotton holds the cylinder shape, doesn’t stretch out under the weight of the bags and stands up to washing. Acrylic will work but slumps a little more. Choose a light, solid color so the shells stand out.
- Cream (main color): 150 g, about 285 m (312 yd)
The quantity includes a margin of about 15% for your gauge swatch and small differences in tension.
Tools:
- 5.0 mm (H-8) crochet hook
- One 2.5 in (6.4 cm) plastic, wooden or metal ring for the hanger
- Tapestry needle
- Stitch marker
- Scissors
- Measuring tape
- Spray bottle and a rolled towel for blocking
Abbreviations (US Terms)
- ch – chain
- sl st – slip stitch
- sc – single crochet
- hdc – half double crochet
- dc – double crochet
- sc2tog – single crochet 2 together
- BLO – back loop only
- st(s) – stitch(es)
- sk – skip
- RS / WS – right side / wrong side
Special stitch – Shell: Work 5 dc in the same stitch. The 3rd of those 5 dc is the shell’s center dc.
Gauge and Checkpoints
- Double crochet (base): 14 dc and 8 rounds = 4 in (10.2 cm)
- Shell pattern: 2 shell repeats (12 sts) = 3.5 in (8.9 cm) wide; 4 shell rounds = 2 in (5.1 cm) tall
- Single crochet (tab): 16 sc = 4 in (10.2 cm)
Test the base first. The base is a small, quick piece, so use it as your gauge test.
- Checkpoint 1, after Round 3: The base should lie flat and measure about 4.5 in (11.4 cm) across, with a hole about 1.6 in (4.1 cm) wide.
- Checkpoint 2, after Round 12: Measured from the base edge, the wall should be about 4.25 in (10.8 cm) tall. Flattened, the tube should be about 7 in (17.8 cm) wide, which is half of the 14 in (35.6 cm) circumference.
- Checkpoint 3, after Round 29: The wall should be about 12.75 in (32.4 cm) tall.
If the base is too large or ruffles, go down to a 4.5 mm hook. If it is too small or cups, go up to a 5.5 mm hook. Keep the stitch counts the same and change only the hook, because the shell repeat needs exactly 48 stitches.
Body: Base
Ch 18 and join with a sl st to the first ch to form a ring. Don’t twist the chain. This ring becomes the dispensing hole.
Round 1: Ch 3 (counts as dc), dc in next ch, 2 dc in next ch, dc in next 2 ch, 2 dc in next ch; repeat from * 5 more times. Join with sl st to top of ch-3. (24 dc)
Round 2: Ch 3 (counts as dc), 2 dc in next st, dc in next st, 2 dc in next st; repeat from * 11 more times…
Correction to the repeat count: repeat from * 10 more times, for 12 increase groups in total. Join. (36 dc)
Round 3: Ch 3 (counts as dc), dc in next st, 2 dc in next st, dc in next 2 sts, 2 dc in next st; repeat from * 10 more times. Join. (48 dc)
Checkpoint 1: Lay the base flat and measure it. It should be about 4.5 in (11.4 cm) across.
Round 4 (edge turn): Ch 1, sc in BLO of each st around. Join to first sc. (48 sc)
Working in the back loop leaves the front loops as a ridge around the bottom edge and turns the work upward to start the wall.
Body: Shell Wall
The wall alternates two rounds. Round A places shells over single crochets. Round B splits the first shell across the round’s join so that the shells sit between the shells below. Both rounds have exactly 48 stitches: 8 shells of 5 dc plus 8 sc.
Round 5 (Round A): Ch 1, sc in first st, sk 2 sts, shell in next st, sk 2 sts, sc in next st; repeat from * 6 more times, sk 2 sts, shell in next st, sk 2 sts. Join with sl st to first sc. (8 shells + 8 sc = 48 sts)
Round 6 (Round B): Ch 3 (counts as dc), 2 dc in same st as join (half shell), sc in center dc of next shell, shell in next sc; repeat from * 6 more times, sc in center dc of last shell, 2 dc in same st as beginning ch-3 (completes the split shell). Join with sl st to top of ch-3. (3 + 2 + 35 dc + 8 sc = 48 sts)
Round 7 (Round A): Ch 1, sc in same st as join (the top of the ch-3 is the center of the split shell), sk 2 dc, shell in next sc, sk 2 dc, sc in center dc of next shell; repeat from * 6 more times, sk 2 dc, shell in next sc, sk 2 dc. Join to first sc. (48 sts)
Rounds 8–29: Alternate Round B (every even round) and Round A (every odd round), following Rounds 6 and 7. Round 29 is a Round A. (48 sts in every round)
Checkpoint 2: After Round 12, the wall should be about 4.25 in (10.8 cm) tall.
Checkpoint 3: After Round 29, the wall should be about 12.75 in (32.4 cm) tall. That is 0.25 in (0.6 cm) for Round 4 plus 25 shell rounds × 0.5 in (1.3 cm). Don’t fasten off.
Border: Top Rim and Dispensing Hole Edge
Rim gauge: The rim keeps the body’s 48 stitches, at the same 3.5 sts per inch as the shell pattern, so it fits around the 14 in (35.6 cm) top with no ruffling or pulling in.
Round 30 (leveling): Ch 2 (counts as dc) in same st as join, hdc in next dc, sc in next 3 dc, hdc in next dc, dc in next sc; repeat from * 6 more times, hdc in next dc, sc in next 3 dc, hdc in next dc. Join to top of ch-2.
Count: 1 + (7 × 6) + 5 = 48 sts. This is a conversion round: you work 1 stitch into each of the 48 existing stitches and add none. The 5 stitches over each shell and the 1 stitch over each single crochet give 6 per repeat × 8 repeats = 48. The taller stitches fill the dips between shells and the sc stay low over the shell peaks, so the top comes out level.
Round 31: Ch 1, sc in each st around. Join. (48 sc) Fasten off and weave in the end.
Why the math works: Each round from the base to the rim has 48 stitches, and 48 is exactly 8 shell repeats of 6. The leveling round converts each 6-stitch repeat to 6 flat stitches. Rounds 30–31 add about 0.75 in (1.9 cm), so the body is 12.75 + 0.75 = 13.5 in (34.3 cm) tall.
Dispensing hole edge: With the base facing you, join yarn in any free loop of the foundation chain. Ch 1 and work sc in each of the 18 free loops. Join. (18 sc) Fasten off.
This round firms up the hole so it keeps its 1.6 in (4.1 cm) round shape as you pull bags through it.
Hanging Tab
- Flatten the body so the round joins run down the center back.
- On Round 31, count 4 stitches to the right of the join and attach yarn there with the RS facing.
Row 1: Ch 1, sc in same st and in next 7 sts. Turn. (8 sc, 2 in / 5.1 cm wide)
Row 2: Ch 1, sc2tog, sc in next 4 sts, sc2tog. Turn. (6 sc)
Rows 3–6: Ch 1, sc in each st. Turn. (6 sc)
Fasten off and leave a 12 in (30.5 cm) tail for sewing. The tab is about 1.5 in (3.8 cm) tall.
Covered Hanging Ring
Round 1: Make a slip knot on the hook. Working over the 2.5 in (6.4 cm) ring, sc around the ring 44 times, pushing the stitches together as you go. Join with sl st to first sc. (44 sc)
The ring should be fully covered, with no plastic showing between stitches and no bunching. If your yarn is thinner or thicker, add or remove sc in pairs until it is. Fasten off and weave in the end. The covered ring is about 3 in (7.6 cm) across.
Attach:
- Turn the stitches so the top loops face the inside of the ring.
- Fold the top 0.5 in (1.3 cm) of the tab (Rows 5–6) over the bottom of the ring toward the inside of the holder.
- With the tail, whipstitch the last row of the tab to Row 3 across all 6 stitches.
- Go through the seam a second time to strengthen it.
About 1 in (2.5 cm) of tab shows between the rim and the ring.
Final Blocking
- Mist the body evenly with water until it is damp but not soaked.
- Roll a hand towel into a firm tube about 4.5 in (11.4 cm) across and slide it into the holder.
- Smooth the shells into straight columns and line up the round joins down the back.
- Press the base flat and round the dispensing hole with your fingers.
- Measure: 4.5 in (11.4 cm) across and 13.5 in (34.3 cm) tall.
- Let it dry completely with the towel inside, then remove the towel.
- Mist the tab lightly and press it flat. Don’t wet the ring hardware.
Final Quality-Control Checklist
- Base Rounds 1–3 counted 24, 36 and 48 dc.
- Every round from 4 to 31 has 48 stitches.
- There are 8 shells per round, and each shell sits centered between two shells of the round below.
- The rim is level all the way around, with no peaks over the shells.
- The dispensing hole is round and about 1.6 in (4.1 cm) wide.
- The tab is centered over the back joins.
- The ring is fully covered and sewn securely through both layers of the tab.
- All ends are woven in on the inside.
Troubleshooting
- Base cups like a bowl: Your tension is tight. Redo it with a 5.5 mm hook, keeping the counts the same.
- Base ruffles: Your tension is loose. Redo it with a 4.5 mm hook.
- Shells don’t line up: Check that each Round B starts in the join stitch and that each Round A starts in the top of the ch-3.
- Stitch count is off by 1: You probably missed the last 2 dc that close the split shell in Round B.
- Tube gets wider as it goes: You may be working shells into the wrong stitch. Recount: there should be 2 skipped stitches on each side of every shell in Round A.
- Bags fall out too easily: Work a second round of 18 sc around the hole, or use a smaller hook for that edge.
- Plastic shows through the ring: Add sc in pairs and push the stitches closer together.
Care
Hand wash in cool water with mild soap. Reshape over a rolled towel and dry flat.
Final Notes
The measurements build on each other:
- The 18-chain hole is 1.6 in (4.1 cm) wide.
- The base grows to 48 stitches and 4.5 in (11.4 cm) across.
- Those 48 stitches form 8 shell repeats around a 14 in (35.6 cm) circumference.
- 25 shell rounds bring the wall to 12.75 in (32.4 cm).
- A 48-stitch rim adds 0.75 in (1.9 cm), for a 13.5 in (34.3 cm) body.
- The tab and 3 in (7.6 cm) ring bring the total length to about 17.5 in (44.5 cm).
If your base passes Checkpoint 1, the rest of the measurements should follow.
Happy crocheting!