

The Ivory Lantern curtain is a light, airy lace panel made from oval motifs. Each oval has a slender “lantern” slot crossed by four fine bars, a raised corded ring, a band of radiating treble spokes, and a soft picot edge. When the curtain hangs in a sunny window, the open slots and diamond gaps throw delicate patterns of light.
The panel uses one color: a warm cream or ivory cotton. The design suits farmhouse, cottage, and Scandinavian rooms and works well as a sheer or café-style curtain. All instructions use US crochet terms.
One finished panel measures 35 in wide × 79.5 in tall (88.9 × 201.9 cm). The photo shows a pair, so make two panels for a full window.
You make 140 identical oval motifs and join them as you go at the picots, in 14 rows of 10 motifs. A straight top band levels the scalloped top edge for hanging. A matching bottom band adds a row of bobble drops.
Finished Size and Construction
- Finished panel size: 35 × 79.5 in (88.9 × 201.9 cm)
- Skill level: Intermediate
- Terminology: US crochet terms
- Yarn weight: Sport (#2 fine) mercerized cotton
- Hook: 3.25 mm (US D-3)
- Number of pieces: 140 oval motifs per panel
- Layout: 10 motifs wide × 14 motifs tall
- Motif size: 3.5 in wide × 5.5 in tall (8.9 × 14.0 cm)
- Size before border: 35 × 77 in (88.9 × 195.6 cm)
- Border depth: top band 1 in (2.5 cm); bottom band with drops 1.5 in (3.8 cm); side edges are left as the natural picot edge
Materials
Yarn: Use a smooth, mercerized sport-weight cotton, about 155 m per 50 g. Mercerized cotton gives crisp picots and hangs well in sunlight without much stretching. Avoid acrylic, which tends to droop in long lace panels.
- Cream / Ivory: 550 g (about 1,705 m), which is 11 balls of 50 g / 155 m per panel
- For a pair of panels: 1,100 g (about 3,410 m)
These quantities include a margin of about 15% for gauge swatches, joining tails, and differences between dye lots. Buy all of the yarn from a single dye lot.
Tools:
- 3.25 mm (US D-3) crochet hook
- Tapestry needle
- Locking stitch markers
- Rust-proof pins
- Blocking mats, or a large clean towel-covered surface
- Spray bottle
- Measuring tape
- 11 curtain clip rings per panel
Abbreviations (US Terms)
- ch – chain
- sl st – slip stitch
- sc – single crochet
- hdc – half double crochet
- dc – double crochet
- tr – treble crochet
- dtr – double treble crochet
- sp(s) – space(s)
- st(s) – stitch(es)
- beg – beginning
Special stitches:
- Picot: Ch 3, sl st in the 3rd ch from hook.
- Joining picot (jp): Ch 1, sl st in the matching picot of the finished neighbor motif, ch 1, sl st in the top of the last sc made.
- Drop: Ch 6, then work a 4-dc bobble in the 4th ch from hook. For the bobble, (yo, insert in the ch, pull up a loop, yo, draw through 2 loops) 4 times, then yo and draw through all 5 loops. Sl st in each of the next 2 ch, then sl st in the top of the last sc made.
Gauge and Checkpoints
Make one complete motif and block it before you start the panel. The blocked motif must measure 3.5 × 5.5 in (8.9 × 14.0 cm).
Checkpoints for one motif (measure lightly flattened):
- After the center strip: 2.5 × 0.5 in (6.4 × 1.3 cm)
- After Round 1: 3 × 1 in (7.6 × 2.5 cm)
- After Round 2: 3.75 × 1.75 in (9.5 × 4.4 cm)
- After Round 3: 5 × 3 in (12.7 × 7.6 cm)
- After Round 4 (blocked): 5.5 × 3.5 in (14.0 × 8.9 cm)
If your motif is too big, go down to a 3.0 mm hook. If it is too small, go up to a 3.5 mm hook. A difference of 0.25 in (0.6 cm) per motif adds up to 2.5 in (6.4 cm) across the width and 3.5 in (8.9 cm) down the length, so fix the gauge before you go on.
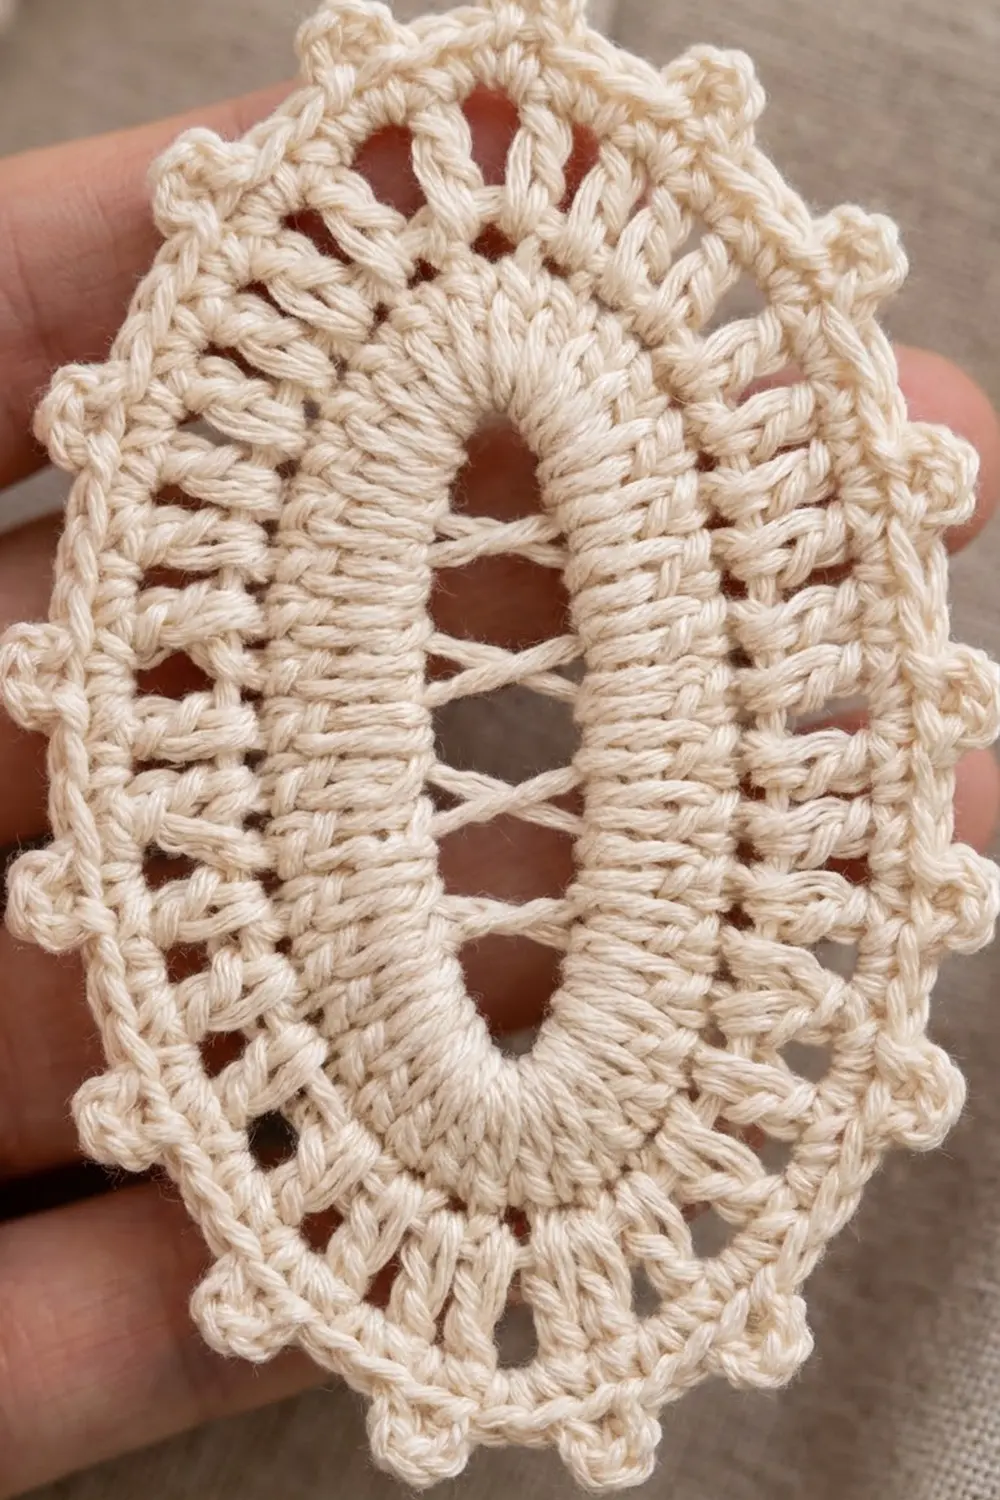
Oval Motif (Make 140)
The motif is worked in the round around a short filet strip. The posts of the strip become the bars across the center slot.
Center strip: Ch 20. Dc in the 8th ch from hook. The skipped 7 ch count as a dc, a ch-2 sp, and 2 skipped foundation ch. Then (ch 2, skip 2 ch, dc in next ch) 4 times.
You have 6 posts and 5 ch-2 sps. Turn the strip so that it runs vertically. The 4 inner dc posts are the horizontal bars across the slot. The 2 outer posts close the ends.
Round 1 (corded ring): Do not turn. Ch 1, then rotate the strip.
- End 1: Work 4 sc around the post of the last dc.
- Side B: Working along the foundation ch, sc in each of the 2 skipped ch of each space and 1 sc in the ch at the base of each inner dc, for 14 sc.
- End 2: Work 4 sc around the beg post.
- Side A: Working along the top, 2 sc in each ch-2 sp and 1 sc in each inner dc, for 14 sc.
Join with a sl st to the first sc.
Count: 36 sc (4 + 14 + 4 + 14).
The slot stays open because the sc are worked into the chains, not across the spaces.
Round 2: Ch 3 (counts as dc). Dc in the same st as the join. Then:
- End 1: 2 dc in each of the next 3 sts, for 8 dc on this end.
- Side B: 1 dc in each of the 14 sts.
- End 2: 2 dc in each of the 4 sts, for 8 dc.
- Side A: 1 dc in each of the 14 sts.
Join to the top of the beg ch-3.
Count: 44 dc = 36 (1 per st) + 8 extra (end increases).
Round 3 (spokes): Ch 5 (counts as tr + ch 1). Tr in the next dc, ch 1; repeat from * around. Join to the 4th ch of the beg ch-5.
Count: 44 tr and 44 ch-1 sps (1 per st).*
The ch-1 sps are numbered as follows: End 1 sps 1–8, Side B sps 1–14, End 2 sps 1–8, and Side A sps 1–14.
Round 4 (picot edge): Ch 1, sc in the same st, (sc, picot) in the next ch-1 sp. Sc in the next tr, (sc, picot) in the next ch-1 sp; repeat from * around. Join to the first sc and fasten off.
Count: 88 sc = 44 (1 per tr) + 44 (in sps), plus 44 picots.*
Each picot takes its number from the space it sits in: E1–E8 on each end, and 1–14 on each side.
Make All Pieces
Quantities: 140 motifs in Cream / Ivory.
Make the first motif completely. Make every later motif through Round 3, then work its Round 4 as a joining round (see below). All motifs face the same way, with End 1 at the top, Side B on the left, and Side A on the right.
Layout (O = one motif, 10 across × 14 down):
Row  1: O O O O O O O O O O
Row  2: O O O O O O O O O O
Row  3: O O O O O O O O O O
Row  4: O O O O O O O O O O
Row  5: O O O O O O O O O O
Row  6: O O O O O O O O O O
Row  7: O O O O O O O O O O
Row  8: O O O O O O O O O O
Row  9: O O O O O O O O O O
Row 10: O O O O O O O O O O
Row 11: O O O O O O O O O O
Row 12: O O O O O O O O O O
Row 13: O O O O O O O O O O
Row 14: O O O O O O O O O O
Joining
Method: Join as you go in Round 4. When you reach a picot that needs to be joined, work a joining picot (jp) instead of a regular picot.
Stitch-to-stitch logic:
- Side join: Join Side B picots 4–11 to Side A picots 4–11 of the motif on the left. This makes 8 joins.
- Vertical join: Join End 1 picots E4 and E5 to End 2 picots E4 and E5 of the motif above. This makes 2 joins.
Because each long side has 14 picots, picots 4–11 are centered when counted from either end. On each end, E4 and E5 are the middle two of the 8 picots. Every join therefore lines up without twisting.
Picots 1–3 and 12–14 on each side stay free. So do E1–E3 and E6–E8 on each end. Together they form the open diamonds where four motifs meet.
Order: Row 1 motifs use side joins only. In Rows 2–14, the first motif uses the vertical join only, and every other motif uses both.
Tension: Keep the joining chains as loose as your regular picot chains. If you pull them tight, the columns pucker and the panel narrows.
Size checkpoint:
- After joining Row 1, the panel is 35 in (88.9 cm) wide.
- After 4 rows, it is 22 in (55.9 cm) tall.
- The fully joined panel is 35 × 77 in (88.9 × 195.6 cm).
Border
The border is worked only along the top and bottom edges. The sides keep their natural picot scallops.
Border gauge: 20 sts = 3.5 in (8.9 cm), which is about 5.7 sts per inch. This matches 20 border sts per motif across a 3.5 in (8.9 cm) motif width.
Edge picots: On every edge motif, use the 8 end picots E1–E8 plus the 3 free side picots closest to that end on each side. Call the side picots S1 (nearest the tip), S2, and S3.
Top Band (along the End 1 edges of Row 1)
Row 1 (leveling row): With the right side facing, join the yarn in S3 on the left side of the first motif and ch 5 (counts as dtr). Then, across each motif:
- Ch 2, tr in S2, ch 1, hdc in S1.
- Sc in E1–E8.
- Hdc in S1, ch 1, tr in S2, ch 2, dtr in S3.
Move directly to the next motif and start it with a dtr in its left S3. Count per motif: 14 sts into picots + 6 ch = 20.
Row total: 10 motifs × 20 = 200 sts.
Rows 2–3: Ch 2 (does not count as a stitch), turn. Hdc in each st across. 200 hdc.
Row 4: Ch 1, turn. Sc in each st across. 200 sc. Fasten off.
Bottom Band (along the End 2 edges of Row 14)
Row 1: Work exactly as Row 1 of the top band, using End 2 picots and the S1–S3 picots nearest End 2. 200 sts (10 × 20).
Row 2: Ch 1, turn. Sc in each st across. 200 sc.
Row 3 (drops): Ch 1, turn. Sc in the first 5 sts. Drop, sc in the next 5 sts; repeat from * 38 more times. Count: 200 sc (5 + 39 × 5) and 39 drops.* Fasten off.
Why the math works: Each motif gives exactly 20 sts to the leveling row, so the 10 motifs give 200 sts. Nothing is added at the motif seams, because two dtr meet directly there. At 5.7 sts per inch, 200 sts measure 35 in (88.9 cm), which matches the joined width. The bands therefore lie flat with no flare or pull. The drop repeat leaves 5 sc at each end, so the drops are centered.
Final Blocking
- Weave in all the ends, following the motif’s own stitches.
- Soak the panel in cool water for 15 minutes, then press out the water. Do not wring it.
- Roll it in towels to remove more moisture.
- Lay one section of about 4 rows flat on the mats.
- Pin the top band straight to 35 in (88.9 cm).
- Pin each motif tip and side join so the columns are vertical and each motif measures 3.5 × 5.5 in (8.9 × 14.0 cm).
- Pin out every free picot to open the diamonds.
- Let the section dry, then move on to the next one. Overlap each section by one row.
- Pin the bottom band last, and let the drops hang over the edge of the mat so they stay round.
Final Quality-Control Checklist
- [ ] Every motif has 4 bars across an open slot.
- [ ] Every motif has 44 picots.
- [ ] Side joins are on picots 4–11, and tip joins are on E4 and E5.
- [ ] There are no twisted motifs, and End 1 faces up throughout.
- [ ] Both band rows count 200 sts.
- [ ] There are 39 evenly spaced drops.
- [ ] The panel measures 35 × 79.5 in (88.9 × 201.9 cm).
- [ ] All ends are secure and hidden.
Troubleshooting
- The slot closes up: You worked sc across the spaces. Work them into the chains only.
- The motif cups: Your Round 3 chains are too tight. Loosen them, or go up a hook size.
- The motif ruffles: Check that Round 2 has 44 sts, and that Round 3 has 1 tr per st with no extras.
- The columns lean: The joins are off by one picot. Count from the tip again.
- The top band flares: Your Row 1 count is over 200. Recount the 20 sts per motif.
- The band pulls in: Your band tension is tighter than your motif tension. Go up 0.25 mm for the band rows.
- Floppy drops: Use a tighter bobble, or close it with a firmer yo.
Care
Hand wash in cool water with a mild soap and dry flat. Re-pin the panel lightly if needed, and rehang it while it is just damp so it settles straight.

Final Notes
The size of the whole curtain comes from the size of one motif. Each motif goes from a 2.5 in (6.4 cm) strip to a blocked 3.5 × 5.5 in (8.9 × 14.0 cm) oval. Ten motifs across give 35 in (88.9 cm), and 14 down give 77 in (195.6 cm). The 1 in (2.5 cm) top band and 1.5 in (3.8 cm) bottom band bring the finished panel to 35 × 79.5 in (88.9 × 201.9 cm). Check your measurements at each stage, and the panel will come out right.
Happy crocheting!