

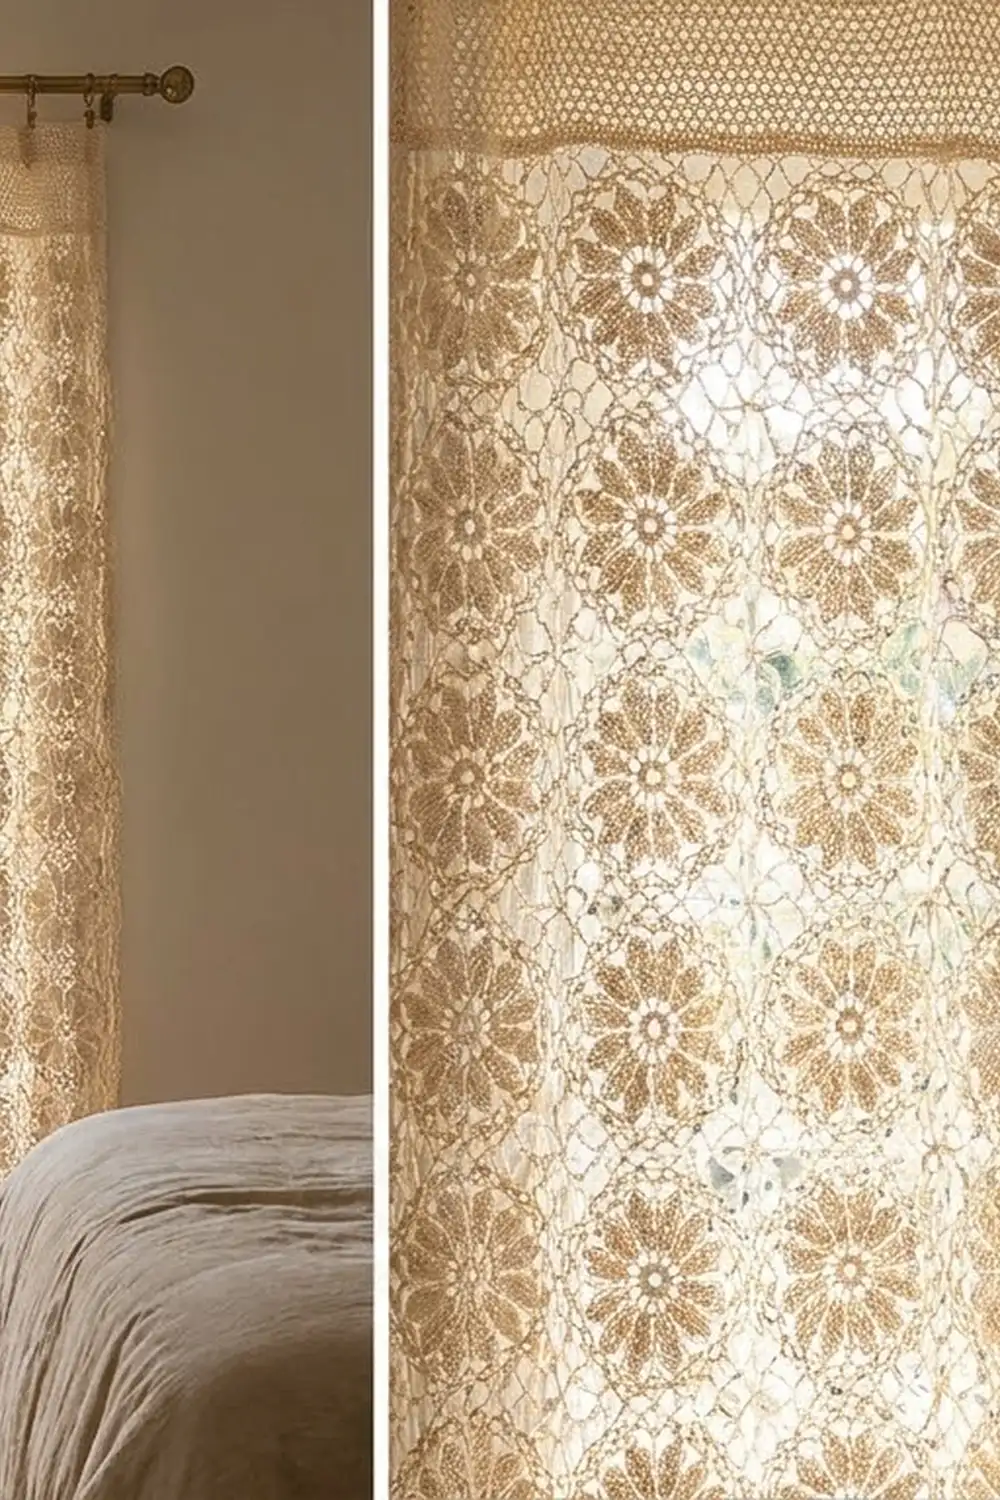
The Sunlit Petal Lace Curtain is a full-length lace panel built from round flower motifs with eight petals each. Each flower sits inside a ring of open chain loops. The motifs touch only at their sides, so small diamond windows open between them. Morning light shines straight through those windows and through the chain loops around every petal.
The whole curtain uses one color: a soft cream or ivory cotton. With a single color, the eye goes to the texture: thick petals, airy mesh and a scalloped hem. The style is cottage-romantic with a light vintage feel, and it suits a bedroom or a pair of French doors.
This pattern uses US crochet terms. One finished panel measures 25 in (63.5 cm) wide by 76.5 in (194.3 cm) long, including the header and hem. Make two panels for a pair.
The construction is easy to follow. You crochet 48 identical flower motifs per panel and join them as you go on the last round, in a grid 4 motifs wide and 12 motifs tall. A two-round border straightens the edges. Then a filet-mesh header goes across the top for clip rings, and a single scallop row finishes the bottom.
Finished Size and Construction
- Finished panel size: 25 in x 76.5 in (63.5 cm x 194.3 cm)
- Skill level: Intermediate
- Terminology: US crochet terms
- Yarn weight: Sport weight (#2 Fine) cotton
- Hook: 3.5 mm (E-4)
- Number of pieces: 48 motifs per panel; 96 motifs for a pair
- Layout: 4 motifs across x 12 motifs down
- Motif size: 6 in (15.2 cm) across
- Size before border: 24 in x 72 in (61.0 cm x 182.9 cm)
- Border depth: 0.5 in (1.3 cm) on each side; the header adds 2.5 in (6.4 cm) on top and the scallop row adds 1 in (2.5 cm) on the bottom
Materials
Choose a smooth mercerized cotton or cotton blend in sport weight, with about 155 m per 50 g. Mercerized cotton gives crisp petals and hangs straight. Avoid fuzzy yarns, because they blur the open lace.
- Cream / ivory: 400 g (about 1,240 m) per panel; 800 g (about 2,480 m) for a pair
One motif uses about 7 g (22 m). The border, header and hem use about 35 g per panel. These quantities include a margin of roughly 8% for gauge swatching and weaving in ends.
Tools:
– 3.5 mm (E-4) crochet hook
– Tapestry needle
– Stitch markers
– Rust-proof pins and blocking mats or a large towel-covered surface
– Spray bottle
– 8 clip-style curtain rings per panel
– Measuring tape
Abbreviations (US Terms)
- ch – chain
- sl st – slip stitch
- sc – single crochet
- hdc – half double crochet
- dc – double crochet
- tr – treble crochet
- dtr – double treble crochet
- sk – skip
- sp(s) – space(s)
- st(s) – stitch(es)
- RS – right side
Special stitch – Joining ch-6 loop: Ch 3, sl st into the center of the matching loop on the neighboring motif, ch 3. Use this in place of a plain ch-6 loop. The loop stays the same length.
Gauge and Checkpoints
Make one complete motif before anything else. Block it lightly and measure it. It must be 6 in (15.2 cm) across, measured from loop tip to loop tip.
Motif checkpoints (measured flat, across the center):
– After Round 1: 1.25 in (3.2 cm)
– After Round 2: 2.25 in (5.7 cm)
– After Round 3: 3.75 in (9.5 cm)
– After Round 4: 4.5 in (11.4 cm)
– After Round 5: 5.25 in (13.3 cm)
– After Round 6: 6 in (15.2 cm)
Border and header gauge: 16 sts = 4 in (10.2 cm) in sc or dc; 5 dc rows = 2.5 in (6.4 cm).
If your motif is too big, change to a 3.25 mm hook. If it is too small, change to a 3.75 mm hook. Even 0.25 in (0.6 cm) of difference per motif adds up to 3 in (7.6 cm) over the 12-motif length, so measure carefully.
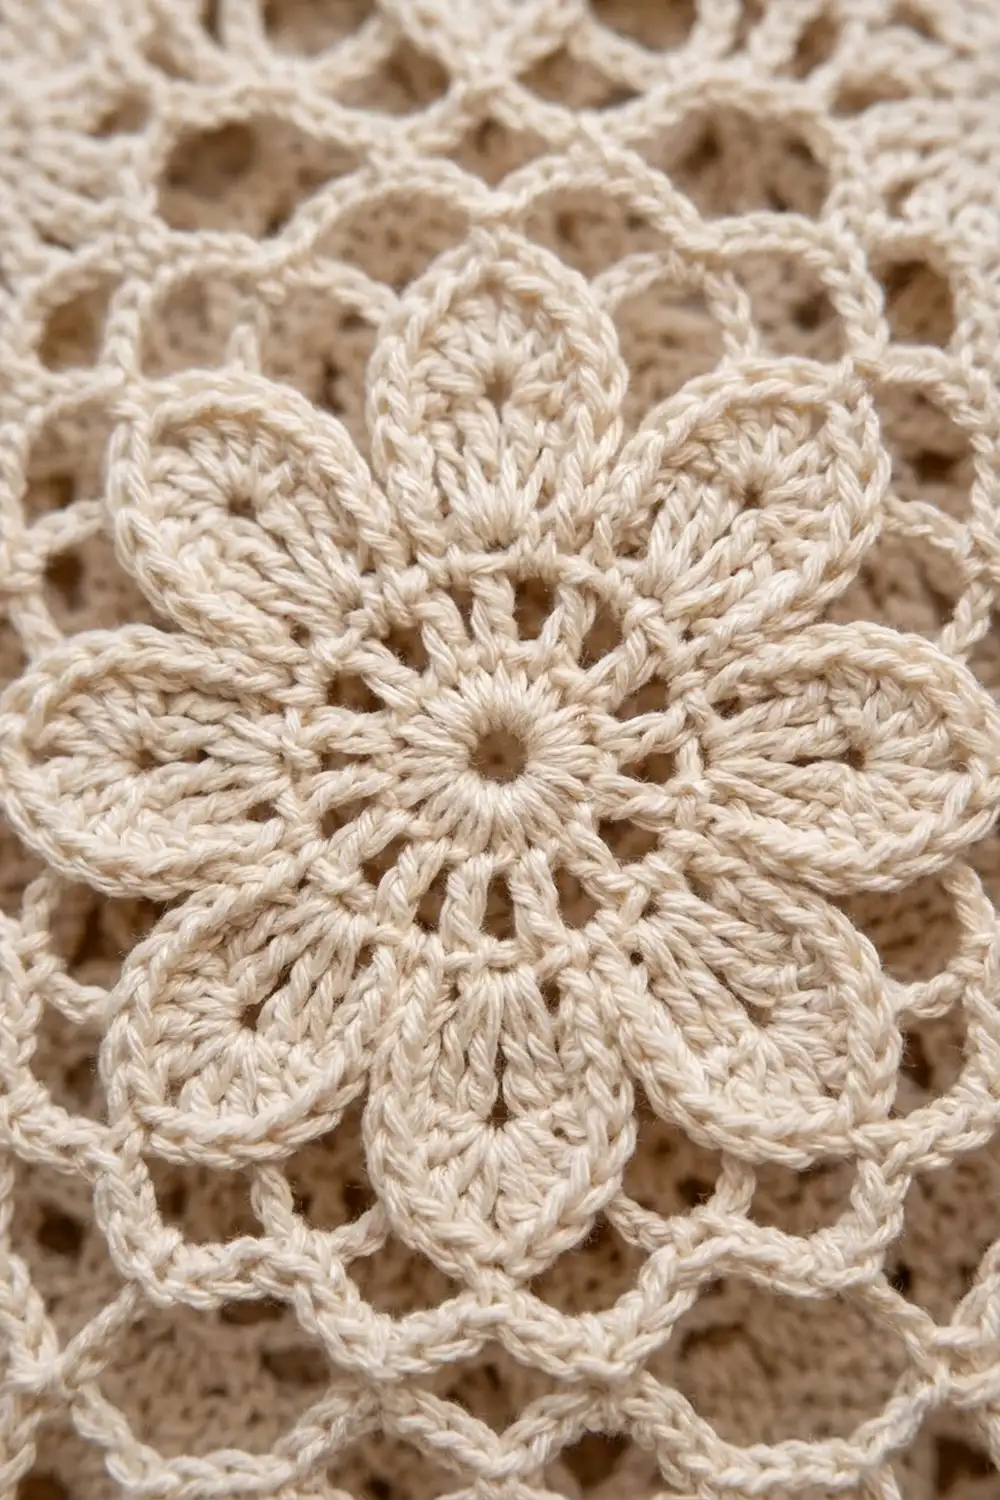
Flower Motif (make 48 per panel)
Round 1: Make a magic ring. Ch 3 (counts as dc), 15 dc in ring, sl st to top of ch-3. Pull the ring closed, leaving a small hole in the center. (16 dc)
Round 2: Ch 5 (counts as dc and ch 2), dc in next dc, ch 2; repeat from * 14 more times, sl st to 3rd ch of beginning ch-5. (16 dc, 16 ch-2 sps)
Round 3 (petal base): Sl st into first ch-2 sp. In this ch-2 sp work (dc, 3 tr), ch 3, in next ch-2 sp work (3 tr, dc); repeat from * 7 more times, sl st to first dc. Each petal uses 2 ch-2 sps, so 16 sps make 8 petals. (64 sts: 8 petals of 8 sts each, plus 8 ch-3 tips)
Round 4 (petal outline): Over each petal work: sl st in dc, sc in next tr, hdc in next tr, 2 dc in next tr, (2 tr, ch 3, 2 tr) in ch-3 tip, 2 dc in next tr, hdc in next tr, sc in next tr, sl st in dc; repeat from * 7 more times. Join with sl st to first sl st. Each petal now has a rounded body and a pointed tip, and the sl sts make a deep dip between petals. (96 sts plus 16 sl sts and 8 ch-3 tips; per petal: 12 sts, 2 sl sts, 1 tip)
Round 5 (lace ring): Sl st across to the first ch-3 tip. Ch 1, sc in ch-3 tip, ch 5, tr in the gap between the 2 sl sts at the dip, ch 5; repeat from * 7 more times, sl st to first sc. (8 sc, 8 tr, 16 ch-5 loops)
Round 6 (outer loops): Before you start, turn the motif so the first loop you work sits at the top. Sl st into the 3rd ch of the next ch-5 loop. Ch 1, sc in same loop, ch 6, sc in next ch-5 loop; repeat from * 14 more times, ch 6, sl st to first sc. Fasten off. (16 sc, 16 ch-6 loops)
Naming the outer loops: Going around, the 16 loops fall into 8 groups of 2: a side pair, then a corner pair, repeated 4 times. Side pairs face up, right, down and left. Corner pairs face the diagonals. You only ever join side pairs. Mark the first side pair on each motif with a stitch marker.
Make All Pieces
- Per panel: 48 motifs in cream
- For a pair: 96 motifs in cream
Work the first motif completely. Join every other motif on Round 6 as you make it.
Layout per panel (4 across x 12 down), numbered in working order:
Row 1:   1   2   3   4
Row 2:   5   6   7   8
Row 3:   9  10  11  12
Row 4:  13  14  15  16
Row 5:  17  18  19  20
Row 6:  21  22  23  24
Row 7:  25  26  27  28
Row 8:  29  30  31  32
Row 9:  33  34  35  36
Row 10: 37  38  39  40
Row 11: 41  42  43  44
Row 12: 45  46  47  48
Joining
Method: Join as you go on Round 6, using the joining ch-6 loop.
Stitch-to-stitch logic: Work Round 6 as normal until you reach a side pair that faces a finished motif. Work each of those 2 loops as a joining ch-6 loop, attaching it to the facing side pair of the neighbor. Join the nearer loop to the nearer loop so the joins never cross. Never join corner pairs. They stay free and outline a diamond window between 4 motifs.
- Motifs 2 to 4: join 1 side pair to the left neighbor (2 joins).
- Motifs 5, 9, 13 and so on (left column): join 1 side pair to the motif above (2 joins).
- All other motifs: join 1 side pair to the motif above and 1 side pair to the left neighbor (4 joins).
Tension advice: Keep the joining sl st as loose as your normal chains. A tight sl st pulls the motifs together and the panel shrinks in that direction. If a joined loop looks shorter than a free loop, don’t add chains. Loosen the sl st instead.
Size checkpoint: After 4 rows of motifs, the piece measures 24 in x 24 in (61.0 cm x 61.0 cm). After all 12 rows, it measures 24 in x 72 in (61.0 cm x 182.9 cm). Measure with the panel lying flat, not hanging.
Border
Border gauge: About 4 sts per inch (16 sts = 4 in / 10.2 cm), the same as the header.
Counting free loops: Each motif on the edge shows 6 free loops along one panel edge: a corner pair, a side pair and a corner pair. At each of the 4 panel corners, the outer corner pair of the corner motif belongs to both edges. Count it only once, as a corner group.
- Long side: 12 motifs x 6 loops = 72 loops, minus 2 corner pairs (4 loops) = 68 loops between corners
- Short side: 4 motifs x 6 loops = 24 loops, minus 4 loops = 20 loops between corners
- Corners: 4 pairs = 8 loops
- Total: 68 + 68 + 20 + 20 + 8 = 184 free loops
Round 1 (leveling round): With RS facing, join yarn in any free loop. Work 4 sc in each free loop around. At each notch where 2 edge motifs meet, work 1 dtr into the joining sl st of the nearest joined loop. The dtr fills the dip so the edge runs straight. Sl st to first sc.
Count: 184 loops x 4 sc = 736 sc, plus 28 dtr (11 per long side, 3 per short side) = 764 sts.
- Each long side between corners: 68 x 4 = 272 sc + 11 dtr = 283 sts
- Each short side between corners: 20 x 4 = 80 sc + 3 dtr = 83 sts
- Each corner group: 2 loops x 4 sc = 8 sc
- Check: 283 + 283 + 83 + 83 + (4 x 8) = 764 sts
Round 2: Ch 1, sc in each st around, sl st to first sc. Fasten off. (764 sc: 283 per long side, 83 per short side, 8 per corner group) You don’t need corner increases, because the corner groups already curve around the round motifs.
Header (top edge only): With RS facing, join yarn in the 1st sc of the top-right corner group. You will work across 8 + 83 + 8 = 99 sts.
- Row 1: Ch 3 (counts as dc), dc in each st across. Turn. (99 dc)
- Row 2: Ch 4 (counts as dc and ch 1), sk 1, dc in next st, ch 1, sk 1, dc in next st; repeat across. Turn. (50 dc + 49 ch-1 sps = 99 sts)
- Row 3: Ch 3, dc in ch-1 sp, dc in next dc; repeat across. Turn. (99 dc)
- Row 4: Repeat Row 2. (50 dc + 49 ch-1 sps)
- Row 5: Repeat Row 3. Fasten off. (99 dc)
Scallop hem (bottom edge only): With RS facing, join yarn in the 1st sc of the bottom-left corner group. Again you work across 8 + 83 + 8 = 99 sts.
- Row 1: Ch 1, sc in first 2 sts, sk 2, 7 dc in next st, sk 2, sc in next st; repeat from * 15 more times, sc in last st. Fasten off. (16 scallops; 2 + (16 x 6) + 1 = 99 sts used)
Why the math works: Each motif covers 6 in (15.2 cm) of edge. It gives 6 loops x 4 sc = 24 sc, plus 1 dtr at its notch, for 25 sts per 6 in. That is about 4.2 sts per inch, close to the 4-sts-per-inch header gauge, so the edges don’t ruffle or pull in. The 99 sts on the top and bottom edges fit the 2-st filet mesh and the 6-st scallop repeat exactly.
Final Blocking
- Weave in all ends along the back of the petals or inside the border sts.
- Soak the panel in cool water for 10 minutes, then roll it in a towel and press out the water. Do not wring.
- Lay the panel flat on mats or towels on a large, clean floor.
- Pin the long sides straight to 76.5 in (194.3 cm) and the width to 25 in (63.5 cm).
- Pin the center of each scallop so the points along the hem are even.
- Open each diamond window and gently push each petal tip outward so the flowers lie flat.
- Let the panel dry completely, 24 to 48 hours.
- Clip 8 rings to header Row 4, at dc 1, 8, 15, 22, 29, 36, 43 and 50. They will sit about 3.5 in (8.9 cm) apart.
Final Quality-Control Checklist
- Every motif measures 6 in (15.2 cm) across.
- Every motif has 8 petals and 16 outer loops.
- Every side pair that faces a neighbor is joined, and no corner pair is joined.
- The panel measures 24 in x 72 in (61.0 cm x 182.9 cm) before the border.
- Border Round 2 has 764 sc.
- The header and hem each start on 99 sts.
- The hem has 16 even scallops.
- The two panels of a pair are within 0.5 in (1.3 cm) of each other in length.
Troubleshooting
Petals cup or ruffle: Your Round 4 tension is too tight, or you added extra tr. Recount: each petal has 12 sts.
Center won’t lie flat: Round 1 is too tight. Pull the magic ring only until the hole is about 0.25 in (0.6 cm).
Panel is narrower than 24 in (61.0 cm): The joining sl sts are too tight. Redo the joins more loosely, or use a larger hook for Round 6.
Side edges wave: Border Round 1 has too many sts. Check that you have 4 sc per loop and only 1 dtr per notch.
Header flares: Use a hook 0.5 mm smaller for the header rows.
Scallops lean: You started on the wrong st. Begin with 2 sc, then the first skip.
Care
Hand wash in cool water with mild detergent and dry flat. Block lightly again after washing, and hang the panel only when it is completely dry.
Final Notes
Here is the measurement chain: Round 1 at 1.25 in (3.2 cm) grows into a 6 in (15.2 cm) motif. Four motifs across make 24 in (61.0 cm), and 12 down make 72 in (182.9 cm). The border brings the width to 25 in (63.5 cm), and the header and hem bring the length to 76.5 in (194.3 cm). If you check each step, the panel will hang straight and glow in the sun.
Happy crocheting!