

This lacy poinsettia is a single layered flower with twelve pointed petals in deep cranberry red and a small cream bobble flower in the center. Each petal is an open mesh with a clear center vein, outlined with a neat single-crochet edge and a tiny picot at the tip.
It looks great tucked into a wreath, clipped onto a tree, tied onto a gift, or sewn to a stocking. The style is classic and a bit vintage, close to the thread poinsettias you see on old holiday linens, but worked in sport-weight cotton so it goes faster and holds its shape better.
The pattern uses US crochet terms. The finished flower measures about 6 in (15.2 cm) from tip to tip. The front layer is about 4.75 in (12.1 cm) across, and the cream center is about 0.75 in (1.9 cm).
You make three parts: a large petal layer, a small petal layer, and a cream center. Both petal layers start with an 18-dc ring, and each petal is then worked in short rows right off that ring. A single-crochet border with picot tips goes around each layer, and then you stack and sew the parts together.
Finished Size and Construction
- Finished size: about 6 in (15.2 cm) tip to tip
- Skill level: Intermediate (short rows, increases, decreases, bobbles)
- Terminology: US crochet terms
- Yarn weight: Sport (#2), cotton or cotton blend
- Hook: 3.0 mm
- Number of pieces: 1 finished motif, made from 3 stacked parts
- Layout: small layer on top of the large layer, rotated 30 degrees, with the cream center on top
- Piece sizes: large layer 6 in (15.2 cm), small layer 4.75 in (12.1 cm), center 0.75 in (1.9 cm)
- Size before border: large layer 5.75 in (14.6 cm), small layer 4.5 in (11.4 cm)
- Border depth: about 0.125 in (0.3 cm) on each side
Materials
Use a smooth, mercerized sport-weight cotton. Cotton shows off the mesh and keeps the points crisp. Fuzzy or very soft yarns hide the lace, and the petals can droop.
- Cranberry red: 15 g / 47 m (both petal layers and assembly)
- Cream: 2 g / 6 m (center flower)
These amounts include a margin for your gauge swatch and sewing tails.
Tools:
- 3.0 mm crochet hook
- Tapestry needle
- Scissors
- Rust-proof pins and a foam blocking mat
- Spray bottle with water
- Optional: pin back, ornament hanger, or ribbon loop
Abbreviations (US Terms)
- ch – chain
- sl st – slip stitch
- sc – single crochet
- dc – double crochet
- dc2tog – double crochet 2 together
- MR – magic ring
- st(s) – stitch(es)
- sp – space
- tch – turning chain
- RS / WS – right side / wrong side
Special stitches:
- Picot: ch 3, sl st in the 3rd ch from the hook.
- Bobble: yarn over, insert hook in the stitch, yarn over and pull up a loop, yarn over and pull through 2 loops; repeat from * 2 more times in the same stitch (4 loops on hook), yarn over and pull through all 4 loops.
- Post: in this pattern, any upright stitch in the petal mesh. That includes a dc, a ch-4 or ch-2 that counts as a dc, and a dc2tog.
Gauge and Checkpoints
Gauge isn’t critical for a decoration, but it controls the finished size. Make the small layer first; it acts as your test piece.
- Gauge: 3 rows of dc = 1 in (2.5 cm); 6 sc = 1 in (2.5 cm)
- Checkpoint 1: Rnd 1 (18 dc) measures 1 in (2.5 cm) across.
- Checkpoint 2: a finished small petal measures 1.75 in (4.4 cm) from the edge of Rnd 1 to the tip, and about 1 in (2.5 cm) at its widest.
- Checkpoint 3: a finished large petal measures 2.375 in (6.0 cm) from the edge of Rnd 1 to the tip, and about 1.5 in (3.8 cm) at its widest.
- Checkpoint 4: the bordered large layer measures 6 in (15.2 cm) tip to tip.
If your pieces come out too big, go down to a 2.75 mm hook. If they come out too small, go up to a 3.25 mm hook. If the ring is right but the petals are too long, your dc are tall; try pulling the first loop a little lower on each dc.
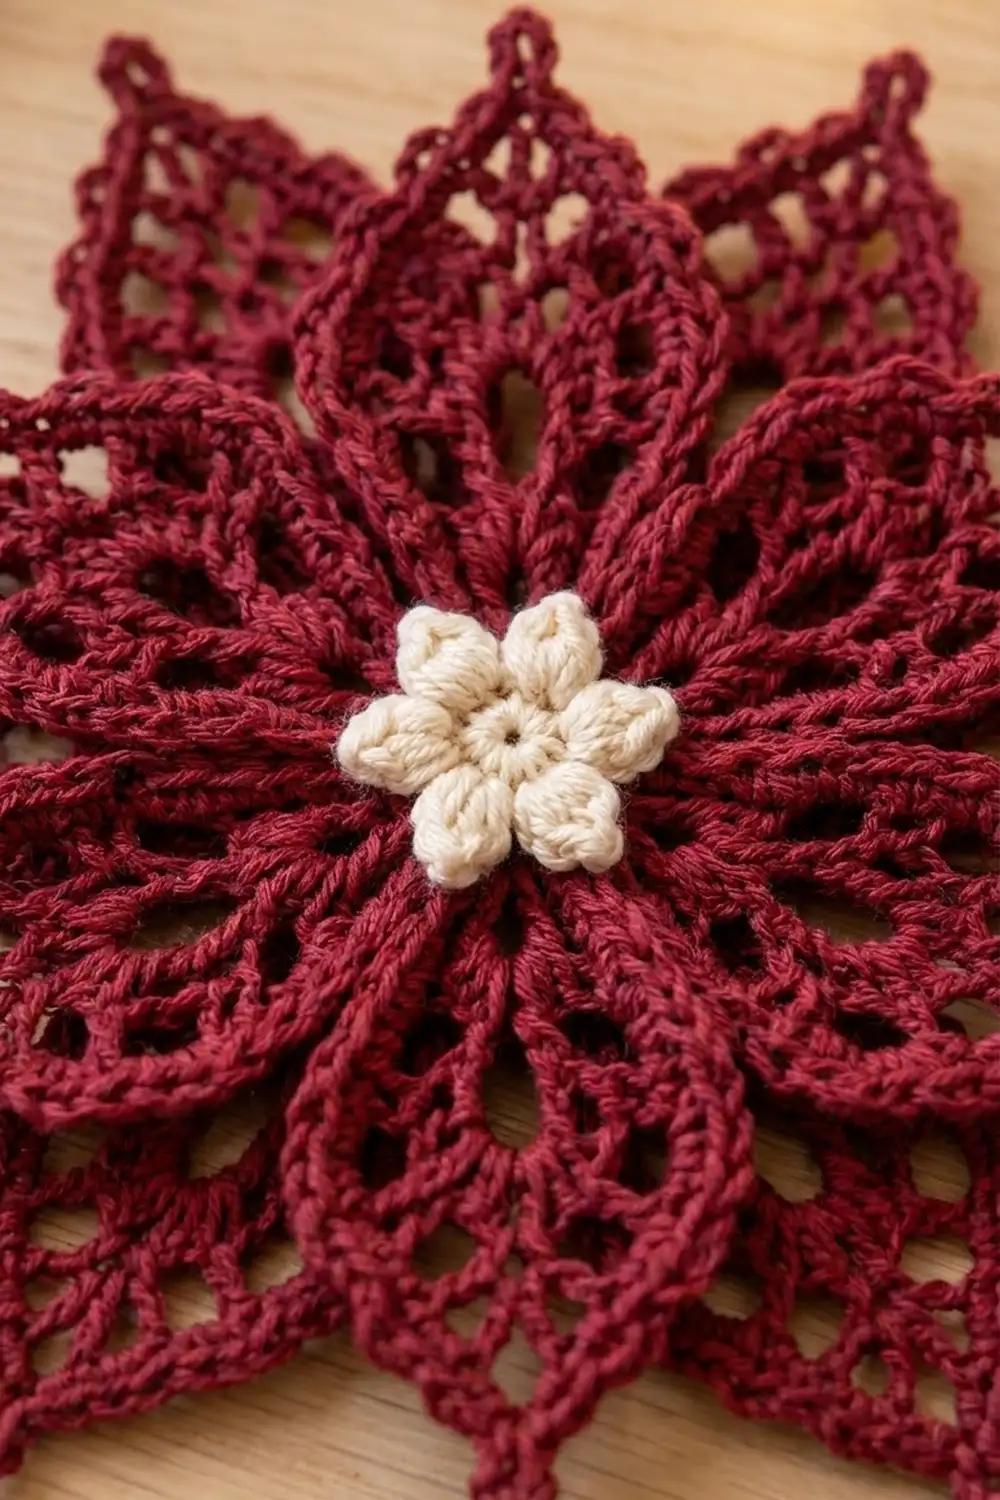
Large Petal Layer (Cranberry Red)
Rnd 1: MR, ch 3 (counts as dc), 17 dc in ring, sl st to the top of the beginning ch-3. Pull the ring tightly closed. (18 dc)
Each petal is worked over 3 sts of Rnd 1. Do not fasten off between petals.
Petal (make 6)
Row 1 (RS): ch 4 (counts as dc + ch 1) in the current st, dc in next st, ch 1, dc in next st, turn. (3 posts, 2 ch-1 sps)
Row 2 (WS, growth row): ch 4 (counts as dc + ch 1), dc in the st at the base of the ch, ch 1, dc in next dc, ch 1, (dc, ch 1, dc) in the 3rd ch of the tch, turn. (5 posts, 4 ch-1 sps)
Row 3 (growth row): ch 4 (counts as dc + ch 1), dc in the st at the base of the ch, (ch 1, dc in next dc) 3 times, ch 1, (dc, ch 1, dc) in the 3rd ch of the tch, turn. (7 posts, 6 ch-1 sps)
Row 4 (straight row): ch 4 (counts as dc + ch 1), (dc in next dc, ch 1) 5 times, dc in the 3rd ch of the tch, turn. (7 posts, 6 ch-1 sps)
Row 5 (decrease row): ch 2, skip the ch-1 sp, dc in next dc (the ch-2 and dc together count as the first decrease), (ch 1, dc in next dc) 3 times, ch 1, dc2tog over the next dc and the 3rd ch of the tch, skipping the ch-1 sp between them, turn. (5 posts, 4 ch-1 sps)
Row 6 (decrease row): ch 2, dc in next dc (counts as first decrease), ch 1, dc in next dc, ch 1, dc2tog over the next dc and the last dc, turn. (3 posts, 2 ch-1 sps)
Row 7 (tip, RS): ch 2, dc2tog over the next dc and the last dc. (1 tip st)
The center post sits in the same column on every row, which forms the raised vein down the middle of the petal.
Travel: sl st into the row-end of each of Rows 6 through 1 down the edge you are on (6 sl sts). Then sl st in the next Rnd 1 st; this is the first st of the next petal.
Repeat the Petal and Travel 4 more times. Work the 6th petal the same way, but after its 6 travel sl sts, don’t sl st into Rnd 1. Go straight to the border.
Count check: 6 petals use all 18 sts of Rnd 1 (6 × 3 = 18).
Small Petal Layer (Cranberry Red)
Rnd 1: Work as for the large layer. (18 dc)
Petal (make 6)
Row 1 (RS): ch 4 (counts as dc + ch 1) in the current st, dc in next st, ch 1, dc in next st, turn. (3 posts, 2 ch-1 sps)
Row 2 (WS, growth row): ch 4, dc in the st at the base of the ch, ch 1, dc in next dc, ch 1, (dc, ch 1, dc) in the 3rd ch of the tch, turn. (5 posts, 4 ch-1 sps)
Row 3 (straight row): ch 4 (counts as dc + ch 1), (dc in next dc, ch 1) 3 times, dc in the 3rd ch of the tch, turn. (5 posts, 4 ch-1 sps)
Row 4 (decrease row): ch 2, dc in next dc (counts as first decrease), ch 1, dc in next dc, ch 1, dc2tog over the next dc and the 3rd ch of the tch, turn. (3 posts, 2 ch-1 sps)
Row 5 (tip, RS): ch 2, dc2tog over the next dc and the last dc. (1 tip st)
Travel: sl st into the row-end of each of Rows 4 through 1 (4 sl sts), then sl st in the next Rnd 1 st.
Repeat 5 more times. On the 6th petal, skip the final sl st into Rnd 1, just like the large layer.
Cream Center
Rnd 1: With cream, MR, ch 1, 6 sc in ring, sl st to the first sc. Pull the ring tight so the center domes slightly. (6 sc)
Rnd 2: (sl st, ch 2, bobble, ch 2, sl st) all in the next sc; repeat from * 5 more times. (6 bobble petals)
Fasten off and leave a 10 in (25.4 cm) tail for sewing.
Border
Work the border on both petal layers in cranberry red, continuing right after the 6th petal’s travel. The hook is now sitting in the valley between petal 6 and petal 1.
Border gauge: 2 sc per dc row-end. A dc row is about 1/3 in (0.8 cm) tall, and 2 sc at 6 sc per inch are also about 1/3 in (0.8 cm), so the edge lies flat.
On the edge where you traveled, insert the hook under the travel sl st and the row-end together. That hides the sl sts inside the border.
Large Layer Border
Border Rnd: ch 1, working up the side of the next petal, 2 sc in each of the 6 row-ends of Rows 1–6 (12 sc); (sc, picot, sc) in the tip st; working down the other side, 2 sc in each of the 6 row-ends (12 sc); sl st in the valley between this petal and the next, at Rnd 1. Repeat from * 5 more times. The last sl st lands in the starting valley and joins the round. Fasten off and leave a 12 in (30.5 cm) tail.
Per petal: 12 + 2 + 12 = 26 sc, 1 picot, 1 sl st.
Total: 156 sc, 6 picots, 6 sl sts.
Small Layer Border
Border Rnd: ch 1, 2 sc in each of the 4 row-ends of Rows 1–4 (8 sc); (sc, picot, sc) in the tip st; 2 sc in each of the 4 row-ends down the other side (8 sc); sl st in the valley. Repeat from * 5 more times. Fasten off.
Per petal: 8 + 2 + 8 = 18 sc, 1 picot, 1 sl st.
Total: 108 sc, 6 picots, 6 sl sts.
Why the math works: the sc count on each side is exactly twice the number of dc row-ends on that side, so the edge length matches the petal height. The tip st gets its own pair of sc plus a picot so the point can turn without curling. The valley sl st pulls the inner curve in, which keeps the petal bases from rippling. The border adds about 0.125 in (0.3 cm) all around, taking the large layer from 5.75 in (14.6 cm) to 6 in (15.2 cm) and the small layer from 4.5 in (11.4 cm) to 4.75 in (12.1 cm).
Assembly
- Block both petal layers first (see below) and let them dry.
- Put the small layer on top of the large layer, RS up. Rotate it 30 degrees so each small petal sits centered between two large petals.
- Using the large layer’s tail, sew through both Rnd 1 rings with small running stitches around the ring. Leave the small petals unsewn so they lift slightly.
- Center the cream flower over the rings and sew it down through Rnd 1 of the cream piece with the cream tail.
- Weave in all ends on the back.
- If you want, sew a pin back or hanging loop onto the back of the large layer’s ring.
Final Blocking
- Lightly mist each petal layer with water until it’s damp but not soaked.
- Draw a 6 in (15.2 cm) circle and a 4.75 in (12.1 cm) circle on paper and put them under the plastic of your blocking mat (or mark them directly on the mat).
- Pin the center ring flat first.
- Pin each petal tip at the picot, right on the circle line. Space the 6 tips evenly, 60 degrees apart.
- Ease each petal into an almond shape with your fingers, and open the mesh spaces so the vein runs straight.
- Let it dry completely before you unpin it.
- After assembly, give the bobble center a light steam (don’t press it) to plump it up.
Final Quality-Control Checklist
- Rnd 1 has 18 dc on each petal layer, and its ring is closed tightly.
- Large petals have 7 rows, with post counts of 3, 5, 7, 7, 5, 3, 1.
- Small petals have 5 rows, with post counts of 3, 5, 5, 3, 1.
- Each petal’s center vein runs straight from base to tip.
- Large border: 156 sc and 6 picots. Small border: 108 sc and 6 picots.
- Small petals sit centered between large petals.
- The cream center has 6 even bobbles.
- Tip-to-tip size is 6 in (15.2 cm).
Troubleshooting
- Petals lean to one side: you probably lost the tch post. Make sure each increase and straight row ends in the 3rd ch of the tch.
- Border ruffles: your sc are wider than your dc rows are tall. Go down a hook size for the border only.
- Border pulls the petals into a cup: go up a hook size for the border.
- Gap at the petal bases: pull the valley sl st snug, and close the Rnd 1 ring more tightly.
- Tips are blunt: tighten the dc2tog on the tip row and pin the picot firmly when blocking.
- Bobbles are flat: keep all 4 loops even before the final pull-through.
Care
Hand wash in cool water with mild soap, roll it in a towel, and reshape it flat to dry. Re-pin the tips if the petals lose their points.
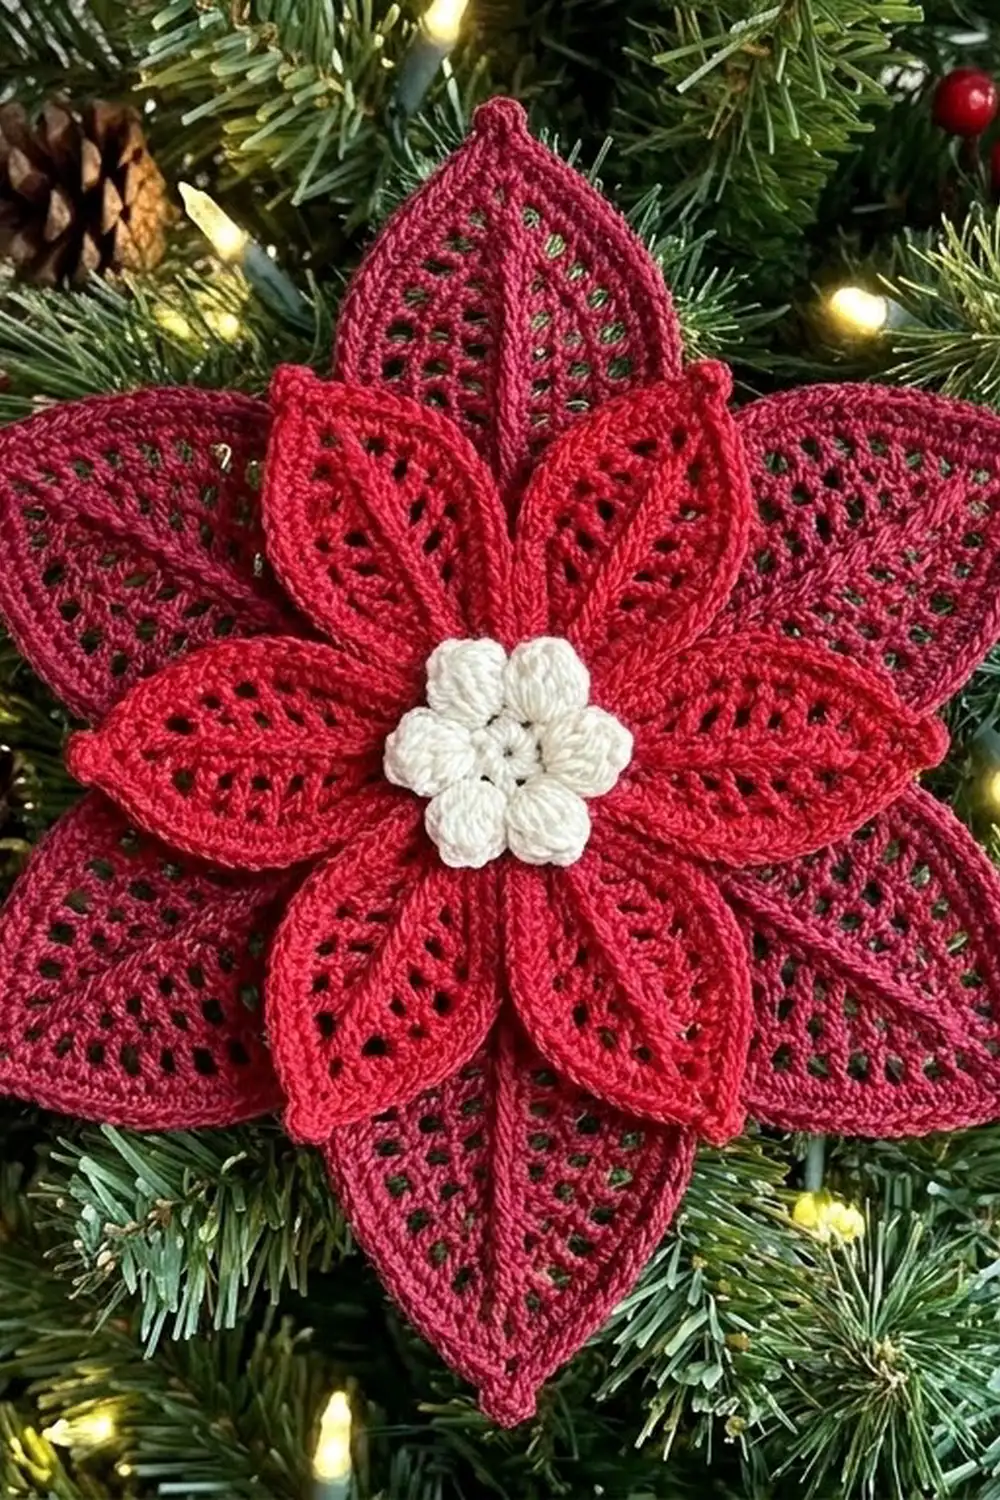
Final Notes
The measurement chain is simple. A 1 in (2.5 cm) ring grows into petals that are 2.375 in (6.0 cm) long on the large layer and 1.75 in (4.4 cm) long on the small layer. That makes the layers 5.75 in (14.6 cm) and 4.5 in (11.4 cm) before the border. The 0.125 in (0.3 cm) border brings them to 6 in (15.2 cm) and 4.75 in (12.1 cm), and the 0.75 in (1.9 cm) cream center finishes the flower. If each checkpoint matches, the finished poinsettia will too.
Happy crocheting!