

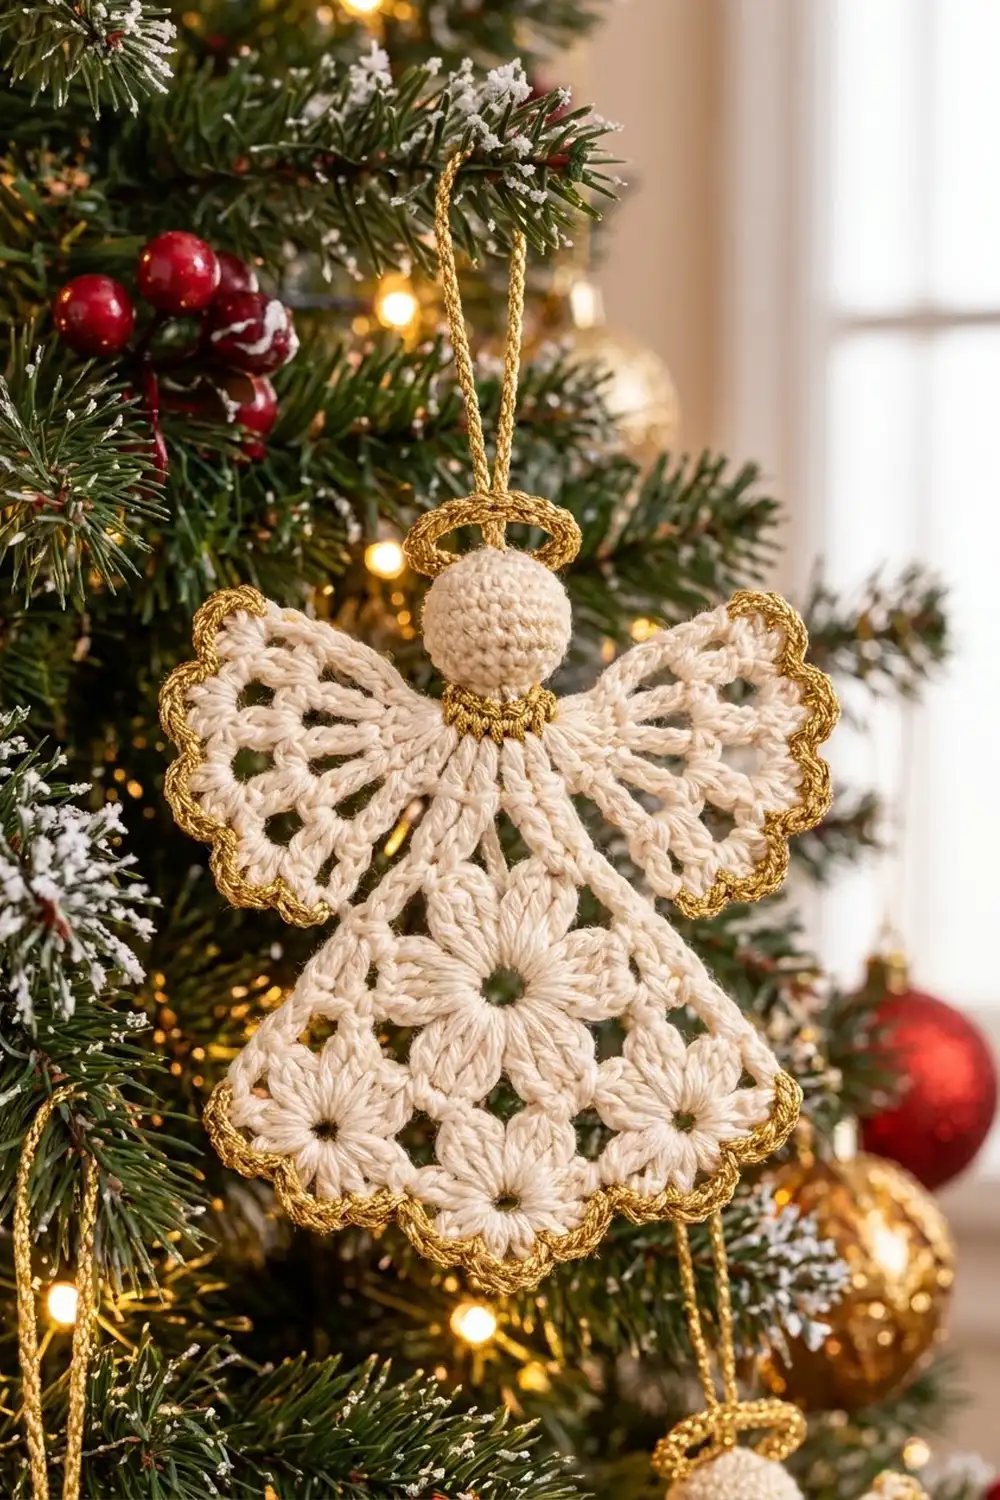
This angel is a lacy Christmas ornament in soft cream cotton, trimmed in shimmering gold. She has a round stuffed head, a little gold halo, fan-shaped lace wings and a triangular skirt full of starburst flowers.
The palette is just two colors: cream for the angel and metallic gold for the collar, halo, hanging loop and rope-like edging. The look is classic and heirloom-style, so she suits a natural, gold-and-white tree or works as a gift-tag topper.
This pattern uses US crochet terms. The finished angel measures about 5 in (12.7 cm) across the wings and 5.25 in (13.3 cm) tall from the top of the halo to the hem. The hanging loop adds about 2.25 in (5.7 cm).
You’ll crochet the skirt top-down in 8 rows. Then you’ll make two fan wings and a small stuffed head, sew the parts together, add the gold border, and finish with the halo and hanging loop.
Finished Size and Construction
- Finished size: 5 in (12.7 cm) wingspan × 5.25 in (13.3 cm) tall, plus a 2.25 in (5.7 cm) loop
- Skill level: Intermediate
- Terminology: US
- Yarn weight: DK (3) cotton, plus DK-weight metallic gold
- Hook: 3.5 mm (E-4)
- Number of pieces: 6 components (1 skirt/body, 2 wings, 1 head, 1 halo, 1 hanging cord) for one ornament
- Layout: wings behind the shoulders, head on the neck, halo and loop on top
- Piece size: skirt 4.5 in (11.4 cm) wide × 3.75 in (9.5 cm) tall; each wing 2.4 in (6.1 cm) long
- Size before border: skirt 4 in (10.2 cm) × 3.5 in (8.9 cm); wing 2.1 in (5.3 cm)
- Border depth: 0.25 in (0.6 cm)
Materials
Use a smooth, tightly plied mercerized cotton in DK weight so the starbursts and spokes show clearly. For gold, choose a metallic yarn or thread of similar thickness. If yours is thinner, hold two strands together.
- Cream: 15 g (about 35 m)
- Gold metallic: 10 g (about 35 m)
Tools:
- 3.5 mm (E-4) crochet hook
- Small handful of polyester fiberfill (about 2 g)
- Tapestry needle
- Stitch markers
- Rustproof pins and a blocking mat
- Spray bottle
- Scissors
The yarn quantities include a margin of about 20% for swatching and weaving in ends.
Abbreviations (US Terms)
- ch – chain
- sl st – slip stitch
- sc – single crochet
- sc2tog – single crochet 2 together
- dc – double crochet
- st(s) – stitch(es)
- sp – space
- tch – turning chain
- rep – repeat
- RS / WS – right side / wrong side
Special stitches
- dc7tog (cluster): Yarn over, insert hook in next st, pull up a loop, yarn over, pull through 2 loops. Repeat from * 6 more times across 7 sts (8 loops on hook). Yarn over and pull through all 8 loops.
- Eye: the ch 1 worked right after a cluster to close it. You’ll work later shells into this small space, which becomes the flower’s open center.
- Shell: 7 dc in the same st or space.
- Reverse sc (crab stitch): working from left to right (right to left if you crochet left-handed), insert hook in the next st to the right, pull up a loop, yarn over, pull through both loops.
Gauge and Checkpoints
Gauge: 18 dc and 9 rows = 4 in (10.2 cm) in cream with a 3.5 mm hook. In gold, 5 sc = 1 in (2.5 cm).
Make one complete skirt before you make any other parts. It works as your gauge test.
- After Row 2: 0.9 in (2.3 cm) tall
- After Row 4: 1.75 in (4.4 cm) tall
- After Row 8: 3.5 in (8.9 cm) tall and 4 in (10.2 cm) wide at the hem
- Each wing after Row 5: 2.1 in (5.3 cm) from the base point to the loop tips
- Head: 1.25 in (3.2 cm) across when stuffed
If your pieces come out more than 0.25 in (0.6 cm) too big, go down to a 3.25 mm hook. If they’re too small, go up to a 3.75 mm hook. Small differences in the skirt can usually be fixed with blocking.
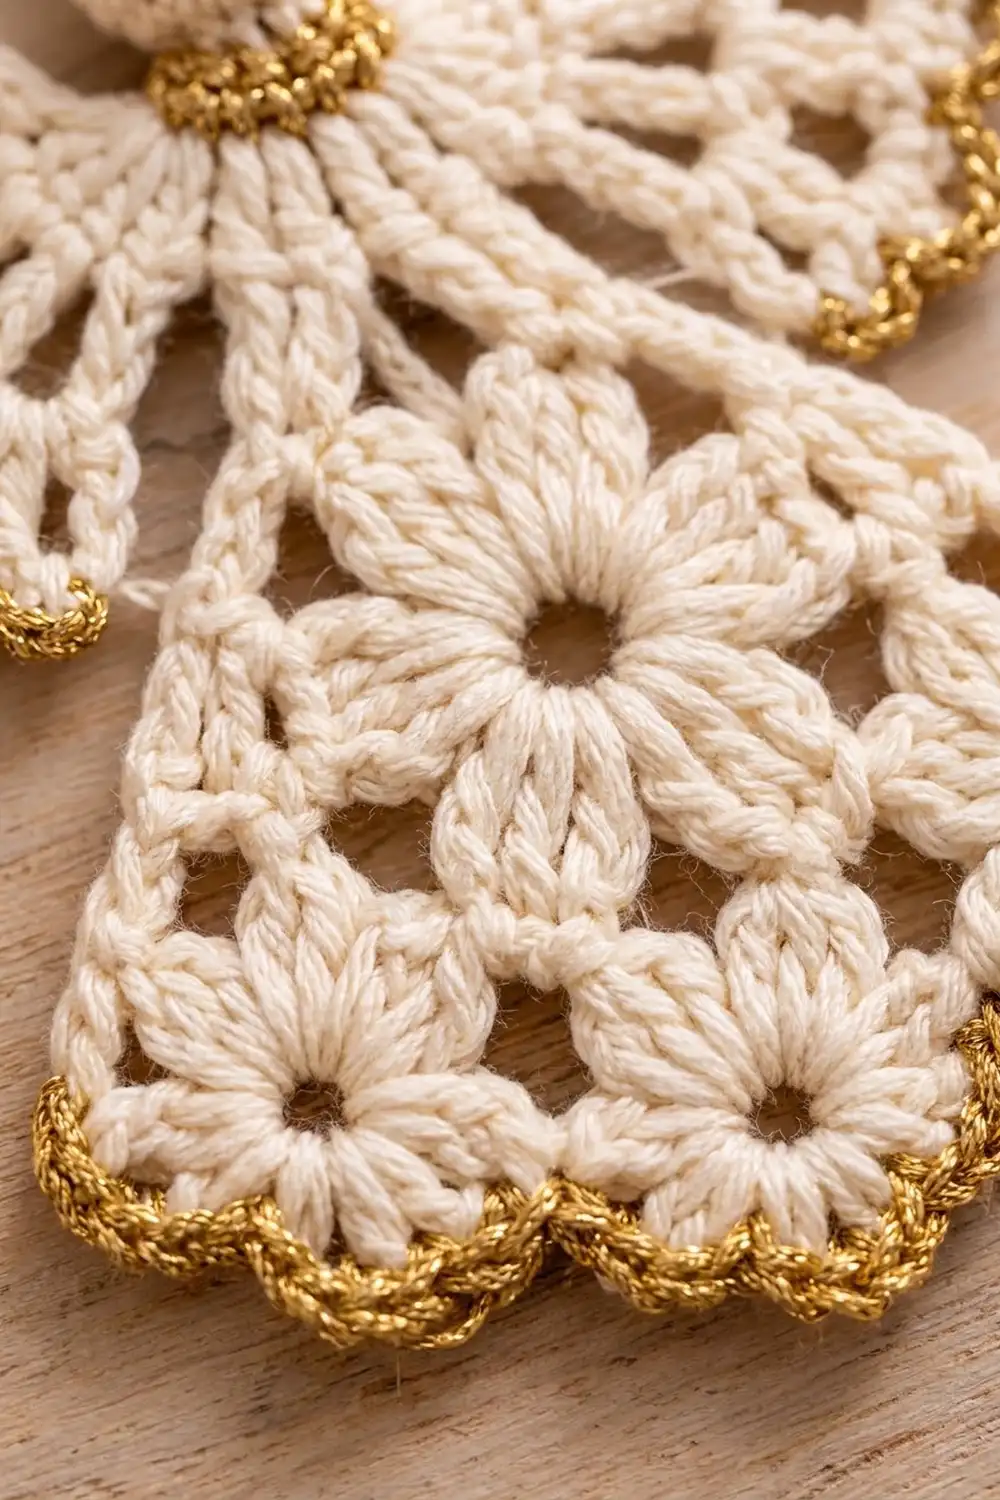
Skirt (Body)
Use cream. The beginning ch-3 counts as a dc throughout.
Row 1 (neck): Ch 7. Dc in 4th ch from hook and in each of the next 3 ch. Turn. (5 dc)
Row 2 (yoke spokes): Ch 3, dc in same st, 2 dc in next st, 3 dc in center st, 2 dc in next st, 2 dc in top of tch. Turn. (11 dc)
Row 3 (top flower, upper petals): Ch 3, dc in same st, dc in next st, ch 2, dc7tog over next 7 sts, ch 1 (eye), ch 2, dc in next st, 2 dc in top of tch. Turn. (12 sts: 6 dc, 1 cluster, 5 ch)
Row 4: Ch 3, 3 dc in same st, skip next 2 dc, sc in ch-2 sp, shell in eye, skip cluster, sc in next ch-2 sp, skip next 2 dc, 4 dc in top of tch. Turn. (17 sts: 2 edge fans of 4 dc, 1 shell, 2 sc)
The shell finishes the top flower.
Row 5 (side flowers, upper petals): Ch 3, dc in same st, ch 2, dc7tog over next 7 sts, ch 1 (eye), ch 2, sc in 4th (center) dc of shell, ch 2, dc7tog over next 7 sts, ch 1 (eye), ch 2, 2 dc in top of tch. Turn. (17 sts: 4 dc, 2 clusters, 1 sc, 10 ch)
Row 6: Ch 3, 3 dc in same st, skip next dc, sc in ch-2 sp, shell in next eye, skip cluster and ch-2 sp, sc in sc, skip ch-2 sp, shell in next eye, skip cluster, sc in ch-2 sp, skip next dc, 4 dc in top of tch. Turn. (25 sts: 2 edge fans, 2 shells, 3 sc)
Row 7 (bottom flowers, upper petals): Ch 3, dc in same st. Ch 2, dc7tog over next 7 sts, ch 1 (eye), ch 2, sc in center dc of next shell. Rep from * once more. Ch 2, dc7tog over next 7 sts, ch 1 (eye), ch 2, 2 dc in top of tch. Turn. (24 sts: 4 dc, 3 clusters, 2 sc, 15 ch)
The two outer clusters sit in the corners, and the middle one is centered.
Row 8 (hem scallops): Ch 3, 3 dc in same st, skip next dc, sc in ch-2 sp, shell in next eye. Skip cluster and ch-2 sp, sc in sc, skip ch-2 sp, shell in next eye. Rep from * once more. Skip cluster, sc in ch-2 sp, skip next dc, 4 dc in top of tch. (33 sts: 2 edge fans of 4 dc, 3 shells, 4 sc)
Fasten off and weave in the ends. The skirt should measure 4 in (10.2 cm) × 3.5 in (8.9 cm). Choose the neater side as the front.
Wings (Make 2)
Use cream.
Row 1: Ch 4, 3 dc in 4th ch from hook. Turn. (4 dc)
Row 2: Ch 3, dc in same st, 2 dc in each of next 2 sts, 2 dc in top of tch. Turn. (8 dc)
Row 3: Ch 4 (counts as dc + ch 1). Dc in next st, ch 1. Rep from * 5 more times, then dc in top of tch. Turn. (8 dc, 7 ch-1 sps)
Row 4: Ch 5 (counts as dc + ch 2). Dc in next dc, ch 2. Rep from * 5 more times, then dc in 3rd ch of tch. Turn. (8 dc, 7 ch-2 sps)
Row 5: Ch 1, sc in first dc. Ch 4, sc in next dc. Rep from * 6 more times, working the last sc in 3rd ch of tch. (8 sc, 7 ch-4 loops)
Fasten off. Each wing is a 120° fan, 2.1 in (5.3 cm) from the base point to the loop tips.
Head
Use cream and work in continuous rounds. Mark the first st of each round.
- Rnd 1: 6 sc in a magic ring. (6)
- Rnd 2: 2 sc in each st. (12)
- Rnd 3: (Sc in next st, 2 sc in next st) 6 times. (18)
- Rnds 4–6: Sc in each st. (18)
- Rnd 7: (Sc in next st, sc2tog) 6 times. (12)
- Stuff the head firmly.
- Rnd 8: Sc2tog 6 times. (6)
Fasten off, leaving a 10 in (25.4 cm) tail. Close the hole.
Gold collar: Join gold around a st of Rnd 7. Work 12 surface sl sts around that round, then fasten off. The head should measure 1.25 in (3.2 cm) across.
Halo and Hanging Cord
Halo: With gold, ch 16 and sl st to the first ch to form a ring. Ch 1, sc in each ch around, and sl st to the first sc. (16 sc) Fasten off. The ring should be about 1 in (2.5 cm) across.
Hanging cord: With gold, ch 30. Sl st in 2nd ch from hook and in each ch across. (29 sl sts) Fasten off. The cord is about 5 in (12.7 cm) long.
Make All Pieces
For one angel:
- Cream: 1 skirt, 2 wings, 1 head
- Gold: 1 collar (on the head), 1 halo, 1 hanging cord
Here is how the parts stack, viewed from the front:
            [ loop ]
            ( halo )
            ( HEAD )
 [WING] >---[ neck ]---< [WING]
           /  skirt  \
          /___________\
Joining
- Place the wings. Lay the skirt face down. Set the two wings on top so their Row 1 base points meet at the center, just below the neck (Rows 1–2). Tilt each wing so its upper straight edge angles about 20° upward.
- Sew the wings. With cream, sew only the center 0.75 in (1.9 cm) of each wing base to the skirt, working stitch to stitch through the dc posts. All bordered edges stay free.
- Attach the head. Set Rnd 8 of the head on the Row 1 neck. Use the head tail to sew through the neck stitches and the wing bases, going all the way around twice.
Pull each stitch snug but not tight, so the lace doesn’t pucker. Checkpoint: the wingspan is about 4.5 in (11.4 cm) before the border.
Border
Border gauge: 5 sc = 1 in (2.5 cm) in gold. Two rows of border add 0.25 in (0.6 cm).
Skirt Border
Row 1: Join gold at the neck end of one side edge. Work down the side, around the hem and up the other side:
- Side: 2 sc in each of the 8 row-ends (16 sc)
- Hem: 2 sc in first st (corner), sc in next 3 dc, skip next sc. [Sc in each of next 7 dc, skip next sc] 3 times. Sc in next 3 dc, 2 sc in last st (corner). (31 sc)
- Second side: 2 sc in each of the 8 row-ends (16 sc)
That is 63 sc in total.
Row 2: Ch 1. Without turning, work reverse sc in each sc back to the start. (63) Fasten off.
Wing Border (Each Wing)
Row 1: Join gold at the base point and work:
- First straight side: 2 sc in each row-end of Rows 1–4 (8 sc)
- Outer edge: 2 sc in first sc of Row 5. 5 sc in next ch-4 loop, sc in next sc. Rep from * 5 more times. 5 sc in last loop, 2 sc in last sc. (45 sc)
- Second straight side: 2 sc in each row-end of Rows 4–1 (8 sc)
That is 61 sc in total.
Row 2: Ch 1. Without turning, work reverse sc in each sc. (61) Fasten off.
Why the Math Works
A dc row is about 0.44 in (1.1 cm) tall, and 2 sc cover 0.4 in (1.0 cm). This slight ease keeps the sides straight instead of rippling. Each shell arc measures about 1.4 in (3.6 cm), which matches 7 sc. Skipping the sc between shells keeps the scallop dips sharp. Each ch-4 loop arches to about 1 in (2.5 cm), which matches 5 sc.
Final Blocking
- Mist the angel lightly until the cream is damp. Never press metallic yarn with a hot iron.
- Pin the skirt to 4.5 in (11.4 cm) wide at the hem and 3.75 in (9.5 cm) tall.
- Pin out each shell scallop, and open each flower eye with a pin tip.
- Fan each wing into a 120° wedge, 2.4 in (6.1 cm) long, and pin every loop.
- Check that the wingspan is 5 in (12.7 cm).
- Let it dry completely, at least 6 hours.
- Sew the halo to the back of the head, tilted slightly forward. Fold the cord in half and sew both ends at the top of the head, behind the halo.
Final Quality-Control Checklist
- Skirt has 33 sts in Row 8, with 3 scallops and 2 corner fans
- Six flowers visible (1, 2, 3), each with an open eye
- Each wing has 8 spokes and 7 loops
- Border counts are 63 on the skirt and 61 on each wing
- Head is round and firm, with the collar sitting level
- Halo is centered and the loop hangs straight
- All ends are woven in and invisible from the front
Troubleshooting
- Skirt ruffles: your dc is too loose. Go down a hook size, or use ch 1 instead of ch 2 beside the clusters.
- Skirt cups: your clusters are too tight. Pull up each cluster loop to full dc height.
- Flower centers are closed: make the eye ch a little looser.
- Wings curl: block them firmly. If they still curl, rework Row 4 with ch 1 sps.
- Border flares: use 2 sc in every other row-end on the upper sides.
- Halo flops: stiffen it with diluted fabric stiffener.
Care
Spot clean or hand wash cool and dry flat, then reshape the angel. Store her flat or hanging, away from crushing weight.
Final Notes
Here is the measurement chain:
- Gauge is 18 dc = 4 in (10.2 cm).
- The skirt measures 4 in × 3.5 in (10.2 × 8.9 cm) before the border.
- Each wing is 2.1 in (5.3 cm) before the border.
- The head is 1.25 in (3.2 cm).
- The 0.25 in (0.6 cm) gold border brings the skirt to 4.5 in × 3.75 in (11.4 × 9.5 cm).
- The finished angel is 5 in (12.7 cm) wide and 5.25 in (13.3 cm) tall.
Check each stage and the angel will come together. Happy crocheting!