

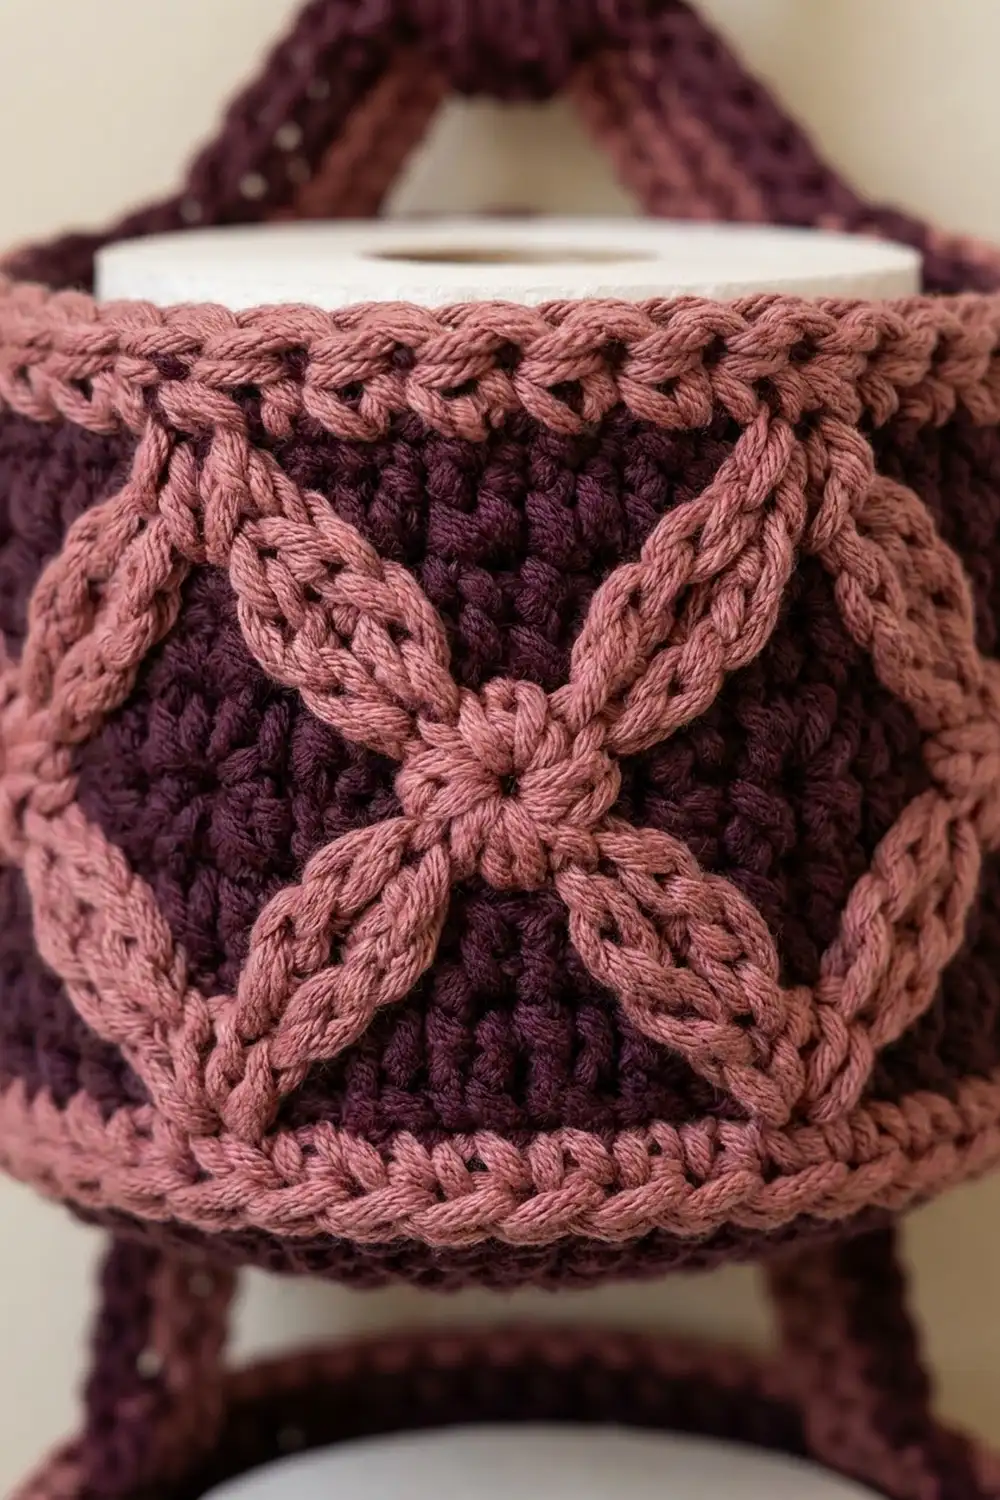
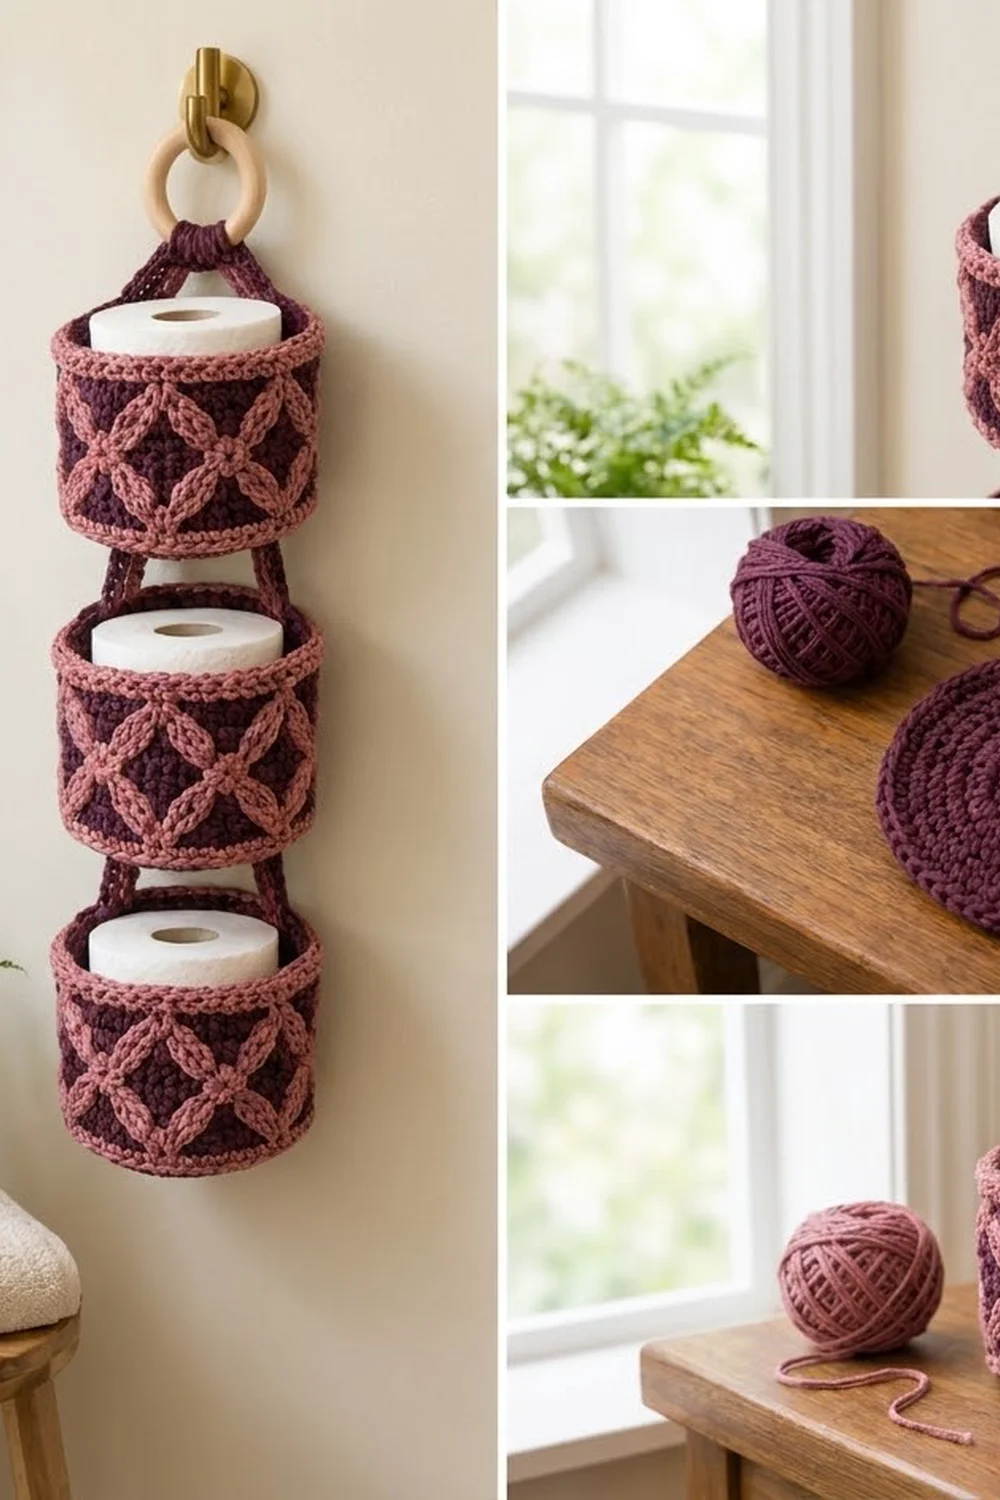
This hanging holder stacks three round baskets in a column, and each basket holds one standard toilet roll. The baskets are dark plum with a raised dusty rose lattice on the walls. The rose lines cross to form diamonds, and a small rose ring sits on each middle crossing. Each basket has a rose band and cord at the bottom and a corded rose rim at the top.
Plum straps link the baskets. A longer plum strap at the top passes through a natural wooden ring, so the holder hangs from one wall hook. The colors suit a warm, calm bathroom.
The pattern uses US crochet terms. Each basket is about 5.5 in (14.0 cm) across and 3.75 in (9.5 cm) tall. The whole holder is about 15 in (38.1 cm) long without the ring, or 17 in (43.2 cm) with it.
Each basket starts with a flat single crochet base worked in joined rounds. The walls go straight up, with color bands at the top and bottom. You add the lattice afterward with surface slip stitch. Then you crochet the straps, sew the pieces together, and finish each basket with a rim border.
Finished Size and Construction
- Finished size: 15 in (38.1 cm) long without the ring; 17 in (43.2 cm) with it
- Skill level: Intermediate
- Terminology: US crochet terms
- Yarn weight: Aran / heavy worsted (#4), cotton or cotton blend
- Hook: 5.0 mm (US H-8)
- Number of pieces: 8 crocheted pieces (3 baskets, 4 connector straps, 1 hanger strap), plus 1 wooden ring
- Layout: 1 column of 3 baskets, with a 0.5 in (1.3 cm) visible gap between baskets
- Basket size: 5.5 in (14.0 cm) across, 3.75 in (9.5 cm) tall
- Basket size before border: 5.5 in (14.0 cm) across, 3 in (7.6 cm) tall
- Border depth: 0.75 in (1.9 cm), worked as 3 rounds
Materials
Choose a firm cotton or cotton-blend yarn in Aran or heavy worsted weight. Cotton holds its shape, handles bathroom humidity, and makes the surface slip stitch lines look crisp. The amounts below assume about 180 m (197 yd) per 100 g.
- Color A, dark plum: 75 g, 135 m (148 yd), for bases, walls, straps, and the ring wrap
- Color B, dusty rose: 45 g, 81 m (89 yd), for bands, cords, lattice, crossing rings, and borders
These amounts include a margin of about 30–50%, so a gauge swatch or a small tension difference won’t leave you short.
Tools:
- 5.0 mm (US H-8) crochet hook
- 1 wooden ring, 2 in (5.1 cm) outside diameter
- Tapestry needle
- 4 locking stitch markers
- Measuring tape
- Scissors
- 1 toilet roll for fit testing
Abbreviations (US Terms)
- ch – chain
- sc – single crochet
- sl st – slip stitch
- inc – 2 sc in the same stitch
- BLO – back loop only
- st(s) – stitch(es)
- rnd(s) – round(s)
- rev sc – reverse single crochet (crab stitch). Working from left to right, insert the hook in the next stitch to the right, yarn over, pull up a loop, yarn over, and pull through both loops.
- surface sl st – hold the yarn behind the fabric (inside the basket). Insert the hook from front to back through a space between stitches, pull up a loop, and draw it through the loop on your hook. This makes a raised chain line on the outside.
Pattern notes: Join every round with a sl st to the first sc. The ch 1 at the start of a round does not count as a stitch. To change color, work the joining sl st with the new color. Place a marker in the first stitch of Rnd 11 and call it st 1, then count around and mark st 31. These two markers show where the straps go.
Gauge and Checkpoints
Gauge: 14 sc and 16 rnds = 4 in (10.2 cm) in sc worked in joined rounds.
Before you make all three baskets, crochet one base and its walls through Rnd 21 and check these measurements:
- After Rnd 5: The base is about 2.75 in (7.0 cm) across and lies flat.
- After Rnd 10: The base is 5.5 in (14.0 cm) across, with a circumference of 17.1 in (43.4 cm).
- After Rnd 21: The wall is 2.75 in (7.0 cm) tall from the turning ridge, and the basket stands 3 in (7.6 cm) tall overall.
- After the border: The basket stands 3.75 in (9.5 cm) tall.
If the base is more than 0.25 in (0.6 cm) too big, switch to a 4.5 mm hook. If it is more than 0.25 in (0.6 cm) too small, switch to a 5.5 mm hook. A ruffled base means your tension is too loose; a base that cups before Rnd 10 means it is too tight. A test roll should drop in easily with a little room to spare.
Basket (Make 3)
Base
Use Color A. Join each round with a sl st to the first sc.
Rnd 1: Make a magic ring, ch 1, and work 6 sc in the ring. (6 sts)
Rnd 2: Ch 1, inc in each st around. (12 sts)
Rnd 3: Ch 1, (sc 1, inc) 6 times. (18 sts)
Rnd 4: Ch 1, (sc 2, inc) 6 times. (24 sts)
Rnd 5: Ch 1, (sc 3, inc) 6 times. (30 sts)
Rnd 6: Ch 1, (sc 4, inc) 6 times. (36 sts)
Rnd 7: Ch 1, (sc 5, inc) 6 times. (42 sts)
Rnd 8: Ch 1, (sc 6, inc) 6 times. (48 sts)
Rnd 9: Ch 1, (sc 7, inc) 6 times. (54 sts)
Rnd 10: Ch 1, (sc 8, inc) 6 times; change to B on the join. (60 sts)
Walls
Rnd 11 (conversion round, B): Ch 1, sc in BLO of each st around. This turns the base up into the wall, and the unused front loops of Rnd 10 form a ridge. (60 worked 1-per-stitch + 0 added = 60 sts)
Rnd 12 (B): Ch 1, sc in each st around; change to A on the join. (60 sts)
Rnds 13–21 (A): Ch 1, sc in each st around. (9 rnds, 60 sts) Put the last loop on a marker, but don’t fasten off.
Bottom cord (B): Turn the basket upside down. Join B in any unused front loop of Rnd 10, sl st loosely in each front loop around, join, and fasten off. (60 worked 1-per-stitch + 0 added = 60 sl sts)
Lattice
The lattice covers the 9 plum rounds (Rnds 13–21). It is a 6-st repeat, so it fits 10 times around the basket (60 ÷ 6 = 10). Each surface sl st moves up 1 round and over 1 st.
Starting points: Along the top of Rnd 12, mark every 6th space between sts, starting just after st 1. You will have 10 marks.
Right-leaning lines (make 10): From the inside, pull up a B loop at a mark. Work 9 surface sl sts, each one 1 round up and 1 st to the right, ending at the top of Rnd 21. Fasten off on the inside.
Left-leaning lines (make 10): Start from the same marks and work 9 surface sl sts, moving 1 st to the left each round.
Geometry check: Lines from neighboring marks cross after 3 rounds. Lines from marks two apart cross after 6 rounds, and lines from marks three apart meet in a V at the top edge. Each diamond is 6 sts wide and 6 rnds tall, about 1.7 in (4.3 cm) by 1.5 in (3.8 cm). Each basket has 20 middle crossings.
Crossing rings: Thread B on the tapestry needle. Around each of the 20 middle crossings, backstitch a ring of 6 short stitches about 0.4 in (1.0 cm) across. Carry the yarn on the inside from one ring to the next. Weave in all ends on the inside.
Make All Pieces
Connector Straps (Make 4)
Use Color A.
Row 1: Ch 4, sc in the 2nd ch from the hook and in the next 2 ch. (3 sts)
Rows 2–14: Ch 1, turn, sc across. (3 sts)
Fasten off, leaving a 12 in (30.5 cm) tail. Each strap is 3.5 in (8.9 cm) long and about 0.9 in (2.3 cm) wide.
Hanger Strap (Make 1)
With A, work as for the connector straps but continue through Row 52. Fasten off, leaving a 12 in (30.5 cm) tail. The strap is 13 in (33.0 cm) long.
Totals
- Color A: 3 bases and walls, 4 connector straps, 1 hanger strap, and the ring wrap
- Color B: 3 sets of bands, cords, lattices, crossing rings, and borders
Layout (top to bottom)
        [ wooden ring ]
       /  hanger strap  \
      [  BASKET 1 (top) ]
        |  0.5 in gap  |
      [ BASKET 2 (mid)  ]
        |  0.5 in gap  |
      [ BASKET 3 (low)  ]
The vertical bars are connector straps. Each gap has 2 of them, one at st 1 and one at st 31.
Joining
Sew on the straps before you work the borders. Line up the baskets so st 1 faces the same direction on all three. That way, the seam where each round is joined stays hidden under a strap.
Stitch-to-stitch logic: The straps and the walls both have 4 rows or rounds per inch, so 1 strap row lines up with 1 wall round and 1 strap st lines up with 1 wall st. Each overlap is 4 rows on 4 rounds, or 1 in (2.5 cm), and covers 3 wall sts.
Connector straps: On the outside of the lower basket, center a strap over sts 60, 1, and 2, with its last 4 rows over Rnds 18–21. Whipstitch all the way around this 3-by-4 rectangle. Repeat at sts 30–32. Then sew the first 4 rows of each strap over Rnds 11–14 of the basket above, at the matching marker. This leaves 6 rows of strap free, 1.5 in (3.8 cm). The 0.75 in (1.9 cm) border below and the 0.25 in (0.6 cm) base edge above take up part of that length, so the visible gap is 0.5 in (1.3 cm).
Hanger: Sew the ends of the hanger strap over Rnds 18–21 of Basket 1, at st 1 and st 31. Pass the middle 8 rows, 2 in (5.1 cm), through the ring. Wrap A tightly 8 times around both layers just below the ring. Each side has 18 free rows, 4.5 in (11.4 cm), and rises about 3.5 in (8.9 cm).
Tension: Catch one wall loop with each sewing stitch, and make about 1 stitch per row. Sew snugly but not so tight that the wall puckers, so the basket stays round.
Size checkpoint: With the holder hanging, measure from the bottom of Basket 3 to the top of Basket 1’s Rnd 21. It should be 11.5 in (29.2 cm). That is 3 baskets at 3 in (7.6 cm) plus 2 free straps at 1.5 in (3.8 cm), minus the two 0.25 in (0.6 cm) base edges below Rnd 11.
Border
Work each basket’s border from the plum loop waiting on its marker.
Border gauge: The same as the wall: 14 sc = 4 in (10.2 cm) and 4 rnds = 1 in (2.5 cm). The border has no increases, so the rim matches the wall exactly.
Rnd 22 (B): Put the A loop back on the hook and change to B with a sl st into the first st. Ch 1, sc in each st around. (30 sts per half, st 1–30 and st 31–60; 6 sts per lattice repeat; 60 sts)
Rnd 23 (B): Ch 1, sc in each st around. (30 sts per half, 60 sts)
Rnd 24 (trim round, B): Ch 1, rev sc in each st around; join and fasten off. (60 worked 1-per-stitch + 0 added = 60 sts; 30 per half)
Why the math works: The bands, the wall, and every border round all have 60 sts. That is 10 lattice repeats of 6 sts, or 2 halves of 30 sts between the straps. Because the count never changes, the rim can’t ruffle or pull in, and each lattice V meets the border evenly. The 3 border rounds add 0.75 in (1.9 cm), so the basket grows from 3 in (7.6 cm) to 3.75 in (9.5 cm) tall. Weave in all ends on the inside.
Final Blocking
- Mist each basket until it is damp but not soaked.
- Wrap a toilet roll in plastic, slip it inside, and shape the wall into a smooth cylinder.
- Pat the base flat and press the bottom cord into a crisp edge.
- Ease the lattice lines so each diamond is 1.7 in (4.3 cm) wide and 1.5 in (3.8 cm) tall.
- Smooth the straps flat to 0.9 in (2.3 cm) wide.
- Let everything dry upright for about 24 hours.
- Hang the holder with a roll in each basket and check that the visible gaps are 0.5 in (1.3 cm).
Final Quality-Control Checklist
- Every round from Rnd 10 to Rnd 24 has 60 sts.
- Each basket is 5.5 in (14.0 cm) across and 3.75 in (9.5 cm) tall.
- Each basket has 10 right-leaning and 10 left-leaning lines of 9 surface sl sts each.
- Each basket has 20 crossing rings.
- The round-join seams are hidden under the straps at st 1.
- The free part of each connector strap is 1.5 in (3.8 cm), and the visible gaps are 0.5 in (1.3 cm).
- The total length is 17 in (43.2 cm), including the ring.
- No ends show on the outside.
Troubleshooting
The base cups: Your tension is too tight. Go up one hook size for Rnds 1–10.
The base ruffles: Your tension is too loose, or you have an extra increase. Recount Rnd 10; it should have 60 sts.
The walls flare: Check that Rnd 11 was worked in BLO and that the walls have no increases.
The lattice puckers: Loosen your surface sl sts, or use a hook one size larger just for the lattice.
The diamonds are uneven: A line probably started in the wrong place. Each line must move exactly 1 st per round.
A basket tilts: One strap is sewn higher than the other. Re-sew both straps over the same rounds.
The roll won’t fit: The base is too small. Check your gauge and rework the basket with a larger hook.
Care
Hand wash in cool water, press out the water, and dry the baskets upright over a roll so they keep their shape. Don’t tumble dry, because heat can distort the lattice and cords.
Final Notes
Here is the measurement chain. A gauge of 14 sc per 4 in (10.2 cm) gives a 60-st base 5.5 in (14.0 cm) across. Eleven wall rounds plus the base edge reach 3 in (7.6 cm), and the border brings each basket to 3.75 in (9.5 cm). Three baskets, two sets of 1.5 in (3.8 cm) connector straps, and the hanger add up to 15 in (38.1 cm), or 17 in (43.2 cm) with the ring. If you check each stage as you go, the holder will hang straight.
Happy crocheting!