

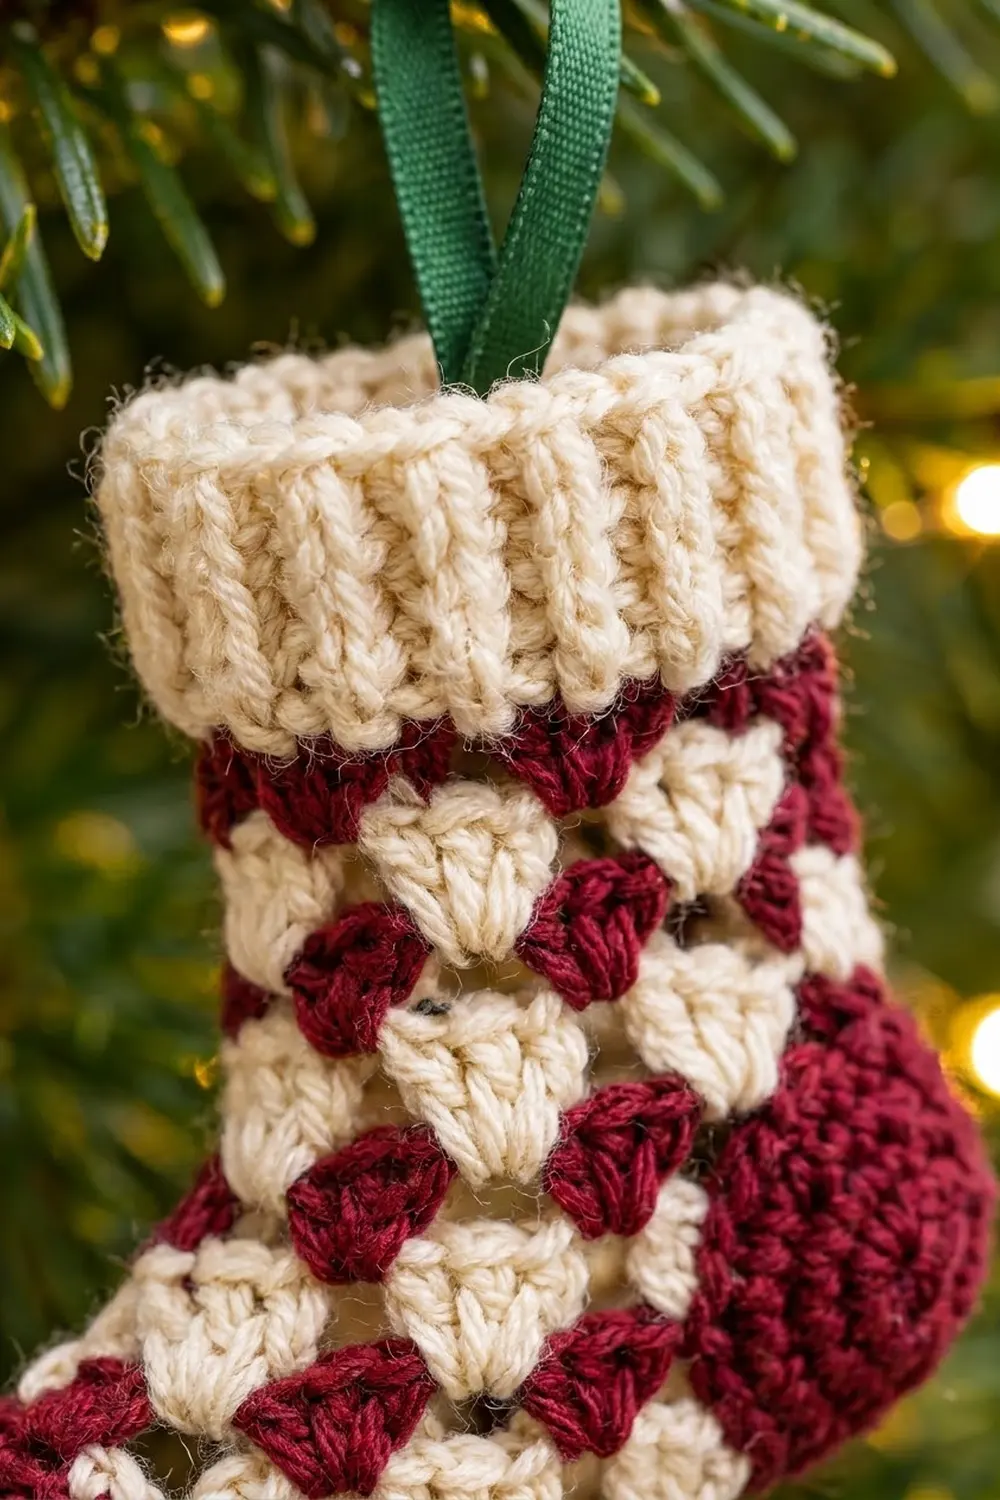
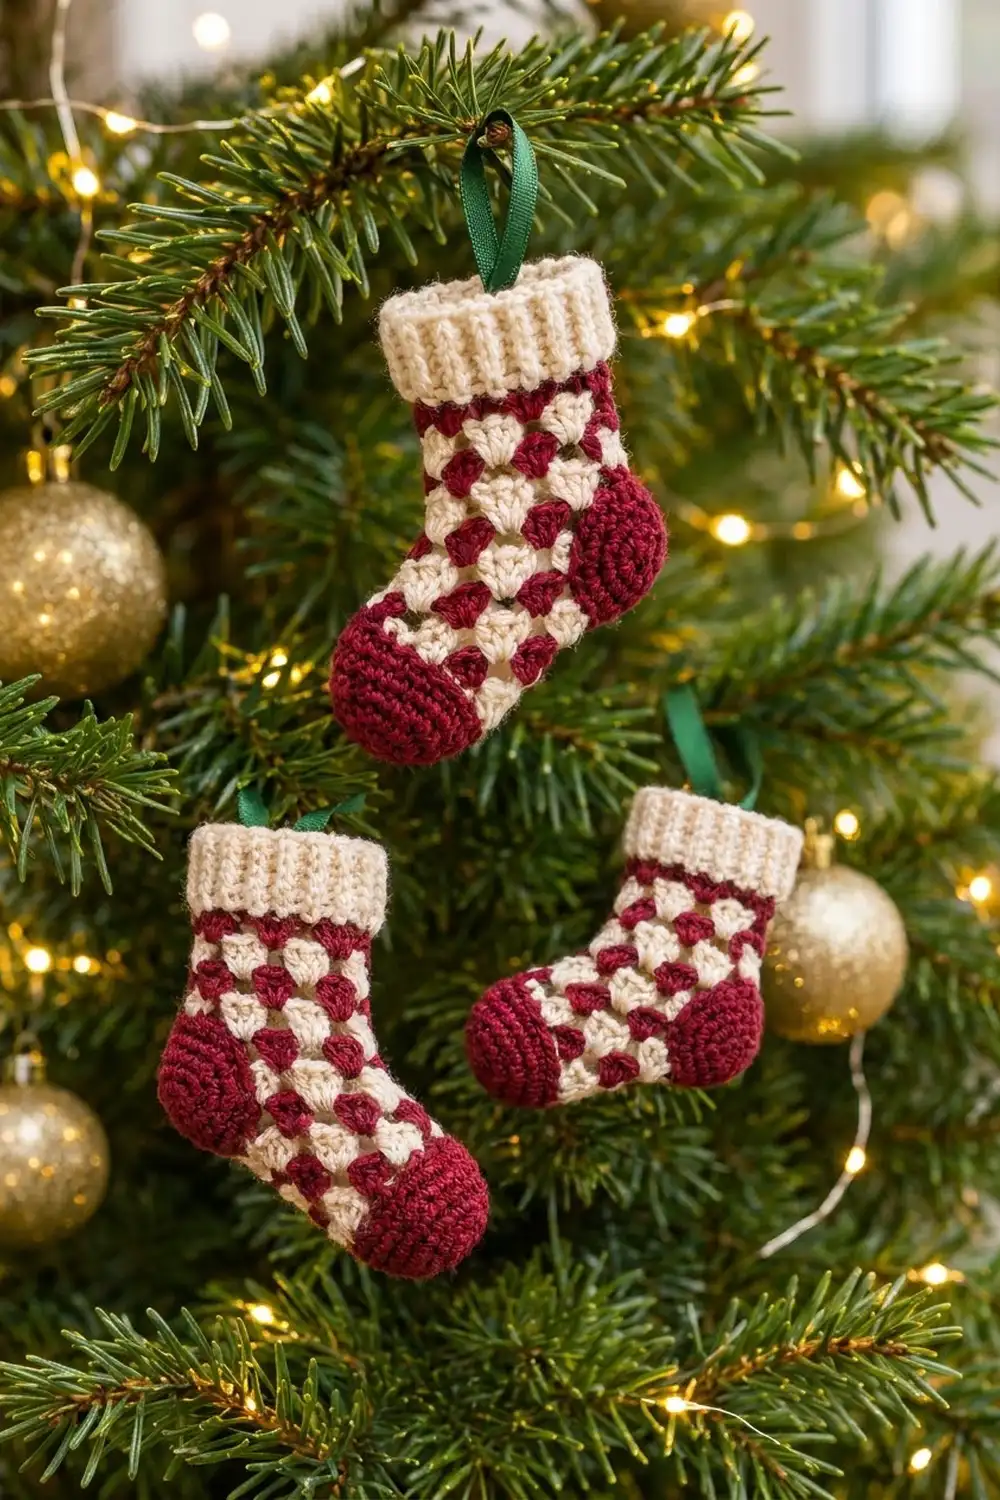
This little stocking has a vintage look: tiny granny clusters in cranberry and cream, a squishy ribbed cuff, and a solid rounded heel and toe. It hangs from a green satin ribbon and looks good on a tree, a gift bag, or a doorknob.
The body alternates one cream round with one burgundy round. Because each cluster sits in the gap between two clusters of the round below, the colors offset into a soft checkerboard of tiny triangles. The heel and toe are solid burgundy single crochet, and the cuff is cream ribbing.
This pattern uses US crochet terms. The finished ornament is about 3.5 in (8.9 cm) tall and 2.75 in (7.0 cm) from heel to toe. The leg is 2 in (5.1 cm) wide when lying flat.
Construction overview: you work top-down in joined rounds, starting from a chain ring. The heel opening is made with a chain gap in the middle of the tube. After the toe, you work the heel into that opening as a decreasing spiral. Last, you add the cuff sideways along the top edge as a ribbed border, then sew in the ribbon.
Finished Size and Construction
- Finished size: 3.5 in (8.9 cm) tall × 2.75 in (7.0 cm) heel to toe
- Skill level: Advanced beginner
- Terminology: US crochet terms
- Yarn weight: DK / light (#3), cotton or cotton blend
- Hook: 3.0 mm (between US C/2 and D/3)
- Number of pieces: 1 (a single stocking; the heel and cuff are worked directly onto it)
- Layout: One standalone ornament
- Piece size: leg 2 in (5.1 cm) wide flat, 4 in (10.2 cm) around
- Size before border (cuff): about 2.7 in (6.9 cm) tall
- Border (cuff) depth: about 0.8 in (2.0 cm)
Materials
Use a smooth, firmly twisted DK cotton so the clusters stay crisp. Very fuzzy yarn hides the gaps between clusters, and those gaps are what create the pattern.
- Color A – Burgundy: 8 g, about 18 m
- Color B – Cream: 8 g, about 18 m
- Dark green satin ribbon: 6 in (15.2 cm) long, 0.25 in (0.6 cm) wide
Tools:
– 3.0 mm crochet hook
– Locking stitch marker
– Tapestry needle
– Sewing needle and green thread
– A pinch of fiberfill (optional, for a fuller shape)
– Scissors
The yarn amounts include about a 30% margin for gauge swatching and weaving in ends.
Abbreviations (US Terms)
- ch – chain
- sl st – slip stitch
- sc – single crochet
- dc – double crochet
- sc2tog – single crochet 2 together
- BLO – back loop only
- sp – space
- st(s) – stitch(es)
- beg – beginning
- rnd – round
Special stitch – cluster (cl): 3 dc worked into the same stitch or space.
Joining space: the gap between the last cluster and the beg ch-3 of the round just finished.
Gauge and Checkpoints
Make one test stocking before planning a batch. The ornament is small, so 1 in (2.5 cm) of difference in your gauge changes the look a lot.
- Single crochet gauge: 24 sc and 26 rnds = 4 in (10.2 cm), worked in the round
- Granny gauge: 8 clusters around = 4 in (10.2 cm) circumference; 4 granny rnds = 1 in (2.5 cm) tall
- Rib gauge (cuff): 6 rib rows = 1 in (2.5 cm), unstretched
Measurement checkpoints:
1. After Rnd 7: the leg measures 1.75 in (4.4 cm) from the top edge and 2 in (5.1 cm) wide flat.
2. After Rnd 12: the foot measures 1.25 in (3.2 cm) from the heel chain.
3. After the toe (Rnd 17): the toe cap adds about 0.75 in (1.9 cm).
4. After the heel: the heel cup is about 0.6 in (1.5 cm) deep and looks like a circle about 1.25 in (3.2 cm) across from the side.
If the leg is wider than 2 in (5.1 cm), go down 0.25 mm in hook size. If it is narrower than 2 in (5.1 cm), go up 0.25 mm.
Main Pattern: Leg
Work in joined rounds without turning. At each color change, finish the old color’s joining sl st by pulling the new color through. Carry the unused color loosely up the inside of the tube.
Foundation: With A, ch 24 and sl st to the first ch to form a ring. Don’t twist the chain.
Rnd 1 (A): Ch 1, sc in each ch around, then sl st to the first sc. (24 sc) Change to B in the joining sl st.
Rnd 2 (B): Ch 3 (counts as dc), 2 dc in the same st. Skip 2 sc, cl in the next sc. Repeat from * 6 more times. Skip the last 2 sc and sl st to the top of the beg ch-3. (8 clusters = 24 dc) Change to A.
Rnd 3 (A): Sl st into the joining space. Ch 3, 2 dc in the same sp, then cl in each of the next 7 spaces between clusters. Sl st to the top of the beg ch-3. (8 clusters = 24 dc) Change to B.
Rnds 4–7: Repeat Rnd 3, alternating B, A, B, A. (8 clusters = 24 dc each rnd)
Rnd 7 is burgundy. Checkpoint: 1.75 in (4.4 cm) from the top edge.
Main Pattern: Heel Opening and Foot
Rnd 8 (B, heel round): Sl st into the joining space. Ch 3, 2 dc in the same sp, then cl in each of the next 3 spaces. These 4 clusters form the front (instep). Ch 12 loosely, skip the remaining 4 spaces, and sl st to the top of the beg ch-3. (4 clusters = 12 dc, plus 12 ch) Change to A.
The 4 clusters of Rnd 7 that you skipped now form the top edge of the heel opening. The ch-12 forms its lower edge.
Rnd 9 (A): Sl st into the joining space, which sits between the last chain and the first cluster.
1. Ch 3, 2 dc in the same sp.
2. Work a cl in each of the 3 spaces between the front clusters.
3. Cl in the first ch of the ch-12.
4. Skip 2 ch, cl in the next ch. Repeat from * 2 more times (clusters land in ch 4, 7 and 10).
5. Skip the last 2 ch and sl st to the top of the beg ch-3.
(8 clusters = 24 dc) Change to B.
Over the chain, the clusters sit 3 chains apart, the same spacing as everywhere else on the tube. That’s why the count returns to exactly 8.
Rnds 10–12: Repeat Rnd 3, alternating B, A, B. (8 clusters = 24 dc each rnd) Rnd 12 is cream.
Checkpoint: 1.25 in (3.2 cm) from the heel chain.
Main Pattern: Toe
Work in a continuous spiral. Place a marker in the first stitch of each round.
- Rnd 13 (A): Change to A. Sc in each dc around. (24 sc)
- Rnd 14: Sc in the next 2 sts, sc2tog. Repeat 6 times. (18 sc)
- Rnd 15: Sc in each st around. (18 sc)
- Rnd 16: Sc in the next st, sc2tog. Repeat 6 times. (12 sc)
- Rnd 17: Sc2tog 6 times. (6 sc)
Fasten off, leaving a 6 in (15.2 cm) tail. Weave the tail through the front loops of the last 6 sts, pull tight, and secure inside. Flatten the toe side to side.
Main Pattern: Heel
With A, join at one corner of the heel opening. Work in a continuous spiral.
- Rnd 1: Ch 1. Sc in each of the 12 dc tops of the 4 unworked Rnd 7 clusters, then sc in each of the 12 free loops on the underside of the ch-12. (24 sc)
- Rnd 2: Sc in the next 2 sts, sc2tog. Repeat 6 times. (18 sc)
- Rnd 3: Sc in the next st, sc2tog. Repeat 6 times. (12 sc)
- Rnd 4: Sc2tog 6 times. (6 sc)
If you’re stuffing the ornament, add a small pinch of fiberfill now. Then cinch the heel closed the same way as the toe. Use the tail to close any small gaps at the two corners of the heel opening.
Because the spiral decreases evenly, the heel reads as a round, solid patch.
Border: Ribbed Cuff
Border gauge: 6 rib rows = 1 in (2.5 cm). The cuff is worked sideways into the 24 free loops left on the foundation chain at the top edge.
With B, join with a sl st in the free loop at the center back of the top edge. This is loop 1.
- Ch 6.
- Row 1: Sc in the 2nd ch from the hook and in the next 4 ch. (5 sc) Sl st in the next free loop (loop 2), then turn.
- Row 2: Skip the sl sts and sc BLO in each of the 5 sc. Ch 1, turn. (5 sc)
- Row 3: Sc BLO in each of the 5 sc. Sl st in each of the next 2 free loops, then turn. (5 sc)
- Row 4: Repeat Row 2.
- Rows 5–24: Repeat Rows 3 and 4 ten more times.
Fasten off, leaving a 10 in (25.4 cm) tail. Sew Row 24 to the base of the beginning ch-6 with a whipstitch through the back loops.
Why the math works: Row 1 uses 2 loops (the join plus one sl st). Each of the 11 later odd rows uses 2 more loops. That’s 2 + (11 × 2) = 24 loops, which matches the 24 foundation stitches exactly.
The cuff is 24 rows deep. At 6 rows per inch, that’s 4 in (10.2 cm) around, the same as the leg. The 5 sc rows (each row 5 stitches long) give a cuff depth of about 0.8 in (2.0 cm).
Ribbon loop: Fold the 6 in (15.2 cm) ribbon in half. Tuck 1 in (2.5 cm) of both ends inside the back of the cuff, over the seam. Sew it down with green thread. This leaves a 2 in (5.1 cm) loop.
Final Blocking
- Lightly mist the stocking with water. Don’t soak it.
- Lay it flat with the toe pointing left and the heel at the back.
- Pinch the leg to 2 in (5.1 cm) wide and line up the cluster columns.
- Shape the heel into a round cup with your fingertips.
- Stand the cuff ribs upright. Don’t stretch them.
- Let it dry flat for several hours, away from heat.
Final Quality-Control Checklist
- Every granny round has 8 clusters (24 dc).
- The colors alternate in every round: burgundy at Rnd 1 and the odd rounds, cream at the even rounds through Rnd 12.
- The toe and heel each close to 6 stitches with no holes.
- The cuff has 24 rib rows and sits flat with no ruffling.
- The finished size is 3.5 in (8.9 cm) tall and 2.75 in (7.0 cm) heel to toe.
- The ribbon is secure and hidden inside the cuff.
- All ends are woven in on the inside.
Troubleshooting
- The tube twists in a spiral: granny rounds naturally lean a little. Block it straight, and always start each round in the joining space.
- There’s a gap at the heel corners: close it with the heel tail, or work one extra sc into the corner on heel Rnd 1 and skip one sc2tog later.
- The cuff ruffles: your rib rows are too short. Use a smaller hook for the cuff only.
- The cuff pulls in: your rib rows are too tall. Use a slightly larger hook for the cuff only.
- Carried strands show through: keep the floats loose and on the inside. If they still show, cut and rejoin each color instead.
- The toe is pointy: flatten it side to side when blocking.
Care
Hand wash in cool water and lay flat to dry. Store it flat in tissue so the cuff and heel keep their shape.
Final Notes
The measurement chain is simple:
– 24 stitches around give a leg 2 in (5.1 cm) wide.
– Every granny round keeps 8 clusters.
– The heel opening splits the tube into 12 stitches front and 12 back.
– Toe and heel both decrease from 24 to 18, 12, then 6.
– 24 rib rows fit the 24 top loops for a 0.8 in (2.0 cm) cuff.
Check your size at each stage, and the result is a 3.5 in (8.9 cm) ornament that looks just right on a tree.
Happy crocheting!