

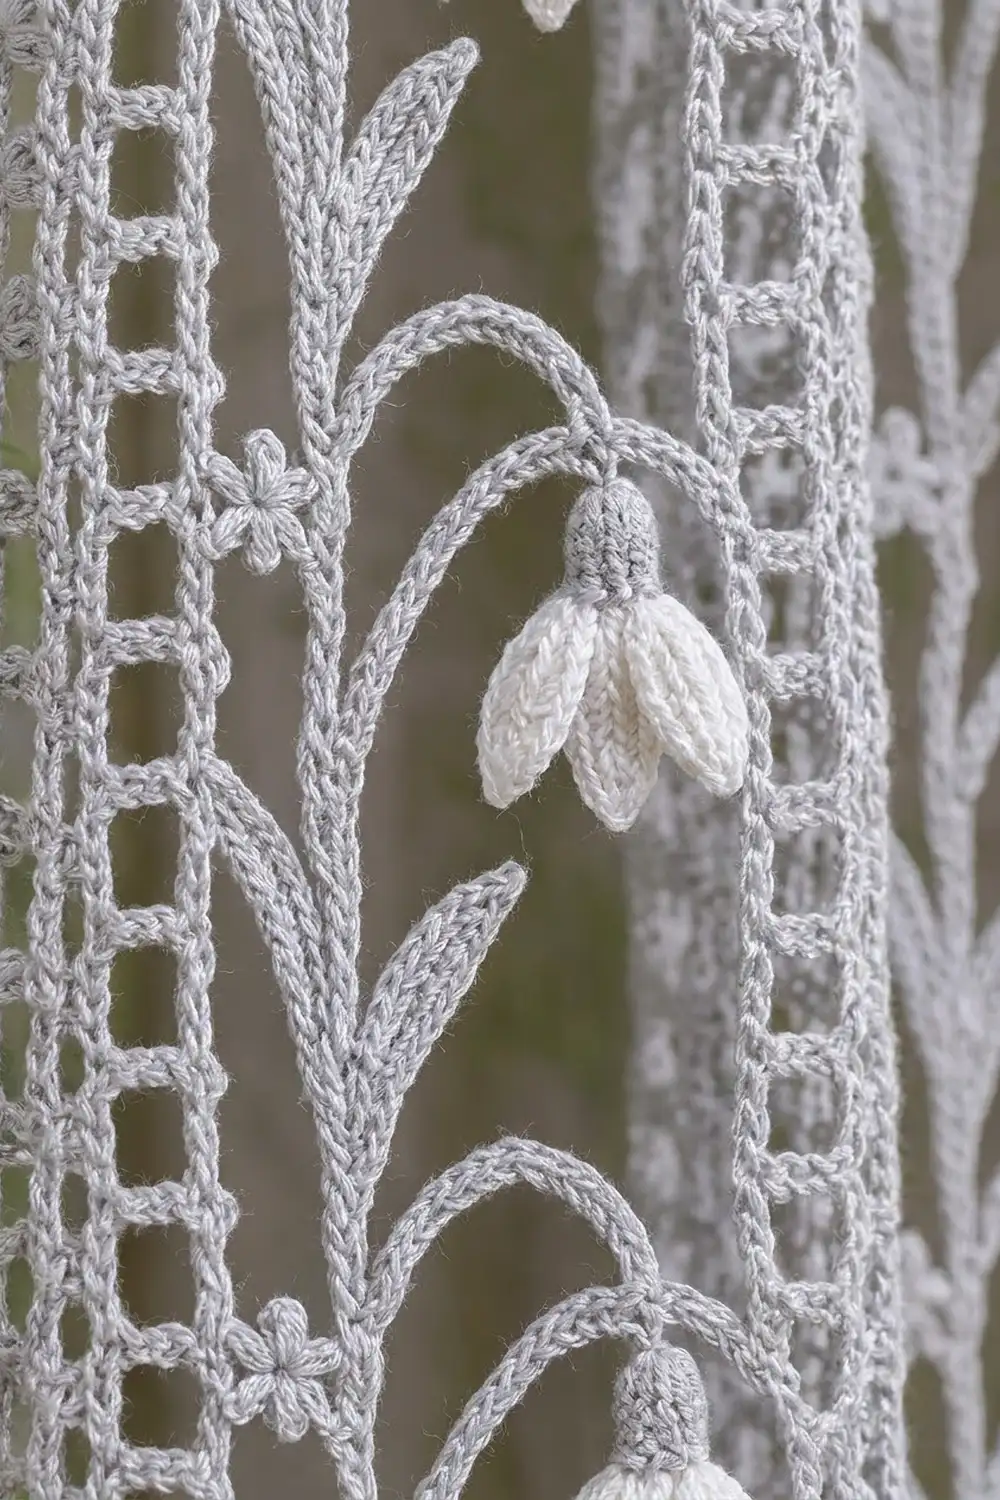
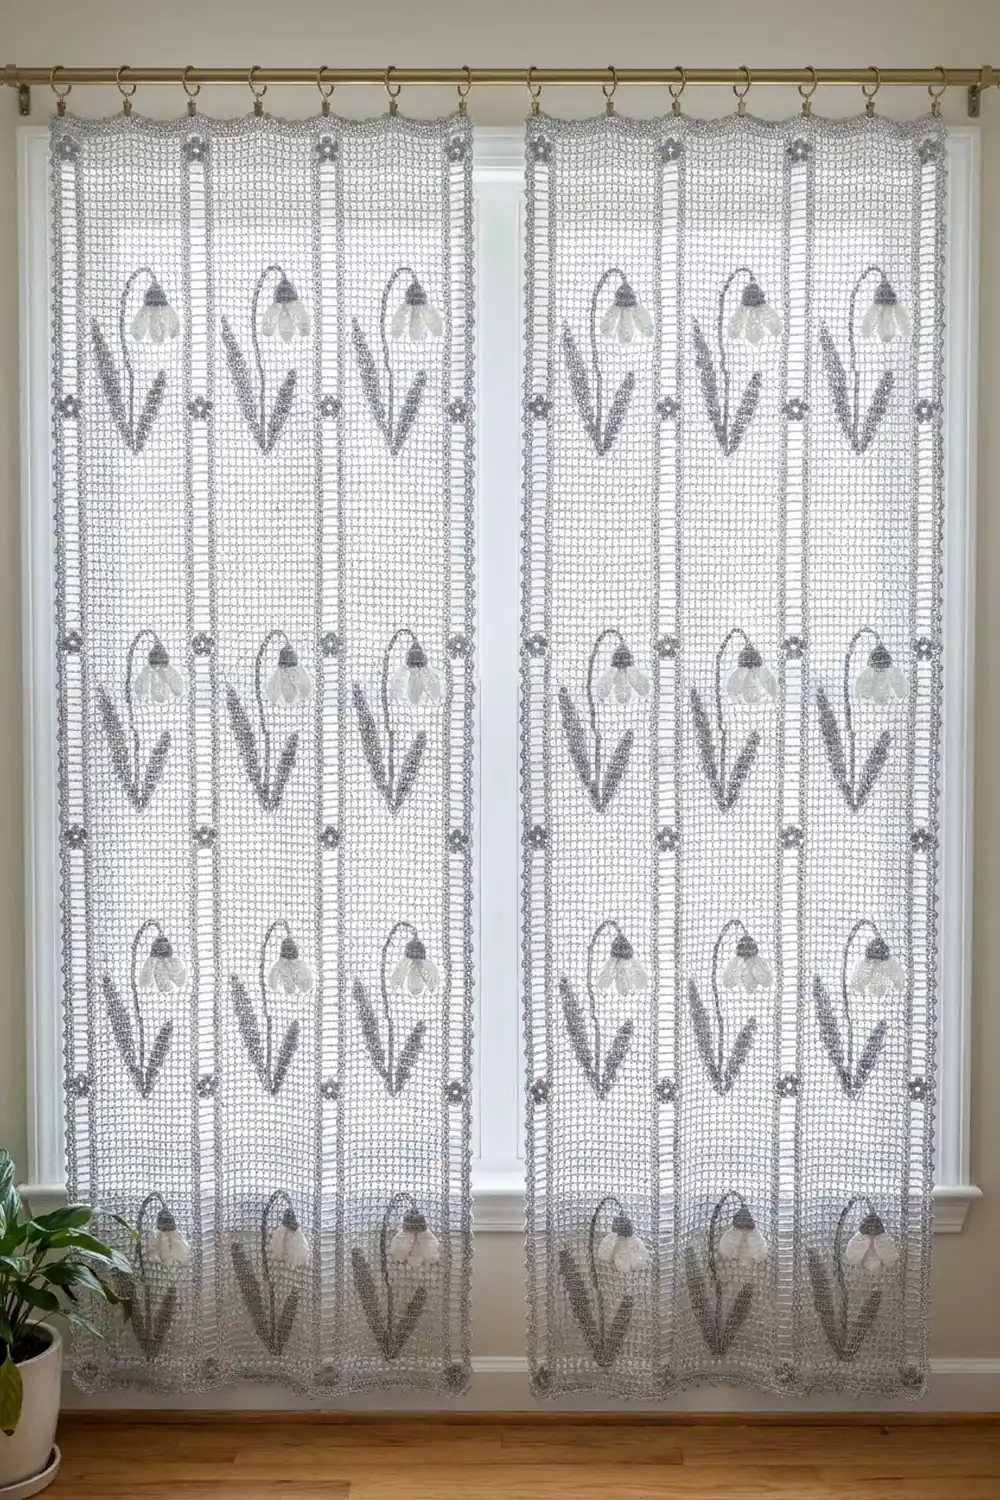
These lace curtains are made to let soft light through. Each panel is a light silver-gray mesh with ladder columns running from top to bottom. Between the ladders, a row of white snowdrops hangs from arching stems, so the curtain reads like a quiet spring garden pressed against the glass.
The palette is just two colors: light silver-gray for the lace, stems, leaves, and tiny seam flowers, and white for the snowdrop petals. The style is vintage filet lace with raised appliqué flowers that catch the light. The pattern uses US crochet terms throughout.
Each finished panel measures 42 in wide × 86 in long (106.7 × 218.4 cm) including the border. The pattern makes a matching pair.
Here’s how it’s built. Each panel is five long mesh strips, worked bottom to top. You join them side by side with a flat slip-stitch seam, sew the snowdrop appliqués onto the mesh, and work a four-round picot border around the whole panel.
Finished Size and Construction
- Finished panel size: 42 × 86 in (106.7 × 218.4 cm)
- Skill level: Intermediate
- Terminology: US
- Yarn weight: #1 super fine (fingering) mercerized cotton
- Hook: 2.5 mm
- Number of pieces: 5 strips per panel, 10 strips for the pair, plus appliqués
- Layout: 5 strips across × 1 strip tall, per panel
- Strip size: 8 × 84 in (20.3 × 213.4 cm)
- Panel size before border: 40 × 84 in (101.6 × 213.4 cm)
- Border depth: about 1 in (2.5 cm) on every side
Materials
Choose a smooth mercerized cotton. It gives crisp ladder openings, holds its shape when it hangs, and survives washing. Avoid fuzzy or very stretchy yarns, because a long panel will grow under its own weight.
- Light silver-gray: 1,100 g (about 3,740 m), for strips, joining, border, stems, leaves, caps, and seam flowers
- White: 40 g (about 136 m), for snowdrop petals
Tools:
- 2.5 mm crochet hook
- Tapestry needle
- Locking stitch markers
- Rust-proof blocking pins and foam mats
- Measuring tape
- Spray bottle
- 10 clip rings per panel, for hanging
Both quantities include a margin of about 15% for the gauge swatch and small tension differences.
Abbreviations (US Terms)
- ch – chain
- sl st – slip stitch
- sc – single crochet
- hdc – half double crochet
- dc – double crochet
- sk – skip
- sp – space
- st(s) – stitch(es)
- tch – turning chain
- RS / WS – right side / wrong side
Special stitch – picot: ch 3, sl st in 3rd ch from hook.
Stitch counting rule: In the strip, every chain counts as one stitch, so each row is always 50 stitches wide.
Gauge and Checkpoints
Gauge: 25 dc and 12 rows = 4 in (10.2 cm) in solid dc.
Test one strip before you commit to all ten. Work Rows 1–12 and measure:
- Checkpoint 1: After Row 12, the strip is 8 in (20.3 cm) wide and 4 in (10.2 cm) tall.
- Checkpoint 2: After Row 36 (one snowdrop section), it is 12 in (30.5 cm) tall.
- Checkpoint 3: The finished strip is 8 × 84 in (20.3 × 213.4 cm).
- Checkpoint 4: The joined panel is 40 × 84 in (101.6 × 213.4 cm).
- Checkpoint 5: The bordered panel is 42 × 86 in (106.7 × 218.4 cm).
If your strip is too wide or tall, go down a hook size. If it’s too narrow or short, go up a hook size. Lace stretches lengthwise when hung, so if your row height is borderline, err slightly short.
Strip (Make 5 per Panel, 10 Total)
Use light silver-gray. Each strip has a 2-dc ladder rail and a ch-2 rung down each edge, with an open mesh center of 13 spaces.
Foundation: Ch 52.
Row 1 (RS): Dc in 4th ch from hook and in each ch across. Turn. (50 sts: 49 dc + tch)
Row 2: Ch 3 (counts as dc throughout), dc in next dc, ch 2, sk 2 dc, dc in next 2 dc, [ch 2, sk 2 dc, dc in next dc] 12 times, ch 2, sk 2 dc, dc in next 2 dc, ch 2, sk 2 dc, dc in next dc, dc in top of tch. Turn. (50 sts: 22 dc + 14 ch-2 sps)
Count check: 2 + 2 + 2 + 36 + 2 + 2 + 2 + 2 = 50.
Rows 3–251: Ch 3, dc in next dc, ch 2, sk ch-2 sp, dc in next 2 dc, [ch 2, sk ch-2 sp, dc in next dc] 12 times, ch 2, sk ch-2 sp, dc in next 2 dc, ch 2, sk ch-2 sp, dc in next dc, dc in top of tch. Turn. (50 sts in every row)
Row 252: Ch 3, dc in next dc, 2 dc in ch-2 sp, dc in next 2 dc, [2 dc in ch-2 sp, dc in next dc] 12 times, 2 dc in ch-2 sp, dc in next 2 dc, 2 dc in ch-2 sp, dc in next dc, dc in top of tch. (50 sts) Fasten off.
The strip has 252 rows: 1 solid bottom row, 250 mesh rows, and 1 solid top row. At 3 rows per inch, that’s 84 in (213.4 cm).
Section map: Mentally divide each strip into 7 snowdrop sections of 36 rows (12 in / 30.5 cm) each. Section 1 is Rows 1–36, Section 2 is Rows 37–72, and so on up to Section 7, Rows 217–252. Place one marker at the start of each section.
Snowdrop Appliqués
Make one full set for each section. That’s 7 sets per strip, 35 per panel, and 70 for the pair.
Stem (Light Silver-Gray)
Ch 56. Sc in 2nd ch from hook and in each ch across. (55 sc) Fasten off, leaving a long tail. The stem measures about 9 in (22.9 cm).
Leaf (Make 2 per Set, Light Silver-Gray)
Ch 21.
- Side 1: Sl st in 2nd ch from hook, sc in next 2 ch, hdc in next 3 ch, dc in next 8 ch, hdc in next 3 ch, sc in next 2 ch.
- Tip: (Sc, ch 2, sc) in last ch.
- Side 2: Working in the opposite loops of the chain, sc in next 2 ch, hdc in next 3 ch, dc in next 8 ch, hdc in next 3 ch, sc in next 2 ch, sl st in last ch.
(40 sts + ch-2 tip) Fasten off, leaving a tail. The leaf is about 3 in (7.6 cm) long and tapers at both ends.
Petal (Make 3 per Set, White)
Ch 9.
- Side 1: Sl st in 2nd ch from hook, sc in next ch, hdc in next ch, dc in next 4 ch.
- Rounded tip: 5 dc in last ch.
- Side 2: Working in the opposite loops, dc in next 4 ch, hdc in next ch, sc in next ch, sl st in last ch.
(19 sts) Fasten off. The petal is about 1.5 in (3.8 cm) long and 0.75 in (1.9 cm) wide. The dc columns give it a softly ribbed, puffy look.
Cap (Light Silver-Gray)
Ch 2, 6 sc in 2nd ch from hook, sl st to first sc to join. (6 sc) Fasten off.
Seam Flower (Light Silver-Gray)
Make 28 per panel (56 total). Ch 4, sl st to first ch to form a ring. [Sc in ring, ch 3] 5 times, sl st to first sc to join. (5 sc + 5 ch-3 petals) The flower is about 0.75 in (1.9 cm) across.
Assembling a Snowdrop
- Lay two petals side by side with their narrow ends touching and the tips fanned slightly apart.
- Lay the third petal centered on top, overlapping each outer petal by about 0.25 in (0.6 cm).
- Stitch through all three narrow ends, then sew the cap over them.
Make All Pieces
Per panel:
- Light silver-gray: 5 strips, 35 stems, 70 leaves, 35 caps, 28 seam flowers
- White: 105 petals (35 snowdrops)
For the pair, double everything: 10 strips, 70 stems, 140 leaves, 70 caps, 56 seam flowers, and 210 petals.
Layout (one panel, RS facing, Row 1 at the bottom):
| A | B | C | D | E |
  8"  8"  8"  8"  8"   = 40 in (101.6 cm)
  each strip 84 in (213.4 cm) tall
Joining
Join the strips in the order A to B, B to C, C to D, and D to E.
- Hold two strips with WS together and Row 1 of both at the same end.
- With light silver-gray and the 2.5 mm hook, work a sl st through the outer dc posts of both strips. Work 2 sl st per row end, matching row 1 to row 1 and row 2 to row 2 the whole way up. That’s 252 rows × 2 = 504 sl st per seam.
- Keep the sl sts loose and even, about the same length as one dc row. If they’re tight, the seam puckers and the panel bows. If the seam puckers, use a 3.0 mm hook just for joining.
The flat seam adds no width. The two ladder rails sit side by side and form the double ladder column you see in the photo.
Size checkpoint: The joined panel measures 40 × 84 in (101.6 × 213.4 cm), with 5 × 50 = 250 sts across the top and 250 across the bottom.
Placing the Appliqués
Work on a flat surface, RS up. Pin every piece before you sew anything. The center mesh has 13 spaces, numbered left to right, and each space is about 0.48 in (1.2 cm) wide. Section rows are counted from that section’s own Row 1.
- Stem: Anchor the base at Row 3 of the section, in space 5. Run it straight up to Row 27, then arch it to the right over 2 spaces. Let the end drop to Row 25.
- Leaves: Sew the base of one leaf beside the stem at Row 4, angled up and to the left to about Row 12. Sew the second leaf at Row 8, angled up and to the right to about Row 16.
- Snowdrop: Sew the cap to the stem end at Row 25 so the petals hang straight down to about Row 21.
- Seam flowers: On each of the 4 seams, center one flower at Row 18 of every section. That’s 4 × 7 = 28 per panel.
Sew with a matching tail, using small stitches through the mesh posts only, so nothing shows through on the WS.
Border
Border gauge: Along the sides, 2 sc per dc row end, which works out to 6 sc per in (2.5 cm). Along the top and bottom, 1 sc per stitch.
Rnd 1 (RS): Join light silver-gray at the top right corner. Work the four sides as follows, then sl st to first sc to join.
- Top: Sc in each st across. (250 sc)
- Corner: Ch 2.
- Side: 2 sc in each row end. (504 sc)
- Corner: Ch 2.
- Bottom: Sc in each foundation ch at the base of each st. (250 sc)
- Corner: Ch 2.
- Side: 2 sc in each row end. (504 sc)
- Corner: Ch 2.
Total: 1,508 sc + 4 corner ch-2 sps
Rnd 2: Sl st into the corner sp, ch 3 (counts as dc), (dc, ch 2, 2 dc) in the same sp. Dc in each sc across to the next corner, then work (2 dc, ch 2, 2 dc) in the corner sp. Repeat around and join.
- Top and bottom: 250 + 4 = 254 dc each
- Sides: 504 + 4 = 508 dc each
- Total: 1,508 + 16 = 1,524 dc
Rnd 3: Repeat Rnd 2.
- Top and bottom: 254 + 4 = 258 dc each
- Sides: 508 + 4 = 512 dc each
- Total: 1,524 + 16 = 1,540 dc
Rnd 4: Sl st into the corner sp, ch 1, (sc, ch 3, sc) in the same sp. [Sc in next 2 dc, picot] across to the next corner, then work (sc, ch 3, sc) in the corner sp. Repeat from * around and join. Fasten off.
- Top and bottom: 258 + 2 = 260 sc each, with 129 picots
- Sides: 512 + 2 = 514 sc each, with 256 picots
- Total: 1,540 + 8 = 1,548 sc, 770 picots, and 4 corner ch-3 loops
Why the math works: Rnd 1 matches the panel exactly. The top and bottom take 250 sts, which is 5 strips × 50 sts. Each side takes 504 sc, which is 252 rows × 2, with no seam extras. Each corner adds exactly 2 sts to each side per round, so the side totals stay even. The picot repeat uses 2 sts, so it fits every side with nothing left over.
The border is 1 sc round, 2 dc rounds, and a picot round. Together they add about 1 in (2.5 cm) per edge, which brings the panel from 40 × 84 in to 42 × 86 in (106.7 × 218.4 cm).
Final Blocking
- Weave in all ends along the dc posts. Trim them only after blocking.
- Soak the panel in cool water for 15 minutes, then press the water out gently. Don’t wring it.
- Roll it in towels to remove excess moisture.
- Lay it on mats in sections, RS up. Pin the long sides straight to 86 in (218.4 cm) and the top and bottom to 42 in (106.7 cm).
- Pin each ladder column straight with a measuring tape alongside it.
- Push the petals into a gentle curve with your fingers so they stay puffy.
- Pin every top picot and leave the panel until it’s fully dry.
Final Quality-Control Checklist
- [ ] Every strip has 50 sts per row and 252 rows.
- [ ] All seams lie flat, with row 1 matched to row 1.
- [ ] Each strip has 7 snowdrop sections, all aligned across the panel.
- [ ] Every snowdrop has 3 petals, with the center petal on top.
- [ ] There are 28 seam flowers per panel.
- [ ] Border counts are correct: 260 / 514 sc in Rnd 4.
- [ ] The panel measures 42 × 86 in (106.7 × 218.4 cm).
- [ ] Both panels match within 0.5 in (1.3 cm).
Troubleshooting
- Strip slants or narrows: You may be skipping the tch. Count to 50 every 10 rows.
- Mesh spaces look uneven: Keep your ch-2s relaxed and the same size every time.
- Seam puckers: Rip it back and redo the seam with a larger hook.
- Panel is longer than 86 in after hanging: Re-block, pinning slightly shorter.
- Petals look flat: Tighten the dc in the tip and reshape the petals while damp.
- Border ruffles: Your corner dc may be too loose. Check that each side has the right count.
Care
Hand wash cool with mild soap, then roll the panels in towels and dry them flat, pinned to size. Don’t tumble dry, and don’t hang them while they’re wet.
Final Notes
The measurement chain is simple to follow:
- Gauge: 25 dc and 12 rows = 4 in (10.2 cm)
- One section: 36 rows = 12 in (30.5 cm)
- One strip: 8 × 84 in (20.3 × 213.4 cm)
- Joined panel: 5 strips = 40 × 84 in (101.6 × 213.4 cm)
- Finished panel: four border rounds bring it to 42 × 86 in (106.7 × 218.4 cm)
Clip 10 rings evenly along the top picots, about every 4.5 in (11.4 cm), and let the snowdrops catch the morning light.
Happy crocheting!