

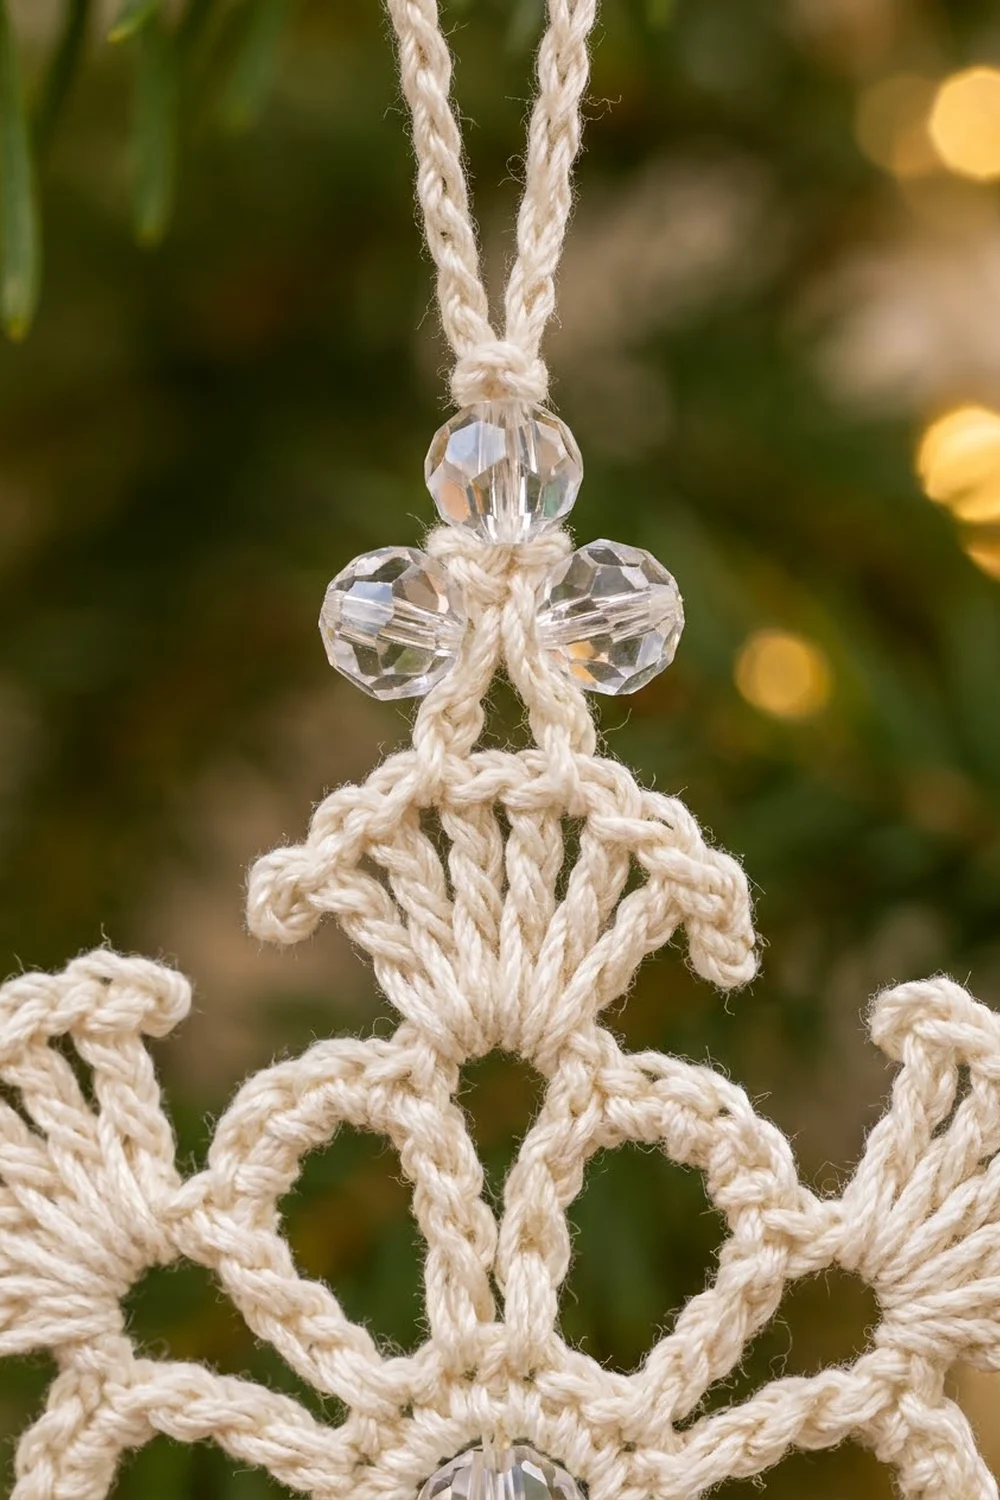
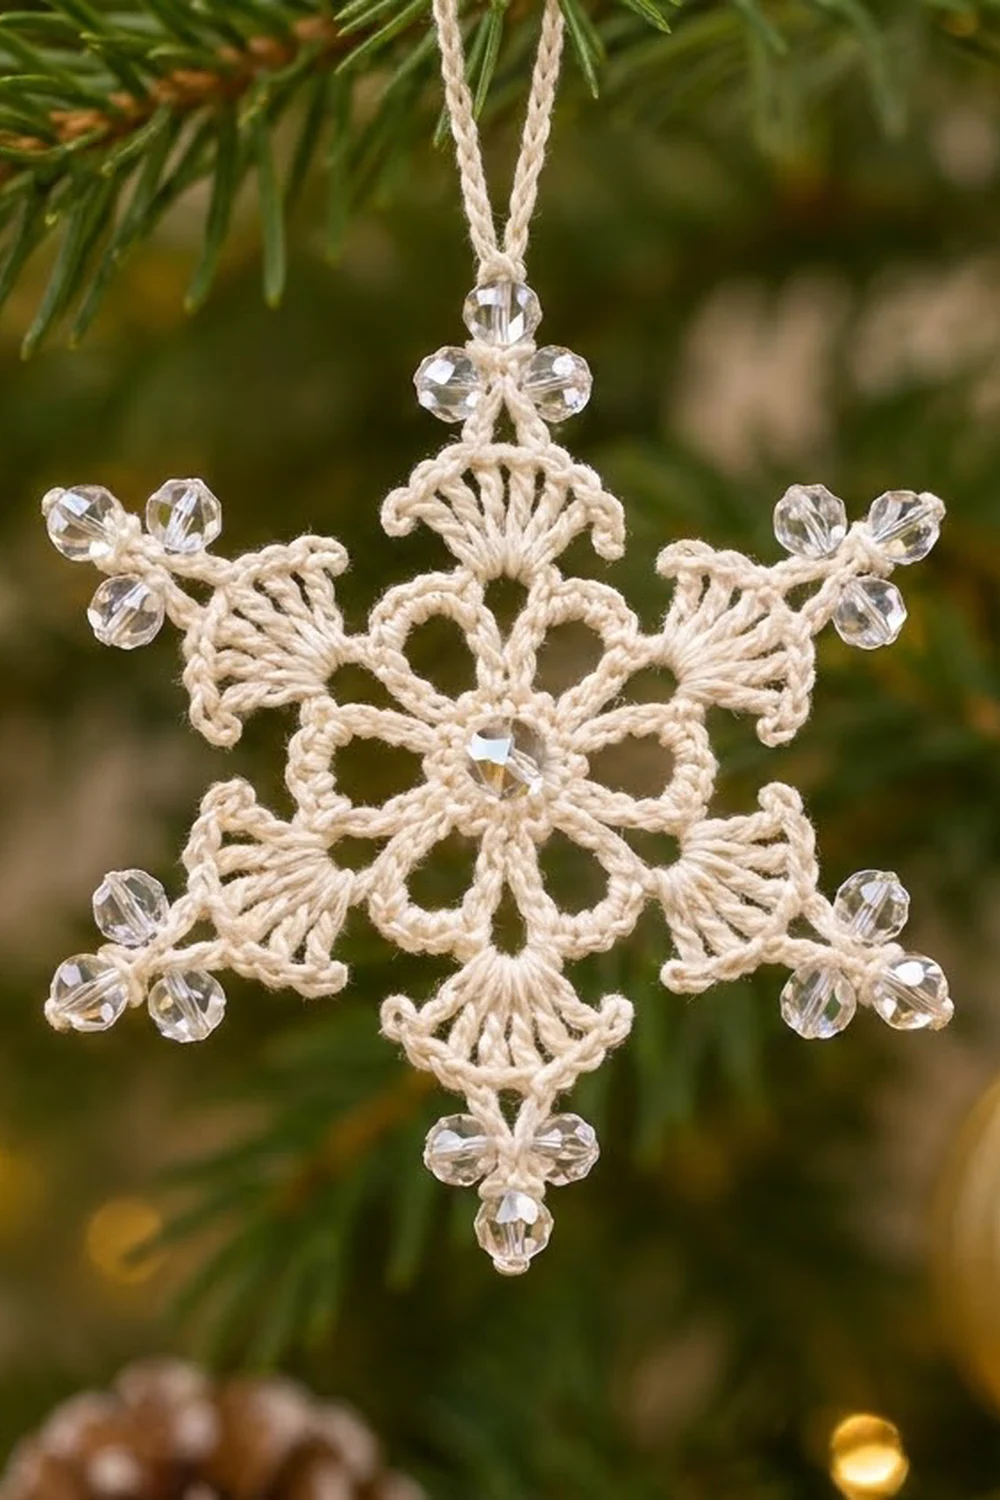
Crystal Frost is a lacy six-pointed snowflake in ivory cotton thread with clear crystal beads. A faceted bead catches the light in the center, six open petals ring it, and six fan-shaped arms flare out to beaded trefoil tips. A slim chain loop at the top lets it hang straight on a branch.
The look is classic heirloom thread crochet: one soft ivory color, with sparkle coming only from the beads. It suits a natural or gold-and-green tree, and it also works as a gift topper or a window ornament.
This pattern uses US crochet terms. The finished snowflake measures 4 in (10.2 cm) from bead tip to bead tip, plus a hanging loop about 1.5 in (3.8 cm) tall.
You make it as one piece in seven rounds: a dense center ring, a round of chain loops, single crochet petals, a linking round, fans, a flare round, and a beaded edging round. You pre-string the beads before you start and add the center bead at the end.
Finished Size and Construction
- Finished size: 4 in (10.2 cm) tip to tip, including beads
- Skill level: Intermediate (thread and beads)
- Terminology: US crochet terms
- Yarn weight: Size 10 crochet cotton thread (lace weight, 0)
- Hook: 1.75 mm steel hook (US 6 or 7 steel)
- Number of pieces: 1 (single motif; nothing to join)
- Layout: Six-point radial snowflake
- Piece size before edging round: 3.25 in (8.3 cm) across the fans, tip to tip
- Edging depth: About 0.375 in (1.0 cm) per tip, including the bead trefoil
Materials
Thread: Use mercerized size 10 cotton thread. It holds its shape when starched, and its smooth finish lets the beads slide easily. Choose a warm ivory or cream; bright white also works but looks colder.
- Ivory size 10 cotton: 4 g, about 25 m (27 yd)
Beads:
– 18 clear faceted beads, 4 mm, with holes at least 1 mm wide (3 per arm)
– 1 clear faceted bead, 8 mm, for the center
– 2 spare 4 mm beads in case one has a tight hole
Tools:
– 1.75 mm steel crochet hook
– Fine big-eye beading needle or dental floss threader, for stringing beads
– Fine tapestry needle
– Sewing needle and ivory sewing thread for the center bead
– Scissors
– Blocking board or foam, rustproof pins, and fabric stiffener or starch
The thread amount includes a margin of about 40% for the swatch, weaving in ends, and the hanging loop.
Abbreviations (US Terms)
- ch – chain
- sl st – slip stitch
- sc – single crochet
- dc – double crochet
- sp – space
- st(s) – stitch(es)
- BT – bead trefoil (special stitch)
Bead Trefoil (BT): Ch 4 for the stem. *Ch 2, slide 1 bead up snug against the hook, ch 2, sl st in the 4th ch of the stem (the top stem ch); repeat from * 2 more times. This makes three beaded picots. Sl st down the 4 stem chains to return to the base. Each picot is a 4-ch loop with the bead sitting at its outer point.
Pre-stringing: Before you start, thread all 18 beads (4 mm) onto the ball end of the thread. Push them back along the thread and bring one forward only when a BT calls for it.
Gauge and Checkpoints
Gauge matters less here than in a garment, but it decides whether the snowflake comes out at 4 in (10.2 cm). Before you string all the beads, work Rounds 1–3 as a test piece and measure them.
Checkpoints (measured flat, lightly pressed):
– After Round 1: 0.6 in (1.5 cm) across
– After Round 3: 1.75 in (4.4 cm) across, petal tip to petal tip
– After Round 5: 2.75 in (7.0 cm) across the fans
– After Round 6: 3.25 in (8.3 cm) across
– After Round 7 and blocking: 4 in (10.2 cm), bead tip to bead tip
If your test piece is too big (Round 3 over 1.875 in / 4.8 cm), change to a 1.5 mm hook or tighten your chains.
If it is too small (Round 3 under 1.625 in / 4.1 cm), change to a 2.0 mm hook. Small differences will relax out during blocking.
Pattern
String the 18 beads (4 mm) onto the thread before you begin.
Round 1 – Center Ring
Make a magic ring. Ch 3 (counts as dc), work 17 dc into the ring. Pull the ring closed until the center hole is about 0.25 in (0.6 cm) wide, just small enough to hold the 8 mm bead later. Sl st to the top of the beginning ch-3.
Count: 18 dc (ch-3 counts as 1).
Round 2 – Petal Loops
Ch 1, sc in the same st as the join, ch 7, skip next 2 dc. *Sc in next dc, ch 7, skip next 2 dc; repeat from * 4 more times. Sl st to the first sc.
Count: 6 sc and 6 ch-7 loops. Each repeat uses 3 dc from Round 1 (1 worked into plus 2 skipped), and 6 × 3 = 18.
Round 3 – Outlined Petals
Sl st into the first ch-7 loop. Ch 1, work 11 sc into the same loop. *Work 11 sc into the next ch-7 loop; repeat from * 4 more times. Sl st to the first sc.
Count: 66 sc (6 petals × 11 sc). The 6th sc of each group is the petal tip. Packing 11 sc onto 7 chains makes each petal curve into a rounded, open loop.
Checkpoint: 1.75 in (4.4 cm) across.
Round 4 – Linking Round
Sl st in the next 5 sc to reach the 6th sc (tip) of the first petal. Ch 1, sc in the same st, ch 7. *Sc in the tip sc of the next petal, ch 7; repeat from * 4 more times. Sl st to the first sc.
Count: 6 sc and 6 ch-7 spaces. Each ch-7 space bridges the valley between two petals. The arms grow from these spaces, so they sit between the petals.
Round 5 – Fans
Ch 1, sc in the same st as the join. *Work 9 dc into the next ch-7 space, sc in the next sc; repeat from * around. On the last repeat, skip the final sc and sl st to the first sc instead.
Count: 60 sts (6 fans × 9 dc + 6 sc). Nine tall stitches on a 7-chain space spread into a fan, with the sc anchoring each fan’s base on a petal tip.
Checkpoint: 2.75 in (7.0 cm) across.
Round 6 – Flare Round
Ch 1, sc in the same st as the join. *2 dc in the first dc of the fan, dc in the next 7 dc, 2 dc in the last dc of the fan, sc in the next sc; repeat from * around. On the last repeat, skip the final sc and sl st to the first sc instead.
Count: 72 sts. This is 66 dc + 6 sc. Per fan, that is 9 dc worked one in each st + 2 added = 11 dc. The two increases at the fan edges make each arm widen outward, and the sc between fans keeps the deep V-notches between arms.
Checkpoint: 3.25 in (8.3 cm) across.
Border: Beaded Edging Round
On this snowflake, the beaded edging round is the border. It firms up each fan edge and adds the trefoil tips.
Border gauge: 12 sc along one arm’s outer edge measures about 1 in (2.5 cm) when relaxed.
Round 7 – Beaded Tips
Sl st in the first dc of the first fan (do not count this sl st). Ch 1. *Sc in the first 5 dc of the fan, (sc, BT, sc) in the 6th (center) dc, sc in the last 5 dc of the fan, sl st in the sc between fans; repeat from * 5 more times. Move to the first sc of the round and join with a sl st.
Count per arm: 12 sc, 1 BT, 1 sl st.
Round total: 72 sc, 6 BT (18 beads), 6 sl st.
Why the math works: Each fan has 11 dc from Round 6. Five dc are worked one-to-one on each side of the center (5 + 5 = 10), and the center dc takes 2 sc plus the BT. So 10 + 2 = 12 sc per arm, using all 11 dc exactly. The sl st in each valley sc adds no height, so the notches between arms stay sharp. Six BTs × 3 beads uses all 18 pre-strung beads, with none left over.
Fasten off, leaving a 6 in (15.2 cm) tail.
Hanging Loop
Pick the arm you want at the top. Join the thread with a sl st at the top of that arm’s BT stem, at the base of its three picots. Ch 30, then sl st in the same st. Fasten off and weave the tail back down the stem. The loop stands about 1.5 in (3.8 cm) tall.
Center Bead
Thread a sewing needle with doubled ivory sewing thread. Come up from the back through the center ring, pass through the 8 mm bead, and go down on the opposite side of the ring. Repeat twice, crossing at 90° the second time so the bead cannot tip. Knot on the back and hide the ends inside the Round 1 stitches.
Final Blocking
- Weave in all ends securely in the stitches of the same color, splitting the plies so they cannot work loose.
- Dip the snowflake in fabric stiffener or thick starch solution and squeeze out the extra. Do not wring it.
- Pin it face up on a blocking board. Pin the center first, then pin each petal tip outward.
- Pin each arm at its BT stem, pulling outward until the snowflake measures 4 in (10.2 cm) from bead tip to bead tip.
- Check the six arms with a ruler or a printed 60° guide. Opposite tips should all measure the same.
- Pin the two outer corners of each fan so the fans flare evenly. Open each petal loop with a pin through its center.
- Lay the hanging loop flat and straight above the top arm.
- Let it dry completely, usually 12–24 hours, before removing the pins.
Final Quality-Control Checklist
- 6 petals, each open and rounded, with 11 sc
- 6 fans with 11 dc in Round 6 and 12 sc in Round 7
- 6 bead trefoils with 3 beads each (18 total)
- Center bead sewn firmly and sitting flat
- Notches between arms sharp and even
- Tip-to-tip measurement of 4 in (10.2 cm) on all three axes
- Hanging loop secure, centered, about 1.5 in (3.8 cm) tall
- No visible knots or tails from the front
- Fully dry and stiff, with no sticky starch residue
Troubleshooting
Petals cup or ruffle: Your sc are too tight or too loose for the ch-7. Rework Round 3 with 10 sc (tight) or 12 sc (loose) only if the change also fits Round 4’s tip position. The simpler fix is adjusting your chain tension in Round 2.
Fans curl forward: Round 6 dc are too tight. Loosen your yarn-over, or block with firmer starch.
A bead won’t slide: Swap it now for a spare. It is much easier before the round reaches that point.
You run out of beads early or have extras: Count the beads before Round 7. You need exactly 18, and an extra or missing BT means a skipped or doubled repeat.
Center hole too big for the bead: Weave the Round 1 tail through the dc posts and pull it snug before sewing the bead.
Snowflake is lopsided: Re-wet and re-pin it with a radial guide, measuring all three tip-to-tip axes.
Hanging loop twists: Block the loop flat, or run a little stiffener along it.
Care
Dust gently with a soft brush, and store flat between tissue paper away from humidity. If needed, rinse in cool water, then re-stiffen and re-block.
Final Notes
The measurement chain runs like this: a 0.6 in (1.5 cm) center ring grows to 1.75 in (4.4 cm) of petals, then 2.75 in (7.0 cm) of fans. The flare round brings it to 3.25 in (8.3 cm), and the beaded edging and blocking take it to 4 in (10.2 cm) tip to tip. In stitches, the chain is 18 dc, 6 loops, 66 sc, 6 linking spaces, 60 fan stitches, 72 flare stitches, and finally 72 sc with 18 beads. Once you’ve made one, the rest go quickly, so you can make a whole set for your tree or gift list.
Happy crocheting!