

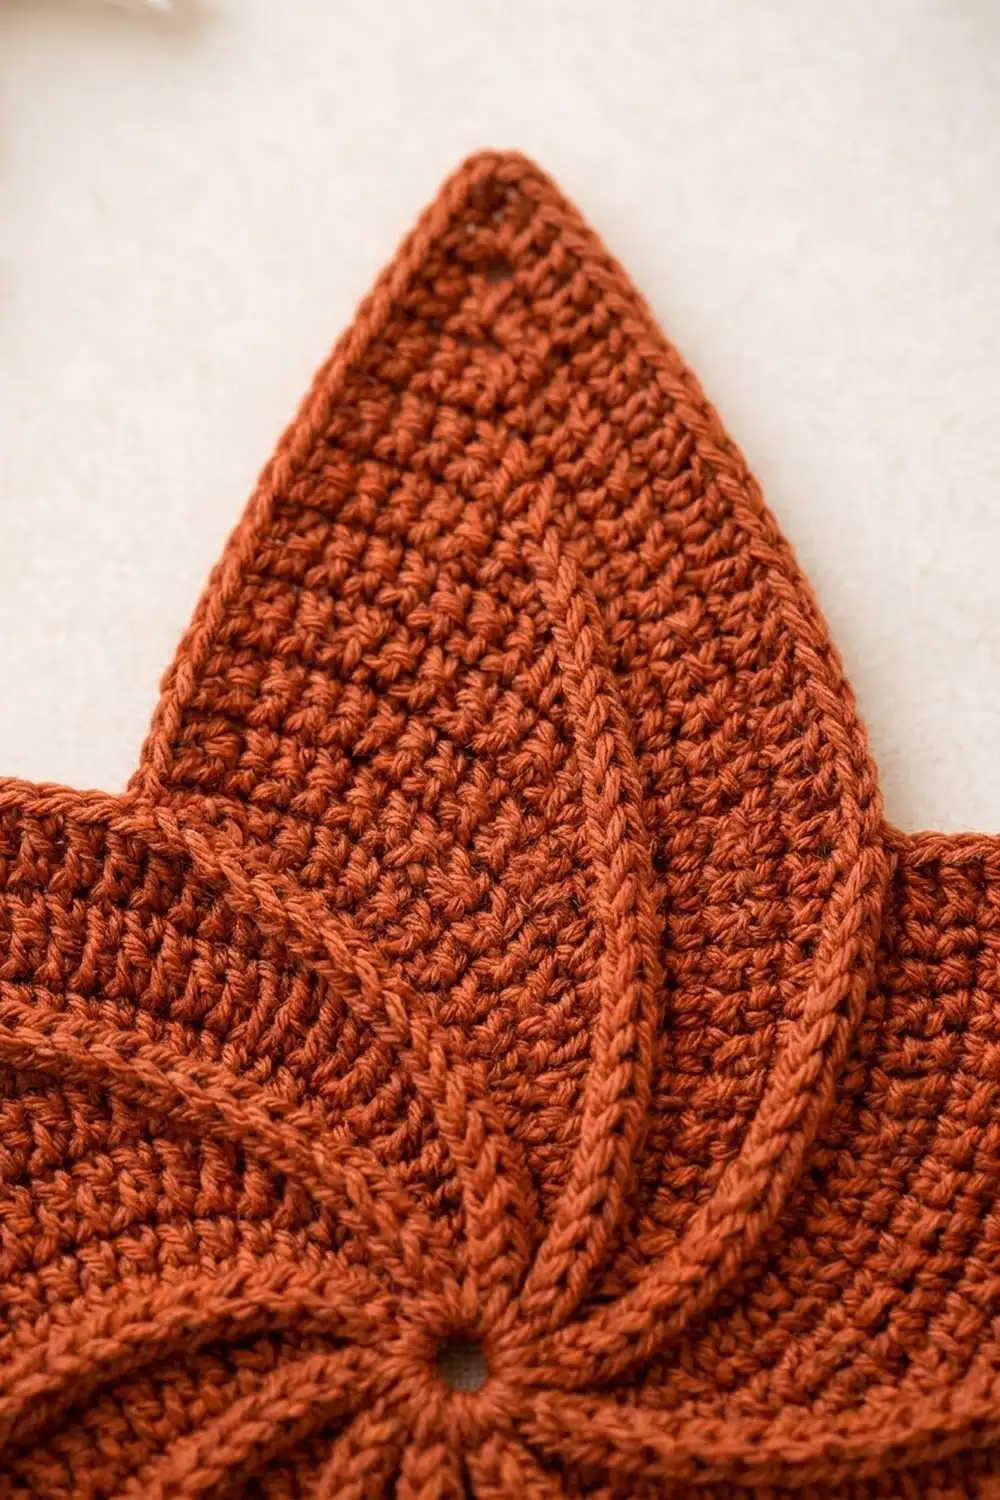
The Cinnamon Swirl Star is a flat, five-pointed star worked in one warm rust shade. Five raised ridges spiral out from a small open center, so the star looks like it is turning slowly, like a pinwheel. A crisp slip-stitch rim frames the outline and keeps the points sharp.
It’s a single solid piece with no joining and no sewing. Use it as a mantel decoration, a large ornament, a trivet-style table accent or a gift topper. Rust, cinnamon and terracotta tones suit the season, but the swirl shows up in any solid, smooth yarn.
This pattern uses US crochet terms. The finished star measures about 10 in (25.4 cm) across the two side points and 9.5 in (24.1 cm) from the top point to the line between the two bottom points.
You start with a magic ring and work 12 joined rounds of single crochet. Each round adds a ch-2 tip at all five points, a centered decrease at each valley, and one front-post double crochet ridge per arm. Two border rounds then square up the edges and add the rim.
Finished Size and Construction
- Finished size: 10 in (25.4 cm) wide x 9.5 in (24.1 cm) tall
- Center to tip: 5.25 in (13.3 cm)
- Skill level: Intermediate (post stitches, centered decreases, counting)
- Terminology: US crochet terms
- Yarn weight: Worsted (#4)
- Hook: 4.5 mm (US 7)
- Number of pieces: 1
- Layout: single five-pointed star, worked in joined rounds from the center
- Piece size before border: 9.5 in (24.1 cm) wide x 9 in (22.9 cm) tall, 5 in (12.7 cm) center to tip
- Border depth: about 1/4 in (0.6 cm) along the edges
Materials
Yarn: Choose a smooth worsted-weight yarn with good stitch definition. Cotton, a cotton blend or a firm acrylic will all show the ridges clearly. Avoid fuzzy or very loosely plied yarns, because they hide the swirl.
- Rust / burnt orange: 25 g, about 45 m (49 yd)
These quantities include a margin for your gauge swatch and tails. The star itself uses a little less.
Tools:
- 4.5 mm (US 7) crochet hook
- 1 locking stitch marker for the round start, plus 5 for the valleys
- Tapestry needle
- Scissors
- Blocking mat, rustproof pins and a spray bottle
- Measuring tape or ruler
Abbreviations (US Terms)
- ch – chain
- sl st – slip stitch
- sc – single crochet
- sc3tog – single crochet 3 together
- FPdc – front post double crochet
- sp – space
- st(s) – stitch(es)
- rnd – round
- MR – magic ring
Special stitches:
FPdc (front post double crochet): Yarn over, insert the hook from front to back to front around the post of the indicated stitch, yarn over and pull up a loop, [yarn over, pull through 2 loops] twice. Skip the stitch behind the FPdc.
Sc3tog (centered decrease): [Insert hook in next st, yarn over, pull up a loop] 3 times, yarn over, pull through all 4 loops on hook. The middle of the three stitches is always the marked valley stitch.
Gauge and Checkpoints
Gauge: 15 sc and 16 rows = 4 in (10.2 cm) with a 4.5 mm hook.
Since this is a single piece, the first four rounds act as your test piece. Work Rnds 1–4, lay them flat and measure before you go on.
Checkpoints:
- After Rnd 4: center to valley 1 in (2.5 cm), center to tip 1.5 in (3.8 cm)
- After Rnd 8: center to valley 2 in (5.1 cm), center to tip 3.25 in (8.3 cm)
- After Rnd 12: center to valley 3 in (7.6 cm), center to tip 5 in (12.7 cm)
- After border: center to tip 5.25 in (13.3 cm), width 10 in (25.4 cm)
If your star is too big: go down to a 4.0 mm hook. Also check that the FPdc is not pulled up taller than the sc around it.
If your star is too small: go up to a 5.0 mm hook.
If it cups: your sc is too tight compared with your increases. Go up half a hook size.
If it ruffles: your stitches are too loose. Go down half a hook size, or chain only 1 instead of 2 at the tips.
Pattern
Notes:
- Join every round with a sl st to the first sc. Ch 1 at the start of a round does not count as a stitch.
- Count each arm between two ch-2 tip spaces. The sc worked into a tip space belongs to the arm on that side of the chain.
- The arm count runs in this order: tip sc, plain sc, ridge (FPdc), 2 sc, valley stitch, plain sc, tip sc.
- From Rnd 3, keep a marker in each valley stitch and move it up every round.
- At the end of each round, the last “2 sc in next st” goes into the first sc of the previous round (the stitch you joined into). Work it as normal.
Center
Rnd 1: Make a MR, ch 1, work 10 sc into the ring, join. Pull the ring closed, leaving a small hole about 1/8 in (0.3 cm) across. (10 sc)
Rnd 2: Ch 1, [(sc, ch 2, sc) in next st, 2 sc in next st] 5 times, join. (20 sc: 4 per arm, plus 5 ch-2 sps)
Setting Up the Swirl
Rnd 3: Sl st into the first ch-2 sp, ch 1. (Sc, ch 2, sc) in ch-2 sp, FPdc around next sc, 2 sc in next sc, sc in next sc and place a valley marker in the sc you just made, 2 sc in next sc; repeat from * 4 more times, join. (40 sts: 8 per arm, plus 5 ch-2 sps)*
Per arm: 1 tip sc + 1 FPdc + 2 sc + 1 valley sc + 2 sc + 1 tip sc = 8.
Growing the Star
All of Rnds 4–12 follow the same repeat. Only the plain sc count changes, and both plain-sc runs use the same number, X.
Repeat for Rnds 4–12: Sl st into the first ch-2 sp, ch 1. *(Sc, ch 2, sc) in ch-2 sp, sc in next X sts, FPdc around the FPdc below, 2 sc in next st, sc3tog over the next 3 sts (centered on the marked valley st; move the marker to the sc3tog), sc in next X sts, 2 sc in next st; repeat from * 4 more times, join.
Per arm, each round = 1 tip sc + X + 1 FPdc + 2 + 1 sc3tog + X + 2 + 1 tip sc = 2X + 8.
| Rnd | X | Sts per arm | Round total |
|---|---|---|---|
| 4 | 1 | 10 | 50 |
| 5 | 2 | 12 | 60 |
| 6 | 3 | 14 | 70 |
| 7 | 4 | 16 | 80 |
| 8 | 5 | 18 | 90 |
| 9 | 6 | 20 | 100 |
| 10 | 7 | 22 | 110 |
| 11 | 8 | 24 | 120 |
| 12 | 9 | 26 | 130 |
Each round also has 5 ch-2 tip spaces, which are not counted in the totals.
Why this works: At each arm, the tip adds 2 sc, the two “2 sc in next st” add 2 more, and the sc3tog removes 2. That’s a net gain of +2 per arm, or +10 per round. The valley stays sharp because the decrease always sits on the marked stitch. Because the FPdc is always stacked on the FPdc below, but one extra plain stitch builds up between it and the tip each round, the ridge moves slowly away from the tip. That gradual drift creates the curved, swirling line.
After Rnd 12: Each arm has 26 sts. The long edge (tip to valley) has 13 sts: 1 tip sc + 9 sc + FPdc + 2 sc. Then comes 1 valley st, then the short edge has 12 sts: 11 sc + 1 tip sc. 13 + 1 + 12 = 26. Measure here: 5 in (12.7 cm) center to tip and 9.5 in (24.1 cm) across the side points.
Border
Border gauge: same as the body, 15 sc = 4 in (10.2 cm). Work the slip stitch rim loosely. If it pulls the edge in, switch to a 5.0 mm hook for Rnd 14 only.
Rnd 13 (edge round): Sl st into the first ch-2 sp, ch 1. (Sc, ch 2, sc) in ch-2 sp, sc in next 10 sts, sc in top of FPdc, sc in next st, sc3tog over next 3 sts (centered on the marker), sc in next 11 sts; repeat from * 4 more times, join. (130 sc: 26 per arm, plus 5 ch-2 sps)*
The FPdc is replaced by a plain sc here, so the ridges end just inside the rim, as in the finished piece.
Per side: long edge 1 tip sc + 10 + 1 + 1 = 13 sts. Valley = 1 st. Short edge 11 + 1 tip sc = 12 sts. 13 + 1 + 12 = 26.
Rnd 14 (rim): Ch 1, sl st loosely in each sc around, working (sl st, ch 2, sl st) in each ch-2 sp. Join to the first sl st. (140 sl sts: 28 per arm, plus 5 ch-2 sps)
Per side: long edge 1 sl st in tip sp + 13 = 14. Valley = 1. Short edge 12 + 1 sl st in tip sp = 13. 14 + 1 + 13 = 28.
Why the math works: Rnd 13 adds 2 sts at each tip and removes 2 at each valley, so the count stays at 26 per arm. The edges straighten without the arms growing wider. Rnd 14 is worked 1 sl st per stitch, plus 2 in each tip space: 26 + 2 = 28 per arm. The rim sits on top of the edge and adds almost no width, so the border depth stays about 1/4 in (0.6 cm). The finished long edge measures about 3.75 in (9.5 cm) and the short edge about 3.5 in (8.9 cm). That small difference gives each point its gentle pinwheel lean.
Fasten off, leaving a 6 in (15.2 cm) tail. Weave all ends into the back along the stitch rows. Use the starting tail to snug the center ring once more before you weave it in.
Final Blocking
- Lay the star face up on a blocking mat.
- Pin the center first so the small ring sits flat and round.
- Pin each tip out to 5.25 in (13.3 cm) from the center, checking the spacing so the five tips are evenly placed.
- Pin each valley to 3.25 in (8.3 cm) from the center, pinning inward so the curve stays crisp.
- Run a finger along each ridge to straighten it into a smooth curve.
- Mist the star with water until it is evenly damp, but not soaked.
- Pat the fabric flat, nudging any ruffled edges into a straight line.
- Let it dry completely, at least 12 hours, before unpinning.
- Measure again: 10 in (25.4 cm) wide and 9.5 in (24.1 cm) tall.
For acrylic yarn, use light steam held 1 in (2.5 cm) above the fabric instead of misting. Never press the iron onto the star.
Final Quality-Control Checklist
- 5 points, each with a clean ch-2 tip
- 5 sharp valleys, each sitting directly on a stacked column of sc3tog
- 5 unbroken ridges running from the center ring and stopping just inside Rnd 13
- 26 sts per arm on Rnd 13 and 28 sl sts per arm on Rnd 14
- Center hole small and closed, about 1/8 in (0.3 cm)
- Star lies flat with no cupping or ruffling
- Width 10 in (25.4 cm), height 9.5 in (24.1 cm)
- All tails woven in securely on the back
Troubleshooting
The ridge breaks or zigzags. You probably worked the FPdc around the wrong post. Always wrap it around the FPdc directly below.
Valleys look rounded. The sc3tog has drifted off center. Check that the marker sits in the middle stitch of the three.
Points curl upward. Your tip chains are too tight. Chain loosely, or block the tips with extra pins.
The arm count is off. Count from tip space to tip space using the table above, then rip back to the last correct round.
The rim pulls in. Undo Rnd 14 and rework it with a 5.0 mm hook.
The ridges look flat. Your FPdc is too short. Pull the first loop up to the height of the current round.
Care
Hand wash in cool water with mild soap, press out the water in a towel, and dry flat, re-pinning the tips if needed. Do not tumble dry.

Final Notes
The measurement chain is simple. Gauge of 15 sc = 4 in (10.2 cm) gives 1 in (2.5 cm) to the valley after Rnd 4. Rnd 12 brings it to 5 in (12.7 cm) center to tip with 26 sts per arm. The two border rounds keep 26 and then 28 sts per arm, adding about 1/4 in (0.6 cm). After blocking, you have a 10 in (25.4 cm) swirl star. Check your measurements at each checkpoint and the star will come out right the first time.
Happy crocheting!