

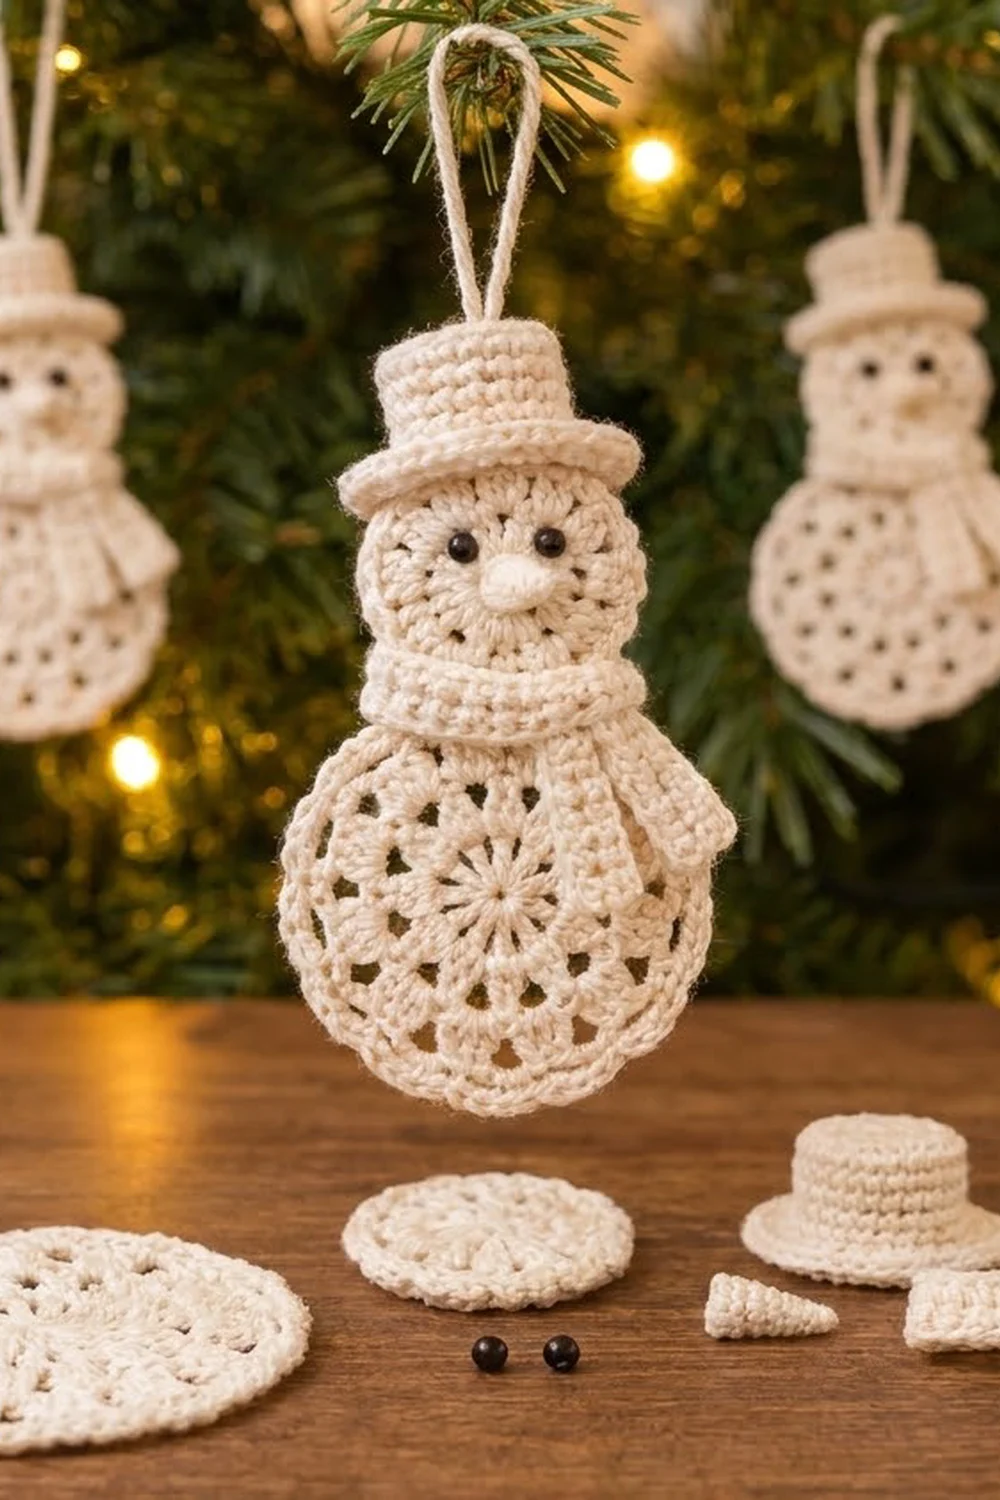
This little snowman is a flat, lacy Christmas ornament made entirely in one soft cream cotton. A spoked lace circle forms his body and a denser round motif forms his head. A tiny three-dimensional top hat, a cone nose, a wrapped scarf and a hanging loop finish the look. Two small black beads make his eyes.
The style is calm and vintage, with no bright colors, just texture. The body has a ring of 12 chain loops around a starburst center, framed by a firm single crochet edge. The head is worked in solid double crochet so the face stands out clearly against the lace below.
This pattern uses US crochet terms throughout. The finished ornament measures 3.0 in (7.6 cm) wide and 5.5 in (14.0 cm) tall from the bottom of the body to the top of the hat. The 1.5 in (3.8 cm) hanging loop brings it to 7.0 in (17.8 cm) overall.
Construction is simple. You crochet eight small parts separately: the body circle with its border, the head circle, the hat, the nose, the scarf band, two scarf tails and the loop. Then you sew them together into one ornament. There is no grid of motifs and no joining of identical pieces.
Finished Size and Construction
- Finished size: 3.0 in (7.6 cm) wide x 5.5 in (14.0 cm) tall, plus 1.5 in (3.8 cm) loop
- Skill level: Easy to intermediate
- Terminology: US crochet terms
- Yarn weight: Fingering (#1) cotton, or size 3 crochet thread
- Hook: 2.25 mm (US B-1)
- Number of pieces: One ornament, sewn together from 8 small crocheted parts plus 2 bead eyes
- Layout: Head stacked above the body, overlapping it by 0.3 in (0.8 cm); hat on top of the head; scarf over the neck seam with both tails hanging to the right
- Body size: 3.0 in (7.6 cm) diameter
- Body size before border: 2.8 in (7.1 cm) diameter
- Border depth: 0.1 in (0.3 cm) all around
- Head size: 2.0 in (5.1 cm) diameter
Materials
Choose a smooth, mercerized cotton in fingering weight (about 210 m per 50 g). Cotton shows stitches clearly, blocks crisply and keeps the lace open. Avoid fuzzy or very stretchy fibers, which blur the spokes.
- Cream cotton: 10 g (about 42 m)
- 2 black beads, 4 mm (or embroider the eyes with black thread)
- 2.25 mm (US B-1) crochet hook
- Tapestry needle and a fine sewing needle
- Black sewing thread for the beads
- Small pinch of fiberfill (optional, for the hat)
- Stitch marker, scissors, ruler
- Blocking mat, rustproof pins, spray bottle
The yarn quantity includes a margin of about 25 percent for your gauge swatch and sewing tails.
Abbreviations (US Terms)
- ch = chain
- sl st = slip stitch
- sc = single crochet
- dc = double crochet
- st(s) = stitch(es)
- sp = space
- BLO = back loop only
- FLO = front loop only
- MR = magic ring
Special stitch: 3-dc group. Work 3 dc into the same chain space. The middle dc of each group is where the lace loops of the next round are anchored.
Gauge and Checkpoints
Gauge: 15 sc = 2 in (5.1 cm), or 7.5 sc per inch, with a 2.25 mm hook. Exact gauge matters less for an ornament than for a garment, but it keeps the head and body in proportion.
Test one piece first. Use the head as your swatch. It takes only 4 rounds and tells you everything you need to know.
Checkpoints:
- Head after Rnd 1: 0.75 in (1.9 cm)
- Head after Rnd 2: 1.3 in (3.3 cm)
- Head after Rnd 3: 1.85 in (4.7 cm)
- Head after Rnd 4: 2.0 in (5.1 cm)
- Body after Rnd 2: 1.1 in (2.8 cm)
- Body after Rnd 3: 1.9 in (4.8 cm)
- Body after Rnd 4: 2.6 in (6.6 cm)
- Body after Rnd 5: 2.8 in (7.1 cm)
- Body after border: 3.0 in (7.6 cm)
If your head is larger than 2.0 in (5.1 cm), switch to a 2.0 mm hook. If it is smaller, switch to a 2.5 mm hook. Keep the stitch counts the same and change only the hook.
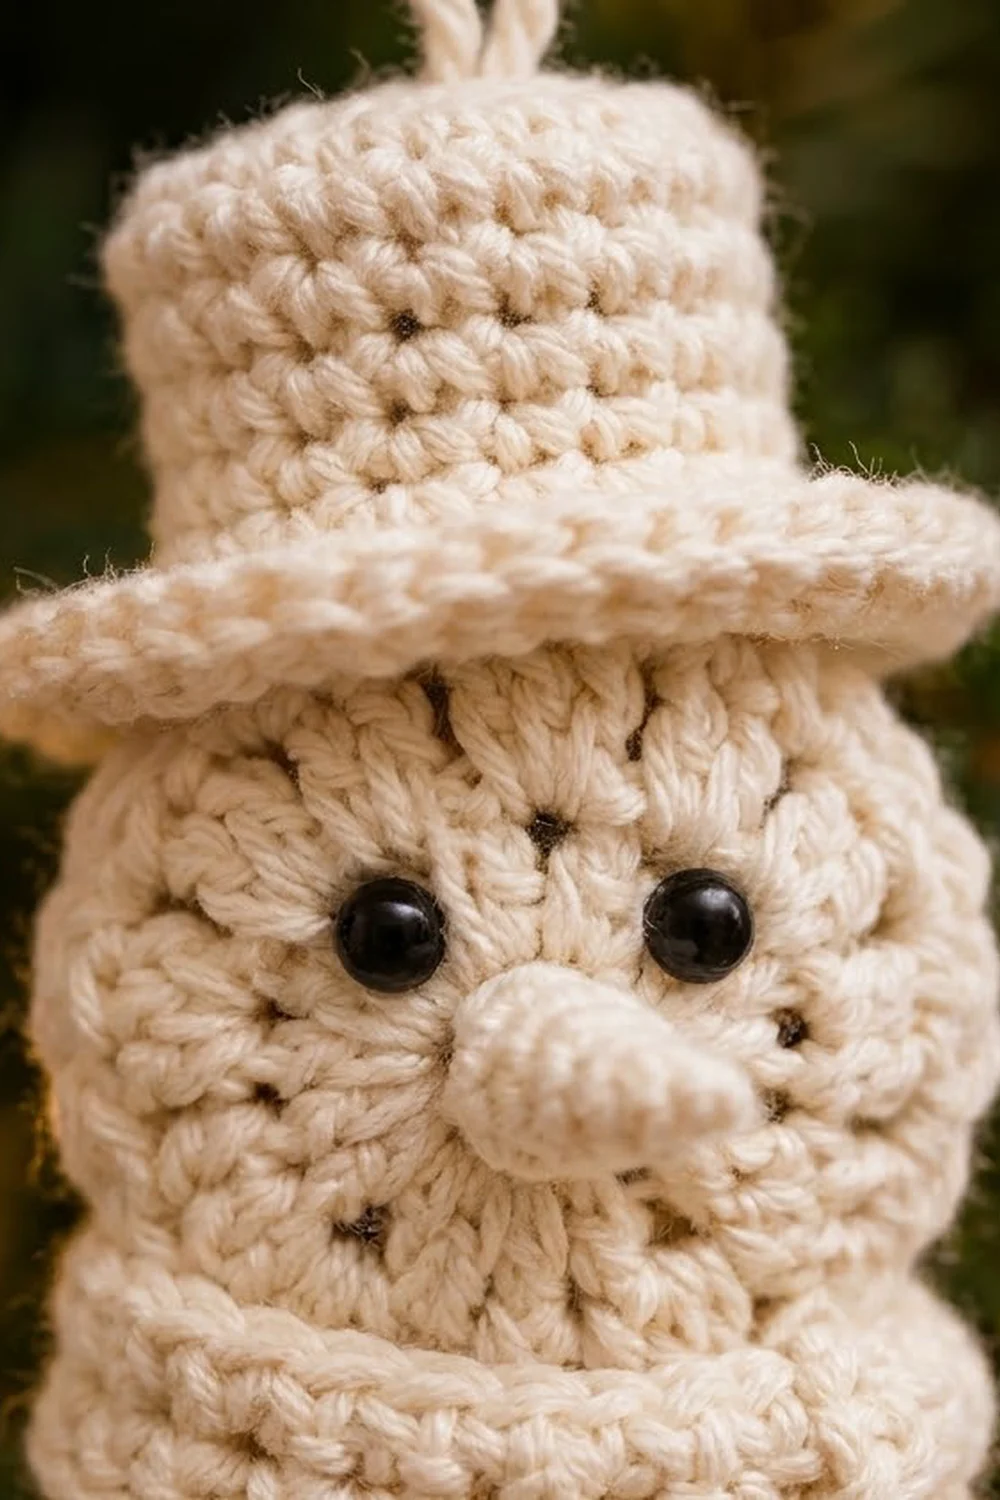
Head
Work in joined rounds. Do not turn.
Rnd 1: MR, ch 3 (counts as dc), 11 dc in ring. Pull the ring closed. Join with sl st to top of ch-3. (12 dc)
Rnd 2: Ch 3 (counts as dc), dc in same st, 2 dc in each st around. Join. (24 dc)
Rnd 3: Ch 3 (counts as dc), 2 dc in next st, dc in next st, 2 dc in next st; repeat from * 10 more times. Join. (36 dc)*
Rnd 4: Ch 1, sc in next 2 sts, 2 sc in next st; repeat from * 12 times. Join to first sc. (48 sc)*
Fasten off, leaving a 10 in (25.4 cm) tail for sewing. The head should lie flat and measure 2.0 in (5.1 cm) across.
Body
The body is the lace circle. Work in joined rounds. Do not turn.
Rnd 1: MR, ch 3 (counts as dc), 11 dc in ring. Join to top of ch-3. (12 dc)
Rnd 2: Ch 4 (counts as dc and ch 1), dc in next st, ch 1; repeat from * 10 more times. Join to 3rd ch of ch-4. (12 dc, 12 ch-1 sps)*
These 12 spokes form the starburst center.
Rnd 3: Sl st into first ch-1 sp. Ch 3 (counts as dc), 2 dc in same sp, ch 2, 3 dc in next ch-1 sp, ch 2; repeat from * 10 more times. Join. (36 dc in 12 groups, 12 ch-2 sps)*
Rnd 4: Sl st in next dc (the middle dc of the first group). Ch 1, sc in same st, ch 5, sc in middle dc of next 3-dc group, ch 5; repeat from * 10 more times. Join to first sc. (12 sc, 12 ch-5 loops)*
These loops form the open lace ring.
Rnd 5: Ch 1, sc in next sc, 5 sc in next ch-5 loop; repeat from * 12 times. Join to first sc. (72 sc = 12 sc worked 1 per existing sc + 60 sc worked into the loops)*
The body now measures 2.8 in (7.1 cm). Do not fasten off. Keep the live loop on a stitch marker, then work the Border section below.
Hat
Work in continuous spiral rounds. Mark the first stitch of each round.
Rnd 1: MR, 6 sc in ring. (6 sc)
Rnd 2: 2 sc in each st around. (12 sc)
Rnd 3: Sc in next st, 2 sc in next st; repeat from * 6 times. (18 sc)*
The hat top measures 0.8 in (2.0 cm) across.
Rnd 4: Sc in BLO of each st around. (18 sc) This makes the sharp fold between the top and the crown.
Rnds 5-7: Sc in each st around. (18 sc)
Rnd 8: Working in FLO, 2 sc in each st around. (36 sc)
Rnd 9: Sc in next 5 sts, 2 sc in next st; repeat from * 6 times. (42 sc)*
Rnd 10: Sl st in each st around. (42 sl st)
Fasten off, leaving a long tail. The brim measures 1.8 in (4.6 cm) across and the hat stands 0.9 in (2.3 cm) tall. If you want the crown to hold a firm cylinder shape, add a pinch of fiberfill.
Nose
Rnd 1: MR, 4 sc in ring. (4 sc)
Rnd 2: Sc in next st, 2 sc in next st; repeat from * twice. (6 sc)*
Rnd 3: Sc in each st around. (6 sc)
Fasten off, leaving a tail. The nose is a short cone about 0.4 in (1.0 cm) long.
Scarf
Neckband
Row 1: Ch 18, sc in 2nd ch from hook and in each ch across. (17 sc)
Rows 2-4: Ch 1, turn, sc in each st across. (17 sc)
Fasten off. The band measures 2.3 in (5.8 cm) x 0.5 in (1.3 cm).
Tails (make 2)
Row 1: Ch 4, sc in 2nd ch from hook and in each ch across. (3 sc)
Rows 2-12: Ch 1, turn, sc in each st across. (3 sc)
Fasten off. Each tail measures 0.4 in (1.0 cm) x 1.5 in (3.8 cm). For a fringed end, knot three 1 in (2.5 cm) strands into the last row and trim them to 0.25 in (0.6 cm).
Hanging Loop
Ch 30, sl st in 2nd ch from hook and in each ch across. (29 sl st) The cord measures about 3.5 in (8.9 cm). Fold it in half to form a 1.5 in (3.8 cm) loop.
Border
The border goes on the body only and picks up right where Rnd 5 ended.
Border gauge: 7.5 sc per inch, the same as your head swatch.
Rnd 6: Ch 1, sc in each st around. Join. (72 sc) That is 18 sc in each quarter of the circle, with 3 lace loops behind each quarter.
Rnd 7: Sl st loosely in each st around. (72 sl st, 18 per quarter) Join and fasten off.
Why the math works: A 3.0 in (7.6 cm) circle has a circumference of about 9.4 in (23.9 cm). At 7.5 sc per inch, 72 sts measure 9.6 in (24.4 cm), slightly more than the circumference. That small extra length keeps the edge from cupping. Rnds 5 and 6 have the same count because the open ch-5 loops underneath spread outward. That lets the edge grow to 3.0 in (7.6 cm) without extra increases. The border adds 0.1 in (0.3 cm) on each side: 2.8 in + 0.2 in = 3.0 in, or 7.1 cm to 7.6 cm.
Assembly
- Block the circles first (see Final Blocking). Sewing lace that is still curled will distort its shape.
- Head to body: Lay the body flat. Center the head on top so its bottom edge overlaps the body’s top edge by 0.3 in (0.8 cm). Whipstitch the head’s Rnd 4 sts to the body along the overlap.
- Eyes: Sew the beads onto Rnd 2 of the head, 0.5 in (1.3 cm) apart and slightly above center.
- Nose: Sew the open end of the nose centered just below the eyes, with the cone pointing outward.
- Scarf band: Lay the band across the neck seam. Fold 0.2 in (0.5 cm) of each end to the back and tack it down.
- Tails: Sew the tops of both tails side by side at the right end of the band (as you face the ornament), letting them hang down over the body.
- Hat: Center the hat on the head so the brim overlaps the head’s top edge by 0.1 in (0.3 cm). Sew around the inside of the brim.
- Loop: Push both ends of the cord into the top of the hat and sew them securely from the inside.
The finished ornament measures 3.0 in (7.6 cm) wide and 5.5 in (14.0 cm) tall: 3.0 in body + 2.0 in head – 0.3 in overlap + 0.8 in of hat above the head.
Final Blocking
- Weave in all ends except the sewing tails.
- Mist the body and head until damp but not dripping.
- Pin the body to a 3.0 in (7.6 cm) circle, with one pin in each of the 12 lace loops.
- Pin the head to a 2.0 in (5.1 cm) circle with 8 evenly spaced pins.
- Pin the scarf band and tails flat and straight.
- Shape the hat crown with your fingers so the top is flat and the brim lies level.
- Let everything dry completely, about 2 to 4 hours.
- Assemble the ornament, then mist it lightly and press it flat under a towel.
Final Quality-Control Checklist
- Head lies flat at 2.0 in (5.1 cm) with 48 sts on Rnd 4.
- Body has 12 even spokes and 12 even ch-5 loops.
- Body measures 3.0 in (7.6 cm) after the border, with 72 sts.
- Hat has a sharp BLO ridge and a level 42-st brim.
- Eyes are level and firmly sewn.
- Scarf covers the neck seam, with both tails on the same side.
- Loop is centered and secure.
- Overall height is 5.5 in (14.0 cm) without the loop.
Troubleshooting
Body cups into a bowl: Your tension tightened on Rnds 5-6. Block firmly, or redo Rnd 5 with a 2.5 mm hook.
Body ruffles: The ch-5 loops are too long for your tension. Redo Rnd 4 with ch-4 loops, keeping 5 sc per loop on Rnd 5.
Head too big for the body: Go down one hook size for the head only.
Hat slouches: Add a little fiberfill, or stiffen it with a light starch spray.
Scarf tails curl: Steam them lightly and pin them flat while they dry.
Gap at the magic ring: Pull the ring tight, then secure the tail with a backstitch on the wrong side.
Care
Hand wash in cool water with mild soap, then reshape while damp and lay flat to dry. Between seasons, store flat in tissue paper so the hat and loop keep their shape.
Final Notes
Every measurement in this ornament builds on the one before it. The head swatch confirms your gauge at 2.0 in (5.1 cm). The body grows to 2.8 in (7.1 cm) at 72 sts, and the border brings it to 3.0 in (7.6 cm). The head overlaps the body by 0.3 in (0.8 cm) and the hat adds 0.8 in (2.0 cm), for a finished height of 5.5 in (14.0 cm) plus the 1.5 in (3.8 cm) loop. Check each number as you go, and your snowman will come out right.
Happy crocheting!