

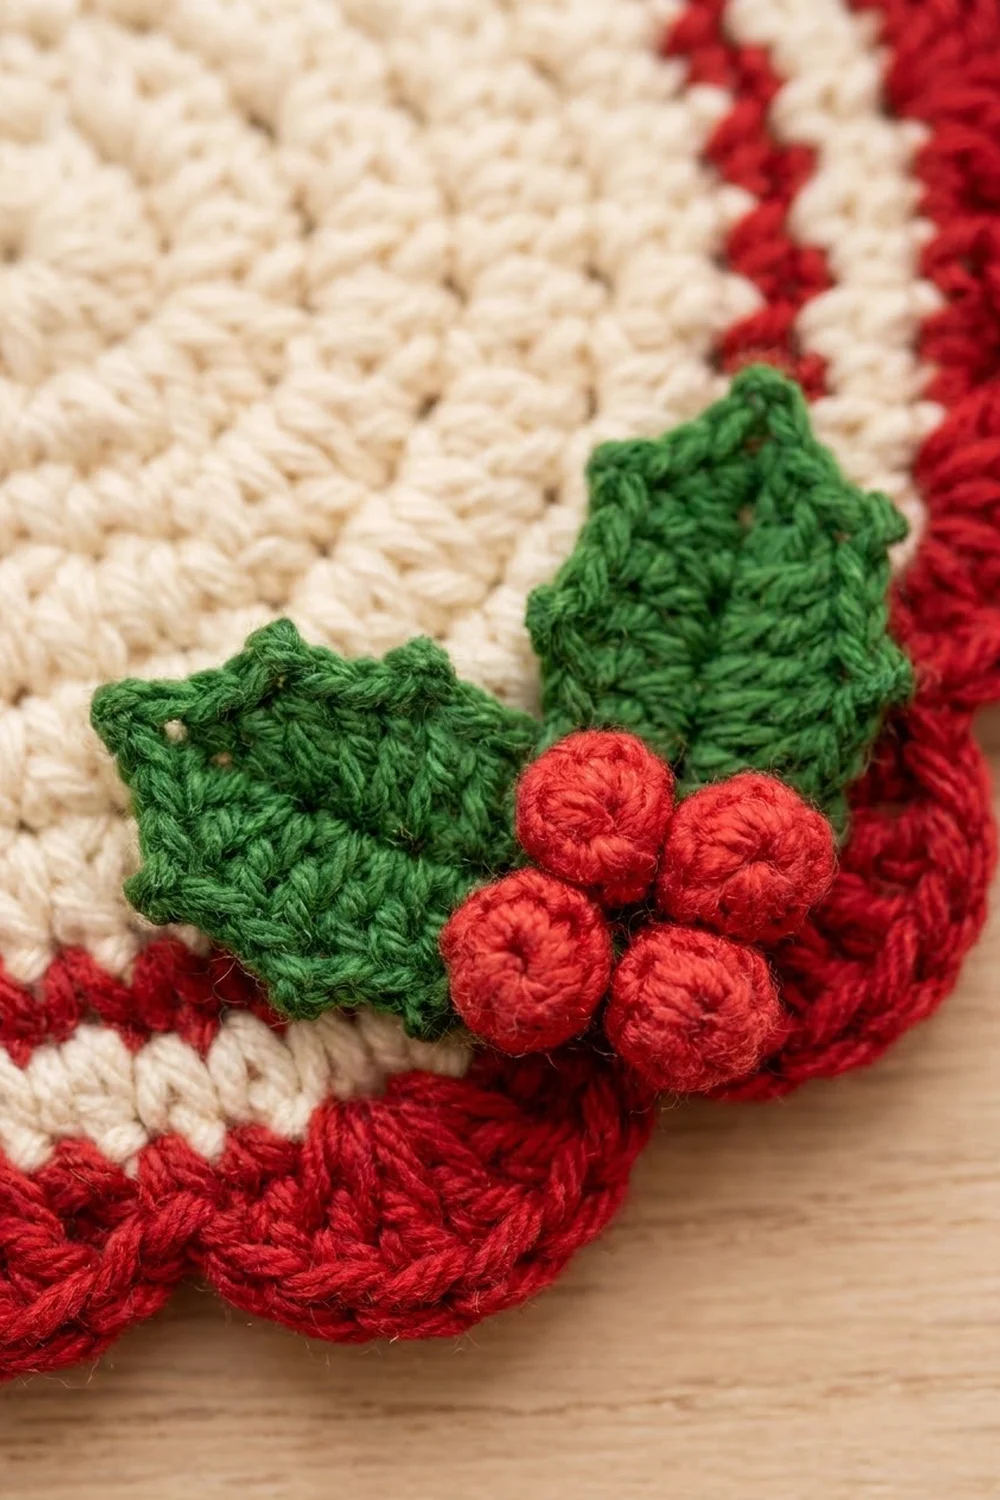
This little Christmas coaster has a soft cream center, one thin red stripe ring and a red scalloped edge. A sprig of holly with three berries finishes the lower right side. It looks like a classic holiday table setting but takes only an evening to make.
The palette uses three colors: cream for the center, a deep Christmas red for the stripe and border, and a leafy green for the holly. Single crochet keeps the fabric firm and flat, so a hot mug sits level on it.
This pattern uses US crochet terms. The finished coaster is 5 in (12.7 cm) across, measured from scallop tip to scallop tip.
The construction is simple. You work 10 joined rounds of single crochet for the striped center, then 2 red border rounds: a solid round followed by a scallop round. You crochet two holly leaves and three berries separately, then sew them onto the lower right.
Finished Size and Construction
- Finished size: 5 in (12.7 cm) diameter
- Skill level: Easy
- Terminology: US crochet terms
- Yarn weight: DK (Category 3) cotton
- Hook: 3.5 mm (E-4)
- Number of pieces: 1 coaster, plus 2 leaves and 3 berries sewn on
- Layout: one single circle; holly cluster at about the 4 to 5 o’clock position
- Piece size before border: 4 in (10.2 cm) diameter after Round 10
- Border depth: 0.5 in (1.3 cm) on every side (Rounds 11–12)
Materials
Use 100% cotton or a cotton blend. Cotton soaks up drips, handles heat, and gives crisp stitch definition. Choose a smooth, mercerized or matte DK cotton at about 2.3 m per gram, which is roughly 115 m per 50 g.
- Cream: 10 g (23 m)
- Red: 7 g (16 m)
- Green: 3 g (7 m)
These amounts include a margin of about 20 percent for gauge swatching and weaving in ends.
Tools:
– 3.5 mm (E-4) crochet hook
– Tapestry needle
– Scissors
– 1 stitch marker
– Rust-proof pins and a blocking mat or folded towel
– Spray bottle
Abbreviations (US Terms)
- ch – chain
- sl st – slip stitch
- sc – single crochet
- hdc – half double crochet
- dc – double crochet
- sc2tog – single crochet 2 together
- sk – skip
- st(s) – stitch(es)
- inc – increase (2 sc in the same st)
Special stitches:
– Picot: Ch 2, then sl st in the 2nd ch from the hook. This makes a small point.
– Tip picot: Ch 3, then sl st in the 3rd ch from the hook. This makes a longer point for the leaf tip.
– Scallop: 5 dc worked into one stitch.
Gauge and Checkpoints
Gauge: 20 sc and 20 rows = 4 in (10.2 cm) in flat rows.
Make one test coaster center (Rounds 1–7) before buying extra yarn for a set. Measure it flat without stretching. Each sc round adds about 0.2 in (0.5 cm) on each side, so the diameter grows about 0.4 in (1.0 cm) per round.
Checkpoints:
– After Round 4: 1.6 in (4.1 cm)
– After Round 7: 2.8 in (7.1 cm)
– After Round 8: 3.2 in (8.1 cm)
– After Round 10: 4 in (10.2 cm)
– After Round 11: 4.4 in (11.2 cm)
– After Round 12: 5 in (12.7 cm)
If your circle is too big, go down 0.25 to 0.5 mm in hook size. If it is too small, go up 0.25 to 0.5 mm. If the circle ruffles, your stitches are too short for the increase rate, so go down a hook size. If it cups like a bowl, go up a hook size.
Coaster Center
Every round is joined, not worked in a spiral. Joined rounds keep the color stripes level with no jog. The ch 1 at the start of each round does not count as a stitch. Place a marker in the first sc of each round so you can find the join easily.
Round 1 (cream): Make a magic ring. Ch 1, then work 6 sc into the ring. Pull the ring closed. Sl st in the first sc to join. (6 sts)
Round 2: Ch 1, then 2 sc in each st around. Join. (12 sts)
Round 3: Ch 1, then sc in next st, 2 sc in next st. Repeat from * 6 times. Join. (18 sts)
Round 4: Ch 1, then sc in next 2 sts, 2 sc in next st. Repeat 6 times. Join. (24 sts)
Checkpoint: 1.6 in (4.1 cm).
Round 5: Ch 1, then sc in next 3 sts, 2 sc in next st. Repeat 6 times. Join. (30 sts)
Round 6: Ch 1, then sc in next 4 sts, 2 sc in next st. Repeat 6 times. Join. (36 sts)
Round 7: Ch 1, then sc in next 5 sts, 2 sc in next st. Repeat 6 times. Join with red: on the final sl st, pull the red yarn through. Fasten off cream, leaving a 6 in (15.2 cm) tail. (42 sts)
Checkpoint: 2.8 in (7.1 cm).
Tip: If your increases start stacking into a hexagon, start the even rounds with half the plain stitches. For Round 6, that means sc in next 2, 2 sc in next, then sc in next 4, 2 sc in next 5 times, ending with sc in next 2. The count stays the same.
The Red Stripe
Round 8 (red): Ch 1, then sc in next 6 sts, 2 sc in next st. Repeat 6 times. Join with cream and fasten off red. (48 sts)
This is the thin red ring seen in the photo. One round of sc gives a crisp line about 0.2 in (0.5 cm) wide.
Checkpoint: 3.2 in (8.1 cm).
Outer Cream Band
Round 9 (cream): Ch 1, then sc in next 7 sts, 2 sc in next st. Repeat 6 times. Join. (54 sts)
Round 10 (cream): Ch 1, then sc in next 8 sts, 2 sc in next st. Repeat 6 times. Join with red and fasten off cream. (60 sts)
Checkpoint: 4 in (10.2 cm). This is your size before the border. Lay the circle flat now. It should sit level with no ripples. Fix any problems before you move on.
Border
Border gauge: Each sc round adds 0.2 in (0.5 cm) per side. The scallop round adds about 0.3 in (0.8 cm) per side. Together they add 0.5 in (1.3 cm) per side, or 1 in (2.5 cm) to the diameter.
A circle has no corners. For counting, treat it as 4 equal quarters. A quarter of Round 10 is 15 sts.
Round 11 (red, conversion round): Ch 1, then sc in next 14 sts, 2 sc in next st. Repeat from * 4 times. Join with sl st in the first sc. (60 sts worked 1 per existing st + 4 added sts = 64 sts)
Each quarter now has 16 sts (15 existing + 1 added).
Checkpoint: 4.4 in (11.2 cm).
Round 12 (red, scallops): Ch 1, then sc in the first st. Sk next st, 5 dc in next st, sk next st, sc in next st. Repeat from * 15 more times. On the final repeat, leave out the last sc and sl st into the first sc to join instead. Fasten off, leaving an 8 in (20.3 cm) tail. (16 scallops: 16 sc + 80 dc = 96 sts)
Each quarter has 4 scallops.
Why the math works: Each scallop repeat uses exactly 4 base stitches (sc, skip, 5-dc stitch, skip). 16 repeats × 4 = 64, which is exactly the Round 11 count. So the last scallop ends 1 st before the starting sc, and the join closes the pattern evenly. Round 10 has 60 sts, which divides into repeats of 4 only as 15 scallops with a slightly tight edge. The 4 extra stitches in Round 11 give 16 scallops, which is enough to let the 5-dc shells fan out flat around the bigger outer edge.
Checkpoint: 5 in (12.7 cm) from scallop tip to opposite scallop tip.
Holly Leaves (Make 2)
Green: Ch 10.
Side 1: Sl st in the 2nd ch from the hook. Sc in next ch, hdc in next ch, picot. Dc in next 2 ch, picot, dc in next ch, hdc in next ch, picot, sc in next ch. In the last ch, work (sc, tip picot, sc). You now turn around the end and work along the opposite side of the foundation chain.
Side 2: Sc in next ch, picot, hdc in next ch, dc in next ch, picot, dc in next 2 ch, picot, hdc in next ch, sc in next ch. Sl st in the same ch as the very first sl st. Fasten off, leaving a 12 in (30.5 cm) tail for sewing.
Count per leaf: 18 sts and 7 picots (Side 1 has 10 sts and 3 side picots plus the tip picot; Side 2 has 8 sts and 3 picots). The picots on the two sides line up as mirror images, which gives the holly its spiky edge.
Each leaf is about 1.5 in (3.8 cm) long and 0.6 in (1.5 cm) wide.
Holly Berries (Make 3)
Round 1 (red): Make a magic ring. Ch 1, then 6 sc into the ring. Pull it closed and join. (6 sts)
Round 2: Ch 1, sc in each st around. Join. (6 sts)
Push the starting tail inside to fill the berry.
Round 3: Ch 1, then sc2tog 3 times. (3 sts)
Fasten off, leaving an 8 in (20.3 cm) tail. Weave the tail through the 3 remaining loops and pull tight. Each berry is a firm ball about 0.4 in (1.0 cm) across.
Assembly of the Appliqué
- Lay the coaster flat with the joins at the back or the top.
- Place the two leaves at about the 4 to 5 o’clock position. Point their tips away from each other so they form a shallow V, with the stem ends touching. The leaves should cover the red stripe and the cream band. Let the lower leaf tip just reach onto the inner edge of the red border.
- Pin the leaves in place. Sew around each leaf with its tail, catching only the back loops of the coaster stitches. Keep the stitches small so they don’t show.
- Stack the three berries in a tight triangle over the point where the leaves meet. Sew each one down with 3 or 4 stitches through its base.
- Weave in every tail on the back of the coaster.
Final Blocking
- Spray the coaster lightly until it is damp, not soaking.
- Lay it face up on a blocking mat or towel.
- Gently pat the center flat with your palm.
- Pin the circle to 5 in (12.7 cm). Place one pin at the tip of each of the 16 scallops so they spread evenly.
- Pinch each leaf tip into a point and pin it if it curls.
- Don’t pin or flatten the berries, so they stay round.
- Let it dry completely, which takes about 4 to 6 hours.
- Remove the pins and check the diameter again.
Final Quality-Control Checklist
- Diameter is 5 in (12.7 cm) tip to tip
- The center lies flat with no cupping or ruffles
- The red stripe is one even ring with no visible jog
- Round 10 had 60 sts and Round 11 had 64 sts
- All 16 scallops are the same size and evenly spaced
- Each leaf shows 7 picots and a clear pointed tip
- All 3 berries are firm, round and tightly closed
- The appliqué is sewn securely with no stitches showing on the front
- All ends are woven in on the back
Troubleshooting
The center cups: Your tension is too tight. Go up 0.5 mm in hook size, or add one extra increase round with no stripe change.
The center ruffles: You have too many stitches or your tension is too loose. Count every round again, or go down 0.5 mm in hook size.
The scallops don’t come out even: Round 11 must have exactly 64 sts. Recount, and check that you skipped exactly 1 st on each side of every 5-dc shell.
There’s a step at the stripe: Change color on the final sl st of the round before, not on the first ch of the new round.
The leaves curl: Spray and pin them flat. Working the foundation chain loosely also helps.
The berries are lumpy: Pull the closing tail firmly and roll each berry between your palms.
Care
Hand wash in cool water with mild soap, press out the water in a towel, and dry the coaster flat. Don’t wring or twist it, so the berries and leaves keep their shape.

Final Notes
The size depends on a short chain of measurements. A 20-sc gauge gives 2.8 in (7.1 cm) at Round 7 and 4 in (10.2 cm) at Round 10. The red sc round brings the coaster to 4.4 in (11.2 cm) with 64 sts, and 16 scallops finish it at 5 in (12.7 cm). If each checkpoint matches, the finished coaster will too. Once you’ve made one, it’s easy to stitch a matching set for your holiday table.
Happy crocheting!