

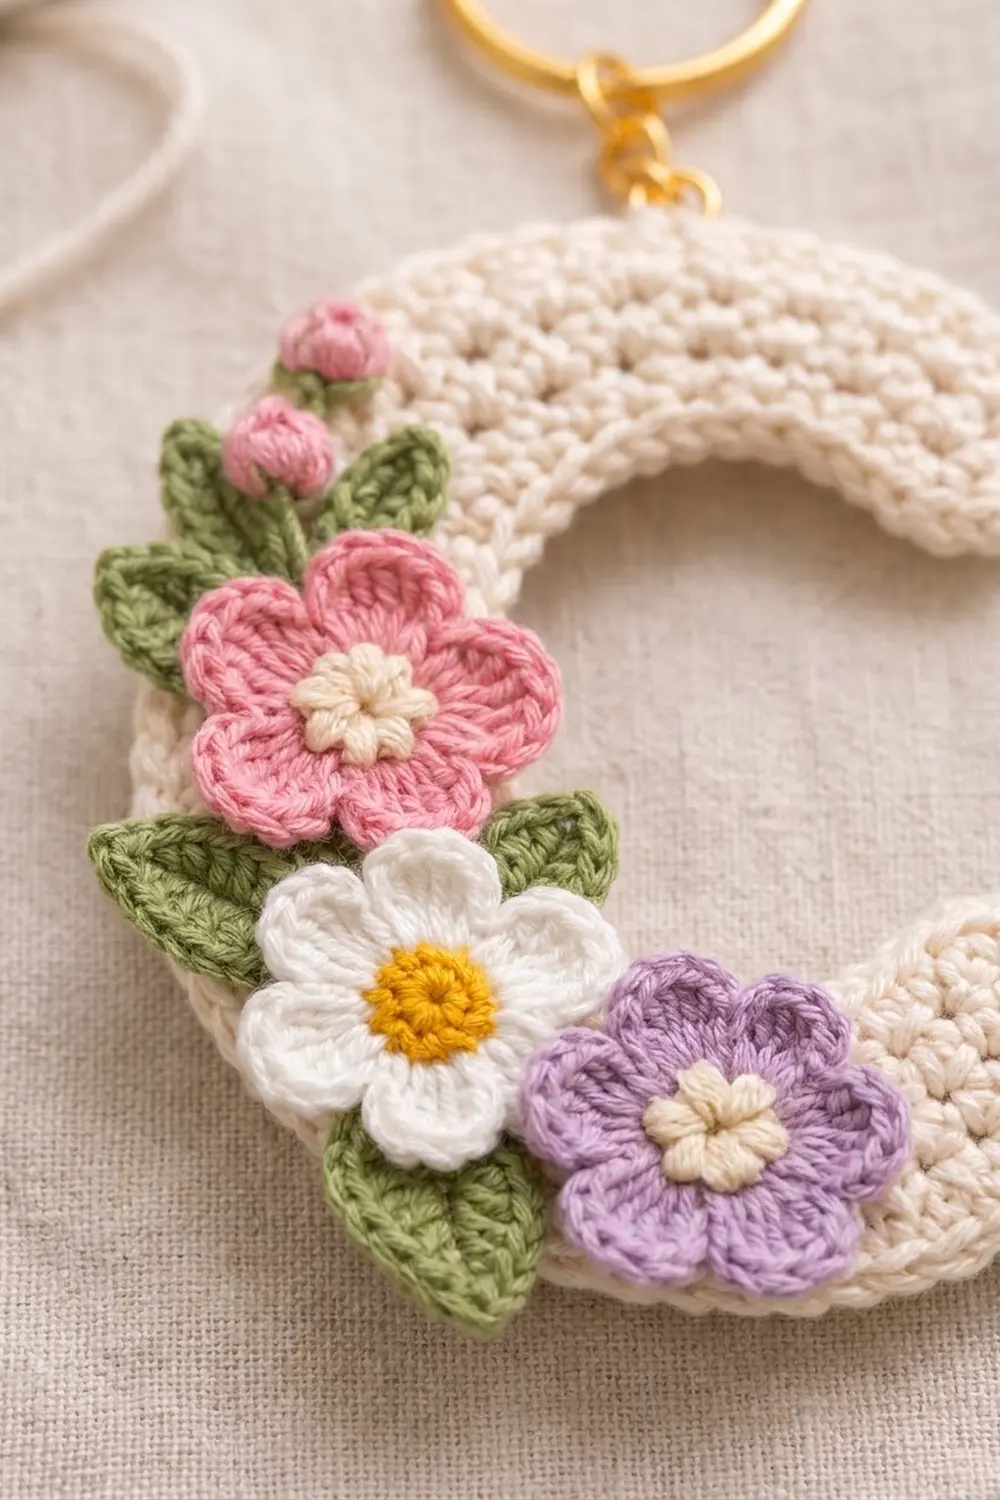
This little letter C is a soft, cushioned initial charm decorated with a small spring bouquet. The cream letter is worked in tight single crochet, so the fabric is firm, smooth, and holds its shape. It looks good clipped to a handbag, backpack, or set of keys.
The flowers are pink, white, and lavender, set against sage-green leaves, with cream and yellow centers. The style is soft and cottage-like. It makes a good personalized gift, and the same idea works for any curved initial.
All terms are US crochet terms. The finished keychain charm measures about 3.6 in (9.1 cm) tall and 2.9 in (7.4 cm) wide, not counting the hardware.
The C is worked flat in five rows. Each row adds four evenly spaced increases, and that alone makes the strip curve into a C. A single round of edging then rounds off the ends and smooths the outline. After that you make three flowers, two buds, and six leaves, sew them onto the lower left curve, and attach the key ring.
Finished Size and Construction
- Finished size: 3.6 in (9.1 cm) tall × 2.9 in (7.4 cm) wide
- Skill level: Easy to intermediate
- Terminology: US crochet terms
- Yarn weight: Worsted (#4) cotton
- Hook: 3.5 mm (E-4)
- Number of pieces: 1 letter body plus 9 small appliqués (3 flowers, 2 buds, 4 large leaves, 2 small leaves), all sewn into one keychain
- Layout: A single C shape with an appliqué cluster on the lower left curve
- Body size before edging: 3.2 in (8.1 cm) tall × 2.6 in (6.6 cm) wide, band 1 in (2.5 cm) wide
- Edging depth: about 0.2 in (0.5 cm) on every side, so the band ends up 1.4 in (3.6 cm) wide
Materials
Use a smooth, tightly plied cotton or cotton blend. Cotton keeps stitch definition crisp and holds up well to daily handling on a bag. Acrylic will also work, but it relaxes more and may need firmer blocking.
Yarn (worsted weight, about 85 m per 50 g):
– Cream: 8 g (14 m), for the letter body and the centers of the pink and lavender flowers
– Pink: 3 g (5 m), for the large flower and the two buds
– White: 2 g (4 m), for the white flower
– Lavender: 2 g (4 m), for the lavender flower
– Yellow: 1 g (2 m), for the white flower’s center
– Sage green: 3 g (5 m), for the leaves
These quantities include a small safety margin for tails and sewing.
Tools:
– 3.5 mm (E-4) crochet hook
– Tapestry needle
– Stitch markers (2)
– One 1 in (2.5 cm) gold split key ring
– About 1 in (2.5 cm) of gold chain
– One 6 mm (0.6 cm diameter) gold jump ring
– Two pairs of flat-nose pliers
– Rustproof pins and a blocking mat
– Spray bottle with water
Abbreviations (US Terms)
- ch – chain
- sl st – slip stitch
- sc – single crochet
- hdc – half double crochet
- dc – double crochet
- st(s) – stitch(es)
- MR – magic ring
- rep – repeat
- inc – 2 sc in the same st
Special stitch – Bud cluster: Make a MR, ch 2, work 4 dc into the ring, pull the ring tight, then sl st into the top of the ch-2. This makes a small rounded bud.
Gauge and Checkpoints
Gauge: 18 sc and 20 rows = 4 in (10.2 cm) in sc worked firmly.
The letter is small, so the letter itself is your gauge swatch. Make Rows 1–2, check the measurements below, and only then carry on.
- After Row 1: the strip measures 3.1 in (7.9 cm) long when laid straight.
- After Row 5: the band is 1 in (2.5 cm) wide, and the top edge of Row 5 measures about 6.7 in (17.0 cm) along the curve.
- After the edging: the C is 3.6 in (9.1 cm) tall and 2.9 in (7.4 cm) wide, and the inner opening is about 0.8 in (2.0 cm) across.
Too big? Go down to a 3.25 mm hook, or work tighter.
Too small? Go up to a 3.75 mm hook.
The curve depends on your row height. If your rows are noticeably taller than the gauge, the C will open wider. If they are shorter, the ends will curl closer together. A small difference can be fixed in blocking.
Letter Body
Work with cream. Ch 1 at the start of each row does not count as a stitch.
Row 1: Ch 15, sc in 2nd ch from hook and in each ch across, turn. (14 sts)
Leave a 6 in (15.2 cm) starting tail. Put a marker in the first sc so you can tell the foundation edge (the inner edge of the C) from the outer edge.
Row 2: Ch 1, sc 1, (inc, sc 2) 4 times, sc 1, turn. (18 sts)
Row 3: Ch 1, sc 2, (inc, sc 3) 4 times, turn. (22 sts)
Row 4: Ch 1, sc 1, (inc, sc 4) 4 times, sc 1, turn. (26 sts)
Row 5: Ch 1, sc 2, (inc, sc 5) 4 times. Do not turn or fasten off. (30 sts)
Why it curves: Every row is about 4 stitches longer than the row before it, while the starting chain stays at 14. A flat circle at this gauge would need about 5.6 extra stitches per row. Four extra stitches gives roughly 255 degrees of a circle, which is a C shape with a natural opening of about 105 degrees on the right.
Checkpoint: The piece should now curl into a C on its own. Lay it flat and check that the band is 1 in (2.5 cm) wide and the C is about 3.2 in (8.1 cm) tall.
Edging (Border)
The edging uses the same gauge as the body: 18 sc per 4 in (10.2 cm). It adds about 0.2 in (0.5 cm) on every edge. You work it in one continuous round, starting from the last stitch of Row 5. Do not turn.
Edging round, with counts per side:
- Outer edge: Row 5 is the outer edge. You are already at its far end, so work back along it with the right side facing. Inc in the first st, sc 28, inc in the last st. (32 sc)
- First end: Rotate to work down the row ends. Sc in each of the next 2 row ends, 3 sc in the middle row end (Row 3), sc in each of the last 2 row ends. (7 sc)
- Inner edge: Work into the free loops of the foundation chain. Sc in each of the 14 loops. (14 sc)
- Second end: Sc in each of the next 2 row ends, 3 sc in the Row 3 row end, sc in each of the last 2 row ends. (7 sc)
Sl st to the first sc to join. (60 sts total: 32 + 7 + 14 + 7)
Fasten off with an 8 in (20.3 cm) tail and weave in all ends on the back.
Why the math works:
– The outer edge is convex. The 30 Row 5 stitches are worked one-to-one, plus 2 increases at the corners, which keeps the corners rounded without ruffling.
– Each end has 5 row ends, about 1 in (2.5 cm). At 4.5 sts per inch, 5 stitches fit flat, and the 2 extra stitches in the middle row end round the end into a soft dome.
– The inner edge is concave. It gets exactly 1 sc per chain loop and no increases, so the small opening stays crisp instead of wavy.
– Edging per side: 32 + 7 + 14 + 7 = 60 sts.
Checkpoint: 3.6 in (9.1 cm) tall and 2.9 in (7.4 cm) wide.
Flowers
Leave a 10 in (25.4 cm) tail on each flower for sewing. Pull each MR tight.
Large pink flower (make 1):
– Round 1 (cream): MR, 10 sc into the ring, sl st to the first sc. Fasten off cream. (10 sts)
– Round 2 (pink): Join pink in any st. (hdc, 3 dc, hdc) in the next st, sl st in the next st; rep 4 more times. (5 petals)
Finished diameter is about 1.3 in (3.3 cm).
White flower (make 1):
– Round 1 (yellow): MR, 10 sc into the ring, sl st to the first sc. Fasten off. (10 sts)
– Round 2 (white): (hdc, 2 dc, hdc) in the next st, sl st in the next st; rep 4 more times. (5 petals)
Finished diameter is about 1.1 in (2.8 cm).
Lavender flower (make 1): Work as for the white flower, using cream for Round 1 and lavender for Round 2. Finished diameter is about 1.1 in (2.8 cm).
Pink buds (make 2): In pink, work one bud cluster each. Each bud is about 0.4 in (1.0 cm).
Leaves
All leaves are worked in sage green. Leave a 6 in (15.2 cm) tail on each.
Large leaf (make 4): Ch 7. Starting in the 2nd ch from the hook, work: sc, hdc, dc, dc, hdc, then 3 sc in the last ch. Rotate and work along the other side of the chain: hdc, dc, dc, hdc, sc. Sl st into the skipped tip ch. (13 sts plus sl st)
Each large leaf is about 1 in (2.5 cm) long.
Small leaf (make 2): Ch 5. Starting in the 2nd ch from the hook, work: sc, hdc, dc, then 3 sc in the last ch. Rotate and work along the other side: dc, hdc, sc. Sl st into the tip ch. (9 sts plus sl st)
Each small leaf is about 0.7 in (1.8 cm) long.
Assembly: Attaching the Appliqués
Imagine the C as a clock face. Pin each piece in place before you sew anything.
- Large leaves: Place one behind where the pink flower will go at 9 o’clock, with its tip sticking out past the outer edge. Place one behind the lower left of the pink flower. Place two around the 7 o’clock area so they will peek out from under the white and lavender flowers.
- Small leaves: Place both near 10 o’clock, fanned outward.
- Buds: Place them on top of the small leaves, one slightly above the other.
- Pink flower: Center it at 9 o’clock, overlapping the outer edge by about 0.25 in (0.6 cm).
- White flower: Center it at about 7 o’clock, just below the pink flower.
- Lavender flower: Place it to the right of the white flower, near 6 o’clock, overlapping one white petal.
Sew everything down from the bottom layer up: leaves first, then buds, then flowers. Use small whipstitches through the back loops of the center rounds and the petal bases. Leave the petal tips free so they stay dimensional. Hide all tails inside the back of the letter body.
Hardware: Find the upper end of the C and count 7 sts along the outer edge from it. Open the 6 mm jump ring sideways with two pliers. Thread it through that edging stitch and the last link of the chain, then close it. Attach the split ring to the other end of the chain.
Final Blocking
- Lightly spritz the letter body with water. Keep the flowers as dry as you can.
- Lay the C face up on the blocking mat.
- Pin the outer curve into a smooth arc, 3.6 in (9.1 cm) tall.
- Pin each rounded end so the overall width is 2.9 in (7.4 cm).
- Shape the inner opening to about 0.8 in (2.0 cm) across.
- Gently lift the petals with your fingers.
- Let it dry completely before you remove the pins.
Final Quality-Control Checklist
- [ ] Row counts were 14, 18, 22, 26, 30
- [ ] The edging has 60 sts (32 + 7 + 14 + 7)
- [ ] The C measures 3.6 in (9.1 cm) × 2.9 in (7.4 cm)
- [ ] Both ends are evenly rounded
- [ ] The flowers have 5 petals each, all sewn down securely
- [ ] Leaf tips stick out past the edge
- [ ] The jump ring is fully closed with no gap
- [ ] No tails are visible on the front
Troubleshooting
- The C closes into an O: Your rows are too short. Use a larger hook, or block the opening wider.
- The C is too straight: Your rows are too tall. Work tighter.
- The edges ruffle: You added extra stitches on the inner edge. Work exactly 14 sc there.
- The ends are pointy: Make sure you worked 3 sc into the Row 3 row end on each end.
- The petals are floppy: Sew closer to the petal bases, and tighten the MR before you join the petal round.
- The ring pulls the edge out of shape: Put the jump ring through both loops of the edging stitch, or through two stitches.
Care
Hand wash in cool water with mild soap, press out the water in a towel, and dry flat. Keep it away from heat so the gold hardware stays bright.

Final Notes
The measurement chain works like this. The 14-stitch foundation (3.1 in / 7.9 cm long) grows by 4 stitches per row to 30 stitches, curling into a C 3.2 in (8.1 cm) tall with a 1 in (2.5 cm) band. The 60-stitch edging brings it to 3.6 in (9.1 cm) × 2.9 in (7.4 cm) with a 1.4 in (3.6 cm) band. Check your work at each of these stages and the finished letter will turn out the right size and shape.
Happy crocheting!