

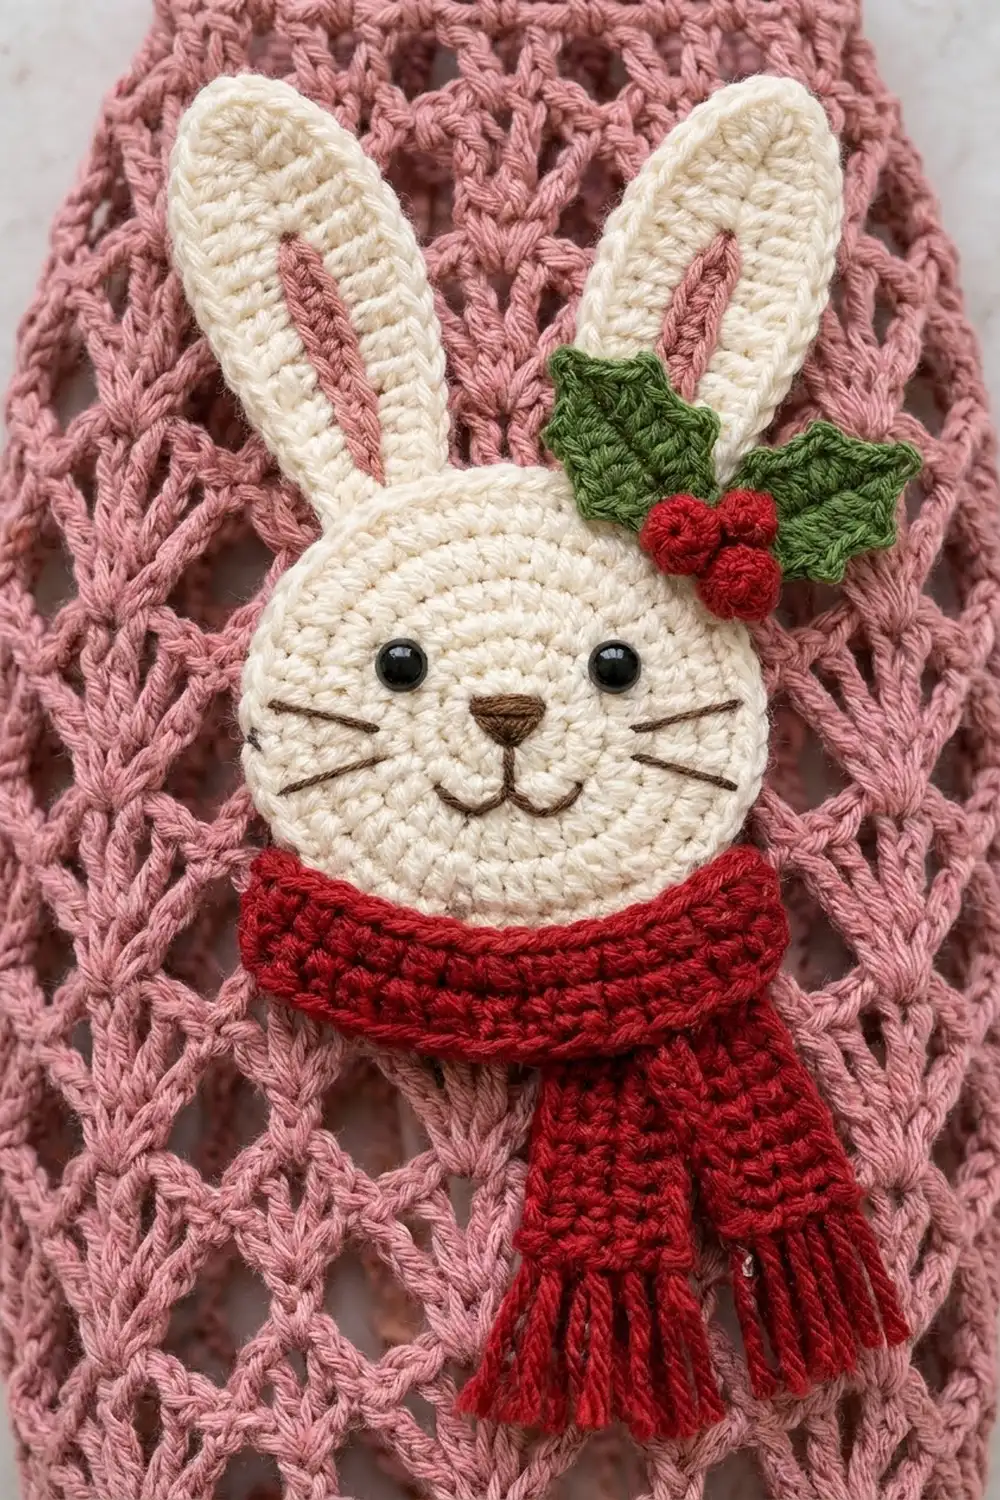
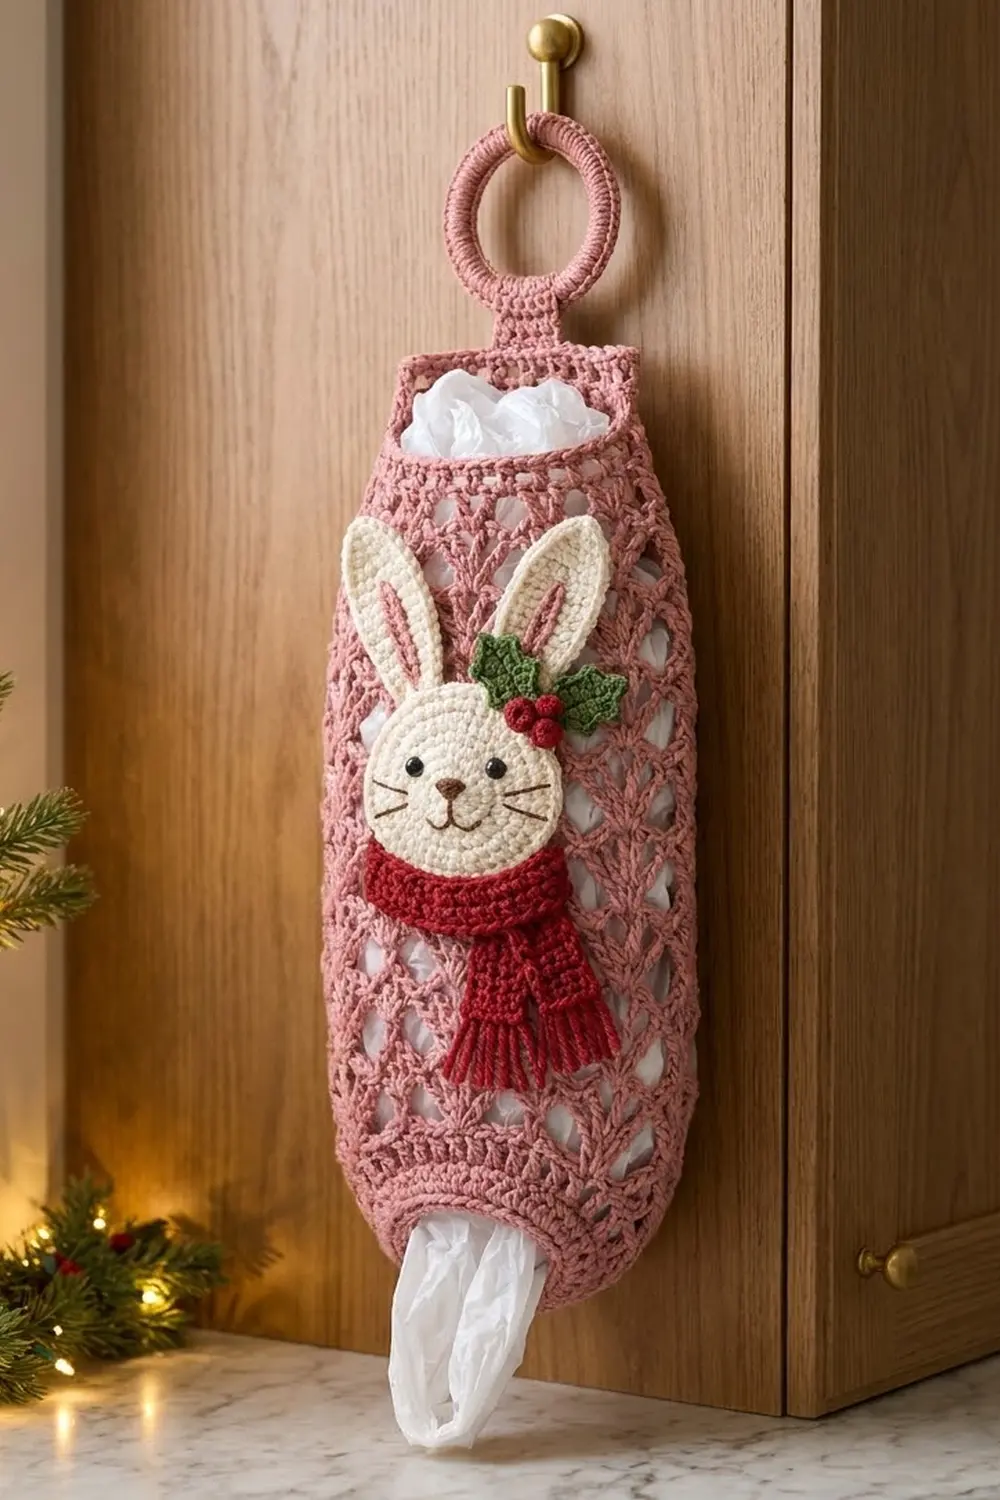
This Holly Bunny Bag Holder is a lacy, dusty-rose plastic bag dispenser with a festive front: a cream bunny face with pink-lined ears, a red fringed scarf, and a sprig of green holly with red berries. It hangs from a covered ring and fills from the top. You pull bags out through a firm oval opening at the bottom.
The body is fan-and-net lace that forms a diamond lattice. Solid bands at the top and bottom gather the tube in, so it bulges gently through the middle.
The pattern uses US crochet terms. Laid flat, the finished body measures 7.5 in (19.1 cm) wide and 14 in (35.6 cm) long. With the tab and ring, it hangs 18.5 in (47.0 cm) long.
You work the tube in joined rounds from the bottom opening up. Then you add a firm edge at each end, cover a ring, make a tab, and crochet the head, ears, scarf, and holly to sew onto the front.
Finished Size and Construction
- Finished size: 7.5 in (19.1 cm) wide x 14 in (35.6 cm) long, flat; 18.5 in (47.0 cm) including tab and ring
- Skill level: Intermediate
- Terminology: US
- Yarn weight: Worsted (#4)
- Hooks: 5.0 mm (H-8) for the body; 4.0 mm (G-6) for the appliqués
- Number of pieces: One holder, worked as a single seamless tube, plus a ring, a tab, and appliqués
- Layout: Vertical tube, opening at the bottom, ring at the top, bunny on the front
- Piece size: 7.5 in (19.1 cm) wide through the lace
- Size before border: 13.75 in (34.9 cm) long
- Border depth: 0.25 in (0.6 cm) at the bottom opening; the top rim round adds almost no height
Materials
Use a smooth worsted cotton or cotton blend. Cotton holds the lace shape and resists stretching under the weight of bags.
- Dusty Rose (Main Color): 100 g, about 180 m (body, ring, tab, inner ears)
- Cream: 20 g, about 36 m (head, outer ears)
- Red: 15 g, about 27 m (scarf, fringe, berries)
- Green: 5 g, about 9 m (holly leaves)
- Black and brown: small amounts for the face
Tools:
- 5.0 mm (H-8) and 4.0 mm (G-6) crochet hooks
- One 3 in (7.6 cm) plastic or metal ring
- Two 6 mm black safety eyes or beads (optional; you can embroider them instead)
- Tapestry needle, scissors, stitch markers
- Rust-proof pins and a blocking mat
These quantities include a margin of about 15 percent. For a sage version, swap the Dusty Rose for green.
Abbreviations (US Terms)
- ch – chain
- sl st – slip stitch
- sc – single crochet
- hdc – half double crochet
- dc – double crochet
- BLO – back loop only
- sk – skip
- st(s) – stitch(es)
- rep – repeat
Special stitches
- Fan: 5 dc in the same stitch. The center (3rd) dc of each fan is where the next round attaches.
- Picot: ch 2, sl st in the first of those 2 ch.
Gauge and Checkpoints
Solid gauge (5.0 mm hook): 16 sc x 18 rounds = 4 in (10.2 cm).
Lace gauge: One fan repeat (sc to sc) = 1.25 in (3.2 cm) wide. One fan round plus one net round = 1.5 in (3.8 cm) tall.
Test first: work Rounds 1–6, flatten the tube, and measure.
- After Round 1, the opening is 8 in (20.3 cm) around and 4 in (10.2 cm) across when flat.
- After Round 4, the band is 6 in (15.2 cm) wide flat and 1 in (2.5 cm) tall.
- After Round 6, the lace is 7.5 in (19.1 cm) wide flat.
- After Round 20, the body is 13 in (33.0 cm) long.
- After Round 23, the body is 13.75 in (34.9 cm) long.
If the band is too wide, go down a hook size. If it’s too narrow, go up one. If only the lace is off, change hooks for the lace rounds only. The stitch counts stay the same.
Body
Use the 5.0 mm hook and Dusty Rose. Join every round with a sl st to the first stitch. Don’t turn.
Part 1: Bottom Band
Foundation: Ch 32. Sl st to the first ch to form a ring, taking care not to twist the chain.
Round 1: Ch 1, sc in each ch around. (32 sc)
Round 2 (growth): Ch 1, *sc in next st, 2 sc in next st; rep from * 15 more times. (48 sc)
Round 3: Ch 2 (does not count as a st), hdc in each st around. (48 hdc)
Round 4: Ch 1, sc in each st around. (48 sc)
The open foundation edge becomes the bag opening.
Part 2: Fan-and-Net Lace
Round 5 (conversion to fans): Ch 1, sc in first st, sk 1, Fan in next st, sk 1, *sc in next st, sk 1, Fan in next st, sk 1; rep from * 10 more times. Join to the first sc. Each repeat uses 4 band stitches, so 12 repeats use 12 x 4 = 48.
(12 sc worked 1 per repeat + 60 dc in 12 fans = 72 sts)
Round 6 (net): Sl st in the next 3 dc to reach the center dc of the first fan. Ch 1, sc in the same dc, *ch 5, sc in center dc of next fan; rep from * 10 more times, ch 5. Join to the first sc.
(12 sc + 12 ch-5 loops = 72 sts)
Round 7 (offset fans): Ch 1, sc in first sc, Fan in 3rd ch of next ch-5 loop, *sc in next sc, Fan in 3rd ch of next ch-5 loop; rep from * 10 more times. Join to the first sc.
(12 sc + 60 dc = 72 sts)
Each fan now sits between two fans of the earlier fan round. This offset is what builds the diamond lattice.
Round 8 (net): Work as Round 6. (12 sc + 12 ch-5 loops = 72 sts)
Rounds 9–20: Rep Rounds 7 and 8 six more times, for 8 fan-and-net pairs in total. (72 sts)
Part 3: Top Band
Round 21 (trim): Ch 1, *sc in next sc, 3 sc in next ch-5 loop; rep from * 11 more times.
(12 sc worked 1 per existing sc + 36 sc worked into 12 loops = 48 sc)
Rounds 22–23: Ch 1, sc in each st around. (48 sc)
Fasten off and weave in the ends.
Hanging Ring and Tab
Ring: With the 5.0 mm hook and Dusty Rose, work about 60 sc around the 3 in (7.6 cm) ring. Pack the stitches tightly until no plastic shows. Sl st to the first sc and fasten off.
Tab: Ch 7.
Row 1: Sc in 2nd ch from hook and in each ch across. (6 sc)
Rows 2–14: Ch 1, turn, sc in each st across. (6 sc)
Fasten off, leaving a 12 in (30.5 cm) tail. The tab measures 1.5 in (3.8 cm) wide and 3 in (7.6 cm) long.
Appliqués
Use the 4.0 mm hook for all appliqués so they lie firm and flat. Leave long tails for sewing.
Head (Cream)
Round 1: Magic ring, ch 1, 6 sc in ring. (6 sc)
Round 2: 2 sc in each st. (12 sc)
Round 3: Sc in next st, 2 sc in next st; rep from * around. (18 sc)
Round 4: Sc in next 2 sts, 2 sc in next st; rep from * around. (24 sc)
Round 5: Sc in next 3 sts, 2 sc in next st; rep from * around. (30 sc)
Round 6: Sc in next 4 sts, 2 sc in next st; rep from * around. (36 sc)
Round 7: *Sc in next 5 sts, 2 sc in next st; rep from * around. (42 sc)
Join and fasten off. The flat circle measures 3 in (7.6 cm) across.
Face: Set the eyes between Rounds 4 and 5, 6 sts apart. With brown, embroider a small triangle nose below them and a “w” mouth under the nose. Add three black straight-stitch whiskers on each cheek.
Outer Ears (Cream, make 2)
Ch 12.
Round 1: Sc in 2nd ch from hook, hdc in next 3 ch, dc in next 6 ch, 5 dc in last ch (tip). Working along the other side of the chain: dc in next 6 ch, hdc in next 3 ch, sc in last ch.
(1 + 3 + 6 + 5 + 6 + 3 + 1 = 25 sts)
Sl st to the first sc and fasten off. Each ear is 3 in (7.6 cm) long and 1.25 in (3.2 cm) wide, flat at the base.
Inner Ears (Dusty Rose, make 2)
Ch 9.
Round 1: Sc in 2nd ch from hook, hdc in next 2 ch, dc in next 4 ch, 5 dc in last ch. Working along the other side: dc in next 4 ch, hdc in next 2 ch, sc in last ch.
(1 + 2 + 4 + 5 + 4 + 2 + 1 = 19 sts)
Fasten off. Each inner ear is 2 in (5.1 cm) long and 0.75 in (1.9 cm) wide. Whipstitch one to the center of each outer ear, leaving an even cream rim all around.
Scarf (Red)
Neck band: Ch 19.
Row 1: Sc in 2nd ch from hook and in each ch across. (18 sc)
Rows 2–5: Ch 1, turn, sc BLO across. (18 sc)
The ridged band measures 4.5 in (11.4 cm) wide and 1.25 in (3.2 cm) tall.
Long tail: Ch 13.
Row 1: Sc in 2nd ch from hook and across. (12 sc)
Rows 2–4: Ch 1, turn, sc BLO across. (12 sc)
It measures 3 in (7.6 cm) x 1 in (2.5 cm).
Short tail: Ch 11. Work as for the long tail, with 10 sc per row. It measures 2.5 in (6.4 cm) x 1 in (2.5 cm).
Fringe: Cut 16 red strands, each 3 in (7.6 cm) long. Fold 2 strands and knot them into each of the 4 row ends at the bottom of each tail. Trim the fringe to 1 in (2.5 cm).
Holly Leaves (Green, make 2)
Ch 9.
Round 1: Sl st in 2nd ch from hook, sc in next ch, hdc in next ch, picot, dc in next 2 ch, picot, hdc in next ch, sc in next ch, (sc, ch 2, sc) in last ch for the tip. Working along the other side: sc in next ch, hdc in next ch, picot, dc in next 2 ch, picot, hdc in next ch, sc in next ch, sl st in last ch.
Each leaf is 1.75 in (4.4 cm) long and 0.75 in (1.9 cm) wide, with two points on each side.
Berries (Red, make 3)
Magic ring, ch 1, 7 sc in ring. Pull the ring tight, sl st to the first sc, and fasten off. Tuck the tail inside. Each berry measures 0.5 in (1.3 cm) across.
Border
The border uses the solid gauge: 16 sc = 4 in (10.2 cm). Flatten the tube with the round joins on one fold. Each “side” is half the round.
Round B1 (bottom opening): Join Dusty Rose in a free loop of the foundation chain at the fold. Ch 1, sc in each loop around. (32 sc: 16 per side)
Round B2: Sl st loosely in each sc around. (32 sl st: 16 per side)
Round T1 (top rim): Join at the fold of Round 23. Sl st loosely in each sc around. (48 sl st: 24 per side)
Why the math works: 32 sts at 4 sc per inch make an 8 in (20.3 cm) opening, 4 in (10.2 cm) across when flat. That’s wide enough for a hand but snug enough to hold the bags in. The 48-st top is 12 in (30.5 cm) around, 6 in (15.2 cm) flat. It gathers the 15 in (38.1 cm) lace (12 repeats x 1.25 in) into the rounded shape. Each border round works one stitch into each existing stitch, so it firms the edges without adding width.
Final Blocking
- Soak the body in cool water for 10 minutes. Press the water out; don’t wring.
- Lay the body flat with the round joins on one side fold.
- Pin the lace to 7.5 in (19.1 cm) x 14 in (35.6 cm), opening each diamond evenly.
- Pin both bands to 6 in (15.2 cm) wide.
- Steam the appliqués flat, holding the steam above them without touching. Let everything dry completely.
- Tab: Fold 1.5 in (3.8 cm) of the tab around the covered ring and sew it down. Sew the other end inside the back top band, centered over Rounds 21–23, so 1.5 in (3.8 cm) shows above the rim.
- Bunny: Sew the ears behind the top of the head, angled outward, with 2 in (5.1 cm) showing. Wrap the scarf band across the lower head and sew its ends behind. Tuck both tails under the band’s right side, with the long tail in front. Sew the leaves and berries at the base of the right ear.
- Center the bunny on the front, with the ear tips 0.75 in (1.9 cm) below the rim. Whipstitch around the edges through the front layer of lace only. Leave the tails and fringe hanging free.
Final Quality-Control Checklist
- Body is 7.5 in (19.1 cm) x 14 in (35.6 cm) flat.
- Each lace round has 12 repeats and 72 sts.
- Diamonds stack in straight columns.
- Opening: 32 sts, 4 in (10.2 cm) flat. Top: 48 sts, 6 in (15.2 cm) flat.
- Ring is fully covered; tab is centered and secure.
- No appliqué stitches pass through to the back layer.
- Hanging length is 18.5 in (47.0 cm).
Troubleshooting
Diamonds slant: Work each fan into the 3rd ch of its loop.
Lace is too short: Chain more loosely, or use ch-6 loops and work the fans into the 3rd ch.
Opening is too stretchy: Work Round B1 with the 4.0 mm hook.
Top flares: Work 2 sc per loop in Round 21 (12 + 24 = 36 sc) and keep 36 sts through Round T1.
Appliqués curl: Steam them again and pin them flat.
Care
Hand wash in cool water and dry flat, reshaping the lace while it’s damp. Don’t tumble dry.
Final Notes
Here’s the measurement chain. The 32-st opening is 4 in (10.2 cm) flat. It grows to a 48-st band, 6 in (15.2 cm) flat, then converts to 12 fan repeats at 7.5 in (19.1 cm) wide. Eight lace pairs at 1.5 in (3.8 cm) each make 12 in (30.5 cm) of lace. With the bands and border, the body reaches 14 in (35.6 cm), and the tab and ring bring it to 18.5 in (47.0 cm). Check each measurement as you go, and your bunny will hang neatly all season.
Happy crocheting!