

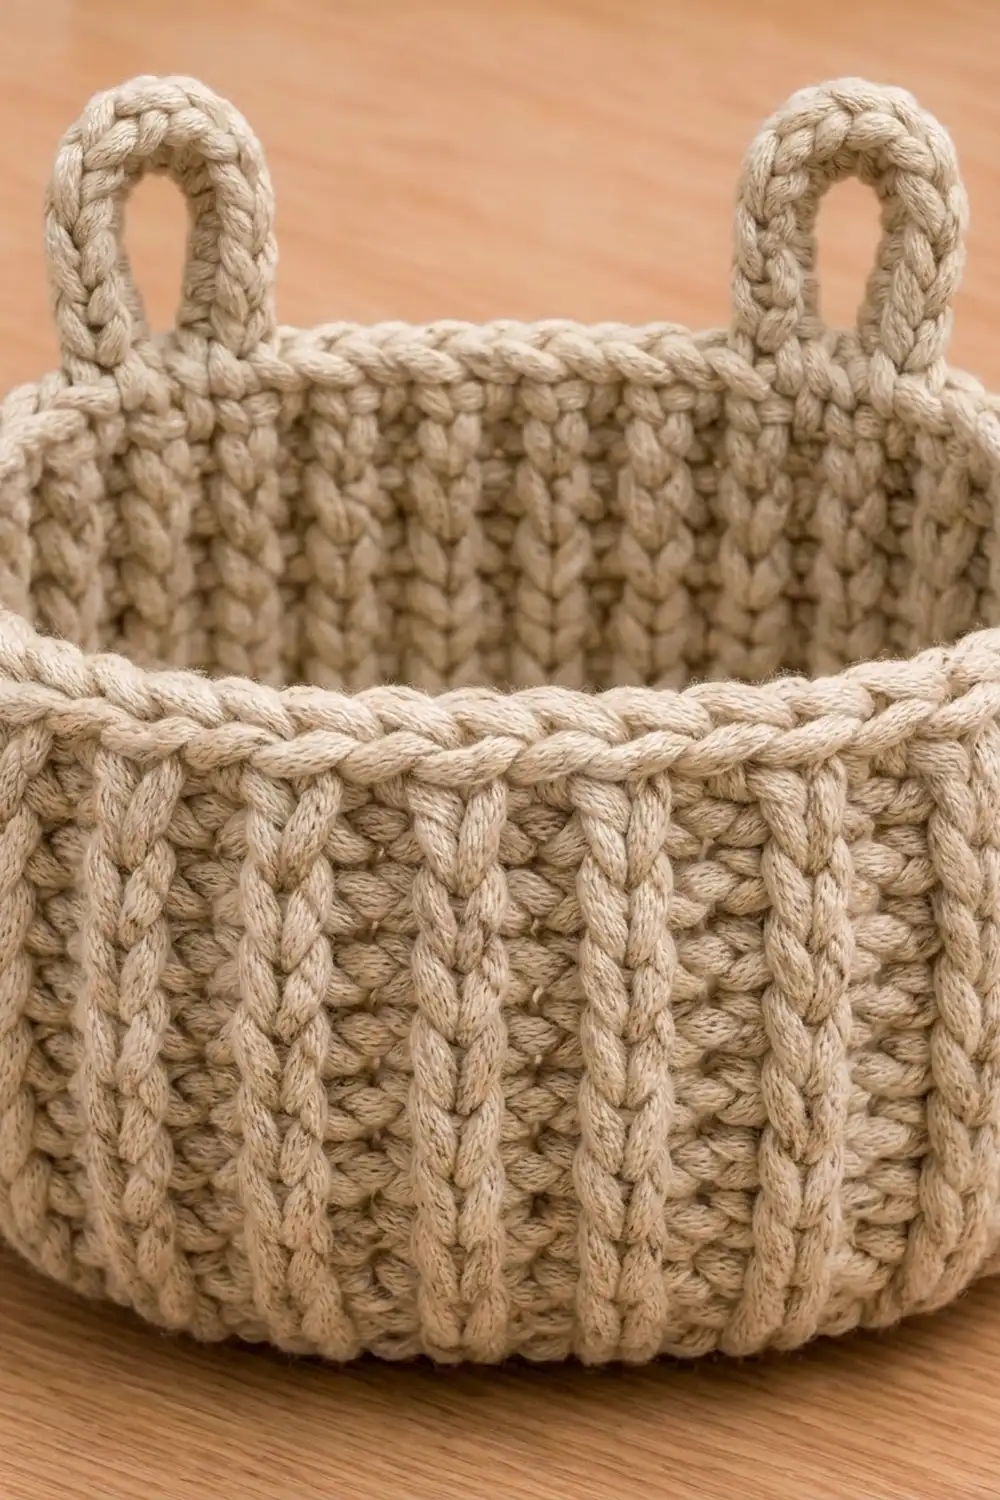
This chunky oval basket looks hand-knit but is worked entirely in crochet. Its walls are covered in neat vertical ribs of stacked “V” stitches. A thick, rope-like rim finishes the top, and two sturdy loops let it hang from wall knobs, hooks or a towel bar.
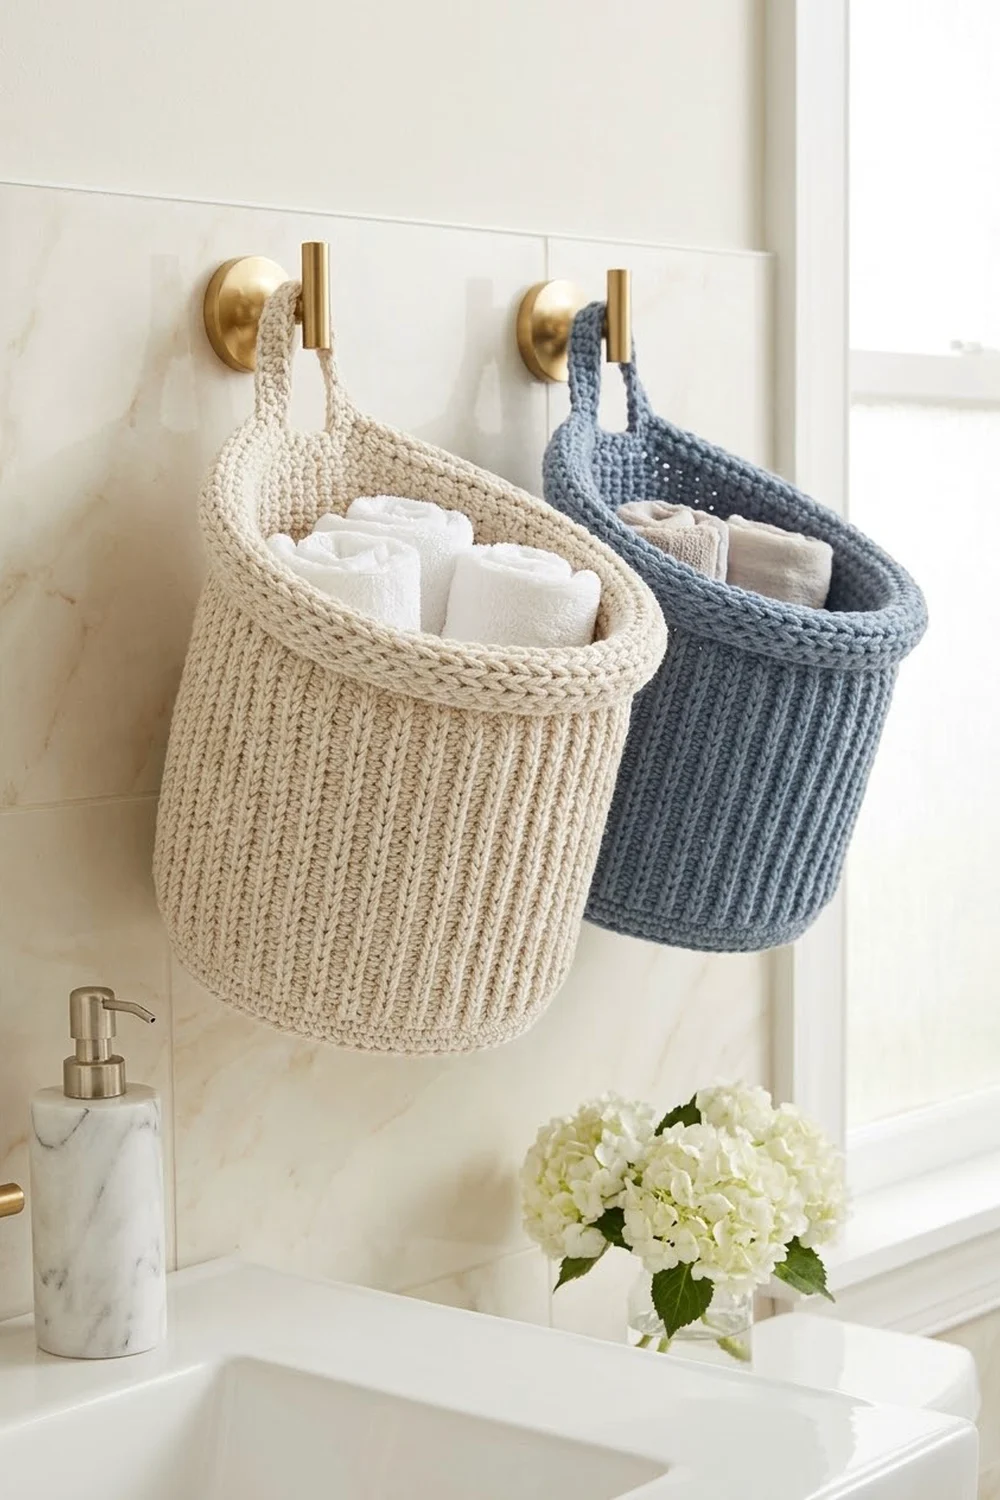
The sample is worked in a warm cream/oatmeal cotton, a calm neutral that suits a bathroom, nursery or entryway. It also looks good in dusty blue, sage or charcoal. Make one for rolled washcloths, or make a pair in two colors.
The pattern uses US crochet terms. The finished basket measures about 8½ in long × 5 in deep × 5¼ in tall (21.6 × 12.7 × 13.3 cm). The hanging loops rise about 2 in (5.1 cm) above the rim.
The construction is simple. You crochet a flat oval base in single crochet, turn the walls up with one back-loop round, and build the ribbed walls in waistcoat stitch. A three-round rim adds the loops and finishes with crab stitch for the rolled edge.
Finished Size and Construction
- Finished size: 8½ in long × 5 in deep × 5¼ in tall (21.6 × 12.7 × 13.3 cm)
- Height including loops: about 7¼ in (18.4 cm)
- Skill level: Easy-intermediate
- Terminology: US
- Yarn weight: Bulky (#5)
- Hook: 6 mm (US J-10)
- Number of pieces: 1, with the loops worked in
- Layout: Single oval piece worked in joined rounds
- Base size: about 8¼ × 4¾ in (21.0 × 12.1 cm)
- Size before rim: walls about 4½ in (11.4 cm) tall
- Rim depth: about ¾ in (1.9 cm)
Materials
Yarn: Use a bulky (#5) cotton or cotton blend with good stitch definition. Smooth, firmly plied or chainette cotton shows the knit-look ribs best. Avoid fuzzy or very stretchy acrylic, because the basket needs to hold its shape while it hangs.
- Cream/oatmeal: about 220 g, roughly 240 m (based on a yarn of about 110 m per 100 g)
These quantities include a margin of about 25% for your gauge swatch and any frogging.
Tools:
- 6 mm (US J-10) crochet hook
- 1 locking stitch marker, plus 2 more for the loop positions
- Tapestry needle
- Scissors
- Measuring tape
- Spray bottle or steam iron, for blocking
- A rolled towel or a box about 8 × 4½ in (20.3 × 11.4 cm), for shaping
Abbreviations (US Terms)
- ch: chain
- sc: single crochet
- sl st: slip stitch
- st(s): stitch(es)
- BLO: back loop only
- inc: 2 sc in the same stitch
- rnd(s): round(s)
- wst: waistcoat stitch
- rev sc: reverse single crochet (crab stitch)
Waistcoat stitch (wst): Look at the sc below. Its front shows a “V” made of two vertical legs. Insert your hook from front to back through the center of that V, between the two legs and under the horizontal bars. Yarn over and pull up a loop, then yarn over and pull through both loops on the hook. Stacking these stitches round after round makes the knit-look rib columns.
Reverse single crochet (rev sc): Work from left to right (right to left if you crochet left-handed). Insert your hook into the next stitch to the right, yarn over and pull up a loop, then yarn over and pull through both loops. Each stitch twists slightly, which creates the rolled, rope-like edge.
Gauge and Checkpoints
- Base gauge: 11 sc and 12 rnds = 4 in (10.2 cm) in sc
- Wall gauge: 11 wst and 14 rnds = 4 in (10.2 cm) in waistcoat stitch
Since this is a single piece, the base itself works as your test piece. Work Rnds 1–4 and measure before you go on.
Checkpoints:
- After Rnd 1: about 4¼ in (10.8 cm) long × ¾ in (1.9 cm) wide
- After Rnd 4: about 6¼ × 2¾ in (15.9 × 7.0 cm)
- After Rnd 7 (finished base): about 8¼ × 4¾ in (21.0 × 12.1 cm), with a circumference of 62 sts, about 22½ in (57.2 cm)
- After Rnd 16: walls about 2½ in (6.4 cm) tall
- After Rnd 24: walls about 4½ in (11.4 cm) tall
- After Rnd 27: about 5¼ in (13.3 cm) tall
If your base is too big, go down to a 5.5 mm hook. If it is too small or feels stiff like cardboard, go up to a 6.5 mm hook. Waistcoat stitch is naturally tighter than regular sc. If the walls pull inward, go up 0.5 mm for the walls only.
Pattern
Work in joined rounds. The ch 1 at the start of each round does not count as a stitch. Join each round with a sl st to the first sc. Joined rounds keep the rib columns straight instead of spiraling.
Oval Base
The base has two straight sides of 10 sts each. They never change. All increases happen in the two curved ends, which are called End A and End B.
Ch 13.
Rnd 1: 3 sc in the 2nd ch from hook. This is End A. Sc in each of the next 10 ch. Work 3 sc in the last ch (End B). Rotate the work and, working into the free loops on the other side of the chain, sc in each of the next 10 ch. Join. (26 sts: End A 3, side 10, End B 3, side 10)
Rnd 2: Ch 1. 2 sc in each of the next 3 sts, sc in each of the next 10 sts; repeat from * once more. Join. (32 sts: 6 per end, 10 per side)
Rnd 3: Ch 1. [Sc in next st, inc] 3 times, sc in each of the next 10 sts; repeat from * once more. Join. (38 sts: 9 per end, 10 per side)
Rnd 4: Ch 1. [Sc in each of the next 2 sts, inc] 3 times, sc in each of the next 10 sts; repeat from * once more. Join. (44 sts: 12 per end, 10 per side)
Measure now: about 6¼ × 2¾ in (15.9 × 7.0 cm).
Rnd 5: Ch 1. [Sc in each of the next 3 sts, inc] 3 times, sc in each of the next 10 sts; repeat from * once more. Join. (50 sts: 15 per end, 10 per side)
Rnd 6: Ch 1. [Sc in each of the next 4 sts, inc] 3 times, sc in each of the next 10 sts; repeat from * once more. Join. (56 sts: 18 per end, 10 per side)
Rnd 7: Ch 1. [Sc in each of the next 5 sts, inc] 3 times, sc in each of the next 10 sts; repeat from * once more. Join. (62 sts: 21 per end, 10 per side)
The base should lie flat and measure about 8¼ × 4¾ in (21.0 × 12.1 cm). If it cups, your increases are too tight. If it ruffles, they are too loose.
Stitch map for Rnd 7, used later to place the loops:
- Sts 1–21: End A
- Sts 22–31: back side
- Sts 32–52: End B
- Sts 53–62: front side
Each round starts at st 1 and there are no increases on the walls, so this map stays the same all the way up.
Base Turn
Rnd 8: Ch 1. Sc in the BLO of each st around. Join. (62 sts)
The unworked front loops form the crisp ridge you see at the bottom edge of the basket. The walls now start to rise.
Ribbed Walls
Rnds 9–24: Ch 1. Work 1 wst in each st around. Join. (62 sts each rnd, 16 rnds)
Each new wst sits directly in the V of the stitch below, so the 62 columns stack up into vertical ribs. Keep your tension even and do not pull each stitch tight. Waistcoat stitch gets stiff quickly, and a slightly relaxed hand keeps it workable.
Checkpoints:
- After Rnd 16: walls about 2½ in (6.4 cm) tall
- After Rnd 24: walls about 4½ in (11.4 cm) tall
Measure the height from the Rnd 8 ridge. The walls should be straight, not flaring out or curving in.
Rim and Hanging Loops (Border)
Rim gauge: The 3 rim rounds add about ¾ in (1.9 cm) in height.
Before you start, place markers in sts 17 and 34. These mark the first stitch of each loop base. Each loop base spans 3 stitches: sts 17–19 and sts 34–36. They sit where End A and End B begin to curve away from the back side. Their centers (sts 18 and 35) are 17 sts apart, about 6¼ in (15.9 cm). Each center is 8½ sts from the middle of the back side, so the loops are symmetrical.
Rnd 25 (loop foundation): Ch 1.
- Sc in each of the first 16 sts.
- Ch 14 and skip the next 3 sts (17–19).
- Sc in each of the next 14 sts (20–33).
- Ch 14 and skip the next 3 sts (34–36).
- Sc in each of the remaining 26 sts (37–62).
- Join.
Count: 56 sc + 2 ch-14 loops. That is 16 + 14 + 26 = 56 sc, and 62 − 6 skipped sts = 56.
Make sure neither ch-14 is twisted before you continue.
Rnd 26 (loop cover): Ch 1.
- Sc in each of the first 16 sc.
- Work 22 sc into the ch-14 space, packing them tightly so they fully cover the chain.
- Sc in each of the next 14 sc.
- Work 22 sc into the next ch-14 space.
- Sc in each of the remaining 26 sc.
- Join.
Count: 100 sts. That is 56 rim sc + 22 + 22 loop sc.
Rnd 27 (rolled edge): Ch 1. Work 1 rev sc in each st around, including all 22 sts on each loop. Join to the first rev sc. Fasten off and weave in the ends securely, especially at the base of each loop. (100 rev sc)
Why the math works:
- The basket’s mouth keeps the same 62-stitch circumference as the walls. Rnd 25 works 56 of those stitches, and the 6 skipped stitches are bridged by the loop bases.
- Rnd 26 covers each 14-chain loop with 22 sc. That ratio of about 1.6 stitches per chain makes the loops dense and firm instead of floppy.
- Rnd 27 is worked 1-for-1 (100 into 100), so nothing is added or lost. The crab stitch simply rolls the edge.
- The loops get the same rope finish as the rim, as in the sample.
- Each loop stands about 2 in (5.1 cm) above the rim. The opening is roughly 1 in (2.5 cm) wide, which fits most wall knobs and hooks.
Final Blocking
- Lightly spray the basket with water until it is damp, not soaked. If you are working with cotton, you can steam it instead, holding the iron above the fabric.
- Stuff the basket with a rolled towel, or slide it over a box about 8 × 4½ in (20.3 × 11.4 cm).
- Square up the base so the Rnd 8 ridge sits level all the way around.
- Pull the rib columns gently so they run straight up from base to rim.
- Stand the loops upright and pinch each one into a smooth arch.
- Let the basket dry completely, at least 24 hours, before you remove the form.
- Measure again: about 8½ × 5 × 5¼ in (21.6 × 12.7 × 13.3 cm).
Final Quality-Control Checklist
- The base lies flat and measures about 8¼ × 4¾ in (21.0 × 12.1 cm).
- Rnd 7 has exactly 62 sts, and every wall round has 62 sts.
- The ridge at the base turn is continuous and level.
- The 62 rib columns run vertically without drifting.
- The walls are about 4½ in (11.4 cm) tall before the rim.
- Rnd 26 has 100 sts, and the loop chains are fully hidden.
- Both loops are the same height and sit 17 sts apart, centered on the back side.
- The rev sc edge rolls evenly all the way around, over both loops.
- All ends are woven in securely with no tails showing.
Troubleshooting
The base cups upward. Your increases are too tight. Go up a hook size for the base only, or check that each increase round has the correct count.
The base ruffles. You have too many stitches or very loose tension. Recount each round against the totals above.
The ribs slant diagonally. You may be working in a spiral or missing the join. Join every round and start each new round in the first stitch, not the joining sl st.
The walls lean inward. Waistcoat stitch is tight. Go up 0.5 mm for Rnds 9–24.
The loops are floppy. Pack the sc more tightly in Rnd 26 or add 2 more sc per loop. If you add stitches, adjust the Rnd 26 and Rnd 27 totals to match.
The loops are uneven. Recount the skipped stitches and the 14 chains on each side, and check that the markers are in sts 17 and 34.
The crab stitch looks messy. Keep the loops on your hook loose. Rev sc needs a little extra slack to twist neatly.
Care
Hand wash in cool water or machine wash on a gentle cycle in a laundry bag. Reshape while damp and dry flat over a rolled towel.
Final Notes
The measurement chain is easy to follow:
- Base: 62 sts, about 8¼ × 4¾ in (21.0 × 12.1 cm)
- Base turn: one BLO round, still 62 sts
- Walls: 16 rounds of waistcoat stitch, about 4½ in (11.4 cm) tall
- Rim: 3 rounds (56 sc + 2 loops, then 100, then 100 rev sc), adding about ¾ in (1.9 cm)
- Finished basket: 8½ × 5 × 5¼ in (21.6 × 12.7 × 13.3 cm)
If each checkpoint matches, the finished basket will too. Hang it, fill it with rolled towels, and make a second one in a contrast color.
Happy crocheting!