

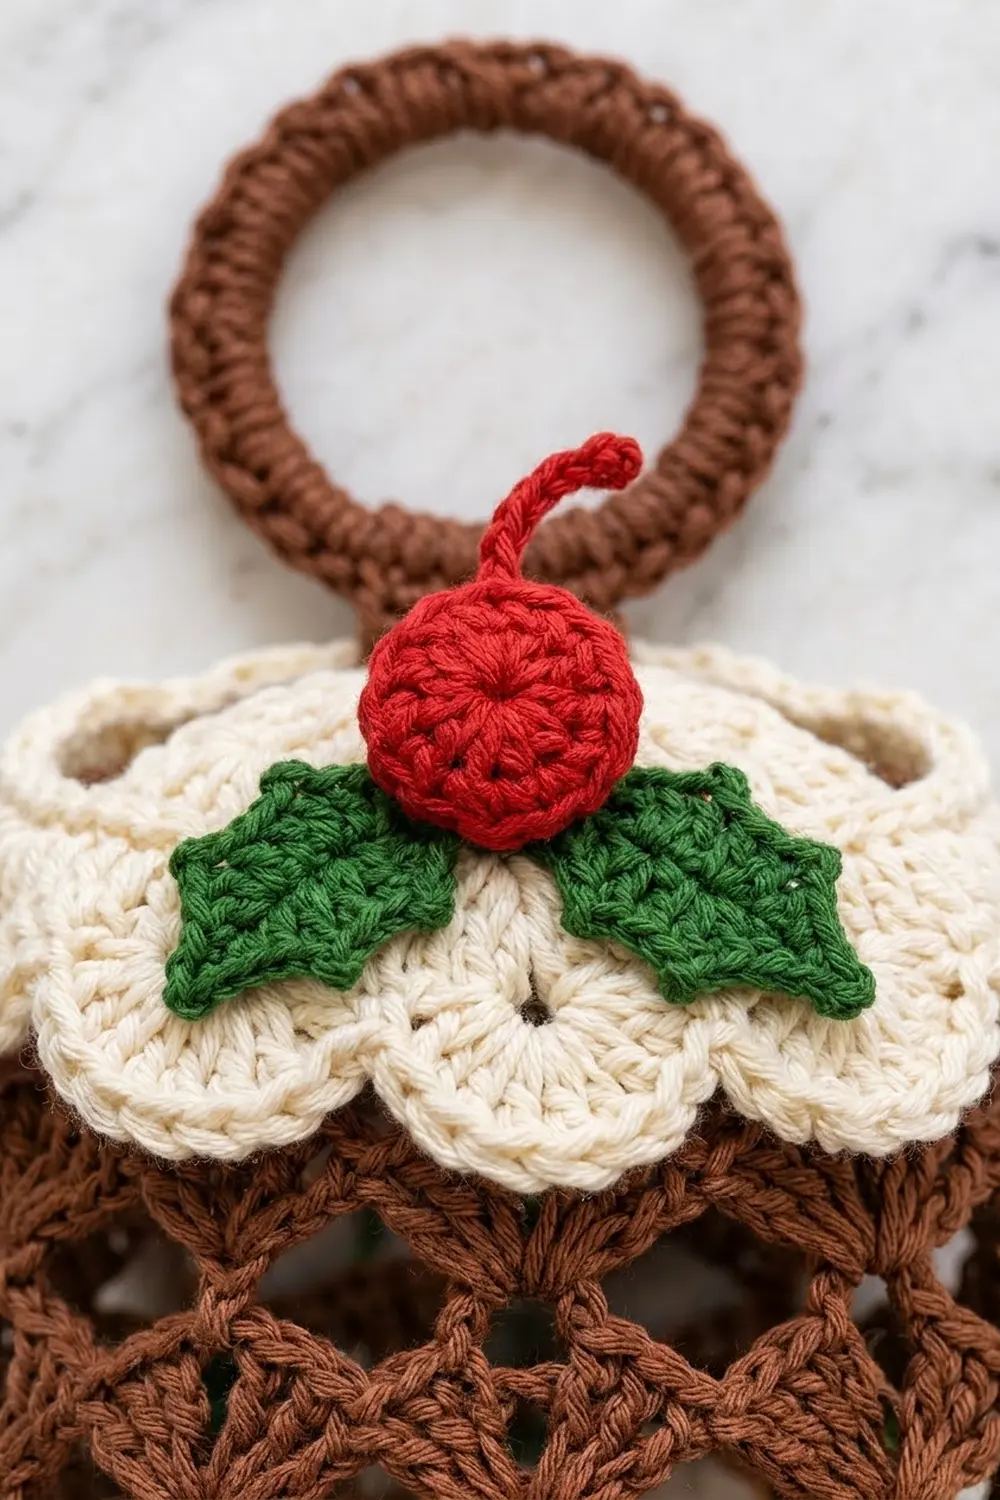
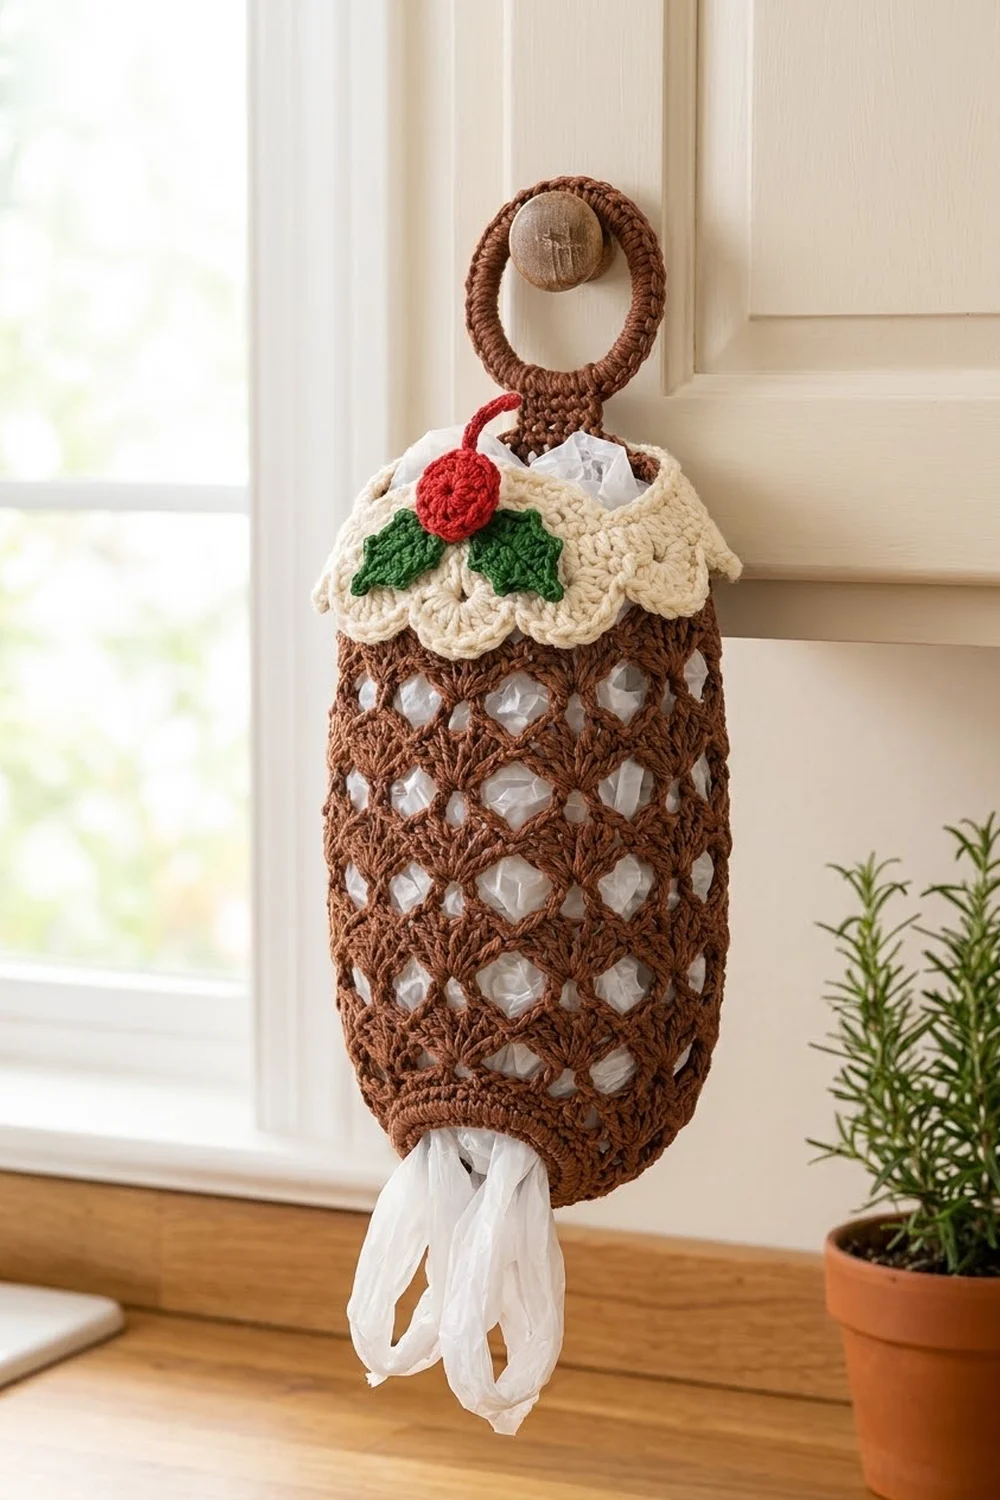
This festive bag holder looks just like a Christmas pudding. The brown lace body shows off the bags inside, and a cream scalloped collar drips over the top like custard. A red berry and two holly leaves finish the front. The holder hangs from a covered ring, and bags pull out through a firm oval opening at the bottom.
The colors are chocolate brown, cream, berry red and holly green. A caramel brown body works just as well if you want a lighter pudding.
This pattern uses US crochet terms. The finished body is about 6 in (15.2 cm) wide laid flat and 12.25 in (31.1 cm) long. With the strap and ring it hangs about 16.7 in (42.4 cm).
The body is worked from the bottom up in joined rounds. You start with the dispensing rim, build the fan lattice, then narrow into a solid top band. Then you add the strap and covered ring, work the cream collar into the top band, and sew on the berry and leaves.
Finished Size and Construction
- Finished size: body 6 in (15.2 cm) wide flat x 12.25 in (31.1 cm) long; about 16.7 in (42.4 cm) including strap and ring
- Skill level: Intermediate
- Terminology: US
- Yarn weight: Worsted (#4), cotton or cotton blend
- Hook: 5.0 mm (H-8)
- Number of pieces: 1 body (strap and cream collar are worked onto it), 1 covered ring, 1 berry, 2 holly leaves
- Layout: one holder; the small parts are sewn to the body, not joined into a larger project
- Body circumference: 12 in (30.5 cm) at the widest point
- Size before border: 6 in x 12.25 in (15.2 cm x 31.1 cm)
- Border (cream collar) depth: about 1.5 in (3.8 cm)
Materials
Choose a smooth worsted cotton. Cotton holds its shape and doesn’t stretch much when the holder is full of bags. Acrylic also works, but the lace will relax more.
- Brown (body, strap, ring): 85 g, about 131 m
- Cream (collar): 15 g, about 23 m
- Red (berry and stem): 5 g, about 8 m
- Green (holly leaves): 6 g, about 9 m
These amounts include a margin of about 15%.
Tools:
- 5.0 mm (H-8) crochet hook
- One 2.75 in (7.0 cm) plastic or metal ring
- Tapestry needle
- Stitch markers
- A small pinch of fiberfill (optional, for the berry)
- Scissors, measuring tape, rust-proof pins
Abbreviations (US Terms)
- ch – chain
- sl st – slip stitch
- sc – single crochet
- hdc – half double crochet
- dc – double crochet
- BLO / FLO – back loop only / front loop only
- sp – space
- st(s) – stitch(es)
- rnd – round
Special stitches:
- 5-dc shell: work 5 dc in the same stitch or space.
- 7-dc shell: work 7 dc in the same stitch or space.
- Picot: ch 3, sl st in the 3rd ch from the hook.
Gauge and Checkpoints
Gauge: 14 sc and 16 rnds = 4 in (10.2 cm). In the lattice, one repeat (7-dc shell + sc) is about 1.5 in (3.8 cm) wide. One mesh round plus one shell round is about 1.2 in (3.0 cm) tall.
Work the first 11 rounds and measure before you go further. This is your test piece.
Checkpoints:
- After Rnd 3: opening about 3.4 in (8.6 cm) wide flat.
- After Rnd 11: about 6 in (15.2 cm) wide flat and 5.2 in (13.2 cm) tall.
- After Rnd 19: about 10 in (25.4 cm) tall.
- After Rnd 25: 12.25 in (31.1 cm) tall; top band about 4.6 in (11.7 cm) wide flat.
Too big? Go down to a 4.5 mm hook. Too small? Go up to a 5.5 mm hook. The stitch counts stay the same either way; only the size changes.
Body
Work in joined rounds with the right side facing you. Do not turn. The ch 1 at the start of sc rounds does not count as a stitch.
Bottom Rim
Foundation: With brown, ch 24. Sl st into the first ch to form a ring, taking care not to twist.
Rnd 1: Ch 1, sc in each ch around, join with sl st to the first sc. (24 sc)
Rnd 2: Ch 1, sc in each st around, join. (24 sc)
Rnd 3: Ch 1, sc in each st around, join. (24 sc)
These three solid rounds make the firm oval opening that the bags pull through.
Rnd 4 (growth): Ch 1, sc in next 2 sts, 2 sc in next st 8 times, join. (32 sc)
Fan Lattice
Rnd 5: Ch 1, sc in next st, skip 1 st, 5-dc shell in next st, skip 1 st 8 times, join to the first sc. (8 shells, 8 sc = 48 sts)
Rnd 6: Sl st in the first 3 dc to reach the center dc of the first shell. Ch 1, sc in the same dc, ch 3, sc in 3rd dc of next shell, ch 3 7 times, join to the first sc. (8 sc, 8 ch-3 loops)
Rnd 7: Sl st into the first ch-3 loop. Ch 3 (counts as a dc), 4 dc in the same loop, sc in next sc, 5-dc shell in next loop, sc in next sc 7 times, join to the top of the ch-3. (8 shells, 8 sc = 48 sts)
Each new shell sits above a gap in the round below. This is what gives you the staggered brick layout.
Rnd 8: Sl st in next 2 dc to reach the center dc. Ch 1, sc in the same dc, ch 4, sc in 3rd dc of next shell, ch 4 7 times, join. (8 sc, 8 ch-4 loops)
Rnd 9: Sl st into the first loop. Ch 3 (counts as a dc), 6 dc in the same loop, sc in next sc, 7-dc shell in next loop, sc in next sc 7 times, join. (8 shells, 8 sc = 64 sts)
Rnd 10: Sl st in next 3 dc to reach the center (4th) dc. Ch 1, sc in the same dc, ch 5, sc in 4th dc of next shell, ch 5 7 times, join. (8 sc, 8 ch-5 loops)
Rnd 11: Sl st into the first loop. Ch 3, 6 dc in the same loop, sc in next sc, 7-dc shell in next loop, sc in next sc 7 times, join. (8 shells, 8 sc = 64 sts)
The longer loops and bigger shells in Rnds 6–11 make the bottom flare out into the rounded pudding shape. Check your gauge now.
Rnds 12–19: Repeat Rnds 10–11 four more times. (64 sts after each shell round)
Top Taper
Rnd 20: Sl st in next 3 dc to reach the 4th dc. Ch 1, sc in the same dc, ch 4, sc in 4th dc of next shell, ch 4 7 times, join. (8 sc, 8 ch-4 loops)
Rnd 21: Sl st into the first loop. Ch 3, 4 dc in the same loop, sc in next sc, 5-dc shell in next loop, sc in next sc 7 times, join. (8 shells, 8 sc = 48 sts)
Rnd 22: Sl st in next 2 dc to reach the 3rd dc. Ch 1, sc in the same dc, ch 3, sc in 3rd dc of next shell, ch 3 7 times, join. (8 sc, 8 ch-3 loops)
Top Band
Rnd 23 (conversion): Ch 1, sc in next sc, 3 sc in next ch-3 loop 8 times, join. (8 sc worked 1 per existing st + 24 sc worked into loops = 32 sc)
Rnd 24: Ch 1, sc in each st around, join. (32 sc)
Rnd 25: Ch 1, sc in BLO of each st around, join. (32 sc) Fasten off.
The free front loops of Rnd 24 will hold the cream collar later.
Strap and Ring
Ring cover: With brown, make a slipknot on the hook. Work sc tightly around the 2.75 in (7.0 cm) ring until it is fully covered, about 44 sc. Push the stitches together as you go so no plastic shows. Join and fasten off. The covered ring is about 3.2 in (8.1 cm) across.
Strap: Flatten the body with the round joins at one side. Find the center 5 sts of Rnd 25 on the back.
Row 1: Join brown in the first of those 5 sts. Ch 1, sc in each of the 5 sts, turn. (5 sc)
Rows 2–8: Ch 1, sc in each st, turn. (5 sc)
Fasten off, leaving a 10 in (25.4 cm) tail. The strap is 1.4 in (3.6 cm) wide and about 2 in (5.1 cm) long. Fold Row 8 over the bottom of the covered ring toward the inside and sew it to Row 5. About 1.25 in (3.2 cm) of strap stays visible.
Berry, Stem, and Holly Leaves
Berry (make 1, red)
Rnd 1: Magic ring, 6 sc in the ring, join. (6 sc)
Rnd 2: Ch 1, 2 sc in each st, join. (12 sc)
Rnd 3: Ch 1, sc in next st, 2 sc in next st 6 times, join. (18 sc)
Fasten off, leaving a long tail. The berry is about 1.4 in (3.6 cm) across. For a padded berry, tuck a pinch of fiberfill behind it when you sew it on.
Stem: With red, ch 9. Sl st in the 2nd ch from the hook and in each ch across. (8 sl st) The stem curls on its own. Sew one end to the top edge of the berry.
Holly Leaf (make 2, green)
Ch 10.
Side 1: Working along the chain and starting in the 2nd ch from the hook: sl st, sc, hdc, picot, dc, dc, picot, dc, hdc, picot, sc. In the last ch, work (sl st, picot, sl st) for the tip.
Side 2: Turn the piece and work in the free loops of the chain: sc, picot, hdc, dc, picot, dc, dc, picot, hdc, sc, sl st.
Fasten off. Each leaf is about 2 in (5.1 cm) long and 1 in (2.5 cm) wide, with three points on each side and a pointed tip.
Border: Cream Custard Collar
The collar is worked into the free front loops of Rnd 24. It hangs over the top band and drapes outward.
Border gauge: same as the body, 14 sc = 4 in (10.2 cm). One finished scallop is about 1.5 in (3.8 cm) wide.
Hold the body upside down so the top band faces you. Join cream in the front loop at the center back, just under the strap.
Rnd 1 (growth): Ch 1, sc in FLO of next 3 sts, 2 sc in FLO of next st 8 times, join. (40 sc; 20 per flat side)
Rnd 2 (growth): Ch 1, sc in next 4 sts, 2 sc in next st 8 times, join. (48 sc; 24 per flat side)
Rnd 3 (eyelets): Ch 1, sc in next st, ch 2, skip 2 sts 16 times, join. (16 sc, 16 ch-2 sps; 8 sc and 8 sps per flat side)
Rnd 4 (scallops): Sl st into the first ch-2 sp. Ch 1, sc in this ch-2 sp, 7-dc shell in next ch-2 sp 8 times, join. Fasten off. (8 sc, 8 scallops = 64 sts; 4 scallops per flat side)
Why the math works: 48 sts divide evenly into 16 groups of 3 (sc + ch-2). Putting a shell in every other space gives 8 scallops. That matches the 8 fan columns in the body, so each scallop sits right above a column. The outer edge is about 12 in (30.5 cm) around, while the top band is 9.1 in (23.1 cm) around. That extra length makes the collar ripple outward like poured custard.
Assembly: Sew the berry to the front center so it overlaps the collar and the top band. Sew one holly leaf on each side, angled slightly downward and tucked just under the berry. Weave in all ends.
Final Blocking
- Make a cardboard tube or rolled towel about 12 in (30.5 cm) around.
- Lightly mist the holder with water.
- Slide it over the form, keeping the bottom rim round and the fan columns straight.
- Open up each shell and arch with your fingers.
- Pin the collar scallops so they curve evenly outward.
- Steam-block the holly leaves flat on their own, pinning out each point.
- Let everything dry completely.
- Check that the body is 6 in (15.2 cm) wide flat and 12.25 in (31.1 cm) long.
Final Quality-Control Checklist
- Bottom opening is firm and about 3.4 in (8.6 cm) wide flat
- 8 fan columns all the way around, evenly staggered
- Top band has 32 sc and lies smooth
- 8 cream scallops, 4 on each flat side
- Strap is centered on the back and sewn securely
- No plastic shows through the ring cover
- Berry, stem and leaves are stitched firmly at front center
- All ends are woven in and secure
Troubleshooting
- Lattice twists: Your joins are drifting. Always join into the first stitch of the round, not the turning chain beside it.
- Bags fall out the bottom: The rim is too loose. Redo Rnds 1–3 with a hook 0.5 mm smaller.
- Collar cups inward: Rnds 1–2 are too tight. Go up one hook size for the collar only.
- Collar ruffles too much: Work Rnd 4 with 5-dc shells instead.
- Ring shows through: Add more sc and pack them together tightly.
- Leaf points are soft: Pull each picot snug and pin it out while blocking.
Care
Hand wash in cool water with mild soap. Reshape and dry flat, and keep it out of the dryer.
Final Notes
Here is the measurement chain. A gauge of 14 sc = 4 in (10.2 cm) gives a 3.4 in (8.6 cm) opening. Eight fan columns build the body to 6 in (15.2 cm) wide flat. The body then tapers to a 32-st top band, and the 8-scallop collar finishes it at 12.25 in (31.1 cm) long. Check each stage as you go, and your pudding will hang neatly all season.
Happy crocheting!