
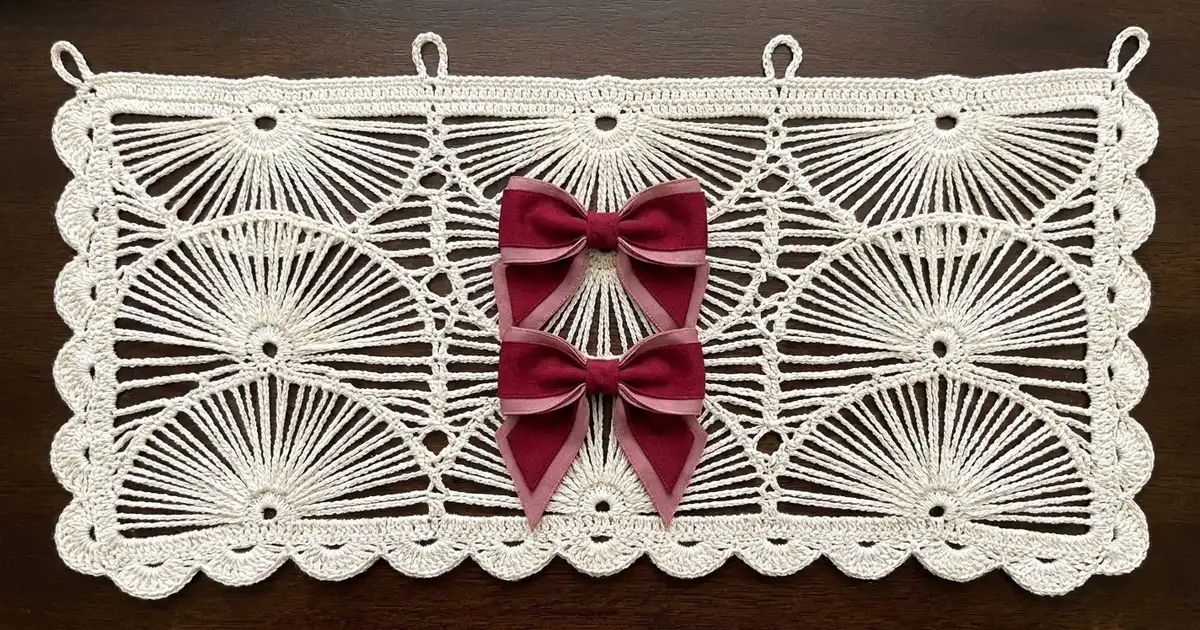
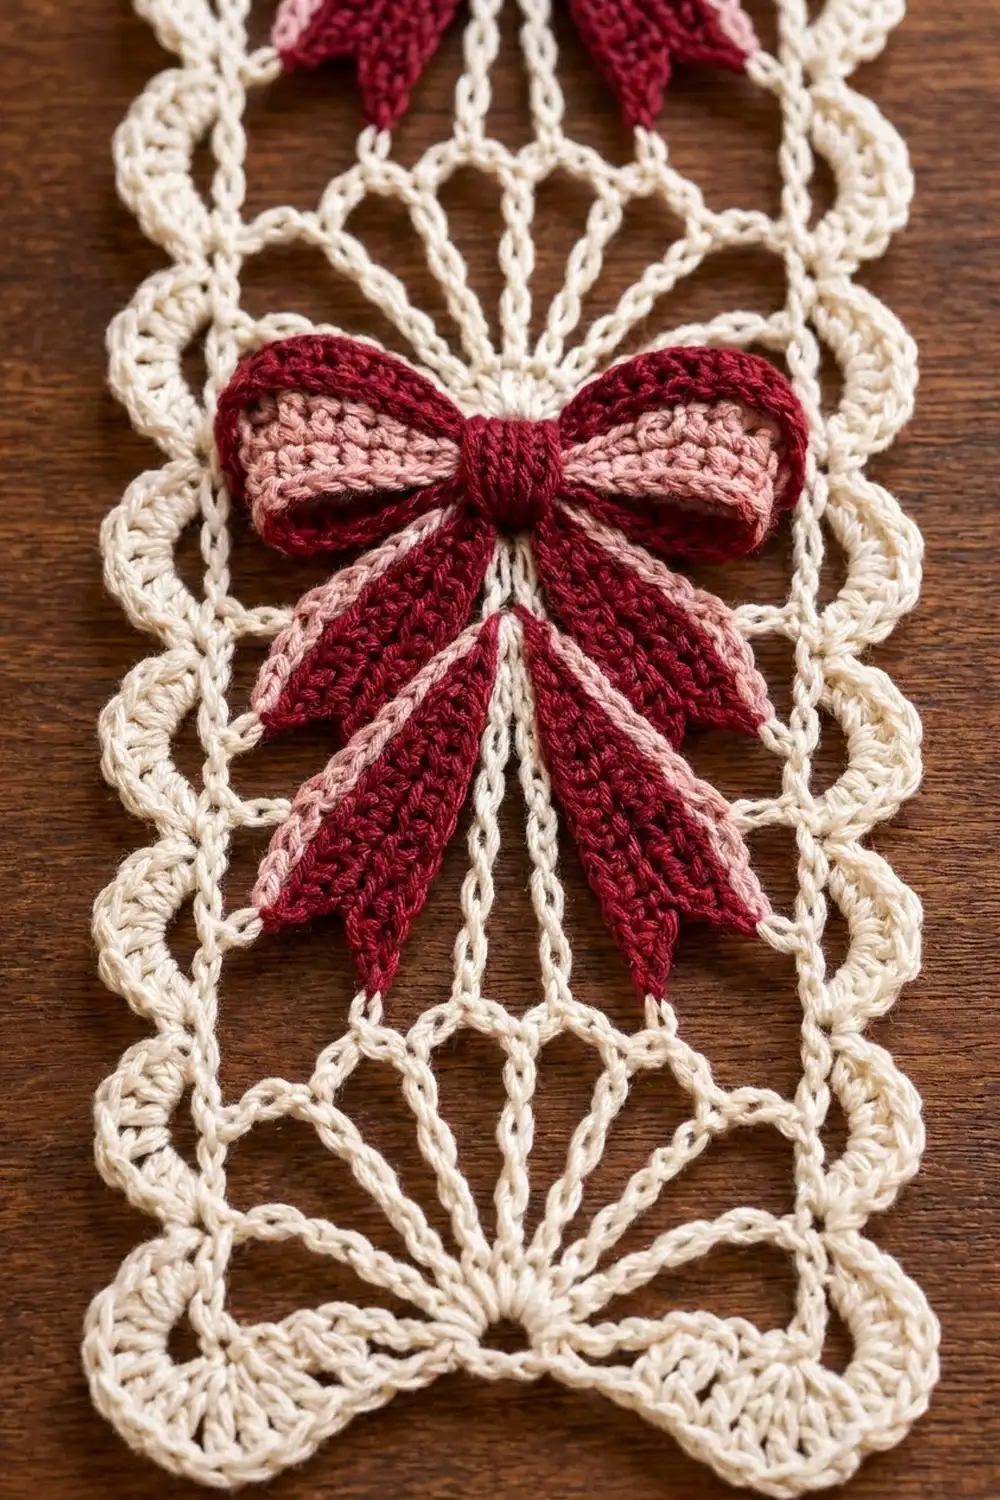
This lace strip is one narrow panel of ivory lace with three two-tone bows sewn on. Each section of the strip has an open fan of long stitches that spreads upward from a small chain ring. Shell scallops run along both long edges and across the bottom, and three chain loops at the top let the strip hang.
The colors are a soft ivory for the lace, deep cranberry for the bows, and a dusty rose lining that shows under each bow loop and along each tail. It looks like a vintage holiday ribbon, so it works as a door hanger, a shelf drop, or a gift-wrap accent.
All instructions use US crochet terms. The finished strip measures 5.0 in (12.7 cm) wide and 10.6 in (26.9 cm) long without the loops. With the loops it is 11.6 in (29.5 cm) long.
The strip body is worked flat in rows from the bottom up, in four repeating fan sections. A two-round border adds the scallops, and the top loops are added last. The bows are made as separate small layered pieces and sewn onto the upper three fan hubs after blocking.
Finished Size and Construction
- Finished size: 5.0 × 10.6 in (12.7 × 26.9 cm), plus 1 in (2.5 cm) loops
- Skill level: Intermediate
- Terminology: US
- Yarn weight: Sport (2), mercerized cotton
- Hook: 3.0 mm (between US C-2 and D-3)
- Number of pieces: 1 lace strip, plus 3 sewn-on bows (each bow has 7 small parts)
- Layout: single vertical strip with 4 fan sections; bows on sections 2, 3, and 4
- Size before border: 3.8 × 9.4 in (9.7 × 23.9 cm)
- Border depth: 0.6 in (1.5 cm) per edge
- Section height: 2.25 in (5.7 cm)
Materials
Use a smooth mercerized cotton in sport weight, around 155 m per 50 g. Cotton keeps the fans crisp and the scallops sharp. A wool blend will block, but the lace will stay softer.
- Ivory (strip): 35 g, about 109 m
- Cranberry (bows, knots, tails): 12 g, about 37 m
- Dusty rose (linings): 8 g, about 25 m
These quantities include a margin of about 20 percent.
Tools: 3.0 mm hook, tapestry needle, 6 stitch markers, rust-proof pins, blocking mat, spray bottle, ruler, and optional light spray starch.
Abbreviations (US Terms)
- ch: chain
- sl st: slip stitch
- sc: single crochet
- hdc: half double crochet
- dc: double crochet
- tr: treble crochet
- dtr: double treble crochet (yarn over 3 times, insert, pull up a loop, then yarn over and pull through 2 loops 4 times)
- sc2tog: single crochet 2 together
- sk: skip
- sp: space
- st(s): stitch(es)
- RS: right side
Special stitch – Shell: 5 dc in the same st.
Corner shell: 7 dc in the same st.
Hub ring: tr in the indicated sp, ch 5, sl st in the top of the tr just made.
Gauge and Checkpoints
Gauge: 24 dc and 10 dc rows = 4 in (10.2 cm) with the 3.0 mm hook.
Before you make the whole strip, work Rows 1–6 as a test piece. This is the foundation bar plus one full fan section.
- After Row 1: width 3.8 in (9.7 cm)
- After Row 6: height 2.65 in (6.7 cm)
- One section (5 rows): 2.25 in (5.7 cm)
If your piece is too big, go down to a 2.75 mm hook. If it is too small, go up to a 3.25 mm hook. Width matters more than height, because the border math depends on the stitch counts, not the inches. If your width is right but your sections come out short, loosen your yarn-overs on the tr and dtr rows.
Strip Body
Throughout the body, count every ch-1 sp in the mesh rows as one stitch. Turning chains count as stitches.
Foundation: With ivory, ch 25.
Row 1 (bar): Dc in the 4th ch from the hook and in each ch across. Turn. (23 dc)
Fan Section (Rows 2–6)
Row 2 (mesh): Ch 4 (counts as dc + ch 1), sk next st, dc in next st, *ch 1, sk next st, dc in next st; repeat from * 9 more times. Turn. (12 dc and 11 ch-1 sps = 23 sts)
Row 3 (stems): Ch 6 (counts as tr + ch 2), sk next ch-1 sp and next dc, tr in next ch-1 sp, ch 7, sk next 7 sts, make a hub ring in the next ch-1 sp (this is the 6th ch-1 sp, the center of the row), ch 7, sk next 7 sts, tr in next ch-1 sp, ch 2, sk next ch-1 sp and next dc, tr in 3rd ch of the turning ch. Turn. (23 sts: 4 tr, 1 hub tr, 2 ch-7 sps, 2 ch-2 sps; the ring is not counted)
The two ch-7 spans are the open stems that run out from the hub to the side columns.
Row 4 (fan): Ch 5 (counts as dtr), 3 dtr in the ch-2 sp, dtr in next tr, ch 3, sk the ch-7 sp, work [dtr, (ch 1, dtr) 6 times] in the hub ring, ch 3, sk the next ch-7 sp, dtr in next tr, 3 dtr in the ch-2 sp, dtr in the 4th ch of the turning ch. Turn. (17 dtr: 5 on each side column, 7 fan spokes; 6 ch-1 sps; 2 ch-3 sps)
The 7 spokes splay from the ring like the ribs of a fan.
Row 5 (tie): Ch 1, sc in the first 5 dtr, sk the ch-3 sp, sc in the first spoke, *sc in the ch-1 sp, sc in the next spoke; repeat from * 5 more times, sk the ch-3 sp, sc in the next 4 dtr and in the top of the turning ch. Turn. (23 sc: 5 + 13 + 5)
Row 6 (bar): Ch 3 (counts as dc), dc in each sc across. Turn. (23 dc)
Repeat the Sections
Rows 7–11: Repeat Rows 2–6 (section 2).
Rows 12–16: Repeat Rows 2–6 (section 3).
Rows 17–21: Repeat Rows 2–6 (section 4).
Each bar row ends with 23 dc. Place a marker in each hub ring of sections 2, 3, and 4 (Rows 8, 13, and 18). These rings are where the bows will go. Do not fasten off after Row 21.
Checkpoint: The body measures 3.8 × 9.4 in (9.7 × 23.9 cm). The total is 0.4 in (1.0 cm) for Row 1 plus four sections of 2.25 in (5.7 cm) each.
Bows (Make 3)
Each bow has 7 parts. Leave long tails on every part for sewing.
Rose bow lining: With dusty rose, ch 19. Row 1: Sc in the 2nd ch from the hook and across. Turn. (18 sc) Rows 2–6: Ch 1, sc across. Turn. (18 sc) This piece should measure 3.0 × 1.2 in (7.6 × 3.0 cm).
Cranberry bow front: With cranberry, ch 18. Row 1: Hdc in the 3rd ch from the hook and across. Turn. (16 hdc) Rows 2–3: Ch 2 (counts as hdc), hdc across. Turn. (16 hdc) This piece should measure 2.7 × 0.9 in (6.9 × 2.3 cm).
Cranberry tails (make 2): Ch 5. Row 1: Sc in the 2nd ch from the hook and across. Turn. (4 sc) Rows 2–8: Ch 1, sc across. (4 sc) Row 9: Ch 1, sc2tog, sc in the next 2. (3 sc) Row 10: Ch 1, sc2tog, sc in the last st. (2 sc) Each tail is 0.7 in (1.8 cm) wide and 2 in (5.1 cm) long, with an angled tip.
Rose tail linings (make 2): Ch 6. Row 1: Sc in the 2nd ch from the hook and across. (5 sc) Rows 2–8: Ch 1, sc across. (5 sc) Row 9: Ch 1, sc2tog, sc in the next 3. (4 sc) Row 10: Ch 1, sc2tog, sc in the last 2. (3 sc) Each lining is 0.8 in (2.0 cm) wide.
Cranberry knot: Make a magic ring. Rnd 1: 6 sc in the ring. (6) Rnd 2: 2 sc in each st. (12) Rnd 3: Sc in each st. (12) Rnd 4: Sc2tog 6 times. (6) Tuck the yarn ends inside to pad the knot, then close the ring. The knot is 0.75 in (1.9 cm) across.
Assemble Each Bow
- Lay the cranberry front on the rose lining with their top edges matching and the front centered side to side. The rose shows 0.15 in (0.4 cm) past each end and 0.3 in (0.8 cm) below the bottom edge.
- Wrap cranberry yarn 8 times around the center of both layers. Pull tight until the center narrows to 0.5 in (1.3 cm), so two loops puff out. Tie the ends at the back.
- Lay each cranberry tail on a rose lining, matching the straight ends and the inner long edge. The extra rose stitch shows along the outer edge. Whipstitch the two layers together at the straight end. Flip one pair face down so its tip slants the other way.
- Sew the straight ends of both tail pairs behind the cinched center. Angle them down and outward in an inverted V, about 30 degrees from vertical.
- Sew the knot over the front of the wrap.
Bow checkpoint: 3.0 in (7.6 cm) wide and about 2.4 in (6.1 cm) tall from the top of the loops to the tail tips.
Border
Border gauge: Round 1 places 51 sc along each long edge, about 5.4 sc per inch over 9.4 in (23.9 cm). Round 2 uses a 6-st repeat (sc, sk 2, shell, sk 2), and each repeat is about 1.1 in (2.8 cm) wide along the sides.
Round 1 (sc): Do not turn after Row 21. Ch 1.
- Top: 3 sc in the first dc (corner), sc in the next 21 dc, 3 sc in the last dc (corner).
- Long side: Work 51 sc in the row ends: 2 sc per dc row, 3 per tr row, 4 per dtr row, and 1 per sc row in each section (12 per section × 4 = 48), plus 3 in the side of Row 1.
- Bottom: 3 sc in the first foundation ch (corner), sc in the next 21 ch, 3 sc in the last ch (corner).
- Second long side: 51 sc, as for the first side.
- Sl st to the first sc. (156 sc)
Counts per side, including the 2 corner sts: each long side has 55 sc (1 + 1 + 51 + 1 + 1) and each short side has 25 sc (1 + 1 + 21 + 1 + 1). Check: 55 + 55 + 25 + 25 − 4 shared corners = 156. Place a marker in each corner center st.
Checkpoint: 4.2 × 9.8 in (10.7 × 24.9 cm).
Round 2 (shells): Sl st to the top-left corner center st. Ch 3 (counts as dc), 6 dc in the same st (corner shell).
- Top: *Sk 2, sc in next st, sk 2, shell in next st; repeat from * 2 more times, sk 2, sc in next st, sk 2. (3 shells, 4 sc)
- Corner: Corner shell in the marked st.
- Long side: Work as for the top, but repeat from * 7 more times. (8 shells, 9 sc)
- Corner shell, work the bottom as for the top, corner shell, work the second long side, and sl st to the top of the ch-3.
- (4 corner shells, 22 shells, 26 sc = 164 sts)
Why the math works: Between two corner centers, the pattern uses (sk 2, sc, sk 2) once, and then (shell, sk 2, sc, sk 2) as many times as needed. That totals 5 + 6k stitches, where k is the number of shells. Each short edge has 23 sts between corner centers (5 + 18, so 3 shells). Each long edge has 53 sts (5 + 48, so 8 shells). Every edge starts and ends with an sc, so each corner shell sits alone and the scallops line up evenly.
Checkpoint: 5.0 × 10.6 in (12.7 × 26.9 cm).
Hanging loops (make 3): With RS facing, join ivory in the 4th dc of the top-left corner shell. Ch 12, sl st in the same st. Work 18 sc into the loop and sl st to the base, then fasten off. Repeat at the 3rd dc of the center top shell and at the 4th dc of the top-right corner shell. Each loop stands 1 in (2.5 cm) tall.
Final Blocking
- Weave in all ivory ends along the side columns.
- Soak the strip in cool water for 10 minutes, then roll it in a towel to press out the water.
- Pin it to 5.0 × 10.6 in (12.7 × 26.9 cm). Pin the bars straight first, then the center of each shell.
- Open each fan so the 7 spokes are evenly spaced. Pull the hub rings round with a pin.
- Mist with starch if you like. Let it dry completely.
- Sew one bow to each marked hub ring (sections 2–4). Sew through the knot center, tack the outer edge of each loop, and tack each tail tip. Keep the bows raised rather than flat.
- Steam the bows lightly from above without pressing.
Final Quality-Control Checklist
- Every bar row has 23 dc.
- All four fans have 7 spokes coming from a round hub ring.
- Round 1 totals 156 sc, with 51 sc in each long edge.
- Round 2 has 8 shells along each long edge and 3 across the top and the bottom.
- The finished size is 5.0 × 10.6 in (12.7 × 26.9 cm).
- On every bow, the rose lining shows evenly below the loops and along the outer edge of each tail.
- The bows are centered on the hubs of sections 2–4, and the lowest fan stays plain.
- The three loops are the same height.
Troubleshooting
- The fan cups or ruffles: Your dtr are too tight or the ch-1 sps are too loose. Keep the chains matched to the stitch height.
- The strip narrows in the stem rows: Make sure each ch-7 is relaxed and the side columns get 5 sts.
- The scallops crowd or gap: Recount the Round 1 sides. You need exactly 51 sc in each long edge.
- The bow center won’t narrow: Wrap more tightly, or add 2 more wraps.
- The rose lining doesn’t show: Check the bow lining (18 sc) against the front (16 hdc), and make sure the top edges are aligned.
- The loops stretch: Add more sc into each loop until it is firm.
Care
Hand wash cool with mild soap, then reshape and dry flat. Steam the bows lightly if they lose their shape. Do not wring.

Final Notes
The measurement chain is simple. Matching the gauge gives a 3.8 in (9.7 cm) bar. Four 2.25 in (5.7 cm) sections on top of Row 1 make a 3.8 × 9.4 in (9.7 × 23.9 cm) body. Round 1 brings it to 4.2 × 9.8 in (10.7 × 24.9 cm), and the shell round finishes it at 5.0 × 10.6 in (12.7 × 26.9 cm). Each bow measures 3.0 in (7.6 cm) across. Check the counts at each checkpoint and the strip will come out matching the photo. If you want more than one strip, make each one the same way and hang them side by side.
Happy crocheting!