
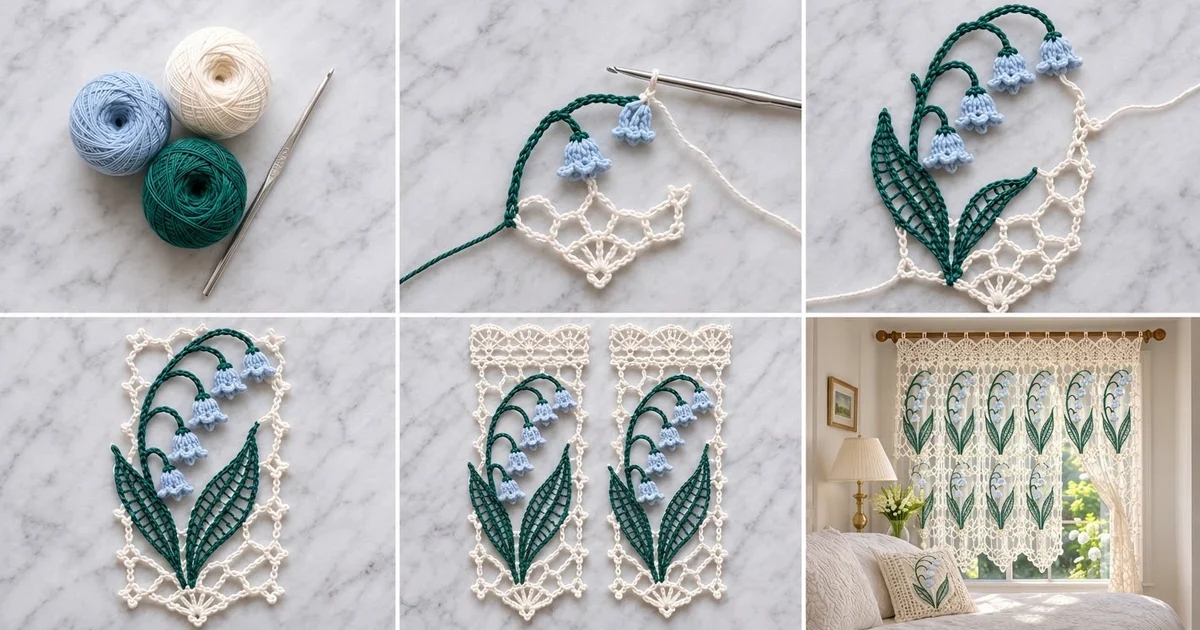
This lace panel shows a lily of the valley spray framed in ivory openwork. A dark green stem rises from two lattice leaves, arches to the right, and carries five small light blue bells. Each bell has a dark green cap and a scalloped rim. Behind the spray, an ivory chain-loop net fills a rectangle edged with a picot frame. A small ivory fan sits at the bottom center.
The palette is ivory, dark green, and light blue, and the look is in the Irish crochet tradition: separate pieces built up into one lacy panel. You can use it as a doily-style accent, frame it as a textile picture, or hang it in a small window. The open net lets light through, so the flowers read clearly against a bright background.
All instructions use US crochet terms. The finished panel measures 6 x 9 in (15.2 x 22.9 cm) after blocking.
You will make five bells, one branched stem, two leaves, and a small fan, then sew them into a single spray. Next you crochet the ivory net in rows, sew the spray and fan onto it, and finish with a two-round picot border.
Finished Size and Construction
- Finished size: 6 x 9 in (15.2 x 22.9 cm)
- Skill level: Intermediate
- Terminology: US crochet terms
- Yarn weight: Fingering-weight (super fine) mercerized cotton
- Hook: 2.25 mm (US B-1)
- Number of pieces: 1 finished panel (appliqué parts sewn onto one net)
- Layout: Single vertical rectangle, spray centered, bells hanging on the right
- Piece size (net before border): 5 x 8 in (12.7 x 20.3 cm)
- Size after Border Rnd 1: about 5.1 x 8.1 in (13.0 x 20.6 cm)
- Border depth: 0.5 in (1.3 cm) per side
Materials
Use a smooth, mercerized cotton in fingering weight, roughly 170 m per 50 g. Mercerized cotton gives crisp stitch definition, holds its shape after blocking, and keeps the bells from going floppy. Avoid fuzzy or brushed yarns, which blur the lattice.
- Ivory (A): 15 g, about 51 m. Used for the net, fan, and border
- Dark green (B): 8 g, about 27 m. Used for the bell caps, stem, and leaves
- Light blue (C): 4 g, about 14 m. Used for the bells
These quantities include a margin for swatching and sewing.
Tools
- 2.25 mm (US B-1) crochet hook
- Fine tapestry needle
- Rust-proof pins
- Blocking mat or folded towel
- Small scissors
- Spray bottle
- Ruler or tape measure
Abbreviations (US Terms)
- ch: chain
- sl st: slip stitch
- sc: single crochet
- hdc: half double crochet
- dc: double crochet
- sk: skip
- sp(s): space(s)
- st(s): stitch(es)
- rnd: round
- picot: ch 3, sl st in the 3rd ch from hook
Back-bump slip stitch: insert the hook under the bump on the back of the chain and work a sl st. This gives the stem a neat, rounded look.
Gauge and Checkpoints
- Stitch gauge: 7 sc and 8 sc rows = 1 in (2.5 cm); chains also run about 7 per inch
- Net gauge (blocked): 8 mesh loops = 5 in (12.7 cm) wide; 17 mesh rows = 8 in (20.3 cm) tall
Make one bell and one leaf first, then compare them with these checkpoints:
- Bell after Rnd 4: about 0.6 in (1.5 cm) wide
- Finished bell: about 0.7 in (1.8 cm) tall
- Large leaf: about 4.3 in (10.9 cm) long and 1.2 in (3.0 cm) wide
- Stem from base to tip: about 5.7 in (14.5 cm)
- Net after Row 3, lightly stretched: 5 in (12.7 cm) wide
If your pieces come out bigger, switch to a 2.0 mm hook. If they come out smaller, use a 2.5 mm hook. Pieces that are too big will crowd the net, and pieces that are too small leave empty space on the left.
Bells (Make 5)
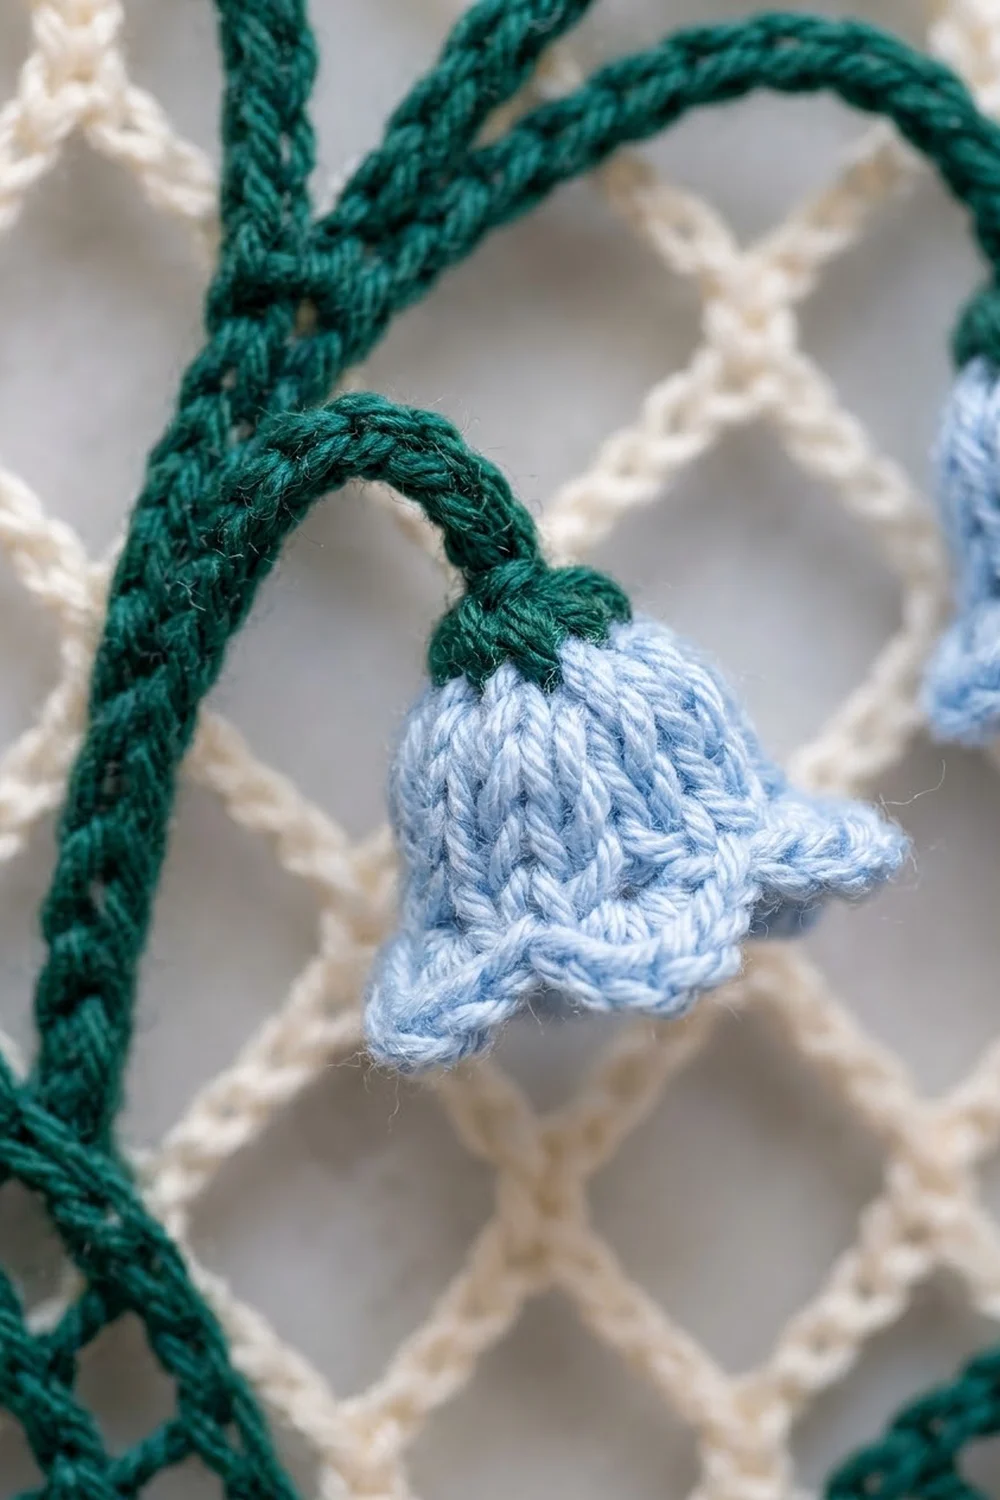
Rnd 1: With B, make a magic ring, ch 1, 6 sc in ring, sl st to first sc. Change to C in this sl st. Leave an 8 in (20.3 cm) tail of B. (6 sts)
Rnd 2: With C, ch 1, 2 sc in each st around, sl st to first sc. (12 sts)
Rnd 3: Ch 1, sc in each st around, sl st to first sc. (12 sts)
Rnd 4: Ch 1, sc in each st around, sl st to first sc. (12 sts)
Rnd 5 (scallop rim): *Sl st in next st, (hdc, dc, hdc) in next st; repeat from * 5 more times, sl st to first sl st. (6 scallops: 6 sl st + 18 scallop sts = 24 sts)
Fasten off C and weave in that end. Pull the B tail tight so the green cap closes, and keep the tail for sewing. Pinch each scallop into a small point so the rim flares outward.
Stem (Make 1)
The stem is one chain worked back from the tip toward the base, with four short branches (pedicels) along the way.
With B, ch 41.
- Sl st in the back bump of the 2nd ch from hook and in each of the next 4 ch. (5 sl st, top tip)
- *Ch 7, sl st in the back bump of the 2nd ch from hook and in each of the next 5 ch (6 sl st, pedicel made), then sl st in the next 5 main stem ch; repeat from * 3 more times. (4 pedicels; 20 main stem sl st)
- Sl st in each of the remaining 15 ch down to the base.
Count: 5 + 20 + 15 = 40 main stem sl st, plus 4 pedicels of 6 sl st each. Fasten off, leaving a 10 in (25.4 cm) tail.
Leaves
Each leaf is worked around both sides of a foundation chain. The center vein and lattice spaces form in Rnd 1.
Large Leaf (Make 1)
With B, ch 31.
Rnd 1: Sc in the 2nd ch from hook (tip), ch 2, sk 2 ch, dc in next ch; repeat from * 8 more times (9 dc), ch 2, sk next ch, (sc, ch 2, sc) in last ch (base). Rotate and work into the free loops on the other side of the chain: ch 2, dc in the same ch as the last dc, ch 2, dc in the ch that holds the next dc of the first side; repeat from * 7 more times, ch 2, sl st to first sc. (2 sc, 18 dc, 21 ch-2 sps: 10 on each side and 1 at the base)
Rnd 2: Sl st in the first ch-2 sp, ch 1, sc in same sp, *ch 3, sc in next ch-2 sp; repeat from * 19 more times, ch 3, sl st to first sc. (21 sc, 21 ch-3 loops)
Rnd 3 (outline): Sl st in the first loop, ch 1, 4 sc in the same loop and in each of the next 19 loops (20 loops). In the last loop, which wraps the tip, work (2 sc, ch 2, 2 sc). Sl st to first sc. (84 sc plus a ch-2 tip)
Fasten off and leave a 10 in (25.4 cm) tail.
Small Leaf (Make 1)
With B, ch 25. Work as for the Large Leaf with these changes:
Rnd 1: On the first side, the repeat runs 6 more times (7 dc). On the second side, the repeat runs 6 more times after the first dc (7 dc). (2 sc, 14 dc, 17 ch-2 sps: 8 on each side and 1 at the base)
Rnd 2: The repeat runs 15 more times. (17 sc, 17 ch-3 loops)
Rnd 3: 4 sc in each of 16 loops, (2 sc, ch 2, 2 sc) in the tip loop. (68 sc plus a ch-2 tip)
The small leaf should be about 3.4 in (8.6 cm) long.
Fan (Make 1)
With A, ch 4.
Row 1: 9 dc in the 4th ch from hook. (10 sts, counting the skipped ch as a dc)
Row 2: Ch 4 (counts as dc + ch 1), turn, dc in next st, *ch 1, dc in next st; repeat from * across. (10 dc, 9 ch-1 sps)
Row 3: Ch 1, turn, sc in first dc, *ch 3, sc in next dc; repeat from * across. (10 sc, 9 ch-3 loops)
Fasten off and leave a tail. The fan is a half circle about 1.25 in (3.2 cm) wide.
Assembling the Spray
- Pin the leaves in a V with their bases touching. The large leaf leans left and the small leaf leans right.
- Put the stem base between the leaf bases. Curve the stem up the left side, then arch it to the right so the tip and pedicels point down.
- Use the B tail on each bell to sew its cap to the end of a pedicel or to the stem tip, so the bells hang open-end down.
- Sew the leaf bases and stem base together with a few small, hidden stitches.
Ivory Net
With A, ch 34.
Row 1: Sc in the 2nd ch from hook, *ch 5, sk 3 ch, sc in next ch; repeat from * 7 more times. (9 sc, 8 loops)
Row 2: Ch 5 (counts as dc + ch 2), turn, sc in first loop, *ch 5, sc in next loop; repeat from * 6 more times, ch 2, dc in last sc. (8 sc, 7 full loops, 2 half loops)
Row 3: Ch 1, turn, sc in the dc, *ch 5, sc in next ch-5 loop; repeat from * 6 more times, ch 5, sc in the 3rd ch of the turning ch. (9 sc, 8 loops)
Rows 4–17: Repeat Rows 2–3 seven more times. You will end on a Row 3 type row. (17 rows; 9 sc, 8 loops)
Checkpoint: Pin the net out to 5 x 8 in (12.7 x 20.3 cm). Do not fasten off.
Border
Border gauge: 7 sc = 1 in (2.5 cm). Corners are 3-sc groups, and the center sc of each group is the corner st. Each side count below includes both of its corner sts.
Rnd 1: Ch 1. Along the top, work 3 sc in the last sc of Row 17, then 4 sc in each of the 8 loops (32 sc), then 3 sc in the first sc of the row. Down the side, work 4 sc around each of the 8 dc or turning-ch posts (32 sc) and 3 sc in each of the 7 sc-row ends from Rows 3–15 (21 sc). Along the bottom, work 3 sc in the first foundation sc, 4 sc in each of the 8 skipped ch-3 sps (32 sc), and 3 sc in the last foundation sc. Work the second side the same way as the first. Sl st to first sc.
- Top and bottom: corner + 1 + 32 + 1 + corner = 36 sts each
- Each side: corner + 1 + 53 + 1 + corner = 57 sts each
- Total: (36 x 2) + (57 x 2) − 4 shared corners = 182 sts
Checkpoint: about 5.1 x 8.1 in (13.0 x 20.6 cm).
Rnd 2 (picot frame): Sl st to the nearest corner st. Ch 1, (sc, ch 3, picot, ch 3, sc) in the corner st. *[Ch 3, picot, ch 3, sk 6 sts, sc in next st] to the next corner. On the last repeat, that sc goes into the corner st itself. Then work (ch 3, picot, ch 3, sc) in the same corner st. Repeat from * around and sl st to the first sc. Fasten off.
- Top and bottom: 5 loops each
- Each side: 8 loops each
- Corners: 1 loop each
- Total: 30 loops and 30 sc
Why the math works: Each loop moves 7 sts forward (6 skipped + 1 sc). The top has 36 sts, so it spans 35 st-moves from corner to corner, and 35 ÷ 7 = 5 loops. Each side has 57 sts, so 56 ÷ 7 = 8 loops. Every loop lands exactly on a corner, and the middle bottom loop sits at center, directly under the fan point. The arched loops add about 0.4 in (1.0 cm) beyond Rnd 1, which brings the panel to 6 x 9 in (15.2 x 22.9 cm).
Final Blocking
- Lay the panel face down on the mat and sew the fan to the bottom center of the net with A. Its rounded edge faces up and its point touches the bottom border.
- Turn the panel face up. Put the spray in the net with the leaf bases just above the fan. Using matching thread, tack the leaves, stem, and bell caps to the mesh crossings every 0.4 in (1.0 cm).
- Spritz the whole panel until it is damp.
- Pin the outer edge to 6 x 9 in (15.2 x 22.9 cm), with one pin in every picot.
- Open the net loops into even diamonds, and pin each leaf tip to a sharp point.
- Shape the bell scallops with your fingertips.
- Leave it to dry completely before unpinning.
Final Quality-Control Checklist
- Five bells, each with 6 scallops and a green cap
- 40 main stem sl st and 4 pedicels
- Large leaf 84 sc and small leaf 68 sc on Rnd 3, both with pointed tips
- Net 8 loops wide and 17 rows tall
- Border Rnd 1 has 36/57/36/57 sts (182 total)
- Border Rnd 2 has 30 loops, with a picot at each corner
- Fan centered above the middle bottom loop
- Finished size 6 x 9 in (15.2 x 22.9 cm)
Troubleshooting
- Bells cup inward: Work Rnd 5 more loosely, or block the bells over a pencil tip.
- Stem twists: Make sure you work the sl st into the back bumps, then steam it flat.
- Leaves curl: Your Rnd 3 tension is too tight. Remake it with looser sc.
- Net leans to one side: Check that you worked the turning ch-5 and the ending ch 2, dc on every Row 2.
- Border ripples: You have too many sc on Rnd 1. Count each side against 36/57.
- Border cups: You have too few sc. Check the 4-sc counts around the posts.
- Tacking shows from the front: Use B on the green parts and catch only the back loops.
Care
Hand wash in cool water with mild soap, roll it in a towel, and re-pin it flat to dry. Do not wring or tumble dry the piece.

Final Notes
The measurement chain runs like this. Bells come to 0.6 in (1.5 cm) at Rnd 4, the large leaf is 4.3 in (10.9 cm), and the stem is 5.7 in (14.5 cm). The net measures 5 x 8 in (12.7 x 20.3 cm), Border Rnd 1 is 5.1 x 8.1 in (13.0 x 20.6 cm), and the finished panel is 6 x 9 in (15.2 x 22.9 cm). Check each stage before moving on, and the spray will fit neatly inside its frame.
Happy crocheting!