

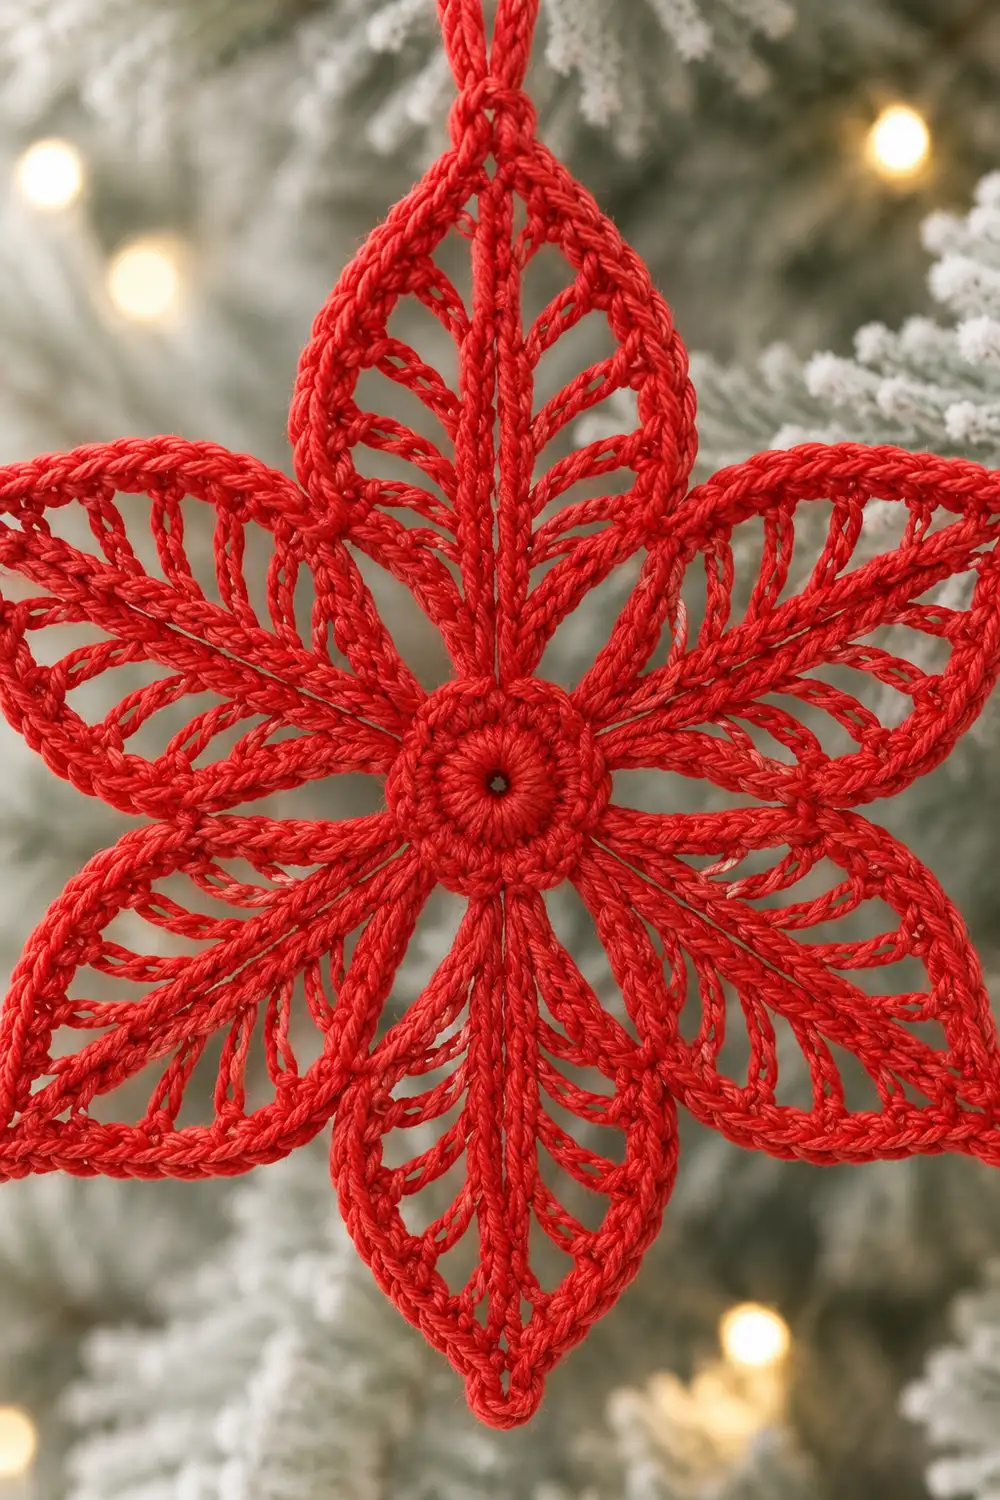
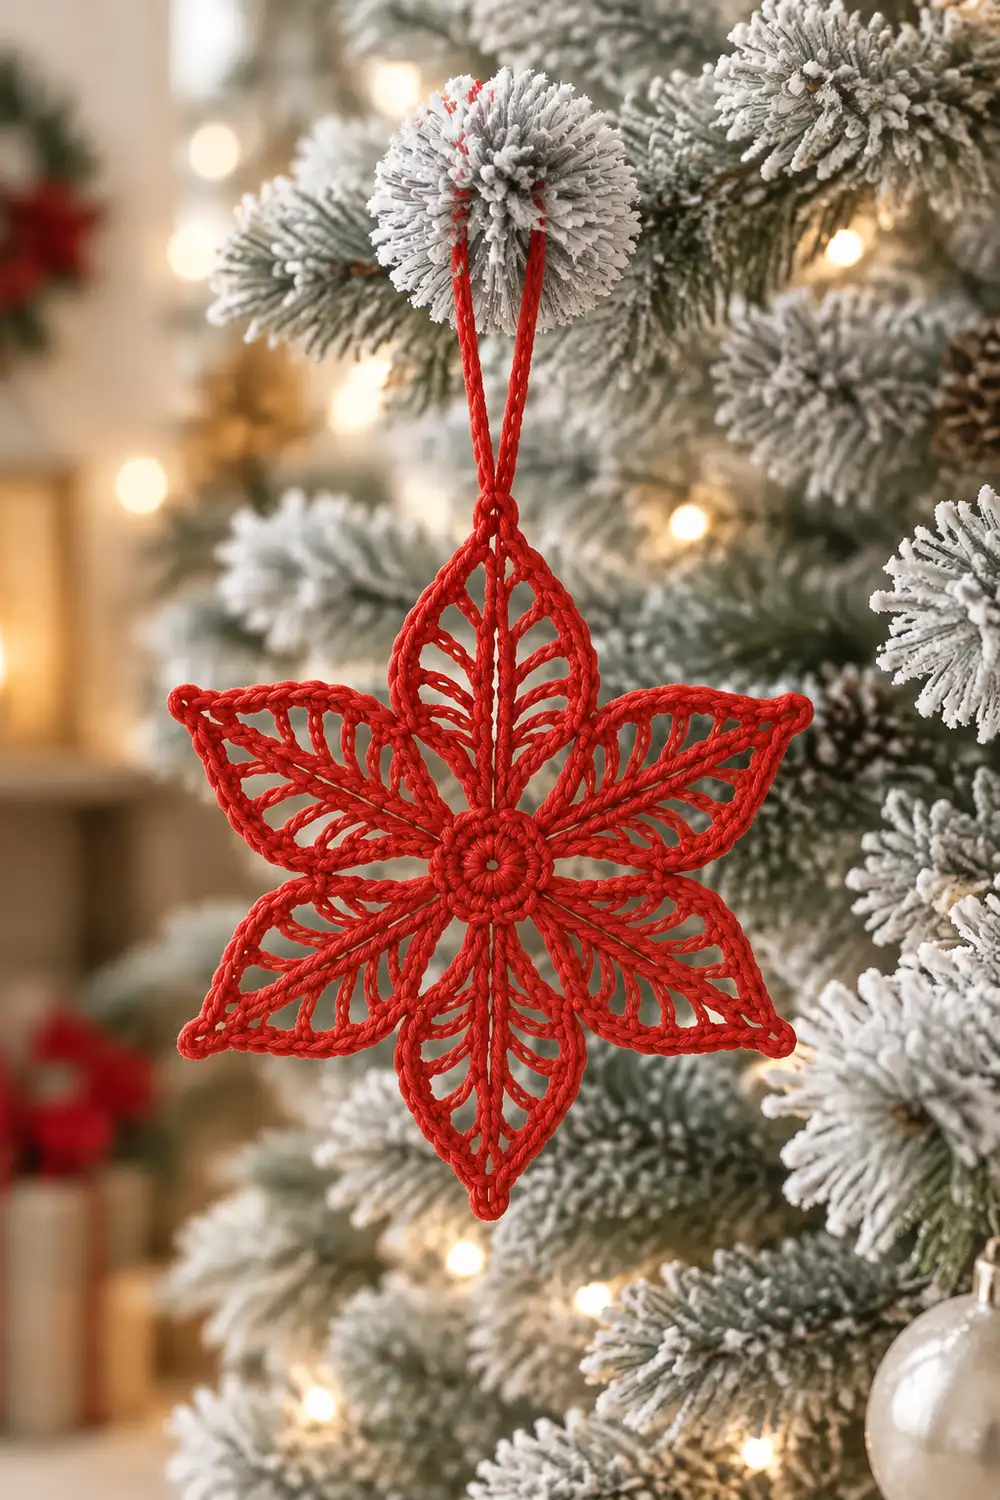
This little ornament is a five-pointed star flower crocheted in bright red cotton. Each of the five petals is open and lacy. Tall stitches fan out from a solid center vein, so every petal looks like a leaf with its veins showing. A small textured circle sits where the petals meet.
A red cord loop rises from the top petal and finishes in a soft gray and white pom-pom. That pom-pom does two jobs: it marks the hanging point and adds a fuzzy, wintry accent. Against a frosted tree with warm white lights, the red petals stand out sharply.
The pattern is written in US crochet terms. The finished ornament measures 3.5 in (8.9 cm) across, measured as the circle through the five petal tips.
Construction is simple and fully continuous. You crochet a two-round textured center, then build five petals directly off it. Each petal starts as a slip-stitch spine, and openwork “veins” are worked up one side and down the other. One round of single crochet outlines every petal. A chain-and-slip-stitch hanging cord and a small pom-pom finish the piece.
Finished Size and Construction
- Finished size: 3.5 in (8.9 cm) across the tips
- Skill level: Intermediate (simple stitches, careful placement)
- Terminology: US crochet terms
- Yarn weight: Fingering (#1) mercerized cotton or size 3 crochet thread
- Hook: 2.25 mm (US B/1)
- Number of pieces: 1 ornament, plus 1 pom-pom
- Layout: 5 petals radiating from a round center
- Piece size: center 0.75 in (1.9 cm); each petal 1.25 in (3.2 cm) long before border
- Size before border: 3.25 in (8.3 cm) across the tips
- Border depth: 0.125 in (0.3 cm), adding 0.25 in (0.6 cm) to the total width
Materials
Yarn advice: Choose a smooth, tightly twisted mercerized cotton. It shows the vein stitches crisply and holds stiffener well. Fuzzy or loosely plied yarn blurs the openwork. For the pom-pom, use any soft worsted or brushed yarn. A little halo helps it look frosted.
Yarn quantities:
- Red (fingering cotton): 8 g, about 27 m (30 yd)
- Gray (worsted or brushed, for the pom-pom): 3 g, about 6 m (7 yd)
- White (worsted or brushed, for the pom-pom): 3 g, about 6 m (7 yd)
All quantities include a margin for a gauge swatch and weaving in ends.
Tools:
- 2.25 mm (US B/1) crochet hook
- Tapestry needle
- Small scissors
- Stitch marker
- Pom-pom maker for 1.25 in (3.2 cm) poms, or a cardboard template
- Blocking mat and rust-proof pins
- Spray starch or fabric stiffener
Abbreviations (US Terms)
- ch – chain
- sl st – slip stitch
- sc – single crochet
- dc – double crochet
- tr – treble crochet
- sc2tog – single crochet 2 together
- BLO – back loop only
- st(s) – stitch(es)
- sp – space
- pos – position (a numbered spot along a petal spine)
Special stitches and terms:
- Picot: Ch 3, sl st in the 3rd ch from hook.
- Spine: The solid center vein of each petal. It is a short chain with slip stitches worked back down it. Its 10 slip stitches are numbered pos 1 (nearest the center) to pos 10 (nearest the tip).
- Side A is worked into the outer loops of the spine sl sts. Side B is worked into the free bottom loops of the spine’s foundation chain.
Gauge and Checkpoints
Gauge: 8 sc and 9 rows = 1 in (2.5 cm) in sc worked flat.
Make one test ornament before committing to a batch. Measure it at each stage:
- After Round 2: The center measures 0.75 in (1.9 cm) across and lies flat.
- After the first spine: The 10 sl sts measure 1.25 in (3.2 cm) from the center edge to the tip chain.
- After Round 3: The tip-to-tip measurement is 3.25 in (8.3 cm). Each petal is about 1 in (2.5 cm) wide at its widest point, across the two tr veins.
- After Round 4: The ornament measures 3.5 in (8.9 cm) across the tips once blocked.
If it’s too big: Change to a 2 mm hook, or tighten your chains. Loose spines are the most common cause.
If it’s too small: Change to a 2.5 mm hook. Do not add stitches. The petal math depends on the exact counts.
Pattern
Center
Round 1: Make a magic ring. Ch 1, work 10 sc in the ring. Join with a sl st to the first sc. Pull the ring tight. (10 sc)
Round 2: Ch 1. Working in BLO, work 2 sc in each st around. Join with a sl st to the first sc. (20 sc)
The unused front loops of Round 1 form a raised ring. This is the textured center. The 20 stitches divide into 5 groups of 4, one group per petal.
Checkpoint: The center is 0.75 in (1.9 cm) across and flat.
Round 3: Petals
Petal 1 is built on the joining stitch of Round 2 (st 1). This is its base st. Place a marker in Petal 1. It will become the top of the ornament.
Make a petal:
Spine: From the base st, ch 11. Sl st in the 2nd ch from hook and in each of the next 9 ch. You now have 10 sl sts, pos 10 down to pos 1. Sl st in the base st again. The skipped 11th ch sits at the tip.
Side A (working up toward the tip): Rotate the work so the spine points away from you. Work into the outer loop of each spine sl st, starting at pos 1:
- sc in pos 1
- ch 2, skip pos 2, dc in pos 3
- ch 3, skip pos 4, tr in pos 5
- ch 3, skip pos 6, tr in pos 7
- ch 2, skip pos 8, dc in pos 9
- ch 1, sc in pos 10
Tip: Work 1 picot.
Side B (working down toward the center): Work into the free bottom loops of the foundation chain on the other side of the spine, starting at pos 10:
- sc in pos 10
- ch 1, dc in pos 9
- ch 2, skip pos 8, tr in pos 7
- ch 3, skip pos 6, tr in pos 5
- ch 3, skip pos 4, dc in pos 3
- ch 2, skip pos 2, sc in pos 1
Each petal has: 1 spine of 10 sl sts, 6 posts and 5 ch-sps per side (11 ch per side), and 1 tip picot. Side B mirrors Side A exactly. The dc and tr posts are the leaf veins. The chains between their tops form the petal outline.
Moving to the next petal: Sl st in the base st again, sl st in the next 3 sts, then sl st in the next st. That last st is the new base st.
Round 3 sequence: Make Petal 1 on st 1. Make the remaining petals on sts 5, 9, 13 and 17. After Petal 5, sl st in its base st, then sl st in the next 3 sts (sts 18-20). Do not fasten off.
Stitch logic: 5 petals x 4 center sts = 20 sts, so every Round 2 stitch is used exactly once.
Checkpoint: The tip-to-tip measurement is 3.25 in (8.3 cm). The petals may cup slightly. Blocking fixes that.
Border
Border gauge: The border is worked at the same density as the petals. You place 1 sc per chain in each ch-sp and 1 sc in the top of each post. This keeps the outline exactly as long as the petal frame, so it lies flat without pulling or rippling.
Round 4: Ch 1. Sc2tog over the pos 1 sc of Petal 5’s Side B and the pos 1 sc of Petal 1’s Side A. This is the first valley st. Then work each petal as follows.
Side A, 16 sc:
- 2 sc in ch-2 sp, sc in dc
- 3 sc in ch-3 sp, sc in tr
- 3 sc in ch-3 sp, sc in tr
- 2 sc in ch-2 sp, sc in dc
- 1 sc in ch-1 sp, sc in pos 10 sc
That is 2+1+3+1+3+1+2+1+1+1 = 16 sc.
Tip: Work (sc, ch 3, sc) in the picot. (2 sc + 1 ch-3 point)
Side B, 16 sc:
- sc in pos 10 sc, 1 sc in ch-1 sp
- sc in dc, 2 sc in ch-2 sp
- sc in tr, 3 sc in ch-3 sp
- sc in tr, 3 sc in ch-3 sp
- sc in dc, 2 sc in ch-2 sp
That is 16 sc.
Valley: Sc2tog over the pos 1 sc of this petal’s Side B and the pos 1 sc of the next petal’s Side A. (1 st)
Repeat around. After Petal 5’s Side B, skip the final valley, because it was worked at the start. Join with a sl st to the first sc2tog. Fasten off.
Count: Each petal has 16 + 2 + 16 = 34 sc. Five petals give 5 x 34 = 170 sc. Add 5 valley sts for 175 sts total, plus 5 ch-3 points.
Why the math works:
- Each side has 11 chains, and the border places exactly 11 sc into them.
- The 5 post tops on each side (dc, tr, tr, dc, and the pos 10 sc) get 1 sc each. That gives 11 + 5 = 16.
- The pos 1 sc is the only post left out of the side count. It is used in the valley sc2tog instead, so no stitch is counted twice.
- The ch-3 at each tip adds length only where the outline turns sharply, which keeps the points crisp.
Checkpoint: The ornament measures 3.5 in (8.9 cm) across the tips. The border adds 0.125 in (0.3 cm) on each side.
Hanging Cord
Join red with a sl st in the ch-3 point of Petal 1, the marked petal. Ch 36, which is about 4.5 in (11.4 cm). Sl st in the same ch-3 point. Turn, then sl st in each of the 36 ch back around the loop. Sl st in the ch-3 point again. Fasten off.
The finished loop hangs 2.25 in (5.7 cm) above the tip. The sl sts firm it into a neat cord that won’t stretch.
Pom-Pom
Wind gray and white together to make a 1.25 in (3.2 cm) pom-pom. Mixing the colors as you wind gives a frosted, speckled look. Tie it tightly with a 8 in (20.3 cm) length of gray yarn.
Use the tie ends to fasten the pom-pom firmly at the fold of the cord loop. Knot securely, thread the ends through the pom-pom’s center, and trim the pom-pom evenly.
Final Blocking
- Weave in all red ends along the spine sl sts, where they hide best. Leave the pom-pom off until blocking is done, or cover it while you spray.
- Dampen the ornament, or spray it with starch until it’s evenly wet but not dripping.
- Lay it face up on the blocking mat. Pin the center flat first.
- Pin each ch-3 point outward so every tip sits 1.75 in (4.4 cm) from the center.
- Pin each spine straight from the center to its tip.
- Pin the top of each tr vein outward so the cells on both sides open evenly.
- Check that the five petals are spaced evenly around the center.
- Let it dry fully, about 24 hours. Unpin, then attach the pom-pom if you left it off.
Final Quality-Control Checklist
- The center is 0.75 in (1.9 cm) across, with a visible textured ring.
- There are exactly 5 petals, each with a straight spine and 4 visible veins on each side.
- Side A and Side B of every petal mirror each other.
- Border count is 175 sts plus 5 ch-3 points.
- Finished size is 3.5 in (8.9 cm) across the tips.
- The cord loop hangs 2.25 in (5.7 cm) and is firmly attached.
- The pom-pom is tight, round and secure.
- All ends are woven in invisibly.
Troubleshooting
Petals cup or curl: The spine chain is too tight. Chain more loosely, or use a hook 0.25 mm larger for the spine chain only.
Petal edges ruffle: The ch-3 spaces are too loose. Keep each chain the same size as one sc.
Spine twists: You worked Side A into the wrong loop. Always use the outer loop of the sl sts, and keep the spine facing away from you.
Petals uneven in size: Recount the spine. It must have exactly 10 sl sts, with the 11th ch skipped at the tip.
Center puckers: Your magic ring wasn’t pulled tight, or you missed the BLO in Round 2.
Rounded tips: Check that you worked (sc, ch 3, sc) into the picot, and pin the points firmly during blocking.
Gaps at the valleys: The sc2tog must catch both pos 1 stitches. Tighten it as you finish it.
Care
Spot clean only with a damp cloth, then reshape and let dry flat. Store the ornament flat in tissue so the petals and pom-pom keep their shape.
Final Notes
The measurement chain is short and reliable:
- The center measures 0.75 in (1.9 cm).
- Each 10-stitch spine adds 1.25 in (3.2 cm), giving 3.25 in (8.3 cm) across the tips.
- The 175-stitch border adds 0.125 in (0.3 cm) on each side, for a finished 3.5 in (8.9 cm).
If each checkpoint matches, the finished ornament will too. Optional: a few of these in red or white would make a lovely matched set for gifting.
Happy crocheting!