

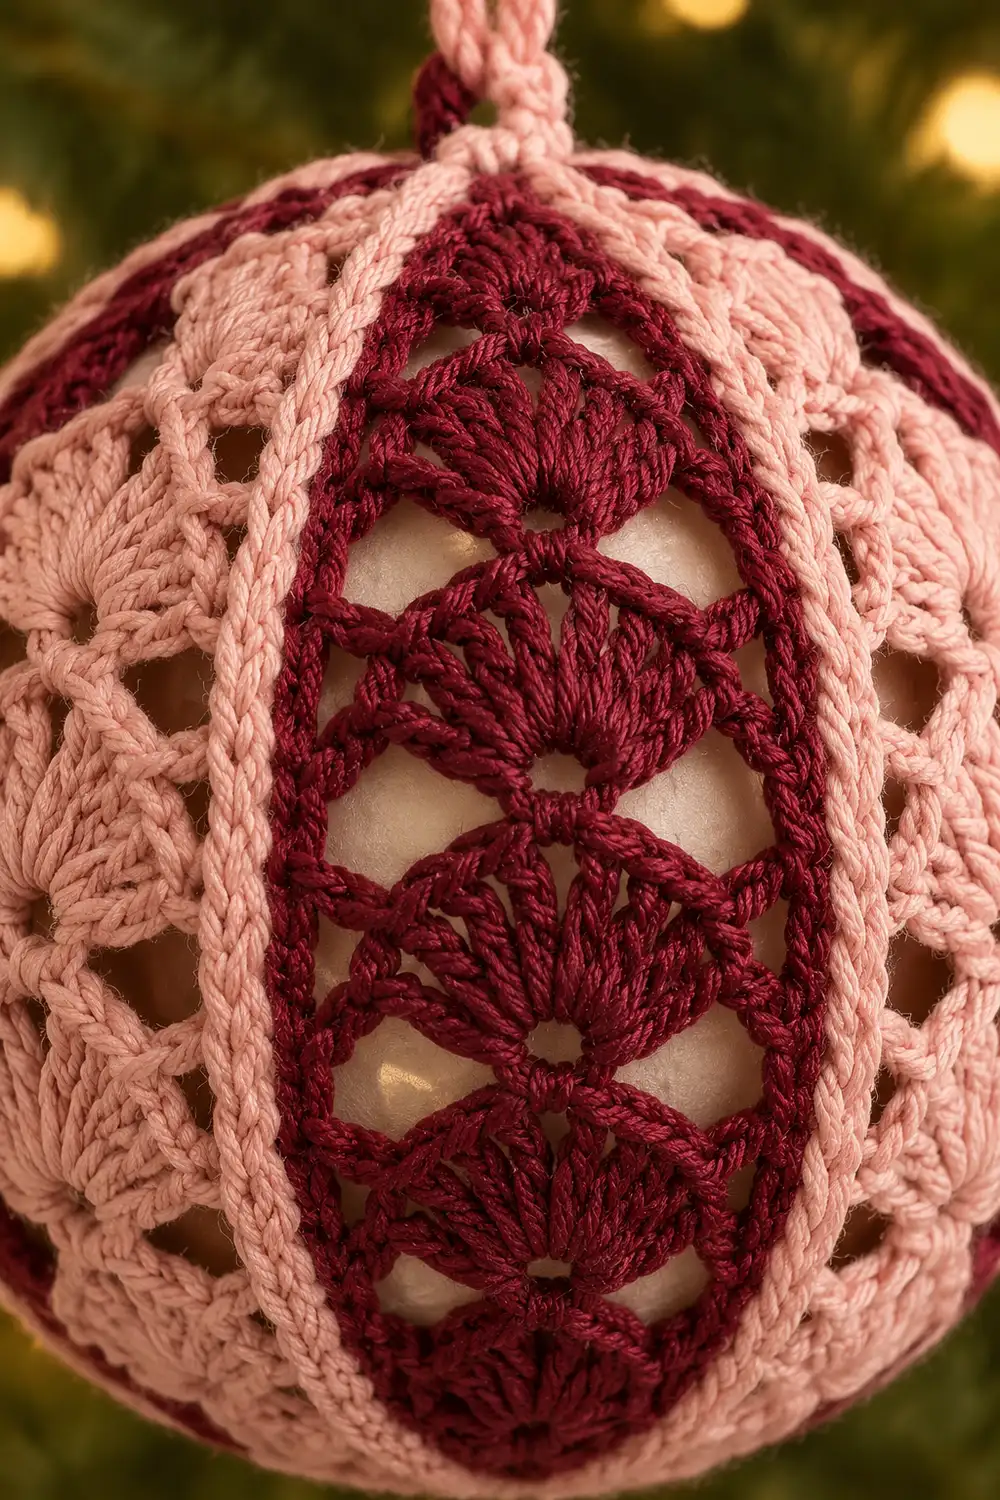
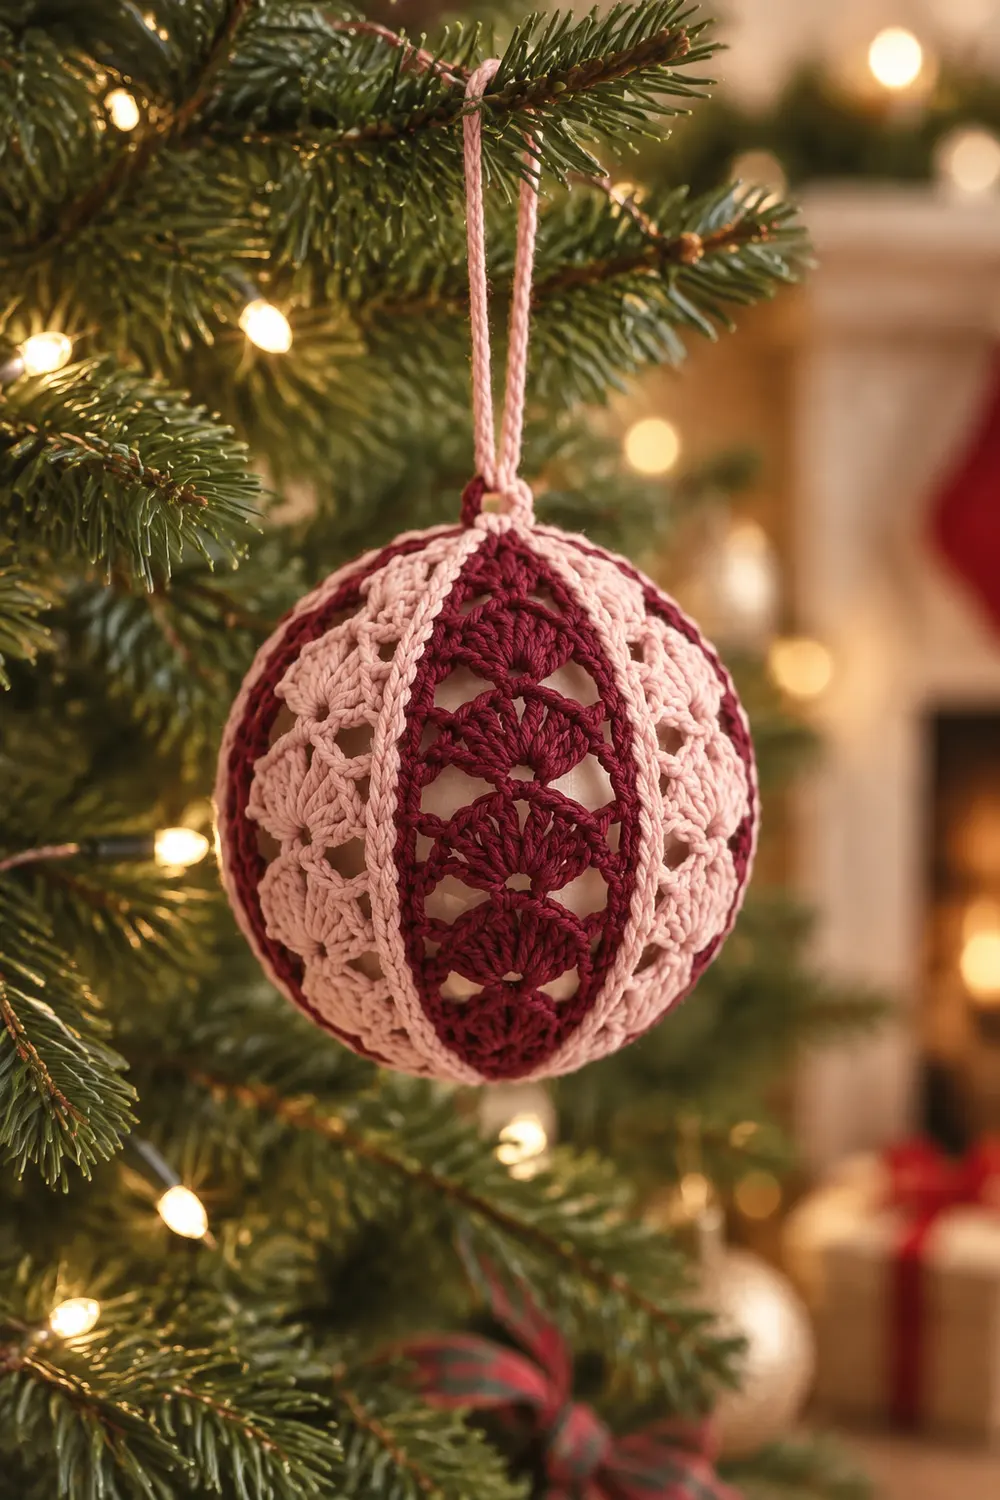
This ornament ball is a cotton lace cover stretched over a 3 in (7.6 cm) cream ball. Vertical panels of dusty rose and deep burgundy wrap the sphere. Raised popcorn stitches sit in a staggered diamond lattice, with small mesh windows between them that let the cream insert glow through.
The palette is soft and vintage. Pink panels alternate with burgundy panels, and solid pink outline rows frame every burgundy stripe. A pink crocheted cord loop at the top lets it hang on the tree.
The pattern uses US crochet terms. The finished ornament measures about 3.25 in (8.3 cm) in diameter. The hanging loop adds about 3 in (7.6 cm) above it.
The cover is one piece. You work it flat and sideways, in rows that run from pole to pole. Each row changes stitch height from short sc at the ends to tall dc in the middle, so the piece curves like an orange segment. You then wrap it around the insert and seam it. Short decrease rounds close each pole, and the hanging cord is worked straight off the top cap.
Finished Size and Construction
- Finished size: about 3.25 in (8.3 cm) diameter, plus a 3 in (7.6 cm) hanging loop
- Skill level: intermediate
- Terminology: US crochet terms
- Yarn weight: #2 fine (sport) cotton
- Hook: 2.75 mm (C-2)
- Number of pieces: 1 cover, worked in one piece. The cord is worked directly from the top cap.
- Layout: 6 vertical panels in the order pink, burgundy, pink, burgundy, pink, burgundy. Each panel is 4 rows.
- Piece size (flat, before seaming): 4.8 in (12.2 cm) pole to pole × 9.6 in (24.4 cm) across the center
- Size before border: a seamed cover with an open ring at each pole. Each ring edge is about 4.8 in (12.2 cm) around.
- Border depth: 3 rounds per pole cap, about 0.5 in (1.3 cm) deep
Materials
Use a smooth, mercerized sport-weight cotton. Mercerized cotton gives the popcorns crisp edges and holds the shape over the insert. Avoid fuzzy or very stretchy yarns, because the lace will blur and sag.
- Dusty rose (pink): 12 g, about 36 m. Used for panels, seam, pole caps, and cord.
- Burgundy: 7 g, about 21 m. Used for panels.
These figures assume a cotton of about 150 m per 50 g. The quantities include roughly a 20% margin for swatching and tails.
Tools:
- 2.75 mm (C-2) hook, plus 2.5 mm and 3.0 mm hooks for gauge adjustment
- 3 in (7.6 cm) cream ball insert, such as a satin-covered foam ball or a shatterproof ornament with the cap removed
- Tapestry needle
- 2 stitch markers
- Scissors and a ruler
- Spray bottle or steam iron (optional, for blocking)
Abbreviations (US Terms)
- ch – chain
- sl st – slip stitch
- sc – single crochet
- hdc – half double crochet
- dc – double crochet
- sc2tog – single crochet 2 together
- sk – skip
- sp – space
- st(s) – stitch(es)
- RS / WS – right side / wrong side
- rep – repeat
Popcorn (pc): Work 4 dc in the same st. Remove your hook from the loop. Insert the hook from front to back through the top of the first dc of the group. Place the dropped loop back on the hook and pull it through.
The “ch 1” that follows each pc in the pattern locks it closed. A pc counts as 1 st. Popcorns are worked only on RS rows, so they always pop toward the outside of the ornament.
Gauge and Checkpoints
Gauge: 12 sc = 2 in (5.1 cm) along a row. Five dc-height rows = 2 in (5.1 cm), which means each row is about 0.4 in (1.0 cm) tall at the center.
Test first: Work Rows 1–4, the first pink panel, before committing. This panel is your swatch.
Checkpoint 1 (after Row 4):
– Length pole to pole: 4.8 in (12.2 cm)
– Panel width at the center: 1.6 in (4.1 cm)
Checkpoint 2 (after Row 12): The center width is 4.8 in (12.2 cm).
Checkpoint 3 (after Row 24): The center width is 9.6 in (24.4 cm). The length is still 4.8 in (12.2 cm).
The insert’s circumference is 9.4 in (23.9 cm). A 9.6 in (24.4 cm) cover fits snugly once you account for stitch thickness.
If your pieces are too big: If the length is over 5 in (12.7 cm) or the center width is over 10 in (25.4 cm), go down to a 2.5 mm hook.
If your pieces are too small: If the length is under 4.6 in (11.7 cm) or the center width is under 9 in (22.9 cm), go up to a 3.0 mm hook.
Do not change the stitch counts. All of the shaping depends on the 29-stitch row.
The Cover: Row Types
Every row has 29 positions. Each sc, hdc, dc, pc, and ch-1 sp counts as one position.
Every row starts with ch 1, which does not count as a stitch. Turn at the end of every row.
The row is symmetric:
– Positions 1–2 are sc
– Positions 3–4 are hdc
– Positions 5–25 form the tall center zone
– Positions 26–27 are hdc
– Positions 28–29 are sc
Solid Row (S): Ch 1. Sc in the first 2 sts, hdc in next 2, dc in next 21, hdc in next 2, sc in last 2.
– Work into every st, pc, and ch-1 sp of the row below.
– Count: 4 sc, 4 hdc, 21 dc = 29 sts.
Mesh Row (M, always a WS row): Ch 1. Sc in the first 2 sts, hdc in next 2, dc in next st.
– Ch 1, sk next st or ch-sp, dc in next st (a dc or the top of a pc). Rep from * 9 more times.
– Hdc in next 2, sc in last 2.
– Count: 4 sc, 4 hdc, 11 dc, 10 ch-1 sps = 29.
Popcorn Row A (PC-A, always a RS row): Ch 1. Sc in the first 2 sts, hdc in next 2, dc in next st.
– Ch 1, sk next st or ch-sp, pc in next st, ch 1, sk next st or ch-sp, dc in next st. Rep from * 4 more times.
– Hdc in next 2, sc in last 2.
– Count: 4 sc, 4 hdc, 6 dc, 5 pc, 10 ch-1 sps = 29.
– The popcorns land on positions 7, 11, 15, 19, and 23.
Popcorn Row B (PC-B, offset, always a RS row): Ch 1. Sc in the first 2 sts, hdc in next 2, dc in next st, ch 1, sk next ch-sp, dc in next st.
– Ch 1, sk next ch-sp, pc in next st, ch 1, sk next ch-sp, dc in next st. Rep from * 3 more times.
– Ch 1, sk next ch-sp, dc in next st, hdc in next 2, sc in last 2.
– Count: 4 sc, 4 hdc, 7 dc, 4 pc, 10 ch-1 sps = 29.
– The popcorns land on positions 9, 13, 17, and 21. They sit between the PC-A popcorns, which forms the diamond lattice.
All dc and pc positions are odd numbers, and all ch-sps are even numbers. Because of this, every row type stacks cleanly on any other.
The Cover: Row by Row
Foundation: With pink, ch 30.
Row 1 (RS, Solid): Sc in the 2nd ch from the hook and the next ch, hdc in next 2 ch, dc in next 21 ch, hdc in next 2 ch, sc in last 2 ch. Turn. (29 sts)
Place a marker on this edge. This is the top edge (A), where Row 1 began. Every color change happens at edge A. The opposite end is the bottom edge (B).
Pink panel (Rows 1–4):
– Row 1 (RS): Solid
– Row 2 (WS): Mesh
– Row 3 (RS): PC-A
– Row 4 (WS): Solid. Change to burgundy in the last yarn over. (29 sts)
Burgundy panel (Rows 5–8):
– Row 5 (RS): PC-A
– Row 6 (WS): Mesh
– Row 7 (RS): PC-B
– Row 8 (WS): Solid. Change to pink in the last yarn over. (29 sts)
Do not cut the unused color. Carry it loosely up edge A. Each color is needed again 4 rows later, at the same edge.
Rows 9–12: Repeat the pink panel. Checkpoint 2: the center width is 4.8 in (12.2 cm).
Rows 13–16: Repeat the burgundy panel.
Rows 17–20: Repeat the pink panel.
Rows 21–24: Repeat the burgundy panel. Row 24 ends at edge A. (29 sts) Checkpoint 3: the center width is 9.6 in (24.4 cm).
Fasten off burgundy, leaving a 6 in (15.2 cm) tail. Cut pink, leaving a 20 in (50.8 cm) tail for seaming.
Seam Over the Insert
- Wrap the piece around the insert with the RS out (popcorns facing you). Edge A sits at the top and edge B at the bottom.
- Bring Row 24 to meet the free loops of the foundation chain. Each edge has 29 sts.
- Thread the pink tail on a needle. Whipstitch the back loop of each Row 24 st to the matching foundation-chain loop: 29 stitches, 1 to 1.
- Keep the stitches firm but flat. The seam should lie as smoothly as the other panel joins.
- Checkpoint: The cover hugs the equator with no gap. Both pole openings are rings about 4.8 in (12.2 cm) around, made of 24 row ends each.
Border: Pole Caps
Border gauge: The caps are worked at 6 sc per inch, which matches the main gauge.
The row-end edge is looser, at about 5 row ends per inch. Each row end is roughly 0.2 in (0.5 cm) tall at the sc ends. Working 1 sc per row end therefore draws the ring in from 4.8 in (12.2 cm) to 4 in (10.2 cm). This starts the curve over the pole.
Bottom Cap (Edge B)
Join pink in any row end at edge B.
- Round 1 (conversion round): Ch 1. Sc in each row end around. Join with a sl st. 24 sc worked 1 per row end + 0 extra = 24 sc, which is 4 sc per panel. The ring is now about 4 in (10.2 cm).
- Round 2 (decrease): Ch 1. Sc2tog around. Join. 12 sts, 2 per panel, about 2 in (5.1 cm).
- Round 3 (decrease): Ch 1. Sc2tog around. Join. 6 sts, 1 per panel, about 1 in (2.5 cm).
Fasten off. Thread the tail through the front loops of all 6 sts, cinch closed, and weave in.
Top Cap (Edge A)
Join pink at edge A.
- Round 1: Work as for the bottom cap, but work each sc over the carried pink and burgundy strands and the burgundy tail to hide them. 24 sc.
- Rounds 2–3: Work as for the bottom cap. 12 sts, then 6 sts. Do not fasten off.
Cord: Ch 36, which is about 6 in (15.2 cm). Sl st into the Round 3 joining st to form a ring. Sl st in each ch of the ring for a firmer cord. (36 sl sts)
Fasten off. Cinch the 6 cap sts through their front loops, wrapping the tail twice around the base of the loop to make a small knot. Weave in. The loop hangs about 3 in (7.6 cm) tall.
Why the Math Works
The equator holds 6 panels × 4 rows = 24 rows. Each pole ring therefore has 24 row ends.
- 24 ÷ 6 panels = 4 sc per panel
- Halving twice gives 12, then 6
- That leaves exactly 1 stitch per panel at the close
The decreases are evenly spaced within each panel. As a result, the pink and burgundy stripes meet the pole center symmetrically, and the caps form a rounded dome instead of a pucker.
Final Blocking
- Spritz the cover lightly with water, or hover a steam iron about 0.5 in (1.3 cm) above it. Never press.
- Use your fingertips to push each popcorn outward so it stands proud.
- Nudge the mesh windows open so they read as small, even squares.
- Straighten the panel lines so they run directly from pole to pole.
- Pull the cord straight and let it hang while drying.
- Let the ornament dry fully on the insert, at least 2 hours.
Final Quality-Control Checklist
- [ ] There are 6 panels, alternating pink and burgundy, each 4 rows wide.
- [ ] Every row has 29 positions. PC-A rows have 5 popcorns and PC-B rows have 4.
- [ ] Every popcorn pops outward.
- [ ] The seam is flat and the panel order continues unbroken across it.
- [ ] Each pole cap went 24 → 12 → 6 sts and is cinched with no hole.
- [ ] No carried strands are visible at the top.
- [ ] The diameter is about 3.25 in (8.3 cm).
- [ ] The cord is 36 sl sts and the loop is about 3 in (7.6 cm) tall.
Troubleshooting
Popcorns sink inward: You worked them on a WS row, or you inserted the hook back to front when closing them. Rework them on RS rows, closing from front to back.
The cover is too loose on the insert: Rework with a 2.5 mm hook. Alternatively, use an insert with a slightly larger diameter.
The cover won’t close at the equator: Your rows are too short in height. Go up to a 3.0 mm hook.
The poles pucker: Make sure Round 1 has exactly 24 sc, one per row end, with no extra sts at the seam.
Carried strands show at the top: Work Round 1 of the top cap firmly over them. Tug them gently before cinching.
The seam forms a ridge: You worked through both loops. Redo it through the back loops only.
The mesh looks lopsided: You skipped a st instead of a ch-sp, or the reverse. Recount to 29 positions.
Care
Spot clean with cool water and mild soap, then reshape on the insert and air dry. Store the ornament in a box with tissue so the popcorns don’t flatten.
Final Notes
The measurement chain is short and checkable at every stage:
- Gauge: 6 sts per inch and 0.4 in (1.0 cm) per row.
- First panel: 4.8 in (12.2 cm) long and 1.6 in (4.1 cm) wide.
- Flat cover: 24 rows, 9.6 in (24.4 cm) across.
- Seam: 29 stitches matched 1 to 1 over a 3 in (7.6 cm) insert.
- Pole caps: 24 → 12 → 6 sts.
- Finished ornament: about 3.25 in (8.3 cm) in diameter.
Optional: for a matching set, change only the panel colors and keep every count the same.
Happy crocheting!