

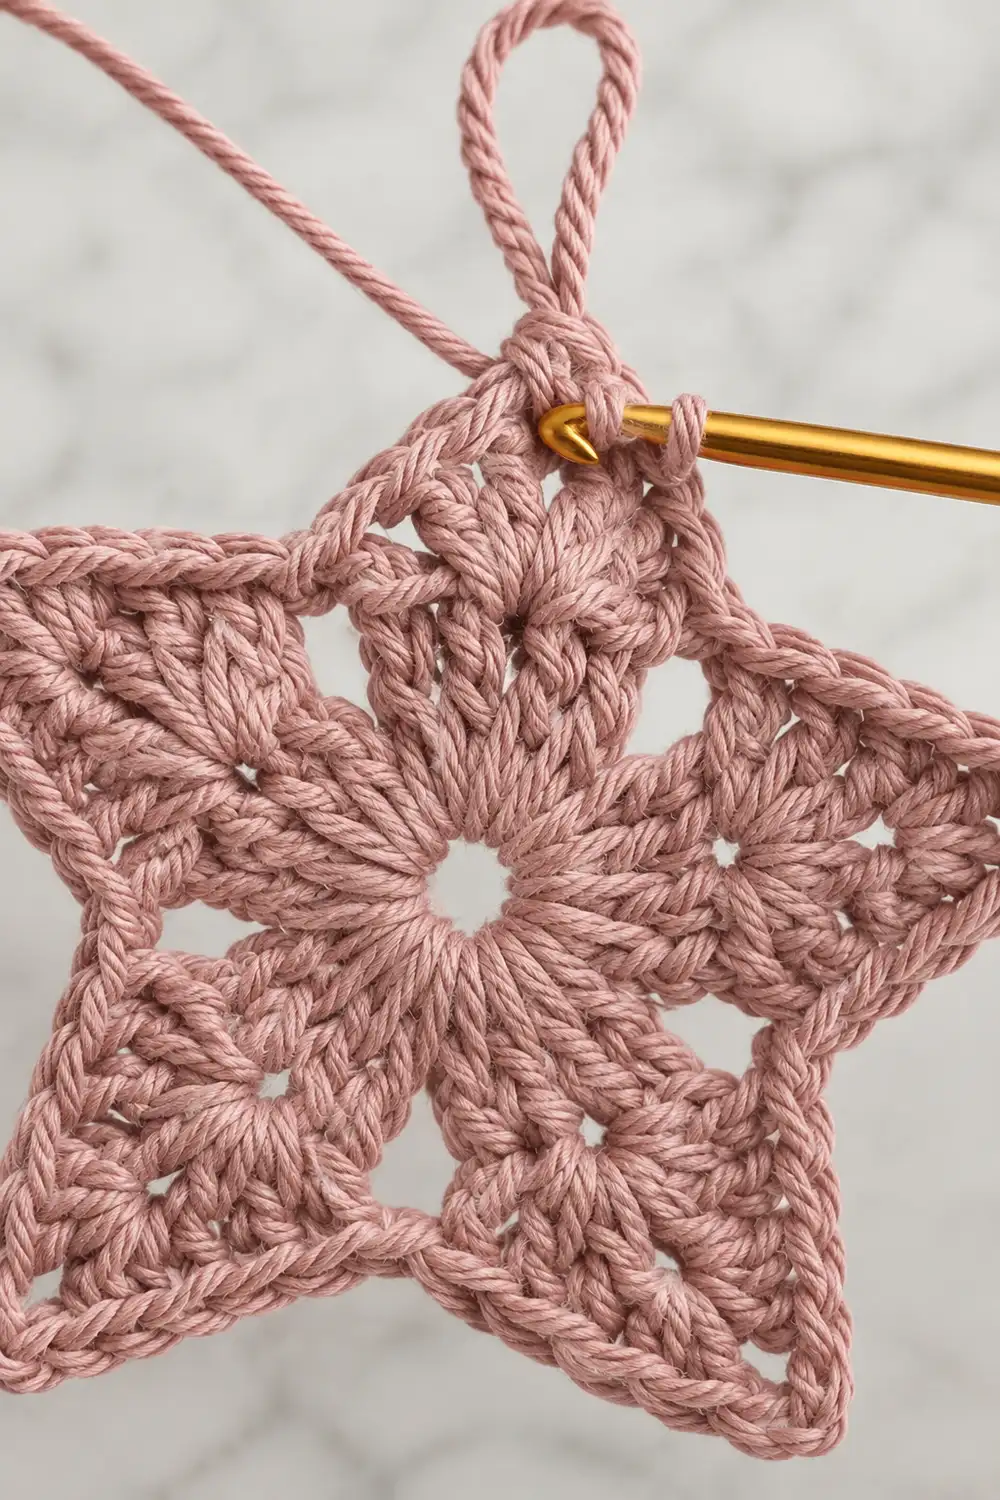
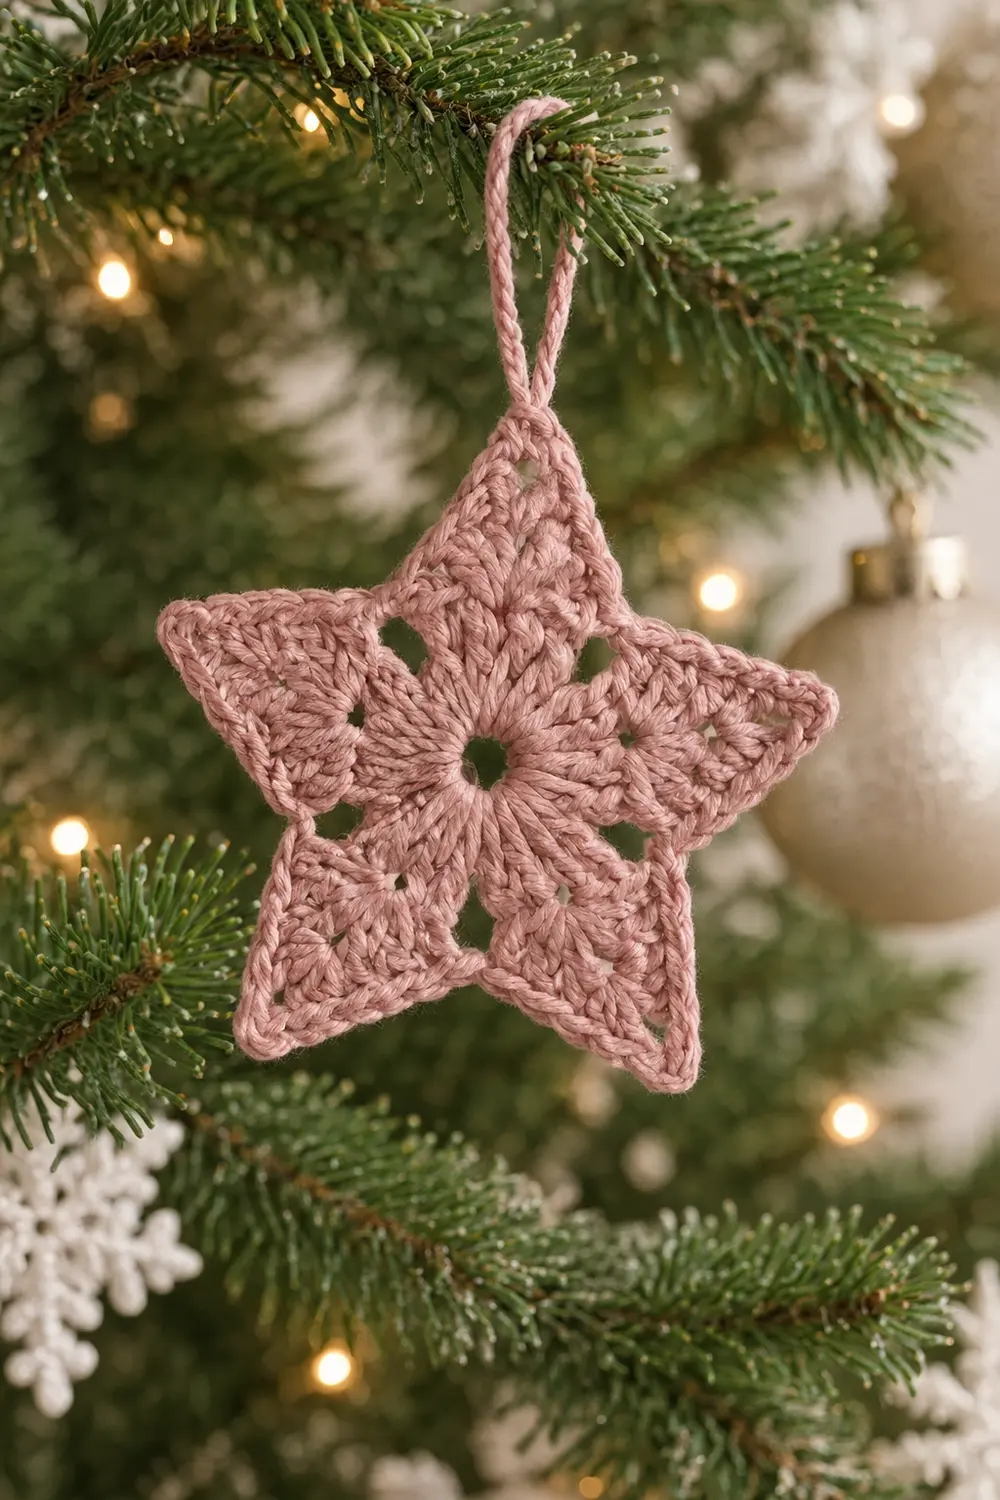
This is a single, lacy five-pointed star worked in a soft dusty rose (mauve pink) cotton. It has an open, filet-style mesh texture, with visible spaces between the stitch groups from the center ring to the outer edge. The result is light, delicate, and quick to make.
The star hangs from a twisted loop in matching yarn at the top point. Each point keeps a defined but soft outline. The last round is a plain single crochet edge that follows the star’s natural shape, with no picots or decorative trim.
The pattern uses US crochet terms. The finished star measures about 3.75 in (9.5 cm) across the widest points. It works well as a tree ornament, gift tag, or package topper.
The star is worked in the round from a magic ring:
- Round 1 sets up five open groups.
- Round 2 builds five shells.
- Round 3 turns each shell into a mesh point with chain spaces.
- Round 4 is a smooth single crochet edge.
The hanging loop is chained at the top point, then twisted at its base.
Finished Size and Construction
- Finished size: 3.75 in (9.5 cm) across the widest points
- Skill level: Easy (advanced beginner)
- Terminology: US crochet terms
- Yarn weight: DK / light worsted (weight 3) cotton
- Hook: 3.5 mm (E-4)
- Number of pieces: 1 (single motif, no joining)
- Layout: One five-pointed star, worked in the round
- Piece size: 3.75 in (9.5 cm) across
- Size before border: 3.25 in (8.3 cm) across after Round 3
- Border depth: about 0.25 in (0.6 cm) per edge, adding 0.5 in (1.3 cm) to the total width
- Hanging loop: about 1.25 in (3.2 cm) tall
Materials
Yarn advice: Choose a smooth, mercerized or combed cotton in DK weight. Cotton shows the open mesh clearly and holds sharp points after blocking. Fuzzy or very soft acrylic will blur the spaces and round off the tips.
Color:
– Dusty rose / mauve pink: 10 g, about 23 m (25 yd)
Tools:
– 3.5 mm (E-4) crochet hook
– Tapestry needle
– Scissors
– Rust-proof pins and a foam blocking mat
– Spray bottle with water
– Optional: spray starch for a crisper finish
– Ruler or tape measure
The yarn quantity includes a margin of about 40% for the gauge swatch, tails, and the hanging loop. The star itself uses roughly 6 g (about 14 m / 15 yd).
Abbreviations (US Terms)
- ch – chain
- sl st – slip stitch
- sc – single crochet
- dc – double crochet
- sp – space
- st(s) – stitch(es)
- rep – repeat
- sc2tog (special stitch, worked across spaces) – Insert hook into the next ch-1 space, yarn over, and pull up a loop. Skip the valley sc. Insert hook into the following ch-1 space, yarn over, and pull up a loop. Yarn over and pull through all 3 loops on the hook. This creates a sharp inward V between two points.
Gauge and Checkpoints
Because this is a single motif, your first star is your gauge test. Measure after each round and compare to the checkpoints below.
Base gauge: With a 3.5 mm hook and DK cotton, 5 sc = 1 in (2.5 cm). Chains run at about 5 ch = 1 in (2.5 cm).
Checkpoints:
– After Round 1: circle about 1 in (2.5 cm) in diameter
– After Round 2: about 2 in (5.1 cm) across the shells
– After Round 3: 3.25 in (8.3 cm) across the widest points
– After Round 4: 3.75 in (9.5 cm) across the widest points
If your star is too big: Go down to a 3.25 mm (D-3) or 3 mm hook. Also check that your chain spaces are not loose.
If your star is too small: Go up to a 3.75 mm (F-5) or 4 mm (G-6) hook.
A difference of up to 0.25 in (0.6 cm) is fine for an ornament. Anything larger is worth a hook change.
Pattern
Round 1 – Center Ring
Make a magic ring.
Ch 3 (counts as dc). Work 2 dc in the ring, then ch 2. Work 3 dc in the ring, ch 2. Repeat from * to * 3 more times.
Pull the ring closed snugly, leaving a small center hole. Sl st to the top of the beginning ch-3.
Count: 15 dc (5 groups of 3) and 5 ch-2 spaces.
Checkpoint: about 1 in (2.5 cm) in diameter.
Round 2 – Shells
Sl st in the next 2 dc and into the ch-2 space.
Ch 3 (counts as dc). Work (2 dc, ch 2, 3 dc) in the same space, then ch 1. Work (3 dc, ch 2, 3 dc) in the next ch-2 space, ch 1. Repeat from * to * 3 more times. Sl st to the top of the beginning ch-3.
Count: 30 dc (5 shells of 6 dc), 5 ch-2 spaces at shell centers, and 5 ch-1 spaces between shells.
This is a growth round: the 15 dc of Round 1 become 30 dc here. Each ch-2 space will become a star point. Each ch-1 space will become a valley between points.
Checkpoint: about 2 in (5.1 cm) across.
Round 3 – Mesh Points
Sl st in the next 2 dc and into the ch-2 space.
First point: Ch 3 (counts as dc). Work (dc, ch 3, 2 dc) in the same space.
Side and valley sequence:
1. Ch 1, skip the next dc, then dc in the next dc.
2. Ch 1, skip the next dc, then sc in the ch-1 space (valley).
3. Ch 1, skip the next dc, then dc in the next dc.
4. Ch 1, skip the next dc.
Next point: Work (2 dc, ch 3, 2 dc) in the next ch-2 space. Repeat steps 1–4. Repeat from * to * 3 more times. Sl st to the top of the beginning ch-3.
How the skips line up: After each point, the next 3 stitches are the last half of that Round 2 shell. You skip 1, dc in 1, and skip 1, landing in the ch-1 valley space. The same skip-dc-skip happens on the first half of the next shell, landing in the next ch-2 space. Each skipped stitch becomes an open mesh square.
Count per point:
– 6 dc: 4 at the tip and 1 on each side
– 1 sc in the valley
– 1 ch-3 tip space
– 4 ch-1 mesh spaces
Round total: 30 dc, 5 sc, 5 ch-3 spaces, and 20 ch-1 spaces.
This is a reshaping round. The dc count stays at 30, but the stitches are redistributed into points, and the chain spaces create the open filet texture.
Checkpoint: 3.25 in (8.3 cm) across the widest points. This is the size before the border.
Border: Round 4 – Smooth Edge
The border is a single round of plain sc that outlines the star. It is not a decorative trim. It simply firms the edges so each point holds a clean, soft shape. It has no picots or shells.
Border gauge: 5 sc = 1 in (2.5 cm). This is the same base gauge you checked earlier.
Setup: Sl st in the next dc and into the ch-3 space. Choose this point as the top of the star.
Instructions:
- Ch 1. Work (2 sc, ch 2, 2 sc) in the ch-3 space.
- Sc in each of the next 2 dc.
- Sc in the ch-1 space, then sc in the next dc.
- Sc2tog across the next ch-1 space and the following ch-1 space, skipping the valley sc.
- Sc in the next dc, then sc in the ch-1 space.
- Sc in each of the next 2 dc.
- Work (2 sc, ch 2, 2 sc) in the next ch-3 space.
- Repeat steps 2–7 three more times.
- Repeat steps 2–6 once more. The last 2 dc are the beginning ch-3 and dc from Round 3.
- Sl st to the first sc.
Do not fasten off.
Count per side (tip to valley): 6 sc. That is 2 sc from the tip group, 2 sc in dc, 1 sc in a ch-1 space, and 1 sc in the side dc. Each valley adds 1 shared sc2tog.
Count per point: 13 sts. That is 4 tip sc, 4 sc on the left side, 1 sc2tog, and 4 sc on the right side, plus 1 ch-2 tip space.
Round total: 10 sides × 6 sc = 60 sc, plus 5 sc2tog = 65 sts, plus 5 ch-2 tip spaces.
Why the math works: Each side of a point in Round 3 has exactly 2 dc at the tip, 1 ch-1 space, 1 side dc, and 1 ch-1 space before the valley sc. Round 4 places 1 sc in each tip dc, 1 sc in the first space, and 1 sc in the side dc. That gives 4 sc, plus the 2 tip-space sc, for 6 sc per side.
The second ch-1 space on each side is absorbed into the sc2tog. That pulls the valley inward instead of letting it round out.
Each side is about 1.3 in (3.3 cm) long at 5 sc per in (2.5 cm). The edge adds about 0.25 in (0.6 cm) per side, bringing the star from 3.25 in (8.3 cm) to 3.75 in (9.5 cm).
Checkpoint: 3.75 in (9.5 cm) across the widest points.
Hanging Loop
In the photo, the hook is working at the top center of the star. This is where the loop is attached.
- Sl st in the next 2 sc to reach the top point, then sl st into the ch-2 tip space.
- Ch 16, about 3.25 in (8.3 cm) of chain.
- Sl st back into the same ch-2 tip space to close the loop.
- Fasten off, leaving a 6 in (15.2 cm) tail.
- Pinch both legs of the loop together just above the tip. Rotate the loop 3 full turns so the lower 0.4 in (1.0 cm) of the legs twist around each other.
- Thread the tail onto a tapestry needle. Wrap it 3 times around the twisted base, pass it down through the center of the wraps, and weave it into the back of the star.
The finished loop stands about 1.25 in (3.2 cm) tall above the tip.
Final Blocking
- Weave in the starting tail along the back of Round 1. Leave the loop tail woven but not trimmed too short.
- Soak the star in cool water for 5 minutes. Press out the water in a towel; do not wring it.
- Lay the star right side up on a blocking mat.
- Pin the top point first, then the four other points. Check that it measures 3.75 in (9.5 cm) across the widest points.
- Pin each valley gently inward to sharpen the V shapes.
- Use a pin or the tip of your needle to open each ch-1 mesh space so the openwork reads clearly.
- Optional: mist lightly with spray starch for a crisper ornament.
- Let it dry completely, usually 4–6 hours, before unpinning.
Final Quality-Control Checklist
- [ ] Round 1 has 15 dc and 5 ch-2 spaces, with a small, tight center hole.
- [ ] Round 2 has 5 shells and 5 ch-1 spaces, for 30 dc total.
- [ ] Round 3 has 30 dc, 5 sc, 5 ch-3 tips, and 20 ch-1 spaces.
- [ ] Round 4 has 65 sts and 5 ch-2 tips, with 6 sc per side.
- [ ] All five points are the same length within 0.13 in (0.3 cm).
- [ ] The star measures 3.75 in (9.5 cm) across.
- [ ] The edge is smooth sc only, with no picots or extra trim.
- [ ] The mesh spaces are open and visible across the whole star.
- [ ] The hanging loop is about 1.25 in (3.2 cm) tall, twisted at the base, and firmly secured.
- [ ] All tails are woven in on the back.
Troubleshooting
The center ring won’t close. You may have pulled the ring closed before working all the stitches. Rework Round 1 and pull the tail firmly before the sl st join.
The star cups or ruffles. Your dc are likely too tall compared to your chains. Tighten the dc, or go down one hook size for Rounds 2 and 3 only.
The points look rounded, not pointed. Make sure the tip is worked as (2 sc, ch 2, 2 sc) in the ch-3 space. Pin the tips sharply when blocking.
The valleys are shallow. Check that the sc2tog skips the valley sc. Working into the valley sc adds height there and softens the V.
The mesh spaces close up. You may be working into the chain stitches instead of the spaces. In Round 4, insert your hook under the ch-1, not into it.
The stitch count is off in Round 3. Recount the skip-dc-skip sequence. Each shell half of 3 dc should give exactly 1 dc and 2 ch-1 spaces.
The loop untwists. Add one more wrap at the base and pass the tail through the wraps twice before weaving it in.
Optional scaling idea: If you like, make several stars and string them on a cord as a garland. This is optional and not part of this pattern.
Care
Hand wash in cool water and lay flat to dry, re-pinning the points if needed. Store flat or hanging to keep the points crisp.
Final Notes
The measurement chain for this star is simple:
- Round 1: 1 in (2.5 cm)
- Round 2: 2 in (5.1 cm)
- Round 3: 3.25 in (8.3 cm), before the border
- Round 4: 3.75 in (9.5 cm), after a plain sc edge of 65 sts (6 sc per side plus 5 valley decreases)
The twisted hanging loop adds 1.25 in (3.2 cm) at the top. Check each round against its count and measurement, block the points firmly, and you’ll have a light, lacy dusty rose star ready to hang.
Happy crocheting!