

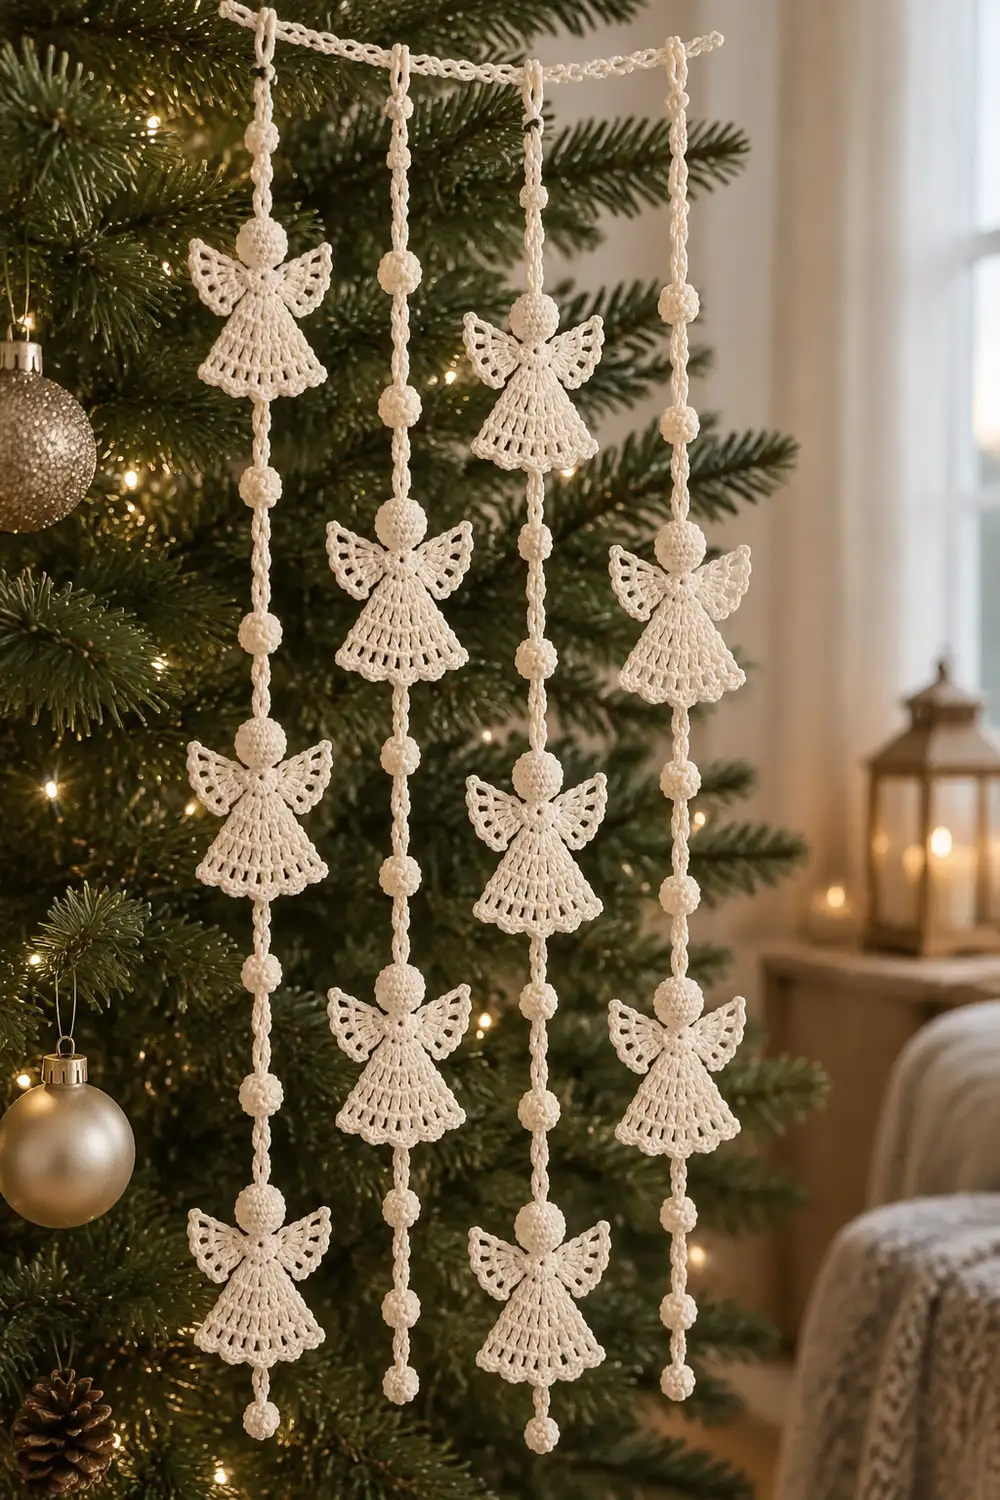
This garland has four vertical strands hanging side by side. Each strand alternates small popcorn spheres with lacy angel ornaments, spaced evenly along a braided-look cord. Each angel has a round ball head, a bell-shaped mesh skirt that flares at the hem, and two openwork wings that extend straight out from the shoulders.
Everything is worked in one cream or off-white cotton, so the garland looks calm and cohesive. It works well against an evergreen branch, a mantel, or a window frame.
The pattern uses US crochet terms. The finished garland measures 15.5 in (39.4 cm) wide and 24 in (61.0 cm) long below the hanger. Each angel is about 3 in (7.6 cm) tall with a 3.5 in (8.9 cm) wingspan.
For each angel, you crochet a stuffed head, a flat filet-mesh body worked in rows from the neck down, and two fan-shaped wings. The spheres are tiny stuffed balls with a round of popcorn stitches. The cord is a chain with slip stitches worked into the back bumps. You thread the spheres onto the cord, then stitch the angels to it.
Finished Size and Construction
- Finished size: 15.5 in (39.4 cm) wide × 24 in (61.0 cm) long, plus a 4 in (10.2 cm) tie at the top of each strand
- Skill level: Intermediate
- Terminology: US crochet terms
- Yarn weight: Fine (#2, sport) mercerized cotton
- Hook: 2.75 mm (C-2)
- Number of pieces: 68 in total: 12 heads, 12 bodies, 24 wings, 16 spheres and 4 cords
- Layout: 4 strands × 7 elements each, in the order sphere–angel–sphere–angel–sphere–angel–sphere
- Piece size:
- Angel: about 3 in (7.6 cm) tall
- Body: 3 in (7.6 cm) wide at the hem
- Wingspan: 3.5 in (8.9 cm)
- Sphere: 0.75 in (1.9 cm)
- Size before border: Angel body 2.75 in (7.0 cm) wide × 1.75 in (4.4 cm) tall. Wing 1.125 in (2.9 cm) long.
- Border depth: about 1/8 in (0.3 cm) of sc trim on the body sides, the body hem and the wing edges
Materials
Yarn: Use a smooth mercerized cotton in fine (#2) weight. Cotton holds the lace crisply and blocks flat. Avoid fuzzy acrylic, because it hides the mesh.
- Cream: 100 g (300 m) in total
- Angels: about 60 g (180 m)
- Spheres: about 16 g (48 m)
- Cords: about 6 g (18 m)
These quantities include a margin of about 18% for swatching and tails.
Tools:
- 2.75 mm (C-2) hook
- Tapestry needle, plus one large blunt needle
- Polyester fiberfill, about 10 g
- Stitch markers
- Rust-proof pins and a blocking mat
- Spray bottle, plus spray starch (optional)
- Ruler or tape measure
- Hanger such as a dowel, a branch or a rod, at least 18 in (45.7 cm) long
Abbreviations (US Terms)
- ch: chain
- sl st: slip stitch
- sc: single crochet
- dc: double crochet
- inc: 2 sc in the same stitch
- dec: sc2tog (the invisible decrease is recommended)
- MR: magic ring
- pc: popcorn
- st(s): stitch(es)
- sp: space
- beg: beginning
- tch: turning chain
- rnd: round
Popcorn (pc): Work 4 dc in the same stitch. Remove the hook from the loop. Insert the hook from front to back into the top of the first dc, pick up the dropped loop and pull it through. The popcorn pops toward you.
Back-bump cord: Make a chain. Then sl st into the back bump of each chain, starting with the 2nd ch from the hook. This gives a firm cord with a braided look.
Gauge and Checkpoints
Base gauge: 6 sc and 7 rnds = 1 in (2.5 cm) in sc worked in the round.
Mesh gauge: 19 sts of dc mesh = 2.75 in (7.0 cm). Ch-1 spaces naturally pack a little tighter than solid sc.
Make one complete angel and one sphere before you make the rest. Check each stage as you go:
- Head: about 1 in (2.5 cm) in diameter and 1 in (2.5 cm) tall
- Body Row 2: 1 in (2.5 cm) wide, the same width as the head
- Body Row 6: 2.75 in (7.0 cm) wide at the hem
- Body after border: 3 in (7.6 cm) wide × about 1.9 in (4.8 cm) tall
- Wing after border: 1.25 in (3.2 cm) long, with a 1.75 in (4.4 cm) outer edge
- Sphere: 0.75 in (1.9 cm)
- Cord: 28 in (71.1 cm) long
If your pieces are too big, go down to a 2.5 mm hook. If they are too small, go up to a 3 mm hook. Change the hook rather than the stitch counts, because the spacing and layout depend on these measurements.
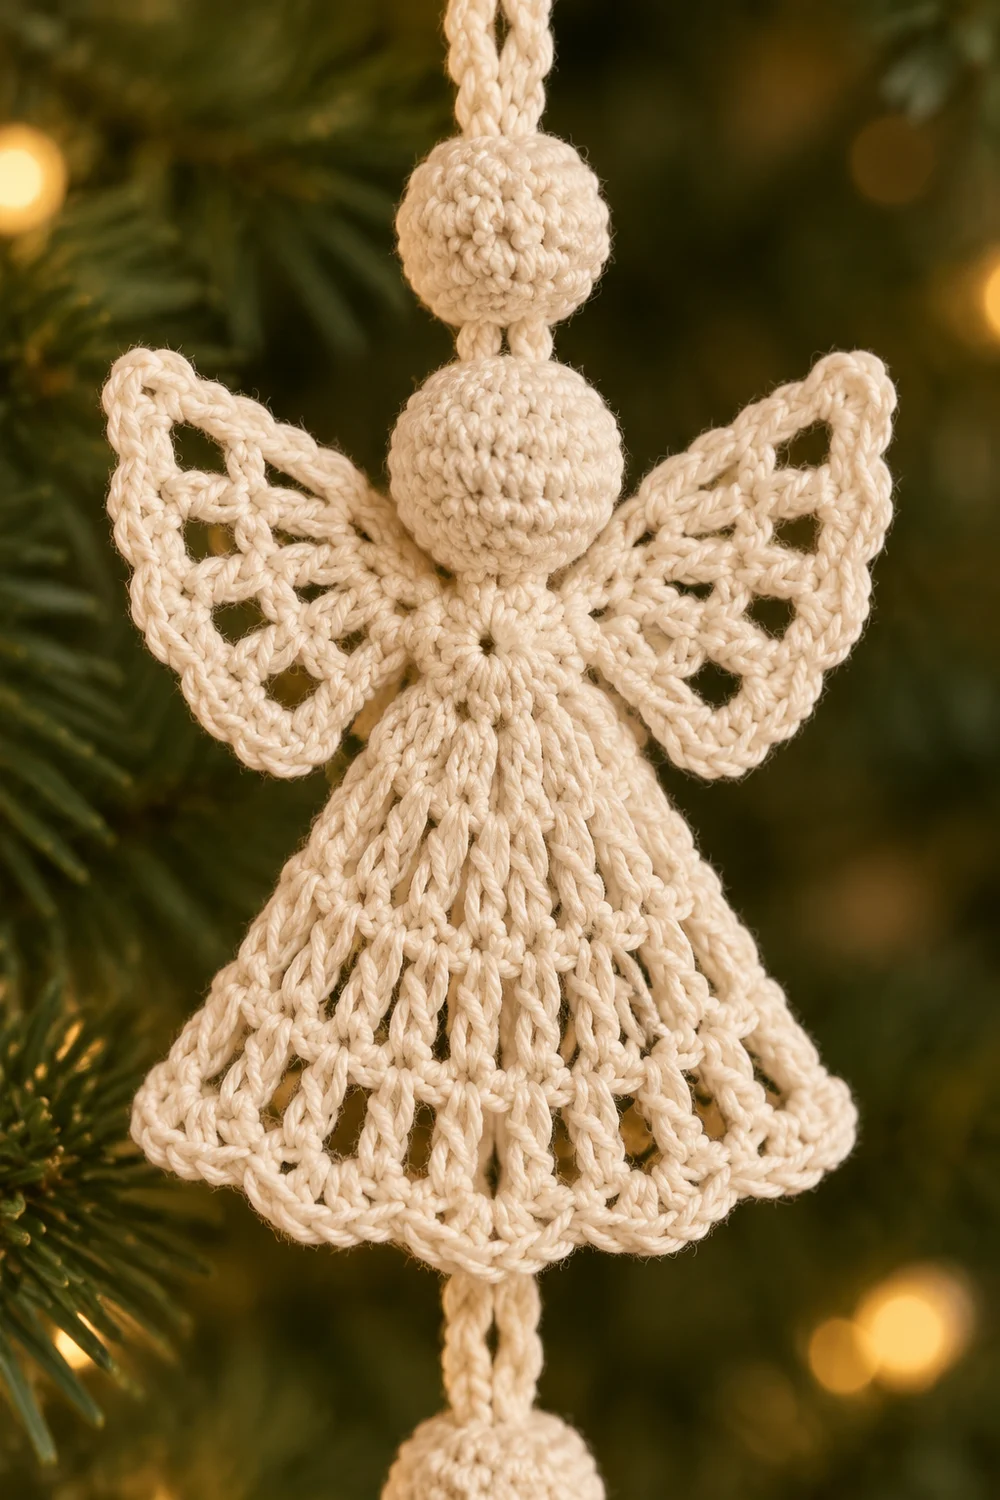
Head (make 12)
Work in continuous rounds and move a marker up each round.
- Rnd 1: 6 sc in MR. (6)
- Rnd 2: inc in each st around. (12)
- Rnd 3: (sc, inc) 6 times. (18)
- Rnds 4–5: sc in each st around. (18)
- Rnd 6: (sc, dec) 6 times. (12) Stuff the head firmly.
- Rnd 7: dec 6 times. (6)
Fasten off and leave a 6 in (15.2 cm) tail. Weave the tail through the front loops of the last round and pull it closed.
Checkpoint: The head should measure 1 in (2.5 cm). The 18-st circumference is 3 in (7.6 cm) at 6 sc per inch, which gives about a 1 in diameter.
Body (make 12)
The body is worked flat in rows from the neck down. The mesh is a dc and ch-1 pattern. Each ch-1 counts as 1 st, so every row has an odd count that starts and ends with a dc.
You increase by adding one mesh (2 sts) at each end, which adds 4 sts per increase row. Rows alternate between straight and increased at the top, then increase twice in a row at the bottom. This gives the bell shape: narrow shoulders and a flared hem.
- Row 1: Ch 8. Sc in the 2nd ch from the hook and in each ch across. Turn. (7 sc)
- Row 2: Ch 4 (counts as dc + ch 1). Skip the next sc, dc in the next sc. (Ch 1, skip 1, dc in the next sc) 2 times. Turn. (4 dc + 3 ch-1 sps = 7 sts)
- Row 3 (increase): Ch 4 (counts as dc + ch 1), dc in the first dc. (Ch 1, dc in the next dc) 3 times, working the last dc into the 3rd ch of the tch. Ch 1, dc in the same st. Turn. (6 dc + 5 sps = 11 sts)
- Row 4: Ch 4 (counts as dc + ch 1). Dc in the next dc. (Ch 1, dc in the next dc) across, working the last dc into the 3rd ch of the tch. Turn. (6 dc + 5 sps = 11 sts)
- Row 5 (increase): Ch 4, dc in the first dc. (Ch 1, dc in the next dc) 5 times. Ch 1, dc in the same st. Turn. (8 dc + 7 sps = 15 sts)
- Row 6 (increase): Ch 4, dc in the first dc. (Ch 1, dc in the next dc) 7 times. Ch 1, dc in the same st. Do not turn. (10 dc + 9 sps = 19 sts)
Fasten off. Row 1 is the neck edge.
Checkpoint: The hem should be 2.75 in (7.0 cm) wide and the body 1.75 in (4.4 cm) tall.
Wings (make 24)
Each wing is a small fan of widening openwork worked in rows.
- Row 1: Ch 5. Dc in the 5th ch from the hook (the skipped ch count as dc + ch 1). (Ch 1, dc in the same ch) 3 times. Turn. (5 dc, 4 ch-1 sps)
- Row 2: Ch 5 (counts as dc + ch 2). Dc in the next dc. (Ch 2, dc in the next dc) 2 times. Ch 2, dc in the top of the beg ch. Turn. (5 dc, 4 ch-2 sps)
- Row 3: Ch 6 (counts as dc + ch 3). Dc in the next dc. (Ch 3, dc in the next dc) 2 times. Ch 3, dc in the 3rd ch of the tch. Do not fasten off. (5 dc, 4 ch-3 sps)
The wing border continues from this point.
Checkpoint: The wing should measure 1.125 in (2.9 cm) from the point to the outer edge.
Spheres (make 16)
- Rnd 1: 6 sc in MR. (6)
- Rnd 2: inc in each st around. (12)
- Rnd 3: (sc, pc) 6 times. (12: 6 sc + 6 pc)
- Rnd 4: dec 6 times. (6)
Stuff the sphere tightly so it feels solid. Close it as you did the head, and leave an 8 in (20.3 cm) tail for attaching.
Checkpoint: The sphere should measure 0.75 in (1.9 cm).
Cords (make 4)
Ch 169. Sl st in the back bump of the 2nd ch from the hook and in each ch across. (168 sl sts) Fasten off.
Checkpoint: The cord should be 28 in (71.1 cm) long, which is 24 in (61.0 cm) of strand plus a 4 in (10.2 cm) tie. If it comes out shorter or longer, add or remove chains at 6 ch per inch.
Make All Pieces
All pieces are cream.
- 12 heads
- 12 bodies
- 24 wings
- 16 spheres
- 4 cords
Layout: Each level shows the distance from the top of the strand (just below the tie) to the top of that element.
LEVEL 1 (2 in / 5.1 cm):       SPHERE  SPHERE  SPHERE  SPHERE
LEVEL 2 (4.25 in / 10.8 cm):   ANGEL   ANGEL   ANGEL   ANGEL
LEVEL 3 (8.75 in / 22.2 cm):   SPHERE  SPHERE  SPHERE  SPHERE
LEVEL 4 (11 in / 27.9 cm):     ANGEL   ANGEL   ANGEL   ANGEL
LEVEL 5 (15.5 in / 39.4 cm):   SPHERE  SPHERE  SPHERE  SPHERE
LEVEL 6 (17.75 in / 45.1 cm):  ANGEL   ANGEL   ANGEL   ANGEL
LEVEL 7 (22.25 in / 56.5 cm):  SPHERE  SPHERE  SPHERE  SPHERE
Spacing math for one strand:
| Section | Length |
|---|---|
| Bare cord at the top | 2 in (5.1 cm) |
| 4 spheres × 0.75 in | 3 in (7.6 cm) |
| 3 angels × 3 in | 9 in (22.9 cm) |
| 6 gaps × 1.5 in (3.8 cm) | 9 in (22.9 cm) |
| Bottom tail | 1 in (2.5 cm) |
| Total | 24 in (61.0 cm) |
Optional: For a staggered look, tie strands 2 and 4 about 3.5 in (8.9 cm) lower on the hanger.
Border
The border is a single round of sc trim on each body and each wing. It is applied before assembly.
Border gauge: Work the trim at mesh density, about 7 sc per inch. This is deliberately tighter than the head’s 6 sc per inch, and it keeps the hem flat and crisp.
Body Border
With the right side facing, join the yarn at the top of the left side, next to the neck. Leave the neck edge (Row 1) unbordered, because it will be sewn to the head.
- Left side: Work 1 sc in the Row 1 row end, then 2 sc in each of the 5 dc row ends. (11 sc)
- Hem: 3 sc in the first st of Row 6. Sc in each of the next 17 sts, working each ch-1 sp as one st. 3 sc in the last st.
- Right side: 11 sc, worked to match the left side.
Fasten off. Total: 45 sc (11 + 23 + 11).
The hem side is a conversion round. Its 23 sc are 19 (1 per existing st) + 4 (2 extra at each corner).
Why it works:
- The 19 hem sc match the 19 mesh sts one-for-one, so the hem neither ruffles nor pulls in.
- Each dc row is about 1/3 in (0.8 cm) tall, so 2 sc per row end keeps the sides near 7 sc per inch.
- The body becomes 3 in (7.6 cm) wide.
Wing Border
Continue from Row 3 of the wing.
- Ch 1. Sc in the last dc made.
- (3 sc in the next ch-3 sp, sc in the next dc) 4 times. (17 sc on the outer edge)
- Down the side: 2 sc in each of the 3 row ends. (6)
- 1 sc at the point.
- Up the other side: 2 sc in each of the 3 row ends. (6)
- Sl st to the first sc.
Total: 30 sc. The outer edge is a conversion: 5 sc (1 per dc) + 12 sc (3 per ch-3 sp).
Three sc lie flat across a ch-3, which brings the wing to 1.25 in (3.2 cm) long.
Joining
Assembling Each Angel
- Center the head over Row 1 of the body.
- Whipstitch the 7 neck stitches to the bottom of the head, one stitch per sc, using the head tail.
- Pin a wing behind each shoulder. The wing point should sit at the Row 2 row end, with the outer edge pointing straight out sideways.
- Tack each wing point with 3–4 small stitches through the back of the body.
Checkpoint: The wingspan should be 3.5 in (8.9 cm). That is 1.25 in + 1.25 in of wing plus 1 in (2.5 cm) of shoulders.
Attaching Elements to the Cord
- Mark the levels from the layout on each cord, measuring down from the 4 in (10.2 cm) tie.
- Open a channel through the center of each sphere with the large blunt needle.
- Thread the 4 spheres onto the cord from the bottom end. Slide each one to its mark.
- Tack each sphere at its top and bottom with its tail, catching the cord.
- Lay each angel face up with the cord running down its center back. The cord should enter at the top of the head and exit at the hem.
- Whipstitch the cord to the back of the head, every row from top to bottom. Then stitch it to the center back of the body, catching one strand of the body at each row.
- Tie an overhand knot 1 in (2.5 cm) below the last sphere and weave in the end.
Tension
Keep the tacking stitches snug but invisible from the front. If the cord is pulled too tight, the angel puckers. If it is stitched too loosely, the angel twists.
Hanging
Tie each strand to the hanger, spacing the strands 4 in (10.2 cm) apart from center to center.
Checkpoint: The garland should be 15.5 in (39.4 cm) wide: 3 gaps × 4 in, plus 3.5 in of wingspan. It should hang 24 in (61.0 cm) long.
Final Blocking
- Lightly mist each angel and sphere with water.
- Pin each body flat. Open every mesh space and pin the hem to 3 in (7.6 cm).
- Pin each wing to 1.25 in (3.2 cm), then open the ch-3 spaces with a pin tip.
- Apply spray starch to the bodies and wings if you want extra crispness.
- Roll the spheres between your palms to round them.
- Let everything dry completely, ideally overnight.
- Hang the garland and straighten each strand by hand.
Final Quality-Control Checklist
- [ ] There are 12 angels and 16 spheres, and every element sits at its marked level.
- [ ] Each head measures 1 in (2.5 cm) and holds its shape when squeezed.
- [ ] Each body hem measures 3 in (7.6 cm) and lies flat.
- [ ] The wings are symmetrical, horizontal and 1.25 in (3.2 cm) long.
- [ ] No stuffing shows through the spheres.
- [ ] All four cords measure 24 in (61.0 cm) below the tie.
- [ ] All ends are woven in and invisible from the front.
Troubleshooting
- Hem ruffles: You probably worked 2 sc into the ch-1 spaces. Use exactly 1 sc per hem st.
- Skirt looks triangular, not bell-shaped: Check that Rows 2 and 4 are straight rows, and that Rows 5 and 6 both increase.
- Mesh spaces close up: Your ch-1s are too tight. Loosen them, or go up a hook size for the body only.
- Popcorns sink inward: Pull the dropped loop through the front of the first dc, not the back.
- Angels twist on the cord: Add tacking stitches at the hem and at the top of the head.
- Wings droop: Tack them higher behind the shoulder and starch them.
Care
Hand wash in cool water with mild soap. Press out the water in a towel, then reshape and dry the pieces flat. Re-starch after washing if you like a crisp finish.
Final Notes
The measurement chain is simple:
- A 1 in (2.5 cm) head sits on a 1 in neck.
- The neck flares to a 3 in (7.6 cm) bordered hem.
- Two 1.25 in (3.2 cm) wings give each angel a 3.5 in (8.9 cm) wingspan.
- Three angels and four 0.75 in (1.9 cm) spheres fill a 24 in (61.0 cm) strand.
- Four strands spaced 4 in (10.2 cm) apart make a 15.5 in (39.4 cm) wide garland.
If you check each link in that chain as you go, the finished garland will hang evenly. Happy crocheting!