

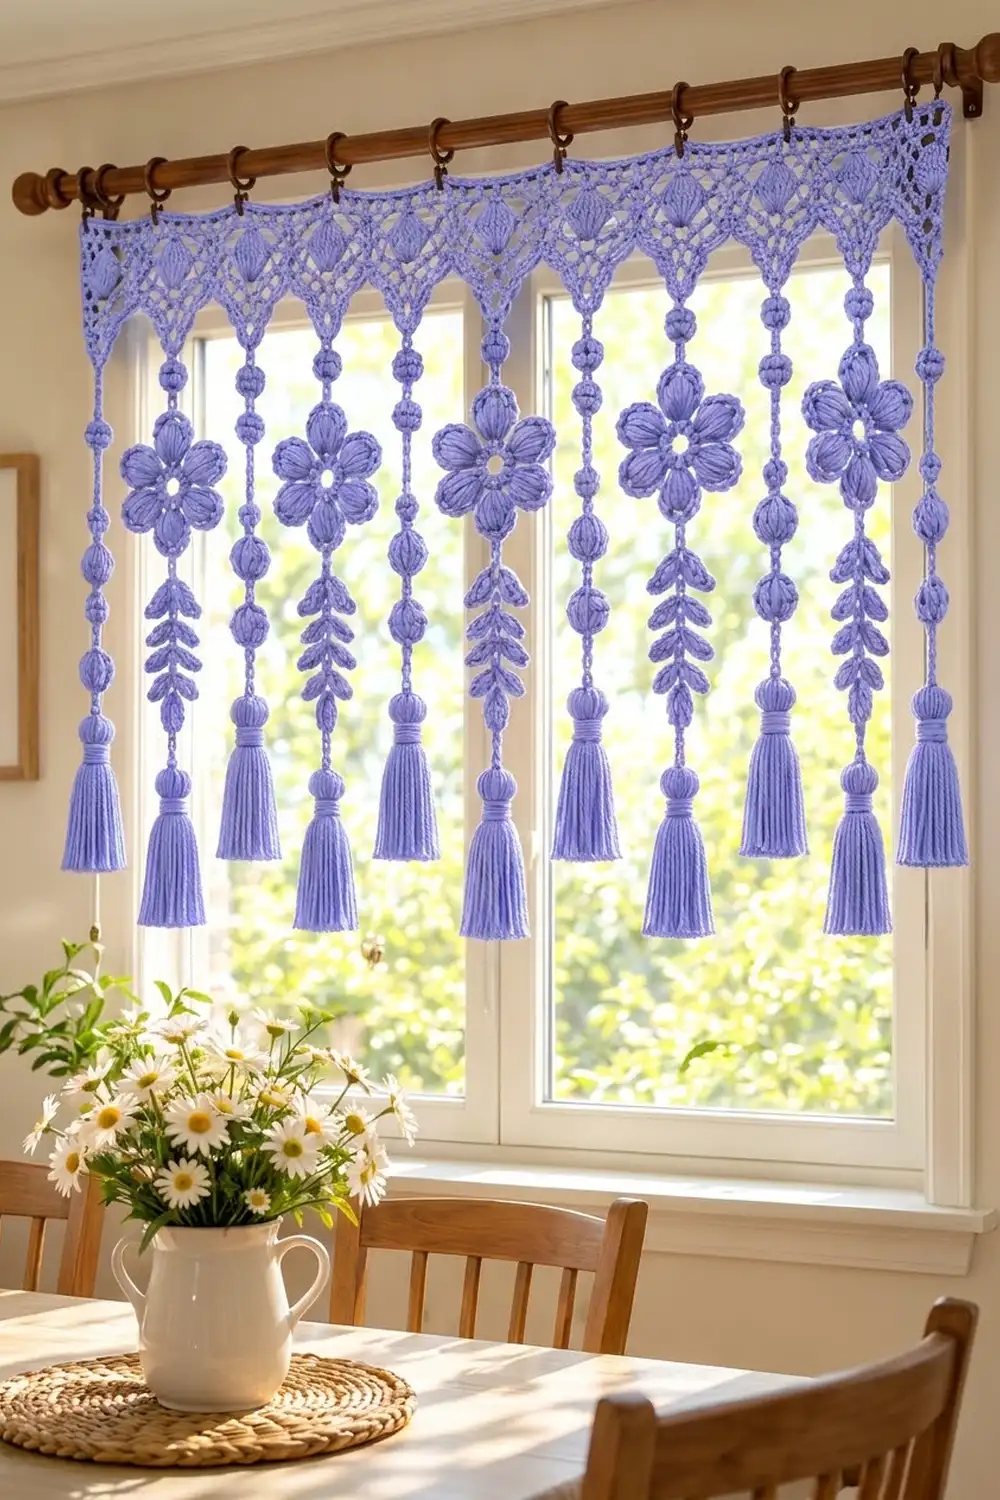
The Periwinkle Bloom Valance is a lacy window topper in one soft periwinkle cotton. A header of 11 pointed triangles hangs from the rod. Each triangle frames a small puff-stitch diamond. Below the points hang 11 strands: some carry crocheted beads, and the others carry a six-petal puff flower and a trailing leaf vine. Every strand ends in a cap bead and a full tassel.
Using one color keeps the focus on texture. In window light, the puffs, picots and mesh cast small shadows, so the piece looks detailed even from across the room. It suits a cottage kitchen, a breakfast nook or a sunroom.
This pattern uses US crochet terms. The header is 37.4 in (95.0 cm) wide and 5.75 in (14.6 cm) deep. Flower strands drop to 28.75 in (73.0 cm) from the rod and bead strands to 25.25 in (64.1 cm).
You make 11 triangle modules and join them corner to corner. A four-row border across their top edges then makes the solid header. Flowers, beads, cap beads and tassels are made separately. The strand cords are chained straight from each point loop.
Finished Size and Construction
- Finished size: 37.4 in (95.0 cm) wide; longest drop 28.75 in (73.0 cm)
- Skill level: Intermediate
- Terminology: US
- Yarn weight: DK (#3) cotton
- Hook: 3.5 mm (E-4)
- Number of pieces: 11 modules, 5 flowers, 41 small beads, 11 cap beads, 11 tassels
- Layout: 11 modules in one row, with strands alternating Bead / Flower
- Module size: 3.4 in (8.6 cm) wide at the top × 4.25 in (10.8 cm) to the point
- Header before border: 37.4 × 4.25 in (95.0 × 10.8 cm)
- Border depth: 1.5 in (3.8 cm)
Materials
Choose a smooth mercerized or combed DK cotton, about 115 m per 50 g. Cotton gives clear stitch definition and hangs straight. Avoid fuzzy blends, because they blur the puffs.
- Periwinkle: 250 g (575 m)
- Small amount of fiberfill or matching yarn scraps for stuffing the beads
- 3.5 mm (E-4) hook
- Yarn needle
- Stitch markers
- 4 in (10.2 cm) piece of cardboard for winding tassels
- 12 curtain clip rings
- Blocking mat and rust-proof pins
These quantities include a margin of about 25 percent.
Abbreviations (US Terms)
- ch – chain
- sl st – slip stitch
- sc – single crochet
- hdc – half double crochet
- dc – double crochet
- dc2tog / dc3tog – double crochet 2 (3) together
- sc2tog – single crochet 2 together
- sk – skip
- st(s) – stitch(es)
- sp – space
- RS – right side
Puff: (Yo, insert hook in st, yo, pull up a loop to dc height) 4 times, yo, draw through all 9 loops, ch 1 to close. The closing ch does not count as a stitch.
Large puff (lp): (Yo, insert hook in st, yo, pull up a loop to 1 in / 2.5 cm) 6 times, yo, draw through all 13 loops, ch 1 to close.
Leaf: Ch 6, sl st in 2nd ch from hook, sc in next ch, hdc in next ch, dc in next ch, hdc in last ch, sl st in the stem ch at the base of the leaf.
Gauge and Checkpoints
Gauge: 20 dc and 9 rows = 4 in (10.2 cm). Chain gauge: 5 ch = 1 in (2.5 cm).
Make one module and one flower before anything else. Check them against these points:
- Module Row 1: 17 dc = 3.4 in (8.6 cm)
- Module after Row 9: 4 in (10.2 cm) from top to point
- Module after edging: 3.4 × 4.25 in (8.6 × 10.8 cm)
- Flower: 3.5 in (8.9 cm) from petal tip to opposite petal tip
- Small bead: 0.6 in (1.5 cm); cap bead: 1 in (2.5 cm)
If Row 1 is wider than 3.4 in (8.6 cm), go down half a hook size. If it is narrower, go up half a size. Being off by just 0.1 in (0.3 cm) per module adds up to 1.1 in (2.8 cm) across the header, so fix the gauge now.
Triangle Module (make 11)
Ch 19.
Row 1 (RS): Dc in 4th ch from hook and in each ch across. The skipped ch count as 1 dc. Turn. (17 sts)
On every following row, ch 2 at the start of the row. It does not count as a stitch. Ch-1 sps count as stitches.
Row 2: Dc2tog, dc in next st, (ch 1, sk 1, dc in next st) 6 times, dc2tog. Turn. (15 sts)
Row 3: Dc2tog, (ch 1, sk 1, dc in next st) twice, ch 1, sk 1, puff in next st, ch 1, sk 1, (dc in next st, ch 1, sk 1) twice, dc2tog. Turn. (13 sts)
The puff sits on the center dc of Row 2. The mesh dc sit on Row 2 dc, and the ch-1 sps sit over ch-1 sps.
Row 4: Dc2tog, dc in next st, ch 1, sk 1, dc in next st, ch 1, sk 1, puff in closing ch of puff, ch 1, sk 1, dc in next st, ch 1, sk 1, dc in next st, dc2tog. Turn. (11 sts)
The two stacked puffs form the raised diamond, with mesh on both sides.
Row 5: Dc2tog, dc in each of next 7 sts (work into the ch-1 sps and the puff), dc2tog. Turn. (9 sts)
Row 6: Dc2tog, dc in next 5 sts, dc2tog. Turn. (7 sts)
Row 7: Dc2tog, dc in next 3 sts, dc2tog. Turn. (5 sts)
Row 8: Dc2tog, dc in next st, dc2tog. Turn. (3 sts)
Row 9: Dc3tog. Do not turn. (1 st)
Edging: Ch 1. Work (sc, ch 4, sc) in the top of the dc3tog; the ch-4 becomes the point loop that the strand hangs from. Next, work 2 sc in each of the 8 row-ends of Rows 8–1 (16 sc). Sc in each of the 17 foundation loops along the top edge (17 sc). Work 2 sc in each of the 8 row-ends of Rows 1–8 down the other side (16 sc). Sl st to the first sc and fasten off.
Count: 51 sc plus the ch-4 loop. The top edge has exactly 17 sc, and that count includes both corner sts.
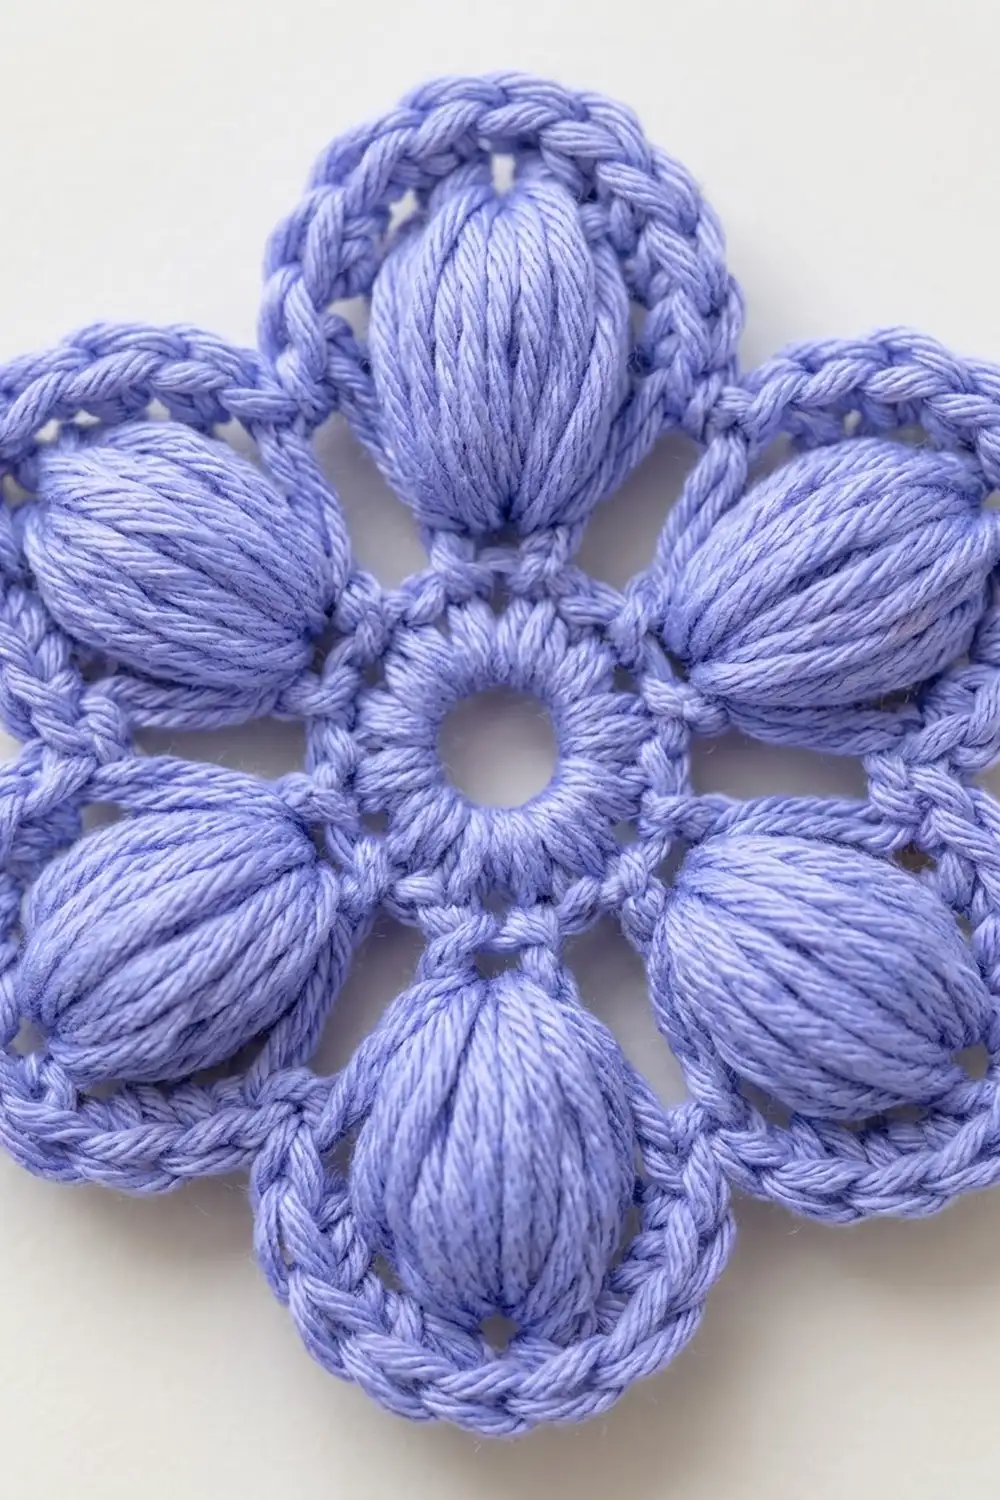
Flower Motif (make 5)
Rnd 1: Magic ring. Ch 3 (counts as dc), 11 dc in ring, sl st to top of ch-3. Pull the ring snug but leave a small open center. (12 dc)
Rnd 2: Ch 2, lp in same st, ch 3, sk 1 dc, lp in next dc, ch 3, sk 1 dc; repeat from * 4 more times. Sl st into the first ch-3 sp. (6 large puffs, 6 ch-3 sps)
Rnd 3: Ch 1. Sc in ch-3 sp, ch 6, sc in closing ch of next lp, ch 6; repeat from * 5 more times. Sl st to first sc. (12 sc, 12 ch-6 arcs)
Rnd 4: Ch 1. Sc in next sc, 7 sc in next arc; repeat from * 11 more times. Sl st to first sc and fasten off. (96 sc)
Each petal is 7 + 1 + 7 sc around its puff, plus 1 shared sc in the valley between petals, for 16 sc per petal × 6 = 96. The sc at the top of each puff is that petal’s tip. Choose one tip as the top and mark it. The bottom tip is the third petal tip around from it, directly opposite.
Beads, Cap Beads and Tassels
Small bead (make 41): Rnd 1: 6 sc in magic ring (6). Rnd 2: 2 sc in each st (12). Rnd 3: Sc in each st (12). Stuff firmly. Rnd 4: Sc2tog 6 times (6). Close the hole and leave a 6 in (15.2 cm) tail.
Cap bead (make 11): Rnd 1: 6 sc in magic ring (6). Rnd 2: 2 sc in each st (12). Rnd 3: (Sc, 2 sc in next) 6 times (18). Rnds 4–5: Sc in each st (18). Rnd 6: (Sc, sc2tog) 6 times (12). Leave this cap open and do not stuff it.
Tassel (make 11): Wind yarn 40 times around the 4 in (10.2 cm) card. Tie the loops at the top with an 8 in (20.3 cm) tie and cut the bottom loops. Wrap the neck tightly 0.5 in (1.3 cm) below the tie, then trim the tassel to 3.5 in (8.9 cm).
Make All Pieces
- Triangle modules: 11
- Flowers: 5
- Small beads: 41 (1 per flower strand × 5, plus 6 per bead strand × 6)
- Cap beads: 11
- Tassels: 11
Layout grid (header modules, left to right, with the strand type below each one):
[M1][M2][M3][M4][M5][M6][M7][M8][M9][M10][M11]
  B   F   B   F   B   F   B   F   B   F    B
B = bead strand (6 total), F = flower strand (5 total).
Joining
Modules: Lay the modules RS up in one row with their top edges on a straight line. Each pair of neighbors touches only at the top corners, which leaves the V-shaped gaps between the points. Use the yarn needle to sew the last top sc of one module to the first top sc of the next. Make 3 small stitches through both sc. This join adds no stitches, so every module keeps its 17 top sc. Sew loosely enough that the corners lie flat without buckling.
Checkpoint: The joined row should measure 37.4 in (95.0 cm) along the top.
Flower strands (M2, M4, M6, M8, M10): Join yarn with a sl st in the ch-4 point loop. Ch 25, which is 5 in (12.7 cm). Sl st into the top petal tip of a flower and fasten off. Next, join yarn at the bottom petal tip and work the vine:
Ch 8. Leaf, leaf (the pair is worked from the same stem ch), ch 6; repeat from * 5 more times. Ch 6. Fasten off and leave a 10 in (25.4 cm) tail.
The stem is 8 + (6 × 6) + 6 = 50 ch = 10 in (25.4 cm), carrying 6 leaf pairs.
Bead strands (M1, M3, M5, M7, M9, M11): Join yarn in the point loop. Ch 75, which is 15 in (38.1 cm). Fasten off and leave a 10 in (25.4 cm) tail.
Beads: Fold each small bead around the cord and sew it in place through the cord. On bead strands, center 6 beads at 2, 4, 6, 8, 10 and 12 in (5.1, 10.2, 15.2, 20.3, 25.4 and 30.5 cm) below the point. On flower strands, center 1 bead 2 in (5.1 cm) below the point.
Tassels: Thread each cord tail down through a cap bead. Tie it securely to the tassel’s top tie, then pull the tassel up so its tie and the top of the neck sit inside the cap. Sew the cap’s edge to the neck wrap.
Lengths below the point: Flower strands are 5 + 3.5 + 10 + 4.5 = 23 in (58.4 cm). Bead strands are 15 + 4.5 = 19.5 in (49.5 cm). The cap bead and tassel together add the 4.5 in (11.4 cm).
Border
The border uses the same gauge as the modules: 20 dc = 4 in (10.2 cm).
Row 1 (RS): Join yarn in the top-right corner sc of M1. Ch 3 (counts as dc). Dc in each sc across all 11 top edges. At each join, put 1 dc in each of the 2 corner sc, with nothing extra. Turn. (187 dc)
Row 2: Ch 4 (counts as dc + ch 1), sk next st, dc in next st. Ch 1, sk 1, dc in next st; repeat from * across. Turn. (187 sts: 94 dc + 93 ch-1 sps)
Row 3: Ch 3 (counts as dc). Dc in each ch-1 sp and each dc across. Turn. (187 dc)
Row 4: Ch 1. Sc in each st across. (187 sc)
Do not turn. Work 2 sc in each of the 3 dc row-ends down the short side (6 sc). Fasten off, then join yarn on the other short end and work 6 sc there too.
Per-side counts: The top and bottom of the border each have 187 sts. Each short end has 6 sc.
Why the math works: 11 modules × 17 top sc = 187, and since the joins add nothing, Row 1 starts at exactly 187. At 5 sts per inch, 187 sts = 37.4 in (95.0 cm), which matches the joined modules. Because 187 is odd, the Row 2 mesh starts and ends with a dc, so both ends match. Three dc rows measure about 1.33 in (3.4 cm). The sc row brings the border to 1.5 in (3.8 cm), so the header is 4.25 + 1.5 = 5.75 in (14.6 cm) deep.
Rings: Clip 12 rings along Row 4: one on sc 1, one on each of sc 17, 34, 51, 68, 85, 102, 119, 136, 153 and 170 (these line up with the module joins), and one on sc 187.
Final Blocking
- Weave in all ends except the cord tails that are already tied inside the cap beads.
- Pin the header RS up to 37.4 × 5.75 in (95.0 × 14.6 cm). Keep the top edge straight and pin each triangle point down sharply.
- Pin each flower to 3.5 in (8.9 cm) across. Open each petal so its puff sits centered inside its scalloped frame.
- Lay the strands out straight. Angle the leaves upward and outward in a herringbone pattern and pin them.
- Mist everything with water until damp and let it dry fully.
- Steam the tassels lightly, comb them straight and re-trim them to 3.5 in (8.9 cm).
Final Quality-Control Checklist
- 11 modules, each with 17 top sc and an intact ch-4 point loop
- Every puff diamond sits centered on its triangle
- Border rows have 187 sts each, and the header measures 37.4 in (95.0 cm)
- Strands alternate B / F, starting and ending with B
- Every flower has 96 sc in Rnd 4 and hangs straight, attached at opposite petal tips
- Each flower strand has 6 leaf pairs
- Each bead strand has 6 evenly spaced beads
- All 11 cap beads are sewn snugly over the tassel necks
- All 12 rings are evenly spaced
Troubleshooting
Triangles curl at the point: Your decreases are too tight. Loosen your dc2tog, or block the points hard.
Header is wider than 37.4 in (95.0 cm): Rework Border Row 1 with a hook half a size smaller to pull the header in.
Puffs look flat: Pull every loop to the same height before you yo through all of them.
Flower cups: Your ch-6 arcs are too short. Chain more loosely, or block the flower flat while it is wet.
Strand twists: Before you cut the tail, let the strand hang and untwist. Then re-block it.
Bead slides: Add 2 more stitches through the cord at the bead’s top and bottom.
Care
Hand wash in cool water with mild soap, press out the water in a towel, and dry the valance flat. Re-block it and re-comb the tassels before you hang it again.
Final Notes
Everything depends on gauge. With 20 dc = 4 in (10.2 cm), each module is 17 sts = 3.4 in (8.6 cm) wide. Eleven modules give 187 sts = 37.4 in (95.0 cm), and the border holds that same 187 through all 4 rows. The 4.25 in (10.8 cm) modules plus the 1.5 in (3.8 cm) border make a 5.75 in (14.6 cm) header. Flower strands at 23 in (58.4 cm) and bead strands at 19.5 in (49.5 cm) create the staggered tassel line. Check each stage before moving on, and the finished valance will hang straight and even.
Happy crocheting!