

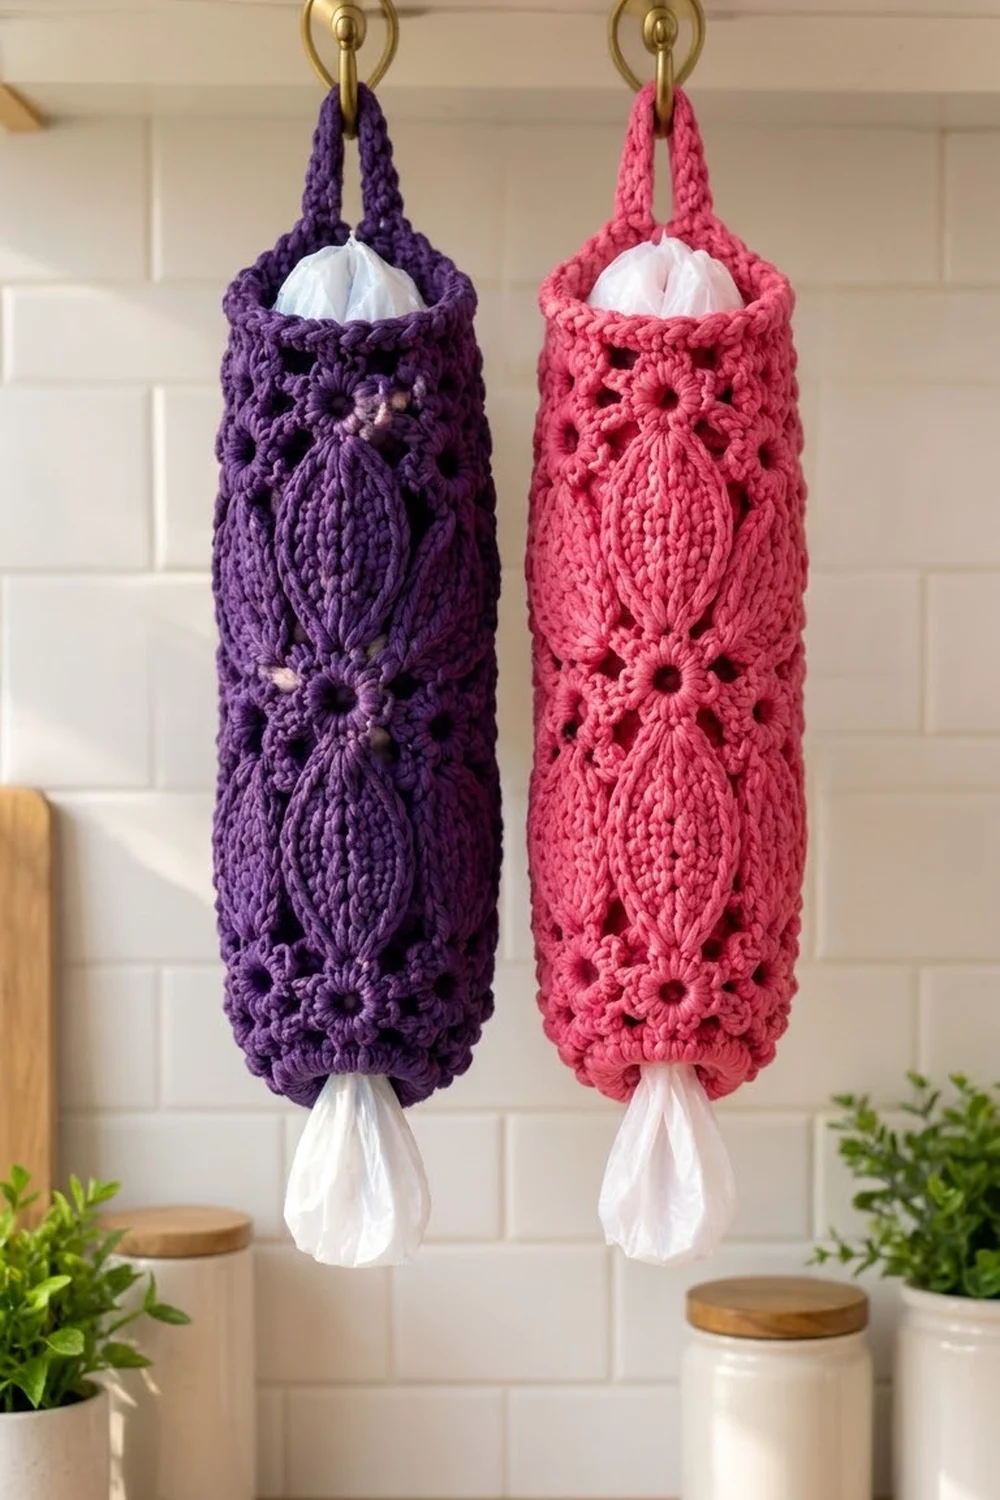
The Lilac Lantern Bag Holder is a tall, textured tube that keeps your plastic shopping bags in one tidy place. You stuff bags in at the top and pull them out one at a time from the narrow opening at the bottom. It hangs from a hook or cabinet knob by a solid loop at the back.
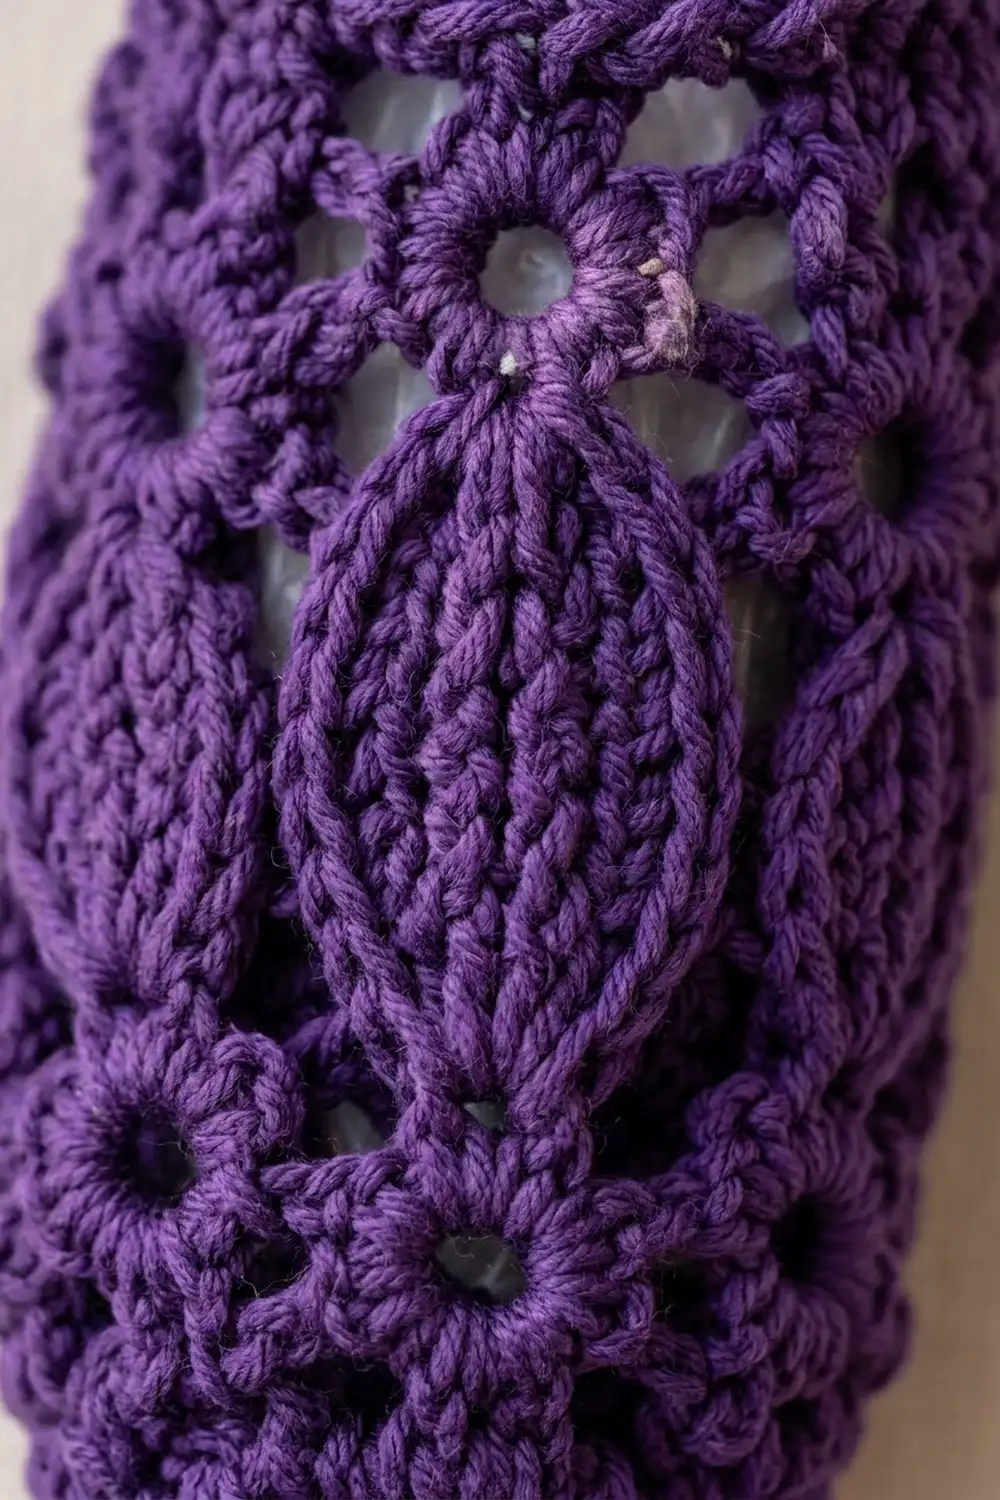
The texture is what makes this design. Columns of raised, ribbed lens shapes run all the way around the tube. Each lens begins and ends at a small round eyelet with a ring of stitches around it, and tiny holes open between the lenses at their widest point. The sample is shown in deep purple and in raspberry pink. A single bold solid color works best because it shows off the post-stitch relief.
This pattern uses US crochet terms. The finished holder is 12 in (30.5 cm) around, 6 in (15.2 cm) wide laid flat, and 15.1 in (38.4 cm) tall, not counting the hanging loop.
You work the holder from the bottom up in joined rounds. You start with a narrow single crochet base and increase to full width. Next come three pattern tiers and a final eyelet band. A top band, a crab-stitch edge, and an attached strap finish the piece. It is one piece with no seams.
Finished Size and Construction
- Finished size: 12 in (30.5 cm) circumference; 6 in (15.2 cm) flat width; 15.1 in (38.4 cm) tall
- Skill level: Intermediate (front post stitches, crab stitch)
- Terminology: US
- Yarn weight: Worsted (#4) cotton
- Hook: 5.0 mm (H-8)
- Number of pieces: 1 (tube with integrated strap)
- Layout: 6 lens columns around the tube, 3 lens tiers tall
- Piece size: 48 sts around; each lens column is 8 sts, 2 in (5.1 cm) wide
- Size before border: 12 in (30.5 cm) around x 14.3 in (36.3 cm) tall after Rnd 39
- Border depth: 0.6 in (1.5 cm) at the top, 0.2 in (0.5 cm) at the bottom
- Hanging loop: about 3.75 in (9.5 cm) tall, 1 in (2.5 cm) wide
Materials
Yarn: Use a smooth worsted weight cotton or cotton blend at about 1.7 m per gram. Cotton keeps the lens ribs crisp and doesn’t sag much under the weight of the bags. Avoid fuzzy or very splitty yarn, because it hides the post stitches.
- One holder, any color: 100 g / 170 m
- Purple sample: deep purple, 100 g / 170 m
- Raspberry sample: raspberry pink, 100 g / 170 m
Tools:
- 5.0 mm (H-8) crochet hook
- 1 locking stitch marker
- Tapestry needle
- Scissors
- Tape measure
- Rust-proof pins
- A rolled towel about 3.75 in (9.5 cm) across, for blocking
These quantities include about a 15% margin for your gauge swatch and weaving in ends.
Abbreviations (US Terms)
- ch – chain
- sl st – slip stitch
- sc – single crochet
- hdc – half double crochet
- dc – double crochet
- FPdc – front post double crochet
- rev sc – reverse single crochet (crab stitch)
- BLO / FLO – back loop only / front loop only
- sk – skip
- sp – space
- st(s) – stitch(es)
- rnd(s) – round(s)
FPdc: Yarn over and insert the hook from front to back to front around the post of the stitch indicated. Yarn over and pull up a loop, then [yarn over, pull through 2 loops] twice. Always skip the stitch hidden behind a FPdc. Each FPdc counts as 1 st.
Rev sc (crab stitch): Work single crochet from left to right (right to left if you crochet left-handed). Insert the hook into the next stitch to the right, pull up a loop, then yarn over and pull through both loops.
Round rules: Join every round with a sl st to the first stitch. Don’t turn. The starting ch-1 (sc and hdc rounds) or ch-2 (dc rounds) doesn’t count as a stitch. Work the first stitch into the same stitch as the join. Place the marker in the first stitch of each round.
Gauge and Checkpoints
- Single crochet: 16 sts and 18 rnds = 4 in (10.2 cm)
- Pattern: 16 sts = 4 in (10.2 cm); one 10-rnd tier = 4 in (10.2 cm) tall
Test first: Work the base (Rnds 1–6) and Tier 1 (Rnds 7–16) before you commit to the whole holder. This test is part of the real project. If the gauge is right, just keep going.
Checkpoints:
- After Rnd 1: the foundation ring lies flat at 3.75 in (9.5 cm) wide
- After Rnd 6: 6 in (15.2 cm) flat width, 1.3 in (3.3 cm) tall
- After Rnd 16: 5.3 in (13.5 cm) tall
- After Rnd 26: 9.3 in (23.6 cm) tall
- After Rnd 36: 13.3 in (33.8 cm) tall
- After Rnd 39: 14.3 in (36.3 cm) tall
- Finished: 15.1 in (38.4 cm) tall
Too big? Go down one hook size, to 4.5 mm. Too small? Go up to 5.5 mm. Don’t change the stitch counts, because the lens repeat needs exactly 48 sts. If only the height is off, check how high you pull up the FPdc loops. Lazy, short posts can make a tier come out 0.25 in (0.6 cm) short.
Base
Ch 30, then join with a sl st to the first ch to form a ring. Don’t twist the chain.
Rnd 1: Ch 1, sc in each ch around, join. (30 sc)
Rnds 2–3: Ch 1, sc in each st around, join. (30 sc)
Rnd 4: Ch 1, sc in next 4 sts, 2 sc in next st; repeat from * 5 more times, join. (36 sc)
Rnd 5: Ch 1, sc in next 5 sts, 2 sc in next st; repeat from * 5 more times, join. (42 sc)
Rnd 6: Ch 1, sc in next 6 sts, 2 sc in next st; repeat from * 5 more times, join. (48 sc)
Check the size now: 6 in (15.2 cm) flat. From here on, think of the round as 6 sectors of 8 sts. Each sector becomes one lens column.
Pattern Tiers
Each tier is a 3-rnd Eyelet Band (B1–B3) followed by a 7-rnd Lens Section (L1–L7). Every round has 48 sts, so the tube stays straight.
Eyelet Band (B1–B3)
B1: Ch 2, dc in next 3 sts, ch 2, sk 2 sts, dc in next 3 sts; repeat from * 5 more times, join. (36 dc + 6 ch-2 sps = 48 sts)
B2: Ch 1, sc in next 2 dc, FPdc around next dc, 2 sc in ch-2 sp, FPdc around next dc, sc in next 2 dc; repeat from * 5 more times, join. (36 sc + 12 FPdc = 48 sts)
B3: Ch 1, sc in each st around, join. (48 sc)
The FPdc on each side of the eyelet, plus the closing round above it, form the raised flower ring around each hole. The eyelets sit at stitch positions 4 and 5 of each sector, in the center of the column.
Lens Section (L1–L7)
L1: Ch 1, hdc in next 3 sts, FPdc around next 2 sts, hdc in next 3 sts; repeat from * 5 more times, join. (36 hdc + 12 FPdc = 48 sts)
L2: Ch 1, hdc in next 2 sts, FPdc around next hdc, FPdc around next 2 FPdc, FPdc around next hdc, hdc in next 2 sts; repeat from * 5 more times, join. (24 hdc + 24 FPdc = 48 sts)
L3: Ch 1, hdc in next st, FPdc around next hdc, FPdc around next 4 FPdc, FPdc around next hdc, hdc in next st; repeat from * 5 more times, join. (12 hdc + 36 FPdc = 48 sts)
L4: Ch 1, hdc in next hdc, FPdc around next 6 FPdc, ch 1, sk next hdc; repeat from * 5 more times, join. (6 hdc + 36 FPdc + 6 ch-1 sps = 48 sts)
L5: Ch 1, hdc in next hdc, hdc in top of next FPdc, FPdc around next 4 FPdc, hdc in top of next FPdc, hdc in next ch-1 sp; repeat from * 5 more times, join. (24 hdc + 24 FPdc = 48 sts)
L6: Ch 1, hdc in next 3 sts, FPdc around next 2 FPdc, hdc in next 3 sts; repeat from * 5 more times, join. (36 hdc + 12 FPdc = 48 sts)
L7: Ch 1, hdc in each st around, working into the tops of the FPdc, join. (48 hdc)
The FPdc panel grows from 2 to 4 to 6 stitches wide, holds for one round, then shrinks from 4 back to 2. That makes the pointed lens shape. The two center posts carry straight up the middle as the center vein. The ch-1 in L4 opens the small hole between neighboring lenses at their widest point.
Working the Tiers
- Tier 1: Rnds 7–16 (B1–B3, then L1–L7)
- Tier 2: Rnds 17–26 (repeat B1–B3, L1–L7)
- Tier 3: Rnds 27–36 (repeat B1–B3, L1–L7)
- Final Eyelet Band: Rnds 37–39 (B1–B3 only)
The B1 eyelets always land at positions 4 and 5, right above the lens tips from L6. This puts an eyelet at both ends of every lens. After Rnd 39 you have 48 sc, and the tube measures 14.3 in (36.3 cm).
Border
Border gauge: 16 sc = 4 in (10.2 cm), the same as the body. With the tube flat, each side holds 24 sts at the top and 15 sts at the bottom.
Top Band
Rnd 40: Ch 1, sc in each st around, join. (48 sc; 24 per side)
Rnd 41: Ch 1, sc in each st around, join. (48 sc; 24 per side)
Rnd 42: Ch 1, working in the FLO only, rev sc in each st around, join. (48 rev sc; 24 per side) Fasten off.
Working in the FLO leaves the back loops of Rnd 41 free on the inside for the strap.
Hanging Strap
Flatten the tube so that a lens column sits centered on the front. Find the 4 center sts of Rnd 41 on the back. Join yarn in the free back loop of the first of those 4 sts.
Row 1: Ch 1, sc in BLO of the same st and the next 3 sts. (4 sc)
Rows 2–36: Ch 1, turn, sc in each st across. (4 sc)
The strap measures 8 in (20.3 cm). Fold it into a loop and sew the last row to the inside of Rnd 40, directly below the base of the strap. Sew through both layers so that the stitches don’t show on the outside. The loop stands about 3.75 in (9.5 cm) tall.
Bottom Edge
Hold the tube upside down. Join yarn in any free loop of the foundation chain.
Bottom Rnd: Ch 1, rev sc in each foundation ch around, join. (30 rev sc; 15 per side) Fasten off.
Why the math works: The top border uses 1 st for every body st, so all 48 sts at 16 sts per 4 in make exactly 12 in (30.5 cm). The edge doesn’t flare or pull in. The bottom edge stays at the 30 foundation sts, which is 7.5 in (19.1 cm) around. That is snug enough to hold the bags but still lets one slide through. Both edges match their own rounds stitch for stitch, so you never need to add or skip anything.
Final Blocking
- Weave in all ends on the inside, running them along the hdc or sc rounds so they don’t show through the eyelets.
- Soak the holder in cool water for 10 minutes, then squeeze it gently in a towel. Don’t wring it.
- Slide the holder over a rolled towel about 3.75 in (9.5 cm) across so that it holds its round shape.
- Line up the lens columns so they run straight up and down. Nudge any that twist.
- Pat the lens ribs to raise them, and press each eyelet open with a fingertip.
- Pin the strap flat into its teardrop loop.
- Check the measurements: 12 in (30.5 cm) around and 15.1 in (38.4 cm) tall.
- Let it dry completely before you hang it.
Final Quality-Control Checklist
- [ ] There are 6 lens columns, all straight and evenly spaced
- [ ] Each lens has an eyelet at the top and at the bottom tip
- [ ] There is a small hole between neighboring lenses at their widest point
- [ ] The final eyelet band sits just under the top band
- [ ] The top band lies smooth, with an even rolled crab-stitch edge
- [ ] The strap is centered on the back and firmly sewn
- [ ] The bottom opening is 7.5 in (19.1 cm) around with a neat rolled edge
- [ ] It measures 6 in (15.2 cm) flat and 15.1 in (38.4 cm) tall
- [ ] No ends show through the eyelets
Troubleshooting
The lenses lean or spiral. You probably added or lost a stitch, often by working into the stitch behind a FPdc. Count each round, 48 sts, before you join.
The lenses look flat. Pull up the FPdc loops to match the hdc height, and keep the hdc firm.
The eyelets are closing up. Make sure you skipped 2 sts in B1, and work both B2 sc into the ch-2 space, not into the chains.
The bottom opening is too tight for bags. Rework Rnds 1–3 with a hook one size larger. The stitch counts stay the same.
The top flares. Use a hook one size smaller for Rnds 40–42.
The strap stretches. Work the strap with a hook one size smaller for denser fabric, and sew a second line of stitching across the join.
Care
Hand wash or machine wash cool on a gentle cycle. Reshape the holder while it’s damp and lay it flat to dry.
Final Notes
The measurement chain is simple. Rnd 6 sets the 48-st width at 6 in (15.2 cm) flat. Each 10-rnd tier adds 4 in (10.2 cm), so the tube reaches 13.3 in (33.8 cm) after Tier 3. The final eyelet band brings it to 14.3 in (36.3 cm), and the borders bring it to 15.1 in (38.4 cm). If your Rnd 6 width and your Tier 1 height match the checkpoints, the rest will follow. Make one in each of your favorite colors and keep the kitchen tidy.
Happy crocheting!