

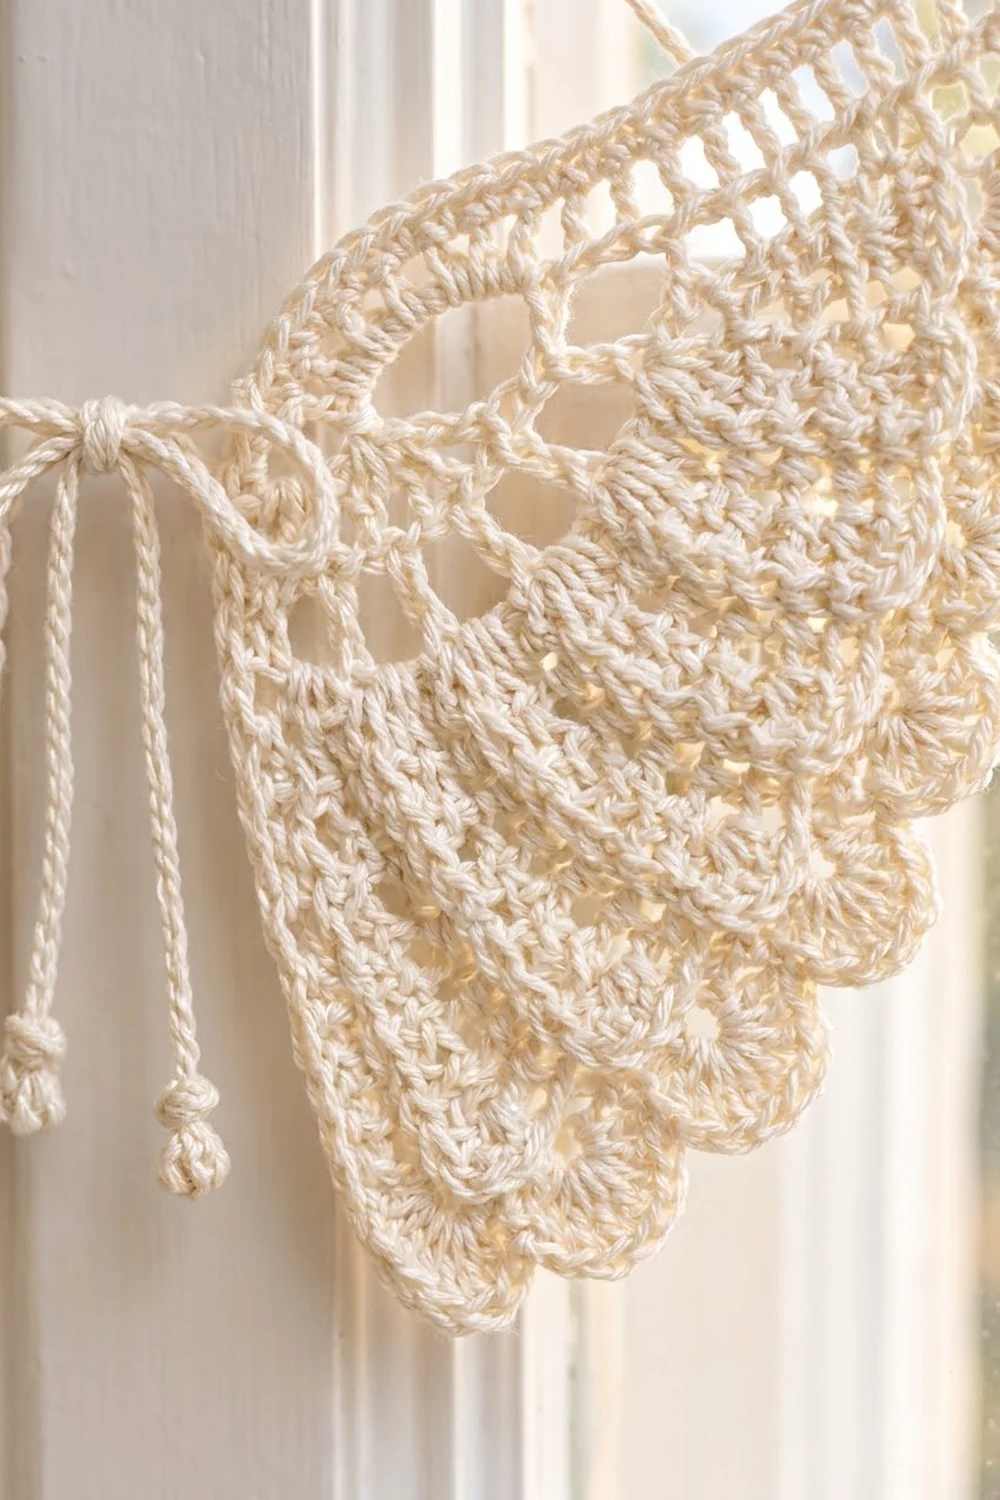
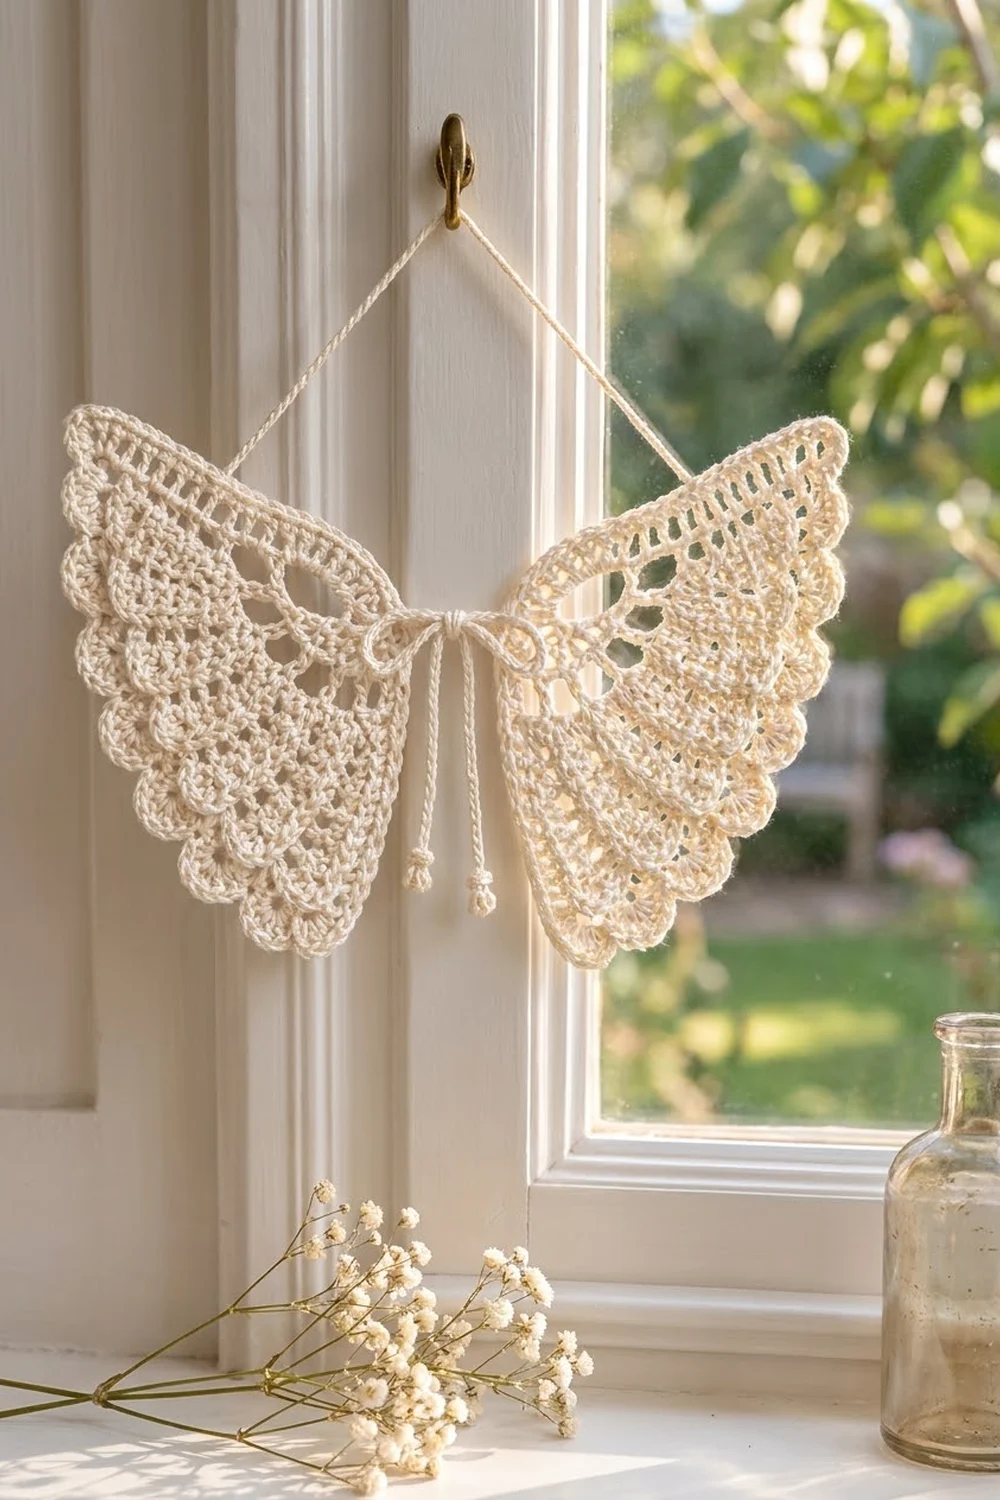
These Whisper Lace Angel Wings are a delicate hanging ornament. Two small fan-shaped wings are joined at the center. Each wing spreads out from a single point, and solid double crochet rows alternate with airy mesh rows, so fine lines of eyelets run out toward a softly scalloped edge.
The sample uses one color, a warm cream cotton thread. It shows off the lace and looks lovely in a window, on a nursery wall or on a mantel. The style is soft, simple and a little vintage. A small chain-cord bow with bobble ends covers the center join, and a thin chain loop holds the wings up.
This pattern uses US crochet terms. The finished wings measure about 7.25 in (18.4 cm) across and 4.25 in (10.8 cm) tall, not counting the cords.
The construction is simple. Crochet two identical quarter-fan wings in turned rows and finish each one with a row of scalloped shells. Flip one wing over to make the mirror pair and sew the two center points together. Then crochet one continuous mesh band across both top edges. Finish with a tie cord and a hanging cord.
Finished Size and Construction
- Finished size: about 7.25 in (18.4 cm) wide x 4.25 in (10.8 cm) tall, cords not included
- Skill level: Easy-Intermediate
- Terminology: US crochet terms
- Yarn weight: size 3 cotton crochet thread (between lace and fingering weight)
- Hook: 2.25 mm (US B-1)
- Number of pieces: 2 wings, plus 2 crocheted cords
- Layout: 2 wings side by side, 1 row x 2 pieces
- Piece size: each wing has a radius of about 3.75 in (9.5 cm) and a top edge of about 3.5 in (8.9 cm)
- Size before border: about 7 in (17.8 cm) wide x 3.75 in (9.5 cm) tall once joined
- Border depth: about 0.5 in (1.3 cm) along the top edge
Materials
Yarn: Use a smooth, mercerized size 3 cotton crochet thread. Mercerized cotton gives crisp stitches, blocks well and holds the shape of the scallops. Don’t use fuzzy or very stretchy fibers, because they blur the eyelets.
- Cream / ivory: about 15 g, roughly 55 m (60 yd)
This amount includes extra for a gauge swatch, the two cords and weaving in the ends.
Tools:
- 2.25 mm (US B-1) crochet hook
- Tapestry needle with an eye big enough for the thread
- 2 locking stitch markers
- Scissors
- Ruler or tape measure
- Blocking mat, rustproof pins and a spray bottle
- Optional: light spray starch
Abbreviations (US Terms)
- ch – chain
- sl st – slip stitch
- sc – single crochet
- dc – double crochet
- st(s) – stitch(es)
- sp – space
- sk – skip
- tch – turning chain
- RS / WS – right side / wrong side
Special stitch – Bobble: (Yarn over, insert the hook in the indicated st, yarn over and pull up a loop, yarn over and draw through 2 loops) 4 times in the same st. Then yarn over and draw through all 5 loops on the hook.
Stitch-count note: In the wing rows, every dc and every ch-1 sp counts as 1 st. A beginning ch-3 counts as 1 dc. A beginning ch-4 counts as 1 dc plus 1 ch-1 sp, which is 2 sts.
Gauge and Checkpoints
Gauge: 26 dc and 13 dc rows = 4 in (10.2 cm), worked flat and lightly blocked.
To check your gauge, ch 32 and work 15 rows of dc (30 dc per row). Measure across the middle of the swatch. If your gauge matches, make one full wing first and check it against the checkpoints below before you start the second wing.
Checkpoints for one wing:
- After Row 6: the straight edges measure about 1.85 in (4.7 cm) from the center point.
- After Row 11: the straight edges measure about 3.4 in (8.6 cm).
- After Row 12: the wing measures about 3.75 in (9.5 cm) from the center point to the tip of a scallop, and the top edge is about 3.5 in (8.9 cm).
If the wing is too big or the edge ripples, switch to a 2.0 mm hook. If the wing is too small or it cups like a bowl, switch to a 2.5 mm hook. A slight cup is often caused by tight increases. Loosen your tension on the solid rows instead of adding stitches.
Wing (Make 2)
Each wing is a quarter circle worked back and forth in rows from a magic ring. Every solid row adds stitches. The mesh rows keep the same count and make the eyelets that spread out from the center.
Row 1 (RS): Make a magic ring, ch 3 (counts as dc), 3 dc in ring. Pull the ring closed. Place a marker in the beginning ch-3; this side is the top edge. Turn. (4 sts)
Row 2: Ch 3 (counts as dc in first st), 2 dc in each of next 3 sts, turn. (7 sts)
Row 3 (mesh): Ch 4 (counts as dc + ch 1), sk next st, (dc in next st, ch 1, sk next st) 2 times, dc in 3rd ch of tch, turn. (7 sts: 4 dc + 3 ch-1 sps)
Row 4: Ch 3 (counts as dc in first st), 2 dc in each of next 6 sts, turn. (13 sts)
Row 5 (mesh): Ch 4, sk next st, (dc in next st, ch 1, sk next st) 5 times, dc in top of tch, turn. (13 sts: 7 dc + 6 ch-1 sps)
Row 6: Ch 3, (2 dc in next st, dc in next st) 6 times, turn. (19 sts)
Row 7 (mesh): Ch 4, sk next st, (dc in next st, ch 1, sk next st) 8 times, dc in top of tch, turn. (19 sts: 10 dc + 9 ch-1 sps)
Row 8: Ch 3, (2 dc in next st, dc in each of next 2 sts) 6 times, turn. (25 sts)
Row 9 (mesh): Ch 4, sk next st, (dc in next st, ch 1, sk next st) 11 times, dc in top of tch, turn. (25 sts: 13 dc + 12 ch-1 sps)
Row 10: Ch 3, (2 dc in next st, dc in each of next 3 sts) 6 times, turn. (31 sts)
Row 11 (mesh): Ch 4, sk next st, (dc in next st, ch 1, sk next st) 14 times, dc in top of tch, turn. (31 sts: 16 dc + 15 ch-1 sps)
Why the solid rows work: Each mesh row from Row 3 to Row 9 has 6k + 1 sts (7, 13, 19 or 25). The next solid row puts the ch-3 in the first st, then works 6 repeats that each use k sts and add 1. That gives 1 + 6(k + 1) sts, exactly 6 more. Over one solid row and one mesh row, the wing grows by an average of 3 sts per row, which is what a flat dc quarter circle needs at this gauge.
Row 12 (scallops): Ch 1, sc in first st, sk next 2 sts, 7 dc in next ch-1 sp, sk next 2 sts, sc in next dc; repeat from * 4 more times, working the last sc in the 3rd ch of tch. Fasten off. (5 scallops; 6 sc + 35 dc = 41 sts)*
Each scallop repeat uses 6 sts, and 1 + (5 x 6) = 31, so the five shells fit Row 11 exactly. Every shell lands in a ch-1 sp and every sc lands on a dc. Row 12 ends at the outer tip of the marked top edge.
Wing check: The top edge is made of 11 dc-height row ends (Rows 1–11) and one short sc row end (Row 12). The inner edge has the same row ends on the other side of the center point.
Make All Pieces
- Cream: 2 wings, both made exactly the same way
- Cream: 1 tie cord and 1 hanging cord (made after the border)
Lay both wings RS up with the marked top edges at the top. Turn Wing 1 over so its WS faces you. The dc lace looks almost the same on both sides, and flipping one wing makes a true mirror image. The center points now meet in the middle:
[ Wing 1 (flipped) ][ Wing 2 ]
   tip ......... center ......... tip
Both top edges now form one straight line, and the two inner edges hang down side by side.
Joining
Method: whipstitch with a tapestry needle and a 12 in (30.5 cm) length of thread.
- Hold the two wings edge to edge at the center points, with the top edges level.
- Match the row ends on the inner edges one to one: Row 1 to Row 1 and Row 2 to Row 2.
- Whipstitch through both layers along those 2 row ends only, about 0.6 in (1.5 cm). Make 2 stitches per row end, going through the end of the dc post each time.
- Leave Rows 3–12 of the inner edges unjoined. They hang free and open into a slim V when the piece is hung.
Tension: Keep the whipstitches snug but not puckered. The two top edges should stay in one straight line with no dip at the center.
Size checkpoint: The joined pair should measure about 7 in (17.8 cm) across the top and 3.75 in (9.5 cm) tall. Weave in the joining tails before you start the border.
Border (Top Band)
The border is a 3-row mesh band worked as one piece across both top edges. It straightens the top line, holds the wings firmly together and adds the row of square holes.
Border gauge: 2 sc per dc row end, about 6.5 sc per inch (2.6 sc per cm). This matches the wing gauge, so the band lies flat.
Border Row 1 (sc, trim row): With the front of the joined pair facing you, join the thread with a sl st at the outer tip of Wing 1 (the end of its Row 12). Ch 1. Work along the top edge of Wing 1 toward the center: 1 sc in the Row 12 sc row end, then 2 sc in each of the 11 dc row ends (Rows 11–1). Work 1 sc into the joining seam. Continue along Wing 2: 2 sc in each of its 11 dc row ends (Rows 1–11), then 1 sc in its Row 12 row end. Turn.
Count: per wing (11 x 2) + 1 = 23 sc; 23 + 1 seam sc + 23 = 47 sc.
The seam sc is the only stitch added beyond the two wings’ own counts. It is listed separately so you can check it: 2 x 23 = 46, plus 1 = 47.
Border Row 2 (mesh): Ch 4 (counts as dc + ch 1), sk next st, (dc in next st, ch 1, sk next st) 22 times, dc in last st, turn. (47 sts: 24 dc + 23 ch-1 sps)
Border Row 3 (sc): Ch 1, sc in each dc and each ch-1 sp across, ending with sc in 3rd ch of tch. Fasten off. (47 sts: 47 worked 1 per existing st + 0 added)
Why the math works: The mesh pattern needs an odd number of stitches. With 47 sts, (47 – 3) / 2 = 22 repeats fit exactly between the beginning ch-4 and the final dc. Stitch 24 is the exact middle, and it is a ch-1 sp, so a mesh hole sits right over the seam. The bow goes through that hole. The band is 23 mesh squares long: 11 over each wing plus 1 at the center.
Cords and Bow
Tie cord: Ch 4, bobble in 4th ch from hook. Ch until the cord measures 9 in (22.9 cm) from the bobble. Ch 3, bobble in 3rd ch from hook. Fasten off and weave in the ends.
Thread the cord from back to front through the center mesh hole so it wraps over the seam. Tie a small bow at the front with loops about 0.75 in (1.9 cm) long and the bobble tails hanging about 1.5 in (3.8 cm).
Hanging cord: Leave a 6 in (15.2 cm) tail and ch until the cord measures 10 in (25.4 cm). Fasten off, leaving another 6 in (15.2 cm) tail. Sew one end to each outer tip of the top band, catching both Border Row 3 and Border Row 2. Weave in the ends.
Final Blocking
- Soak the piece in cool water, then gently press the water out in a towel. Do not wring it.
- Pin the top band straight to 7.25 in (18.4 cm), with a pin at each outer tip and one at the center.
- Pin each wing to a radius of 3.75 in (9.5 cm) from the center to the scallops, opening the fan evenly.
- Pin the peak of each of the 5 scallops, then pin the sc dip between each pair so the shells stay round.
- Open the mesh holes with a blunt needle so they look square and even.
- If you want stiffer wings, mist them with light spray starch.
- Let the piece dry completely before you unpin it, then tie the bow.
Final Quality-Control Checklist
- Each wing has 31 sts in Row 11 and exactly 5 scallops in Row 12.
- Both wings measure 3.75 in (9.5 cm) from the center to the scallop tips.
- Only Rows 1–2 of the inner edges are joined.
- Border Rows 1–3 each have 47 sts.
- The center mesh hole sits directly over the seam.
- The top band is straight and measures 7.25 in (18.4 cm).
- The whole piece is 4.25 in (10.8 cm) tall.
- Both cords are secure and all ends are woven in.
Troubleshooting
- The wing cups: your stitches on the solid rows are too tight. Loosen your tension or go up a hook size.
- The wing ruffles: check your increases. Rows 4, 6, 8 and 10 should each add exactly 6 sts, and Row 2 adds 3.
- The scallops don’t fit: Row 11 must have 31 sts. Recount the mesh row, counting each ch-1 sp as a st.
- The band waves: Border Row 1 has too many sc. Redo it with exactly 2 sc per dc row end.
- The band pulls in: your sc are too tight. Work them more loosely, but keep the count at 47.
- The wings don’t match: block them at the same time, pinning both to the same measurements.
Care
Hand wash in cool water with mild soap, then reshape and dry flat. Re-block and re-starch as needed.
Final Notes
The measurements build in a short chain. A gauge of 26 dc and 13 rows to 4 in (10.2 cm) gives a fan 3.4 in (8.6 cm) across after Row 11. The scallops bring each wing to 3.75 in (9.5 cm). The two joined wings measure 7 in (17.8 cm) across, and the 0.5 in (1.3 cm) band brings the finished piece to 7.25 in x 4.25 in (18.4 cm x 10.8 cm). If you check each stage as you go, your wings will turn out even and light.
Happy crocheting!