

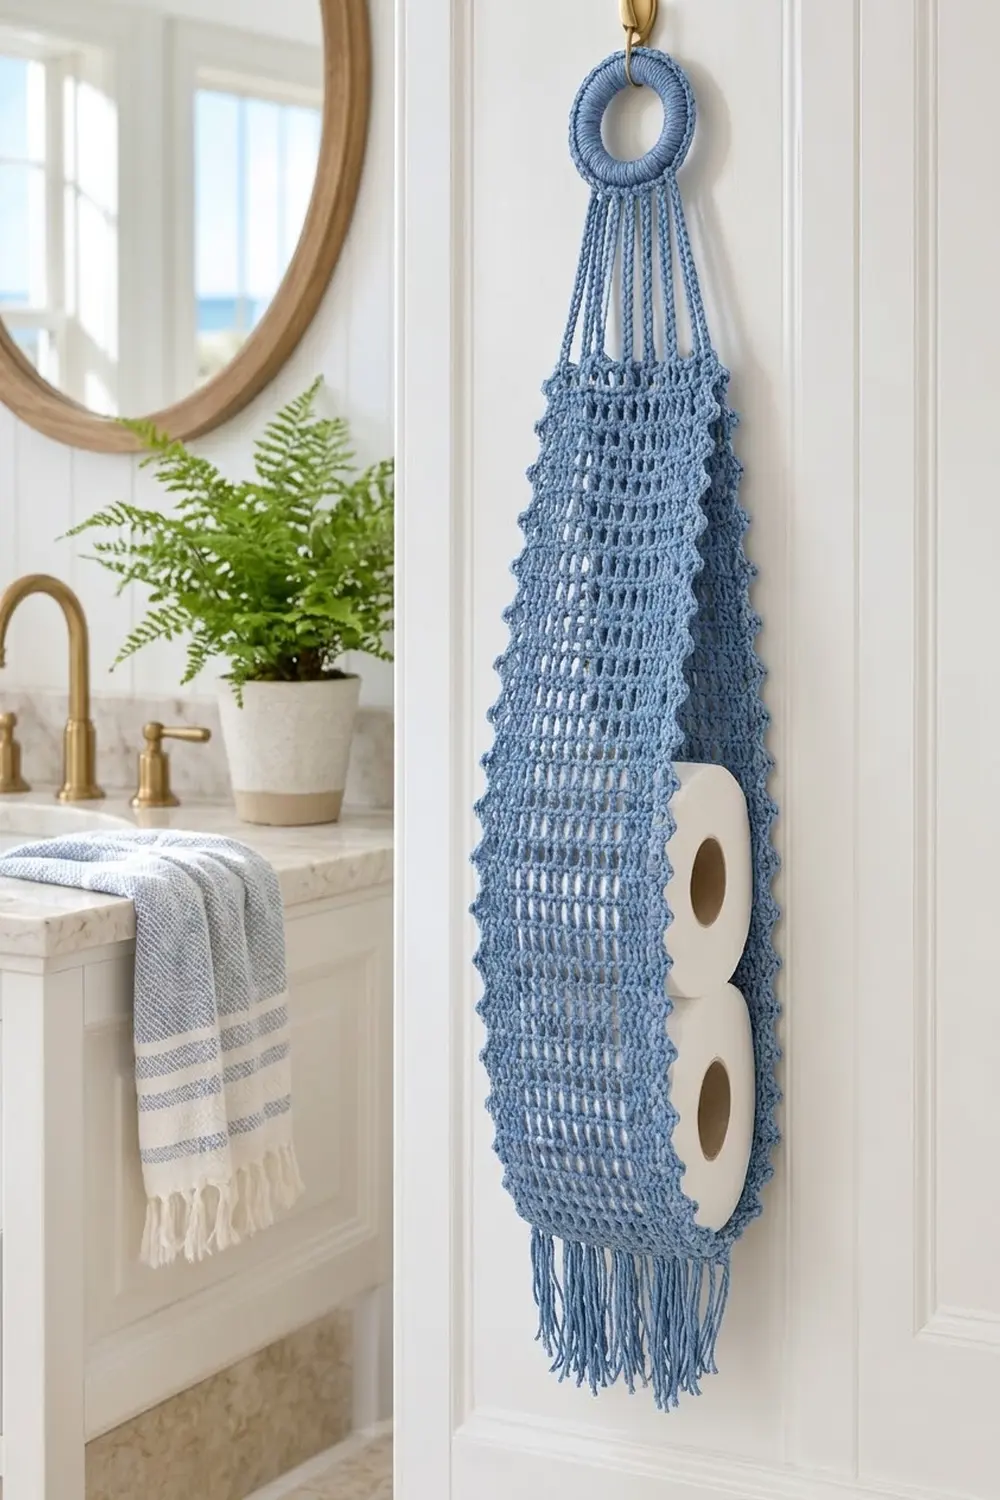
This hanging toilet paper holder is a light, airy sling made from one long strip of open mesh. It holds two standard rolls, hangs from a crocheted ring, and finishes with a soft fringe at the bottom. In cornflower blue cotton it suits a coastal or farmhouse bathroom and keeps spare rolls in reach without taking up floor space.
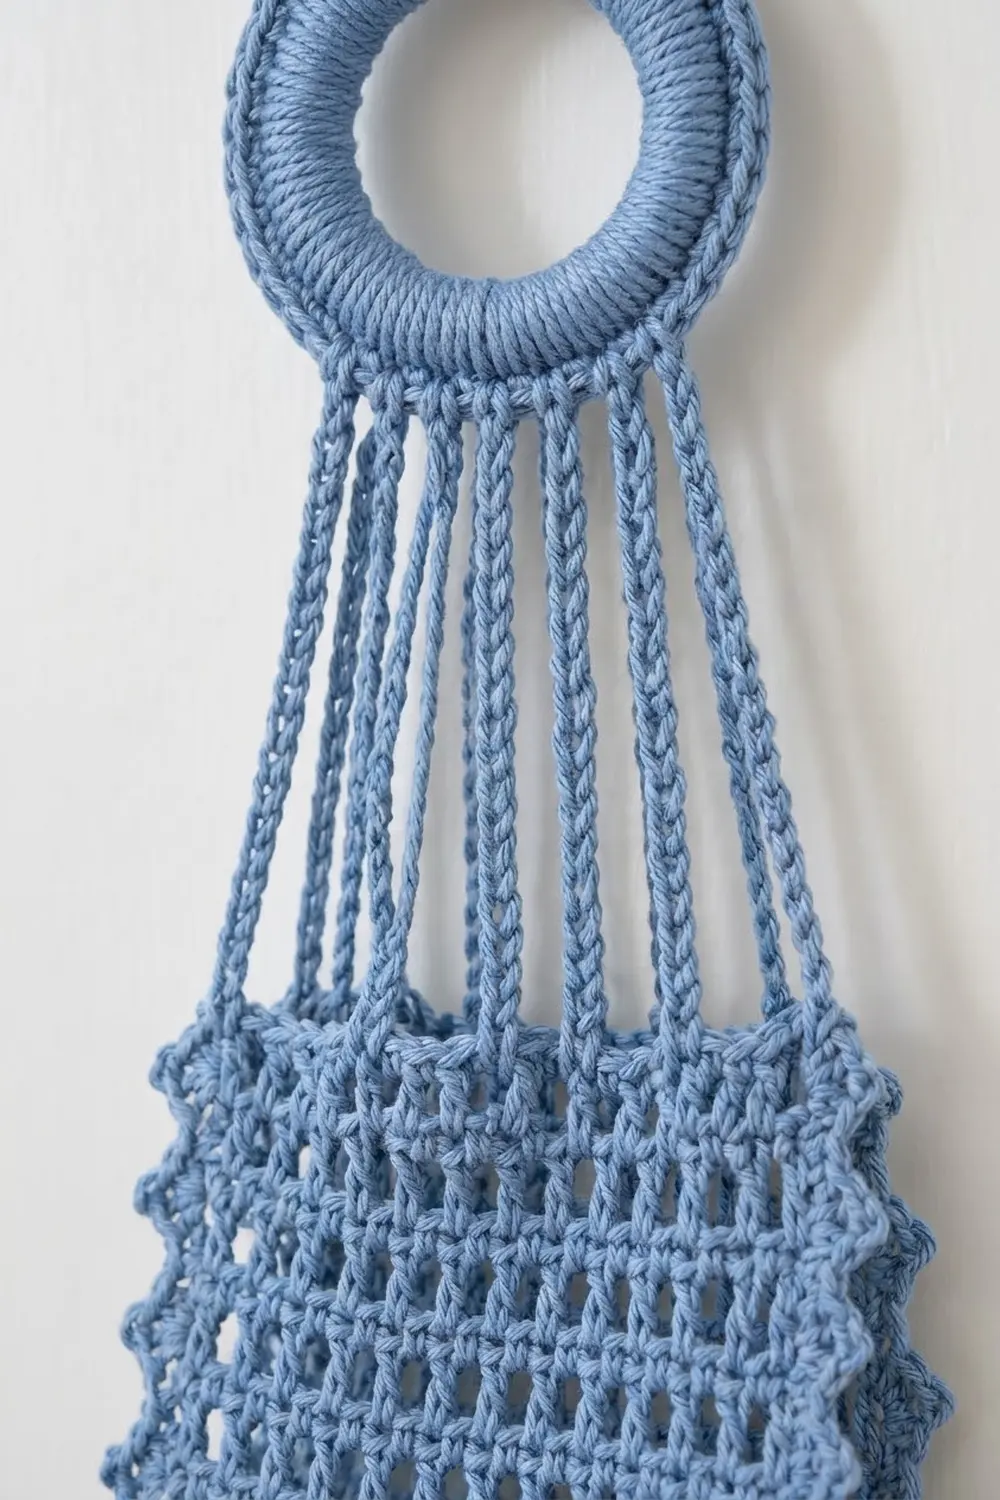
The texture is a classic filet grid: double crochet posts separated by chain-1 spaces, with a solid double crochet row at each end. The long edges get a picot edging that reads like a row of tiny beads, and eight slip-stitched chain cords gather the two ends of the strip into the ring.
The pattern uses US crochet terms throughout. The holder hangs about 27 in (68.6 cm) from the top of the ring to the bottom of the sling, plus 4 in (10.2 cm) of fringe. The strip itself is 5.75 in (14.6 cm) wide and 41.5 in (105.4 cm) long once edged.
Construction is simple: crochet one long mesh strip in rows, work a two-round picot edging all around it, cover a ring, attach the cords from both ends of the strip to the ring, and add fringe at the fold.
Finished Size and Construction
- Finished hanging size: about 5.75 in (14.6 cm) wide x 27 in (68.6 cm) tall, plus 4 in (10.2 cm) fringe
- Skill level: Easy
- Terminology: US crochet terms
- Yarn weight: Worsted (#4), 100% cotton
- Hook: 5.0 mm (H-8)
- Number of pieces: 1 main mesh strip, plus 1 covered ring, 8 cords, and fringe attached directly to it
- Layout: one strip folded in half into a U-shaped sling, open at both sides
- Strip size before edging: 5.25 in (13.3 cm) wide x 41 in (104.1 cm) long
- Strip size after edging: 5.75 in (14.6 cm) wide x 41.5 in (105.4 cm) long
- Edging depth: about 0.5 in (1.3 cm) added to width and to length in total
- Each leg of the sling: about 20.75 in (52.7 cm)
Materials
Choose a smooth worsted-weight cotton. Cotton holds the mesh shape, doesn’t stretch much under the weight of the rolls, and washes well. Avoid acrylic for this project, because it will sag over time.
- Yarn, cornflower blue: about 130 g (about 234 m), based on a cotton that runs about 180 m per 100 g
- 5.0 mm (H-8) crochet hook
- One 2 in (5.1 cm) ring, plastic or metal (a macramé ring or bangle works)
- Tapestry needle
- Scissors
- Tape measure
- Rust-proof pins and a blocking surface
- Small wall or door hook for hanging
The yarn amount includes a margin of about 25 percent for your gauge swatch, small differences in tension, and fringe trimming.
Abbreviations (US Terms)
- ch – chain
- sl st – slip stitch
- sc – single crochet
- dc – double crochet
- sk – skip
- sp – space
- st(s) – stitch(es)
- rep – repeat
- [ ] – repeat the bracketed instructions the number of times given
Special stitch – picot: ch 3, sl st in 3rd ch from hook.
Stitch-count rule for the mesh: each dc and each ch-1 space counts as 1 stitch. A mesh row of 11 dc and 10 ch-1 spaces counts as 21 stitches.
Gauge and Checkpoints
Gauge: 16 sts and 8 rows = 4 in (10.2 cm) in the mesh pattern. That works out to 4 sts and 2 rows per 1 in (2.5 cm).
Test before committing to the full strip. Work Rows 1 through 10 below, then measure without stretching.
- Checkpoint 1 (after Row 10): 5.25 in (13.3 cm) wide x 5 in (12.7 cm) tall
- Checkpoint 2 (after Row 41, halfway): 20.5 in (52.1 cm) long
- Checkpoint 3 (after Row 82): 41 in (104.1 cm) long
- Checkpoint 4 (after edging): 5.75 in (14.6 cm) x 41.5 in (105.4 cm)
If your piece is too big: switch to a 4.5 mm hook and start again. If only the length is off, you can also work fewer mesh rows, but always keep an even number of total rows so the fold lands between two rows.
If your piece is too small: switch to a 5.5 mm hook. A strip narrower than 5 in (12.7 cm) will squeeze the rolls, so width matters more than length here.
The Mesh Strip
Foundation: Ch 23.
Row 1 (solid band): Dc in 4th ch from hook (skipped 3 ch count as first dc), dc in each remaining ch across. Turn. (21 dc)
Row 2 (first mesh row): Ch 4 (counts as dc and ch-1), sk next dc, dc in next dc, [ch 1, sk next dc, dc in next dc] 9 times, working the last dc in the top of the turning ch. Turn. (11 dc and 10 ch-1 sps = 21 sts)
Row 3 (mesh row): Ch 4 (counts as dc and ch-1), sk next ch-1 sp, dc in next dc, [ch 1, sk next ch-1 sp, dc in next dc] 9 times, working the last dc in the 3rd ch of the turning ch-4. Turn. (21 sts)
Rows 4–81: Rep Row 3. (21 sts in every row)
At Row 10, stop and check Checkpoint 1. At Row 41, check Checkpoint 2. Place a removable marker in Row 41 – this is where you will fold the strip and attach the fringe.
Row 82 (solid band): Ch 3 (counts as dc), dc in next ch-1 sp, [dc in next dc, dc in next ch-1 sp] 9 times, dc in 3rd ch of turning ch-4. (21 dc)
Do not fasten off. Check Checkpoint 3: 41 in (104.1 cm) long and 5.25 in (13.3 cm) wide.
Rows 1 and 82 are the firm, solid bands that will sit at the top of each leg, where the cords pull. Rows 2 through 81 give you 80 mesh rows, which become the open grid on both legs and around the curved bottom.
Covered Ring
Round 1: Join yarn to the ring with a sl st. Ch 1, work 40 sc around the ring, pushing the stitches together so the ring is fully covered. Join with sl st to first sc. (40 sc)
Round 2: Working in back loops only, sl st in each sc around. Join with sl st to first sl st. (40 sl sts)
Fasten off and weave in the ends. The covered ring should measure about 2.75 in (7.0 cm) across. The back-loop slip stitches roll toward the outer edge and form the rope-like ridge.
Picot Edging
Edging gauge: work 2 sc in the end of each dc row. With 2 rows per 1 in (2.5 cm), that gives 4 sc per 1 in (2.5 cm), which matches the 4 sts per 1 in (2.5 cm) across the width. Because the edge gets the same number of stitches per inch as the body, it lies flat and doesn’t ruffle or pull in.
How to count: each corner has 1 corner sc (the center sc of a 3-sc group). In the counts below, the per-side numbers are the stitches between corner sc. The 4 corner sc are counted separately.
Round 1: Continuing from Row 82, ch 1, turn so the top of Row 82 faces you.
- Short end (top of Row 82): 3 sc in first dc, sc in next 19 dc, 3 sc in last dc.
- Long side: 2 sc in the end of each row down the side. (164 sc)
- Short end (foundation ch): working in the free loops of the foundation ch, 3 sc in first ch, sc in next 19 ch, 3 sc in last ch.
- Long side: 2 sc in the end of each row up the side. (164 sc)
Join with sl st to first sc. (378 sc total)
Check the math: each short end has 3 + 19 + 3 = 25 sc, and each long side has 164 sc. Then 25 + 25 + 164 + 164 = 378. Counted by side, that’s 4 corner sc + 21 sc between corners on each short end + 166 sc between corners on each long side, and 4 + 21 + 21 + 166 + 166 = 378.
Round 2 (picot round): Sl st in next sc, which is the corner sc of the first group. Ch 1.
- Corner: 3 sc in corner sc.
- Short end: sc in next 21 sc.
- Corner: 3 sc in corner sc.
- Long side: sc in next 3 sc, [picot, sc in next 4 sc] 40 times, picot, sc in next 3 sc. (166 sc, 41 picots)
- Corner: 3 sc in corner sc.
- Short end: sc in next 21 sc.
- Corner: 3 sc in corner sc.
- Long side: rep the long-side instructions above. (166 sc, 41 picots)
Join with sl st to first sc. Fasten off.
Round 2 total: 378 sc worked 1 per stitch + 8 sc added at the corners (2 extra at each of 4 corners) = 386 sc, plus 82 picots.
Long-side check: 3 + (40 x 4) + 3 = 166 sc, with 41 picots spaced every 4 sc. The picots don’t use up any stitches below them, so the long sides still hold exactly 166 sc. After Round 2, each short end has 23 sc between the new corner sc (21 + 1 + 1).
Weave in the ends and check Checkpoint 4: 5.75 in (14.6 cm) x 41.5 in (105.4 cm).
Cords and Assembly
Fold the strip in half at the Row 41 marker, wrong sides together, so both short ends meet at the top. Lay the covered ring about 6 in (15.2 cm) above the ends.
Cord positions: on each short end, count the 23 sc between corners and mark sts 2, 9, 15, and 22. The gaps between cords are 7, 6, and 7 sts, so the cords sit evenly and the layout is mirrored. That gives 4 cords per end and 8 cords total.
Each cord: Join yarn with sl st in a marked sc. Ch 28. Bring the chain up to the ring and work 1 sc around the ring, between stitches of the covering, at the bottom of the ring. Sl st in the back bump of each of the 28 ch back down to the strip. Sl st in the same marked sc. Fasten off. (28 ch + 28 sl sts per cord)
Work all 8 cords. Place them side by side across the bottom 8 stitches of the ring, with the 4 front cords and the 4 back cords alternating, so the ring hangs level. Each finished cord is about 6 in (15.2 cm) long.
Fringe
Cut 30 strands of yarn, each 9 in (22.9 cm) long. Use 3 strands for each fringe.
With the strip still folded, work along Row 41 on the outside of the curve. In each of the 10 ch-1 spaces of Row 41, attach one fringe with a lark’s head knot: fold the 3 strands in half, pull the fold through the space, pull the ends through the loop, and tighten. (10 fringes, 60 hanging ends)
Trim all ends evenly to 4 in (10.2 cm).
Final Blocking
- Wet the holder in cool water and gently squeeze it out. Don’t wring it.
- Roll it in a towel to take out excess water.
- Lay the strip flat, unfolded, and pin it to 5.75 in (14.6 cm) x 41.5 in (105.4 cm).
- Pin the grid straight so the dc posts line up vertically and the ch-1 spaces open into even squares.
- Pin out each picot along both long edges.
- Straighten the fringe with damp fingers.
- Let it dry completely, then fold it at Row 41 and hang it.
Final Quality-Control Checklist
- Every mesh row has 11 dc and 10 ch-1 spaces (21 sts).
- Rows 1 and 82 are solid with 21 dc each.
- Edging Round 1 has 378 sc and Round 2 has 386 sc.
- Each long side has 41 evenly spaced picots, 82 in total.
- The strip measures 5.75 in (14.6 cm) x 41.5 in (105.4 cm).
- All 8 cords are 28 ch long and the ring hangs level.
- The fringe sits on Row 41, centered on the bottom of the sling.
- All ends are woven in securely.
Troubleshooting
Edges wave or ruffle: you’re probably working more than 2 sc per row end. Go back to exactly 2 per row.
Edges pull in or the strip curls: your sc are too tight. Work the edging with a hook one size larger.
The mesh slants: check that the first dc of each row goes into the second dc, not the first, and that the last dc goes into the turning chain.
The ring tilts: one set of cords is shorter. Undo the shorter cords and rework them to 28 ch.
The rolls sit loosely or the sling stretches over time: cotton relaxes when it’s damp. Wash and re-block it flat, or rework it with a hook one size smaller so the sling holds the rolls more snugly.
Care
Hand wash in cool water with mild soap, then reshape and dry flat. Keep it away from direct shower spray so it doesn’t stay damp for long periods.
Final Notes
The whole project runs on one measurement chain. Gauge of 4 sts and 2 rows per 1 in (2.5 cm) gives a 21-st strip that’s 5.25 in (13.3 cm) wide, and 82 rows make it 41 in (104.1 cm) long. Two sc per row end match that gauge, so the edging stays flat and brings the strip to 5.75 in (14.6 cm) x 41.5 in (105.4 cm). Folded at Row 41 and hung on 6 in (15.2 cm) cords from a 2.75 in (7.0 cm) ring, the holder hangs about 27 in (68.6 cm) tall with 4 in (10.2 cm) of fringe below.
Check each checkpoint as you go, and the finished holder will hold two rolls neatly.
Happy crocheting!