

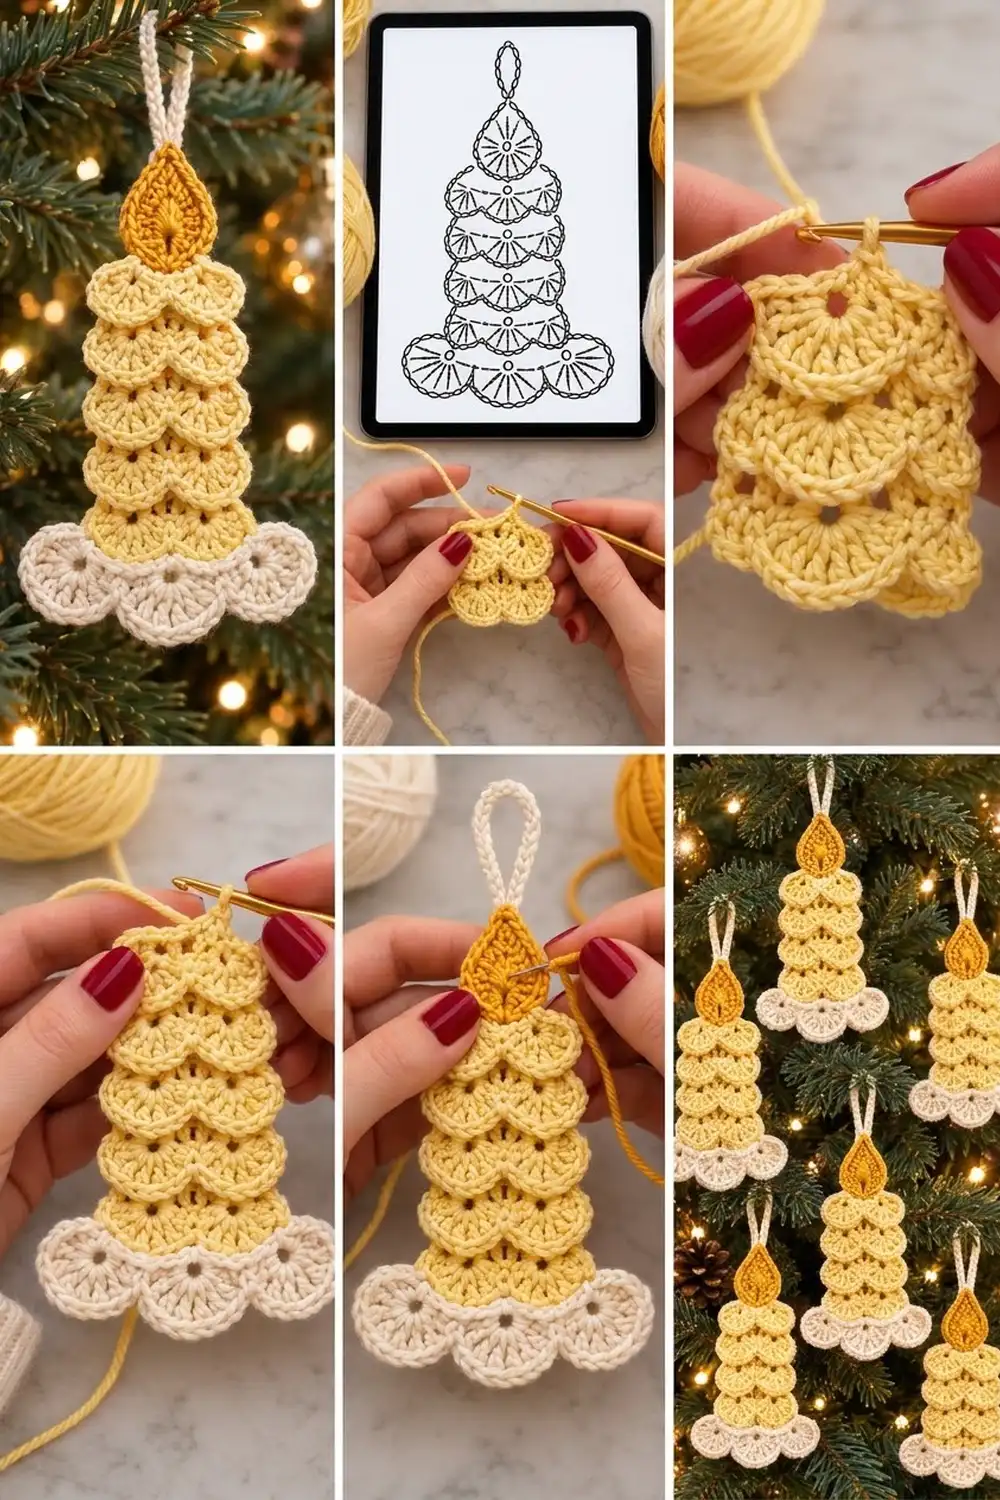
This little candle ornament is made from soft, overlapping fan scallops. Five butter-yellow tiers make up the candle body. A band of round cream scallops forms the base, and a mustard-gold teardrop flame sits on top. A cream chain loop lets it hang straight from a branch.
The palette is warm and calm, and it shows up well against dark evergreen and twinkle lights. The shape is simple enough that a set of matching candles looks neat and even on a tree.
This pattern uses US crochet terms. The finished ornament is about 5.5 in (14.0 cm) tall without the loop and 7 in (17.8 cm) tall with it. At its widest point, the cream base, it measures about 4.25 in (10.8 cm) across.
You make the candle in one continuous piece, from the top down. A foundation row of single crochet comes first. Then you alternate fan rows and “ladder” rows to build the tiers, switch to cream for the base, and finish with an edging row. Last, you work the flame into the free loops of the foundation chain and chain the hanging loop from the flame tip.
Finished Size and Construction
- Finished size: 4.25 in (10.8 cm) wide at the base × 5.5 in (14.0 cm) tall; 7 in (17.8 cm) tall including the loop
- Skill level: Easy–Intermediate
- Terminology: US
- Yarn weight: DK (#3) cotton or cotton blend
- Hook: 3.5 mm (E-4)
- Number of pieces: 1 (flame and loop are worked onto the body; no sewing)
- Layout: a single vertical ornament
- Body width: 2.75 in (7.0 cm) at the top tier, 3.5 in (8.9 cm) at the fifth tier
- Size before edging: 4.25 in (10.8 cm) wide × 4.1 in (10.4 cm) long (body only)
- Edging depth: about 0.15 in (0.4 cm), cream, along the scalloped lower edge
Materials
Choose a smooth, mercerized or matte DK cotton. Cotton holds a crisp scallop and doesn’t droop on the branch. The quantities below assume about 120 m per 50 g.
- Butter yellow (body): 8 g / 19 m
- Cream (base and loop): 4 g / 10 m
- Mustard gold (flame): 2 g / 5 m
Tools
– 3.5 mm (E-4) crochet hook
– Tapestry needle
– Scissors
– Rust-proof pins and a blocking mat or folded towel
– Spray bottle with water
– Stitch marker (optional)
All quantities are for one ornament and include a margin of about 15%. For a set of six, multiply by six and round up to whole balls.
Abbreviations (US Terms)
- ch: chain
- sl st: slip stitch
- sc: single crochet
- hdc: half double crochet
- dc: double crochet
- tr: treble crochet
- sp: space
- st(s): stitch(es)
- RS / WS: right side / wrong side
Special stitch: Fan. Work the stated number of dc (or tr) into one stitch. Skip the stitches on either side of it as the pattern says, so the fan opens into a semicircle.
Ladder row: A WS row of sc anchors joined by chains. On the fans, you work the anchor sc into the loop closest to you only. This leaves the RS outer loop free, so each fan keeps a crisp, raised edge that sits slightly over the tier below.
Gauge and Checkpoints
Gauge: 20 sc and 24 rows = 4 in (10.2 cm), which is 5 sc per 1 in (2.5 cm).
Make one complete ornament before starting a set. Check it at each stage, measuring flat and unstretched:
- After Row 1: 13 sc = 2.6 in (6.6 cm) wide
- After Row 4 (two tiers): 2.75 in (7.0 cm) wide × 1.25 in (3.2 cm) long
- After Row 10 (five tiers): 3.5 in (8.9 cm) wide × 3.5 in (8.9 cm) long
- After Row 13 (edging): 4.25 in (10.8 cm) wide × 4.1 in (10.4 cm) long
- After the flame: 5.5 in (14.0 cm) tall in total
Too big: Use a hook 0.5 mm smaller, or chain more firmly on the ladder rows. Too small: Use a hook 0.5 mm larger. If the fans are cupping, relax your dc tension. Don’t change any stitch counts. The fan spacing depends on them.
Body
Work top-down with butter yellow. Row 1 is a WS row. Every fan row is a RS row.
Foundation: Ch 14.
Row 1 (WS): Sc in 2nd ch from hook and in each ch across, turn. (13 sc) The 13 free loops left on the underside of the chain are where you’ll work the flame later.
Tier 1
Row 2 (RS, fan row): Ch 1, sc in first sc, skip 2 sc, 7 dc in next sc, skip 2 sc, sc in next sc, skip 2 sc, 7 dc in next sc, skip 2 sc, sc in last sc, turn. (3 sc + 14 dc = 17 sts; 2 fans)
That uses all 13 sc: 1 + 2 + 1 + 2 + 1 + 2 + 1 + 2 + 1 = 13.
Row 3 (WS, ladder): Ch 1, sc in first sc. Ch 2, sc in 4th (center) dc of the fan. Ch 2, sc in middle sc. Ch 2, sc in 4th dc of the next fan. Ch 2, sc in last sc, turn. (5 sc + 8 ch = 13 sts)
Tier 2
Row 4 (RS, fan row): Ch 1, sc in first sc. Skip 2 ch, 7 dc in next sc. Skip 2 ch, sc in next sc. Skip 2 ch, 7 dc in next sc. Skip 2 ch, sc in last sc, turn. (17 sts; 2 fans)
Each new fan sits directly below the fan above it, so the scallops stack in neat columns. The ch-2 spaces leave the small eyelets between the tiers.
Row 5 (WS, widening ladder): Ch 1, sc in first sc. Ch 3, sc in 4th dc of the fan. Ch 3, sc in middle sc. Ch 3, sc in 4th dc of the next fan. Ch 3, sc in last sc, turn. (5 sc + 12 ch = 17 sts)
Tier 3
Row 6 (RS, fan row): Ch 1, sc in first sc. Skip 3 ch, 9 dc in next sc. Skip 3 ch, sc in next sc. Skip 3 ch, 9 dc in next sc. Skip 3 ch, sc in last sc, turn. (3 sc + 18 dc = 21 sts; 2 fans)
Check the base: 1 + 3 + 1 + 3 + 1 + 3 + 1 + 3 + 1 = 17.
Row 7 (WS, ladder): Ch 1, sc in first sc. Ch 3, sc in 5th (center) dc of the fan. Ch 3, sc in middle sc. Ch 3, sc in 5th dc of the next fan. Ch 3, sc in last sc, turn. (17 sts)
Tier 4
Row 8: Repeat Row 6. (21 sts)
Row 9: Repeat Row 7. (17 sts)
Tier 5
Row 10: Repeat Row 6. (21 sts) In the final yarn over of the last sc, change to cream. Fasten off yellow, leaving a 4 in (10.2 cm) tail.
Cream Base
Row 11 (WS, cream ladder): Ch 1, sc in first sc. Ch 2, sc in 3rd dc of the first fan. Ch 2, sc in 7th dc of the same fan. Ch 2, sc in middle sc. Ch 2, sc in 3rd dc of the next fan. Ch 2, sc in 7th dc of the same fan. Ch 2, sc in last sc, turn. (7 sc + 12 ch = 19 sts)
This row turns 2 anchor points per fan into 3 fan positions that are spaced evenly and match from left to right. It also forms the narrow cream band across the bottom of the body.
Row 12 (RS, cream fan row): Ch 1, sc in first sc. Skip 2 ch, 11 tr in next sc, skip 2 ch, sc in next sc; repeat from * 2 more times, turn. (4 sc + 33 tr = 37 sts; 3 fans)
Check the base: 4 sc + 3 fan stitches + 12 skipped ch = 19. These 11-tr fans open wider than a semicircle and flare past the body, which gives you the round cream scallops. Don’t fasten off.
Border
The border is a single cream edging row along the scalloped lower edge. The side edges have no border, so the tiered outline stays crisp. Here, one side means one scallop.
Border gauge: about 12 sc per 2.25 in (5.7 cm) of scallop arc. That is slightly denser than flat gauge, so the curve lies smooth.
Row 13 (WS, edging): Ch 1, sl st in first sc. Sc in each of the next 5 tr, 2 sc in next tr, sc in each of the next 5 tr, sl st in next sc; repeat from * 2 more times. Fasten off, leaving a 4 in (10.2 cm) tail.
Count: 37 sts worked 1 per existing stitch + 3 extra sc (one per scallop apex) = 40 sts (36 sc + 4 sl st). Each scallop has 12 sc.
Why the math works: Each fan’s outer edge is 11 tr tops stretched around a curve. One sc per tr follows that curve, but the outside of a circle is longer than its inner base. The single extra sc at the 6th (center) tr eases the outer edge so it doesn’t pull inward. The sl sts at the sc valleys keep the scallops separate.
Flame
Turn the ornament upside down with the RS facing you. Count the 13 free loops of the foundation chain from right to left.
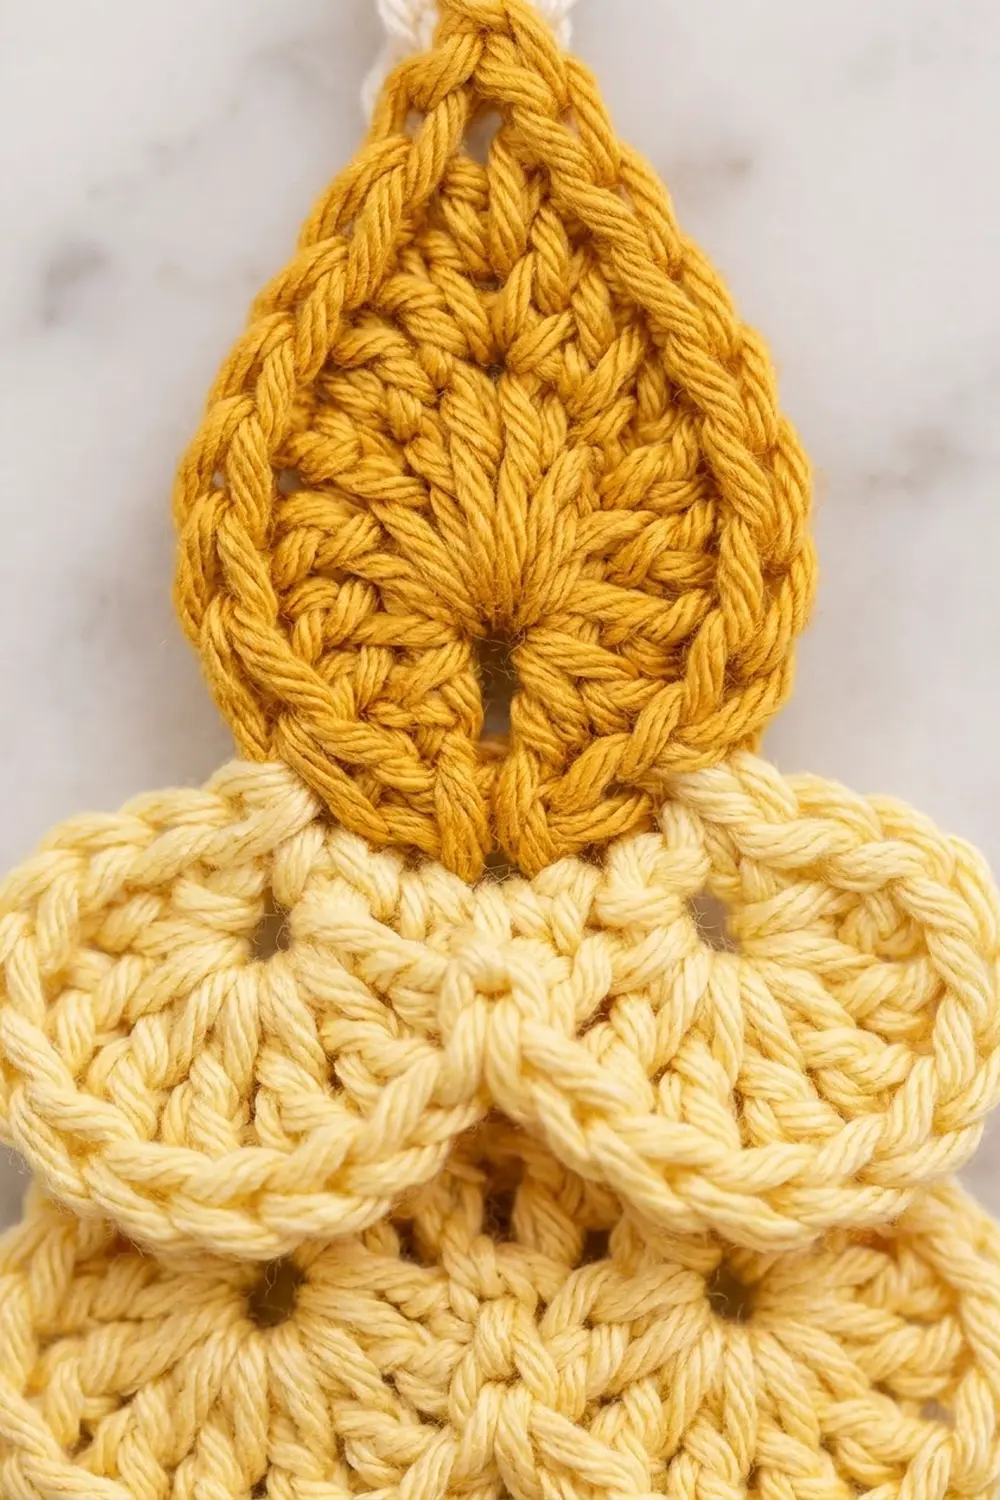
Row F1 (RS): With mustard gold, sl st in loop 5. Skip loop 6, work 9 dc in loop 7 (the center loop), skip loop 8, sl st in loop 9, turn. (9 dc + 2 anchoring sl st)
The fan radiates from the center loop and leaves a small eyelet at the base of the flame.
Row F2 (WS, shaping): Ch 1. Sc in each of the first 2 dc, hdc in next dc, 2 dc in next dc. Work (tr, ch 2, tr) in the 5th (center) dc. Then 2 dc in next dc, hdc in next dc, sc in each of the last 2 dc, and sl st in loop 5 to anchor. (12 sts + ch-2 tip sp)
Check: 2 + 1 + 2 + 2 + 2 + 1 + 2 = 12. The stitches get taller toward the center, so the half circle draws up into a teardrop point. Fasten off.
The flame measures about 1 in (2.5 cm) wide × 1.25 in (3.2 cm) tall above the top edge.
Hanging Loop
Join cream with a sl st in the ch-2 tip space of the flame. Ch 22, then sl st in the same ch-2 space. Sl st in each of the 22 ch back around the loop. This firms it into a rounded cord. Sl st into the tip space again and fasten off.
The loop rises about 1.5 in (3.8 cm) above the flame tip.
Weave in all tails along matching colors. Weave the yellow and cream tails through the ladder rows, and the gold tail through the base of the flame.
Final Blocking
- Lightly mist the ornament until it’s damp. Don’t soak it.
- Lay it RS up on the mat and pin the top edge straight to 2.6 in (6.6 cm).
- Pin the five yellow tiers. Ease each fan into an even semicircle, keeping the tier width at 2.75 in (7.0 cm) at the top and 3.5 in (8.9 cm) at Tier 5.
- Pin the three cream scallops into round arcs to 4.25 in (10.8 cm) across in total. Put one pin at each center eyelet and one at each apex.
- Shape the flame into a teardrop and pin the tip. Pin the loop straight up.
- Check the overall height, 5.5 in (14.0 cm) without the loop, then let it dry completely.
- Optional: for extra crispness, mist it with a light fabric stiffener and dry it flat again.
Final Quality-Control Checklist
- Row 1 has 13 sc and the top edge is straight
- Each yellow tier has 2 fans that stack in columns
- Tiers 1–2 have 7 dc per fan; Tiers 3–5 have 9 dc per fan
- Eyelets show between each pair of tiers
- The cream band has 19 sts and the base has 3 fans of 11 tr
- The edging has 12 sc per scallop and 40 sts in total
- The flame is centered on loop 7 and comes to a clean point
- The loop is firm and centered on the flame tip
- The ornament hangs straight, not tilted
- The finished size is 4.25 in (10.8 cm) × 5.5 in (14.0 cm)
Troubleshooting
Fans curl forward: Your dc tension is too tight compared with the ladder chains. Loosen the fans, or tighten the ladder chains slightly.
Tiers look flat with no overlap: Make sure you work each ladder anchor into the loop closest to you only, never under both loops.
Fans don’t line up in columns: You anchored to the wrong dc. The center is the 4th of 7 or the 5th of 9.
Cream scallops ripple: The tr are too loose. Go down 0.5 mm for Row 12 only.
Cream scallops cup: Check that you have exactly 11 tr per fan and the extra sc at each apex.
Flame leans to one side: Recount the foundation loops. The 9 dc must go in loop 7.
Ornament tilts when hung: Re-center the loop on the ch-2 tip space.
Care
Hand wash in cool water with mild soap, press out the water in a towel, and dry flat. Reshape the scallops while damp, and store the ornament flat between seasons.
Final Notes
The measurement chain is short and easy to follow. Thirteen sc give you a 2.6 in (6.6 cm) top edge. Two 7-dc tiers bring the width to 2.75 in (7.0 cm), and three 9-dc tiers widen it to 3.5 in (8.9 cm). The 19-st cream ladder sets up three 11-tr scallops. The 40-st edging makes the base 4.25 in (10.8 cm) wide, and the flame brings the height to 5.5 in (14.0 cm). If each checkpoint matches, every candle in your set will match too.
Happy crocheting!