

The Ivory Lantern Lattice Table Runner is a lace runner built from diamond motifs joined into an open lattice. Each motif has a small solid ring near its lower point. Above the ring is a large teardrop opening framed by a fan of double crochet, so every diamond looks a little like a lantern or a candle flame.
The whole runner is one color, a soft ivory cotton. Three cream tassels with neat wrapped heads hang from the pointed tips at each short end. It looks calm and elegant on a holiday table, and the single neutral color works just as well in any other season.
This pattern uses US crochet terms. The finished runner is 17.75 in (45.1 cm) wide and 46.0 in (116.8 cm) long, not counting the tassels. Each tassel adds 4 in (10.2 cm) at the ends.
Construction is simple. You crochet 38 identical square motifs in six rounds each. From the second motif onward, each motif is joined to its neighbors on its last round (join-as-you-go). The motifs sit on point in alternating rows of 3 and 2. One round of picot border follows the zigzag outline, and the tassels go on last.
Finished Size and Construction
- Finished size: 17.75 in x 46.0 in (45.1 cm x 116.8 cm), plus tassels
- Skill level: Intermediate
- Terminology: US crochet terms
- Yarn weight: DK (weight 3) mercerized cotton
- Hook: 3.5 mm (E-4)
- Number of pieces: 38 motifs + 6 tassels
- Layout: squares set on point, 15 rows alternating 3 and 2 motifs (8 rows of 3, 7 rows of 2)
- Motif size: 4 in (10.2 cm) per side; 5.66 in (14.4 cm) from tip to tip
- Size before border: 17.0 in x 45.25 in (43.2 cm x 114.9 cm)
- Border depth: 3/8 in (1.0 cm) on every edge
Materials
Choose a smooth mercerized cotton or cotton blend in DK weight, about 120 m per 50 g. Mercerized cotton shows stitches crisply and blocks well, which lace like this needs. Pick a warm ivory or cream rather than optical white to get the soft look shown.
- Ivory (only color): 300 g (720 m / 787 yd)
- Motifs: about 5 g (12 m) each, 190 g total
- Border: about 15 g (36 m)
- Tassels: about 4 g (9.6 m) each, 24 g total
The quantities include a margin of about 25 percent for gauge differences and test swatches. Buy all the yarn from one dye lot, because small shade shifts show up clearly in a one-color lace piece.
Tools
- 3.5 mm (E-4) crochet hook
- Tapestry needle
- Stitch markers
- Stiff card, 4 in (10.2 cm) tall, for the tassels
- Scissors
- Blocking mats, rustproof pins, and a spray bottle
- Measuring tape
Abbreviations (US Terms)
- ch – chain
- sl st – slip stitch
- sc – single crochet
- dc – double crochet
- sc2tog – single crochet 2 together
- sp(s) – space(s)
- st(s) – stitch(es)
- rep – repeat
- beg – beginning
Special stitch – Picot loop (PL): (sc, ch 3, sc) worked into the same space.
Joining picot loop (JPL): sc, ch 1, sl st into the matching ch-3 loop on the neighboring motif, ch 1, sc. Work all of it into the same space on the current motif.
Gauge and Checkpoints
Make one complete motif before anything else. It is your gauge swatch, and if it measures correctly you can use it as motif 1.
Checkpoints for one motif (lightly steamed and laid flat):
- After Rnd 1: the ring is 0.75 in (1.9 cm) across.
- After Rnd 3: the piece is 2.25 in (5.7 cm) across at its widest point.
- After Rnd 4: each side is 3 in (7.6 cm).
- After Rnd 5: each side is 3.5 in (8.9 cm).
- After Rnd 6: each side is 4 in (10.2 cm), and it is 5.66 in (14.4 cm) from tip to tip.
Too big? Go down a half size to a 3.25 mm hook. Too small? Go up to a 3.75 mm hook. Every 1/4 in (0.6 cm) of error on one side becomes about 1 in (2.5 cm) of error across the runner’s width, so fix gauge now.
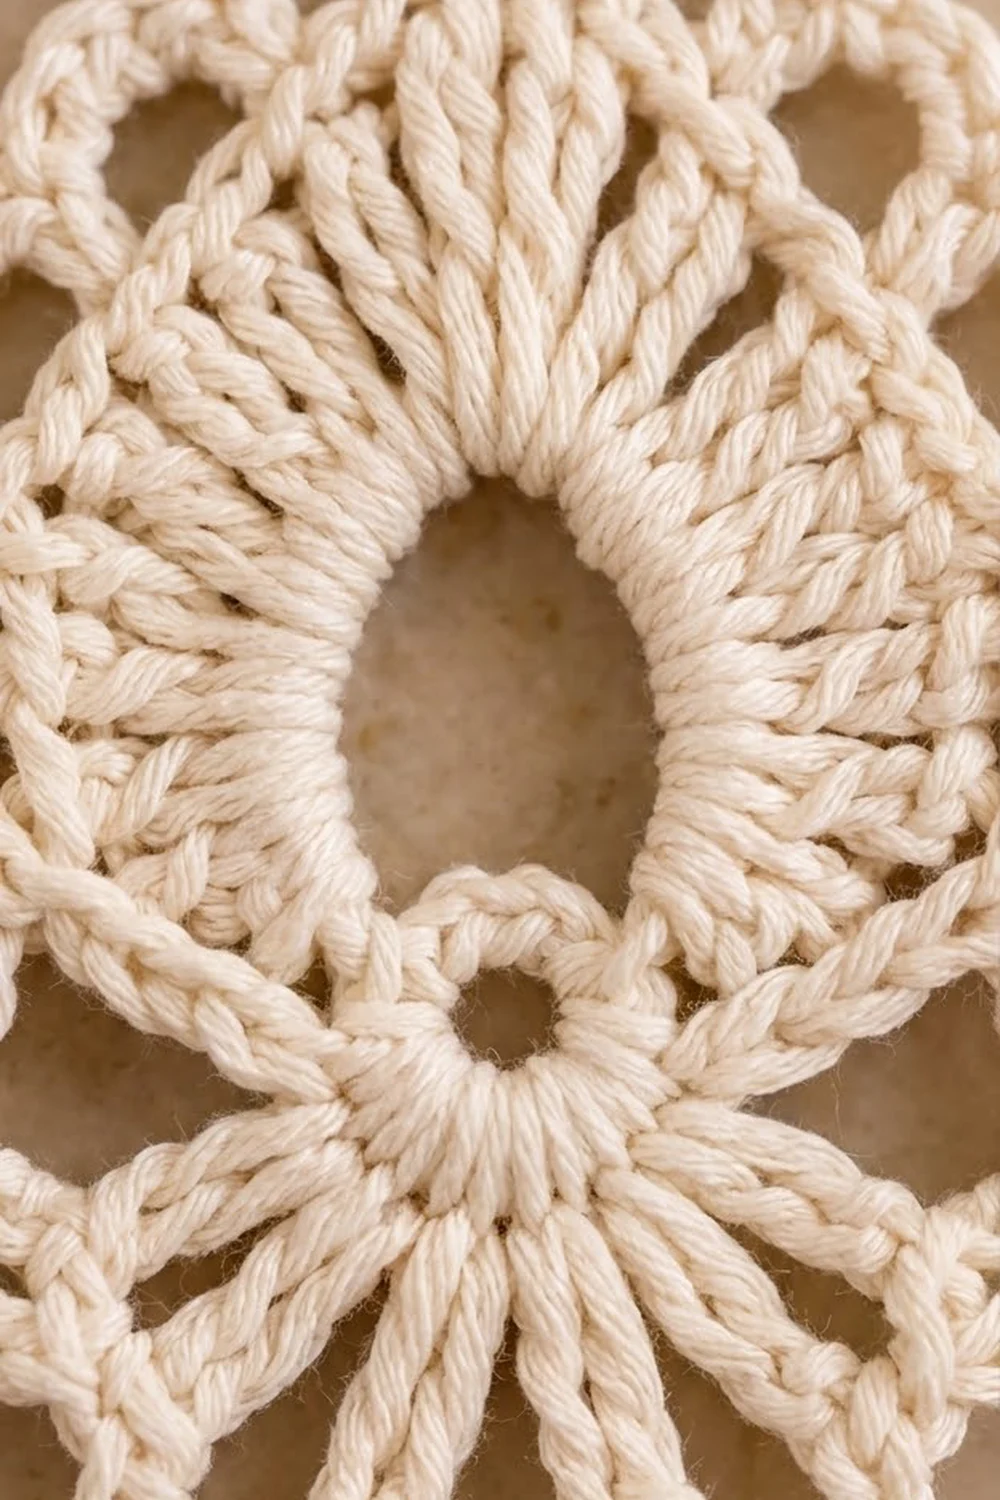
Motif (make 38)
Work each motif in rounds from the center out, without turning. Motif 1 is worked completely. Every other motif is joined to its neighbors during Rnd 6 (see Joining).
Rnd 1 (center ring): Make a magic ring. Ch 1, work 16 sc in the ring, then sl st to the first sc. Pull the ring firmly closed. (16 sc)
Rnd 2 (teardrop loop): Ch 1, sc in each st around (16 sc). Ch 18, then sl st in the first sc of this round. This ch-18 loop stands up above the ring and becomes the teardrop opening. (16 sc + 1 ch-18 loop)
Rnd 3 (fan and spokes): Sl st into the ch-18 loop. Ch 3 (counts as dc) and work 31 dc into the loop, for 32 dc fanned around the teardrop. Then work around the ring: [dc in next sc, ch 1] 16 times. Sl st to the top of the beg ch-3.
(48 dc + 16 ch-1 sps = 64 working positions)
The 32 dc make the solid fan around the opening. The 16 spaced dc with their ch-1 gaps make the spokes around the lower half of the ring.
Rnd 4 (square-up): In this round, treat every dc and every ch-1 sp as one stitch, for 64 positions. Ch 6 (counts as dc + ch 3), dc in the same st as the join (corner made). Dc in each of next 15 sts, (dc, ch 3, dc) in next st; rep from * 2 more times, dc in each of next 15 sts. Sl st to the 3rd ch of the beg ch-6.
(68 dc: 4 corners x 2 dc + 4 sides x 15 dc; 4 corner ch-3 sps)*
Each side now has 17 dc between the corner spaces: 1 corner dc, 15 dc, and 1 corner dc. The corners land at the top of the teardrop, at the bottom of the ring, and at the two points where the teardrop meets the ring. That placement is what makes the motif a diamond with the lantern standing upright.
Rnd 5 (chain loops): Sl st in the next ch-3 corner sp. Ch 1, (sc, ch 5, sc) in the same sp. Ch 3, skip 2 dc, sc in next dc; [ch 4, skip 3 dc, sc in next dc] 3 times; ch 3, skip 2 dc, (sc, ch 5, sc) in corner sp; rep from * around, leaving out the last corner. Sl st to the first sc.
(Per side: 5 loops (ch-3, ch-4, ch-4, ch-4, ch-3) and 4 sc; 4 corner ch-5 loops; 24 sc total)*
Check the skips: 2 + 1 + 3 + 1 + 3 + 1 + 3 + 1 + 2 = 17 dc per side, so every dc on the side is used exactly once.
Rnd 6 (picot scallop edge): Sl st into the next corner ch-5 loop and ch 1. (2 sc, ch 5, 2 sc) in the corner loop, then PL in each of the next 5 side loops; rep from * around. Sl st to the first sc. Fasten off and weave in the ends.
(Per side: 5 picot loops; 4 corner ch-5 loops; 56 sc total)*
Per-side count (used for joining and the border): 5 picot loops between the corner loops. The corner loops are not part of any side count.
Make All Pieces
Make 38 motifs in ivory:
- 1 complete motif (motif 1)
- 37 motifs worked through Rnd 5, then finished and joined on Rnd 6
Layout grid (A = a row of 3, B = a row of 2; each B motif sits in the notch between two A motifs):
Row 1:   A   A   A
Row 2:     B   B
Row 3:   A   A   A
Row 4:     B   B
  ... continue alternating ...
Row 13:  A   A   A
Row 14:    B   B
Row 15:  A   A   A
Total: 8 A rows x 3 = 24 motifs, plus 7 B rows x 2 = 14 motifs, for 38 motifs.
Joining
Method: Join-as-you-go on Rnd 6. Work Rnd 6 as written. When you reach a side or corner that touches a finished neighbor, use the joining stitches below instead of the plain ones.
Stitch-to-stitch logic:
- Shared side: work a JPL in each of the 5 side loops, in order. Because the two motifs face each other, loop 1 joins to the neighbor’s loop 5, loop 2 to loop 4, and so on. Five loops meet five loops, so nothing stretches or bunches.
- Shared corner: instead of (2 sc, ch 5, 2 sc), work (2 sc, ch 2, sl st in the neighbor’s corner ch-5 loop, ch 2, 2 sc).
- Points where 3 or 4 motifs meet: sl st into the sl st of the earlier corner join, not into a fresh loop. This keeps all the points stacked in one spot.
Geometry: B motifs share full sides with the A motifs above and below them. A motifs in the same row touch only at their side corners. A motifs in the same column touch only at their top and bottom corners.
Order: Join row 1 from left to right, using corner-to-corner joins only. In row 2, join the upper two sides of each B motif to the A motifs above it. In row 3, join each A motif’s upper side(s) to the B motifs above, its top corner to the A motif directly above, and its left corner to the motif before it. Continue the same way to row 15.
Tension: Keep the ch 1 on each side of a joining sl st loose, so the join is the same length as the ch 3 of a plain picot. If the joins are tight, the lattice puckers along the seams.
Size checkpoint: after rows 1–3 (8 motifs), the piece should be 17.0 in (43.2 cm) wide and 11.3 in (28.7 cm) long, measured tip to tip.
Border
Border gauge: each picot unit [PL, ch 1] covers about 0.8 in (2.0 cm), so 5 units fill one 4 in (10.2 cm) motif side. The border adds 3/8 in (1.0 cm) on every edge.
Edge inventory: The outline zigzags. It has 22 outer tips, 18 inner notches, and 40 exposed motif sides.
- Each long edge: 8 A motifs x 2 exposed sides x 5 loops = 80 picot loops, plus 8 side tips and 7 notches.
- Each short end: 4 exposed sides x 5 loops = 20 picot loops (1 side on each outer end motif and 2 on the middle one), plus 3 end tips and 2 notches.
- Total: 80 + 80 + 20 + 20 = 200 picot loops, which equals 40 sides x 5. Every loop is accounted for.
Border round: With the right side facing, join the yarn in the corner ch-5 loop at the top tip of the top-left motif. Ch 1, then work around:
- At each outer tip (22): (2 sc, ch 5, 2 sc) in the corner ch-5 loop.
- Along each exposed side: [ch 1, PL in next picot loop] 5 times, ch 1.
- At each inner notch (18): sc2tog. Insert the hook into the ch-2 sp on this side of the joining sl st for the first leg, and into the ch-2 sp on the other side for the second.
Sl st to the first sc and fasten off.
Why the math works: the border puts exactly one PL on every existing picot loop, so each side keeps a 1:1 count of 5. The tips get the same cluster as the motif corners, so they stay sharp. The notches get a decrease, so they pull in neatly instead of flaring. No stitches are added at the seams, because the joins already sit inside the corner loops.
Tassels (make 6)
- Wrap the yarn 40 times around a 4 in (10.2 cm) card.
- Slide a 12 in (30.5 cm) strand under the wraps at the top and tie it tightly. Cut through the loops at the bottom.
- Wrap a 6 in (15.2 cm) strand tightly around the bundle 6–8 times, 3/4 in (1.9 cm) below the top, to form a rounded head. Knot it and bury the ends inside the tassel.
- Trim the tassel to 4 in (10.2 cm).
- Tie one tassel to each of the 3 end tips at both short ends, using the top tie strand.
Final Blocking
- Weave in all remaining ends along stitch lines, not across open spaces.
- Lay the runner right side up. Pin the four outer corner tips first: 17.75 in (45.1 cm) apart across and 46.0 in (116.8 cm) apart along the length.
- Pin every outer tip and notch. Use a tape to check that the tips along each long edge are 5.66 in (14.4 cm) apart.
- Pin each teardrop open and pull the corner ch-5 loops into points.
- Mist the runner until it is damp, but not soaked.
- Let it dry completely, at least 12 hours, before you unpin it.
- Comb the tassels straight and trim them level.
Final Quality-Control Checklist
- [ ] 38 motifs, each 4 in (10.2 cm) per side
- [ ] Every teardrop points toward the same short end
- [ ] Every shared side joined at all 5 loops
- [ ] All 3-way and 4-way points stacked in one join
- [ ] Border: 200 PLs, 22 tip clusters, 18 sc2tog
- [ ] Runner measures 17.75 in x 46.0 in (45.1 cm x 116.8 cm)
- [ ] 6 tassels, each 4 in (10.2 cm), with matching heads
- [ ] All ends secured
Troubleshooting
Teardrop too round or floppy: The ch-18 is too loose. Chain more tightly, or make a ch-16 loop with 30 dc and add 2 more dc in the ring section of Rnd 3 so you still have 64 positions.
Rnd 4 cups: The Rnd 3 spokes are too tight. Keep the ch-1s relaxed.
Rnd 4 ruffles: Work the 32 fan dc more snugly, or go down a half hook size for Rnds 3–4 only.
Seams pucker: Make the ch 1 on each side of every joining sl st a little longer.
Runner leans or twists: Some teardrops are upside down. Check each motif’s orientation before you join it.
Notches gape: Make sure each sc2tog catches both ch-2 spaces.
Care
Hand wash in cool water with mild soap, roll the runner in a towel to remove water, and dry it flat, pinned to size if needed. Do not tumble dry.

Final Notes
The measurement chain is short and reliable. A 0.75 in (1.9 cm) ring grows into a 4 in (10.2 cm) motif with a 5.66 in (14.4 cm) diagonal. Three diagonals give 17.0 in (43.2 cm) of width, and eight give 45.25 in (114.9 cm) of length. The 3/8 in (1.0 cm) border brings the runner to 17.75 in x 46.0 in (45.1 cm x 116.8 cm). Check your first motif carefully, because if it measures right, the rest of the runner will too.
Happy crocheting!