

This hanging toilet paper holder keeps three spare rolls in sight and within reach. It hangs from a towel bar, a cabinet rail, or any rod up to about 1.25 in (3.2 cm) thick. Three straps loop over the bar, and three round pockets sit side by side on a sturdy back panel.
The sample uses one calm cornflower blue in cotton. Each pocket has a solid base band, a middle band of open square mesh, and a solid top band. The mesh lets the white rolls show through and keeps the pockets light. Solid bands at the top and bottom keep them firm.
The pattern uses US crochet terms. The finished holder is about 15.6 in (39.6 cm) wide and 6 in (15.2 cm) tall without the tabs, or about 8 in (20.3 cm) tall including the tab loops. Each pocket is about 4.75 in (12.1 cm) across and 3.75 in (9.5 cm) deep.
Here’s how it’s built: you crochet three pockets in the round from the base up, and one back panel in rows. Next, you sew the pockets to the panel. Then you work a two-round border around the panel and crochet the three tabs from its top edge.
Finished Size and Construction
- Finished size: 15.6 in x 6 in (39.6 cm x 15.2 cm) panel; about 8 in (20.3 cm) tall including tab loops
- Skill level: Easy to intermediate
- Terminology: US crochet terms
- Yarn weight: Worsted (#4), cotton
- Hook: 5.0 mm (US H-8)
- Number of pieces: 4 (1 back panel, 3 pockets); tabs are worked onto the panel
- Layout: 3 pockets in one horizontal row on the panel
- Pocket size: 4.75 in (12.1 cm) base diameter, 3.75 in (9.5 cm) wall height
- Panel size before border: 14.6 in x 5 in (37.1 cm x 12.7 cm)
- Border depth: 0.5 in (1.3 cm) on every side
- Tabs: 2 in x 5.5 in (5.1 cm x 14.0 cm) each before folding
Materials
Yarn: Choose a smooth worsted-weight cotton or cotton blend. Cotton holds its shape in a damp bathroom and gives the mesh crisp, square holes. Avoid very soft acrylic, which lets the pockets sag.
- Cornflower Blue: 200 g, about 340 m (372 yd)
- 3 pockets: about 90 g total (30 g each)
- Back panel and border: about 45 g
- 3 tabs: about 15 g total
These quantities include a margin of about 50 g for gauge differences and swatching.
Tools:
- 5.0 mm (US H-8) crochet hook
- Tapestry needle
- 8 to 10 locking stitch markers
- Measuring tape
- Rustproof pins and a blocking mat
- Spray bottle
- Scissors
Abbreviations (US Terms)
- ch – chain
- sl st – slip stitch
- sc – single crochet
- dc – double crochet
- sk – skip
- st(s) – stitch(es)
- sp – space
- MR – magic ring
- BLO – back loop only
- rep – repeat
- RS – right side
Special stitch – Mesh (filet square): (dc, ch 1, sk 1 st). Each square is 1 dc plus 1 ch-1 space, so each square counts as 2 sts. On later mesh rounds, work the dc into the dc below and the ch-1 over the ch-1 space below. This stacks the squares in straight columns.
Gauge and Checkpoints
Gauge: 14 sc and 16 rows = 4 in (10.2 cm). That works out to 3.5 sts and 4 rows per inch. One mesh round is about 0.5 in (1.3 cm) tall.
Make one complete pocket first and check it before you start the panel. The pocket is the best gauge test because the rolls have to fit inside it.
Checkpoints:
- Pocket base after Round 9: 4.75 in (12.1 cm) across, lying flat
- Pocket wall after Round 14: 1.25 in (3.2 cm) above the ridge
- Pocket wall after Round 17: 2.75 in (7.0 cm) above the ridge
- Finished pocket wall: 3.75 in (9.5 cm); circumference about 15.4 in (39.1 cm)
- Panel after Row 1: 14.6 in (37.1 cm) wide
- Panel after Row 20: 5 in (12.7 cm) tall
- After the border: 15.6 in x 6 in (39.6 cm x 15.2 cm)
If your work is too big: go down to a 4.5 mm (US 7) hook. If it’s too small: go up to a 5.5 mm (US I-9) hook. Base diameter matters most. A standard roll is about 4.25 to 4.5 in (10.8 to 11.4 cm) across, so the base must be at least 4.5 in (11.4 cm) wide.
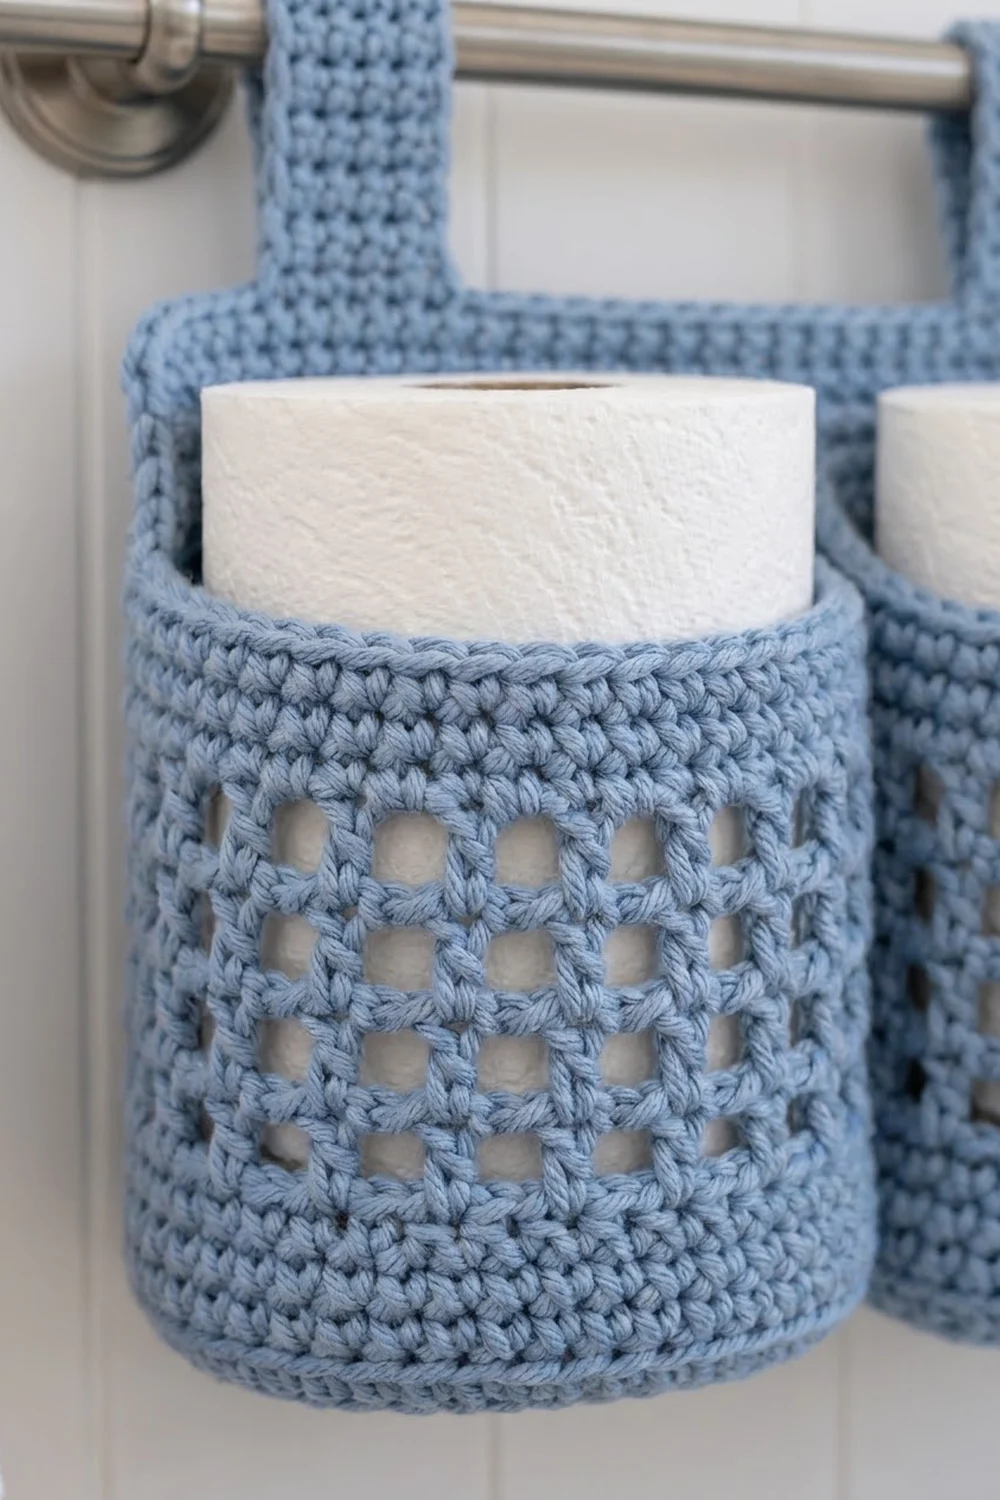
Pocket (Make 3)
Work in continuous joined rounds with the RS facing you. Don’t turn. The ch 1 at the start of a sc round doesn’t count as a stitch.
Base
Round 1: Make a MR, ch 1, 6 sc in ring, sl st to first sc. (6 sts)
Round 2: Ch 1, 2 sc in each st around, sl st to first sc. (12 sts)
Round 3: Ch 1, sc in next st, 2 sc in next st, rep from * around, sl st to first sc. (18 sts)
Round 4: Ch 1, sc in next 2 sts, 2 sc in next st, rep around, join. (24 sts)
Round 5: Ch 1, sc in next 3 sts, 2 sc in next st, rep around, join. (30 sts)
Round 6: Ch 1, sc in next 4 sts, 2 sc in next st, rep around, join. (36 sts)
Round 7: Ch 1, sc in next 5 sts, 2 sc in next st, rep around, join. (42 sts)
Round 8: Ch 1, sc in next 6 sts, 2 sc in next st, rep around, join. (48 sts)
Round 9: Ch 1, sc in next 7 sts, 2 sc in next st, rep around, join. (54 sts)
Checkpoint: the base lies flat and measures 4.75 in (12.1 cm) across.
Lower Solid Band
Round 10: Ch 1, sc in BLO of each st around, join. (54 sts) This turning round leaves a ridge of front loops around the base edge and makes the wall stand up.
Rounds 11–14: Ch 1, sc in each st around, join. (54 sts)
Checkpoint: the wall is 1.25 in (3.2 cm) tall above the ridge.
Mesh Band
Round 15: Ch 4 (counts as dc + ch 1), sk next st, dc in next st, ch 1, sk next st, rep from * around, sl st to 3rd ch of beg ch-4. (27 dc + 27 ch-1 sps = 54 sts)
Rounds 16–17: Sl st into the ch-1 sp, then sl st back into the beginning dc post at the join so you start over a dc. Ch 4 (counts as dc + ch 1), sk ch-1 sp, dc in next dc, ch 1, sk ch-1 sp, rep around, sl st to 3rd ch of beg ch-4. (27 dc + 27 ch-1 sps = 54 sts)
If you prefer, skip the slip-stitch shuffle: just ch 4 straight from the join, which already sits on top of the previous round’s first dc.
Checkpoint: there are three rows of square holes, 27 squares around, and the wall is 2.75 in (7.0 cm) tall.
Upper Solid Band
Round 18 (conversion round): Ch 1, sc in next dc, sc in next ch-1 sp, rep around, join. That’s 27 sc in the dc + 27 sc in the spaces = 54 sts.
Rounds 19–21: Ch 1, sc in each st around, join. (54 sts)
Fasten off and leave a 24 in (61 cm) tail for sewing. Weave a separate short tail neatly around the rim if needed.
Checkpoint: the wall is 3.75 in (9.5 cm) tall from the ridge to the rim, and a roll stands upright inside with room to spare.
Back Panel (Make 1)
Work in turned rows. The ch 1 doesn’t count as a stitch.
Foundation: Ch 52.
Row 1: Sc in 2nd ch from hook and in each ch across, turn. (51 sts)
Checkpoint: the row is 14.6 in (37.1 cm) wide.
Rows 2–20: Ch 1, sc in each st across, turn. (51 sts)
Don’t fasten off yet. Pull up a long loop, slip it onto a locking marker, and set the panel aside. You’ll pick it up again for the border.
Checkpoint: the panel is 14.6 in x 5 in (37.1 cm x 12.7 cm).
Make All Pieces
- Pockets: 3 in Cornflower Blue, about 30 g each
- Back panel: 1 in Cornflower Blue
- Tabs: 3, worked onto the panel during the border stage
Layout (front view, panel stitch numbers from left to right):
 Tab        Tab        Tab
[3-9]     [23-29]    [43-49]   <- tabs on top border edge
+--------------------------------+
|                                |
| [P1]       [P2]       [P3]     |
| 3-15      20-32      37-49     |  <- pocket backs on Rows 2-16
+--------------------------------+
Joining
Lay the panel flat with Row 20 at the top and Row 1 at the bottom. Count the stitches of Row 20 from left to right and mark the centers of each pocket on stitches 9, 26, and 43. They are 17 sts apart, or about 4.86 in (12.3 cm), which leaves about 0.1 in (0.3 cm) between pockets.
Flatten each pocket back. Mark 13 sts on Round 21 of each pocket, with the pocket’s join hidden in the middle. These 13 sts are the flat back, about 3.7 in (9.4 cm) wide.
Stitch-to-stitch logic: the pocket rim and the panel rows both have 3.5 sts per inch, so the 13 back rim stitches match 13 panel stitches one-to-one. Pocket 1 covers panel sts 3–15, Pocket 2 covers 20–32, and Pocket 3 covers 37–49. That leaves 4 sts between pockets and 2 sts at each end.
Method: whipstitch with the long tail.
- Bottom seam: set the base ridge on top of panel Row 1. Sew the 13 front loops from Round 10’s back section to the 13 marked stitches of Row 2, one to one.
- Top seam: sew the 13 back sts of Round 21 to the matching 13 sts of Row 16. The 12 wall rounds cover 3.75 in (9.5 cm), the same height as panel Rows 2–16 (15 rows).
- Side seams: sew a vertical line up each side of the flattened back. Catch one panel row for every pocket sc round, and two panel rows for every mesh round.
Tension: pull each stitch snug but not tight. The panel should stay flat with no puckers, and the pocket front should keep its round shape.
Checkpoint: all three pockets line up level, and the panel still measures 14.6 in x 5 in (37.1 cm x 12.7 cm).
Border
Border gauge is the same as the body: 3.5 sc per inch along stitch edges and about 3.6 sc per inch along row ends. Each round adds 0.25 in (0.6 cm) to every side.
Counts below are listed between corner groups. The corners are counted separately as 3-sc groups.
Put the held loop from Row 20 back on your hook. Make sure the pockets face you.
Round 1: Ch 1.
- Top: 3 sc in first st (corner), sc in next 49 sts, 3 sc in last st (corner).
- Side: down the row ends, sc in each row end, skipping the 5th and 15th (20 row ends – 2 = 18 sc).
- Bottom: working into the free loops of the foundation ch, 3 sc in first ch (corner), sc in next 49 ch, 3 sc in last ch (corner).
- Side: up the row ends, 18 sc as before.
Sl st to first sc.
Count: 49 top + 18 side + 49 bottom + 18 side + 12 corner sts = 146 sts.
Round 2: Ch 1. Sc in each st around, with 3 sc in the center st of each corner group. Sl st to first sc.
Each side gains 2 sts because the outer stitches of the old corner groups now count as side stitches. Count: 51 top + 20 side + 51 bottom + 20 side + 12 corner sts = 154 sts. Check: 146 + 8 = 154. Fasten off.
Why the math works: each side of the panel ends with the same count it started from. The top and bottom each started at 51 sts and end with 51 side sts. The sides use 18 sts in Round 1 to match 5 in (12.7 cm) at 3.5 sts per inch (17.5, rounded up). The two rounds add 0.5 in (1.3 cm) all around, so 14.6 + 1.0 = 15.6 in (39.6 cm) wide and 5 + 1 = 6 in (15.2 cm) tall.
Tabs (Make 3, worked onto the top edge)
Count the 51 top side sts of Round 2 from left to right. Tabs go on sts 3–9, 23–29, and 43–49. The center tab is centered on st 26, and each outer tab starts 2 sts in from its corner group.
Row 1: Join in the first tab st, ch 1, sc in same st and next 6 sts, turn. (7 sts)
Rows 2–22: Ch 1, sc in each st across, turn. (7 sts)
Fasten off and leave a 12 in (30.5 cm) tail. Each tab measures 2 in x 5.5 in (5.1 cm x 14.0 cm).
Fold each tab to the back and whipstitch its last row across the back of panel Row 14, about 1.5 in (3.8 cm) below the top edge. The loop rises about 2 in (5.1 cm) above the panel. To fit a thicker rail, sew the tab end lower down.
Final Blocking
- Weave in all ends, catching them in the solid sc bands.
- Put a paper roll or a tightly rolled hand towel in each pocket to hold the round shape.
- Lay the holder face up on a blocking mat.
- Pin the panel to 15.6 in x 6 in (39.6 cm x 15.2 cm), keeping the edges straight.
- Mist everything evenly until it’s damp, not soaked.
- Square up the mesh holes with your fingertips so the columns line up vertically.
- Pin each tab flat to 2 in (5.1 cm) wide.
- Let it dry completely, about 24 hours, before you remove the pins and inserts.
Final Quality-Control Checklist
- Each pocket has 54 sts on every wall round and 27 mesh squares in each mesh round.
- Each pocket base measures 4.75 in (12.1 cm) across.
- Pocket walls are 3.75 in (9.5 cm) tall, and all three rims sit level.
- The panel border counts 154 sts on Round 2.
- The panel measures 15.6 in x 6 in (39.6 cm x 15.2 cm).
- Tabs are 7 sts wide, evenly spaced, and sewn at the same height.
- The holder hangs straight on the bar without tilting.
- No yarn ends show on the front.
Troubleshooting
The base ruffles: your tension is loose. Use a smaller hook for Rounds 1–9 only.
The base cups before Round 10: your tension is tight, or a round has fewer than 6 increases. Count again and add any missing increases.
The mesh columns slant: the round started over a ch-1 space instead of a dc. Always begin the ch 4 over the first dc.
A roll won’t fit: the base is under 4.5 in (11.4 cm). Remake the pocket with a larger hook, or add Round 10 as one more increase round (sc in next 8, 2 sc in next, 60 sts). If you do that, every later round becomes 60 sts, or 30 mesh squares.
The panel sags under the pockets: sew the side seams more firmly and catch every panel row.
The holder tilts on the bar: the tabs aren’t sewn at matching heights. Re-sew them all at Row 14.
Care
Hand wash in cool water with mild soap and press out the water in a towel. Reshape the pockets around rolls and lay flat to dry.
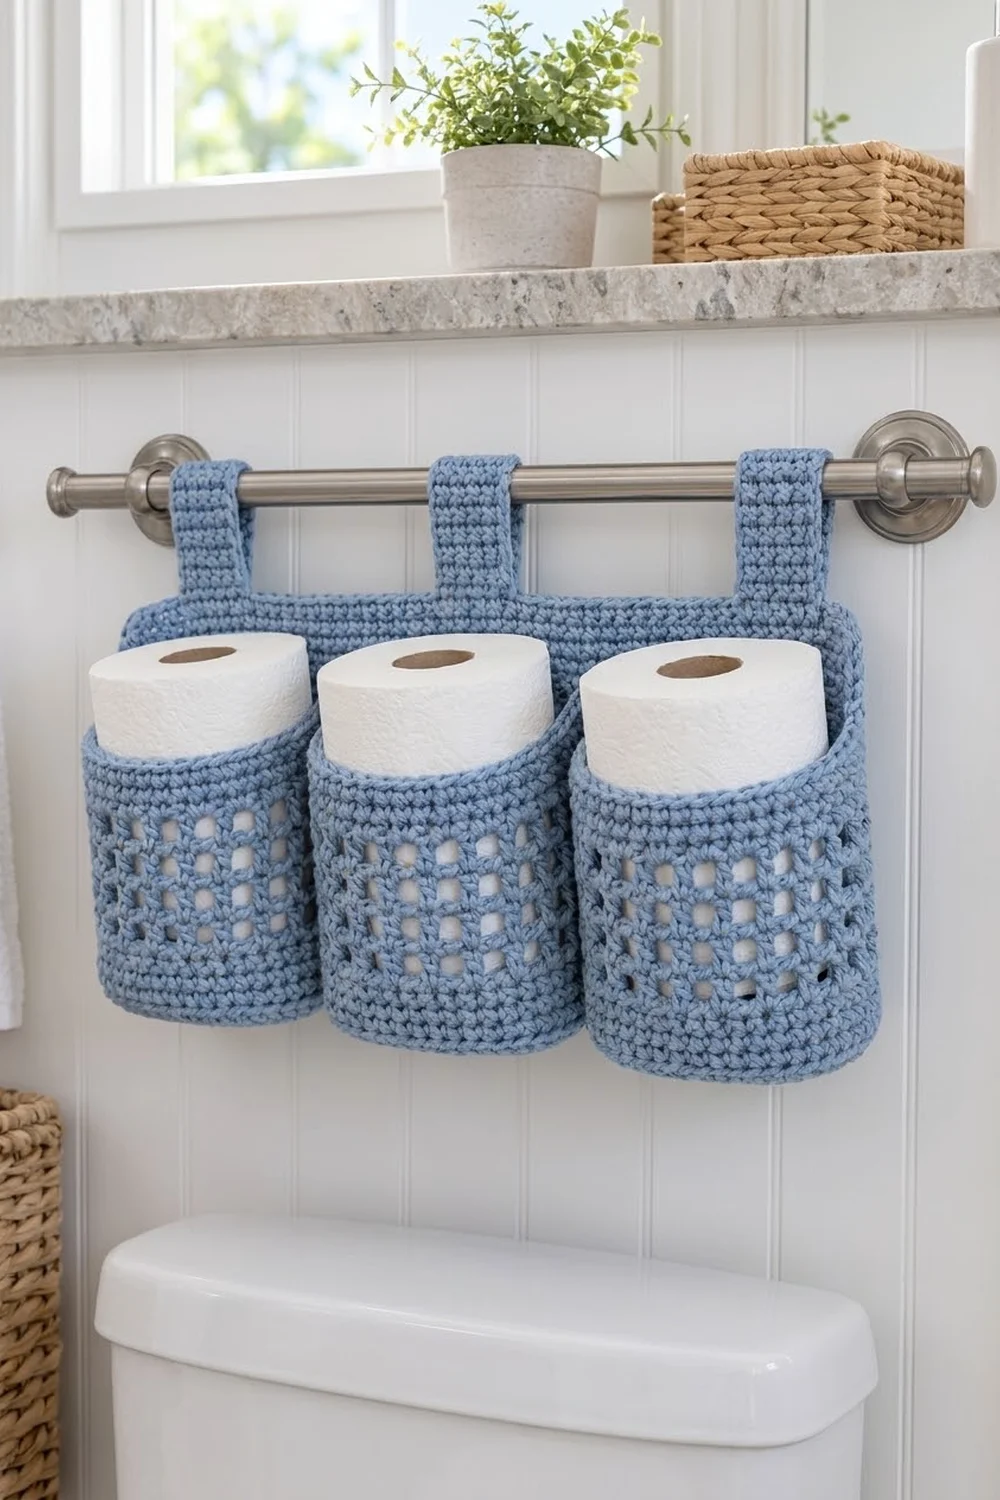
Final Notes
The measurements build on each other. A gauge of 14 sc per 4 in (10.2 cm) gives a 54-st base 4.75 in (12.1 cm) across, which fits a standard roll. Twelve wall rounds make 3.75 in (9.5 cm) pockets, the same height as panel Rows 2–16. The 51-st panel is 14.6 in (37.1 cm) wide and fits three 13-st pocket backs. Two border rounds bring it to 15.6 in x 6 in (39.6 cm x 15.2 cm), and three 7-st tabs hang it from the bar. If you check each step as you go, the finished holder will hang straight.
Happy crocheting!