

These little lace angel wings are a quick, satisfying thread project that looks far more delicate than it is. Each wing has a firm single-crochet ridge along the top, an open honeycomb mesh in the middle, and a scalloped fan edge along the bottom. A wrapped center bump and a doubled chain loop turn the pair into a ready-to-hang ornament.
The sample is worked in a soft, pale butter yellow, which glows warmly against green branches and fairy lights. White, ivory, or metallic gold thread also suits the style, which is classic, light, and a little vintage.
This pattern uses US crochet terms. The finished ornament measures about 4.5 in (11.4 cm) wide and 1.75 in (4.4 cm) tall, not counting the hanging loop.
Construction is simple: you crochet two identical wings in rows, starting at the top edge and working down. You join them at the top center, then work one border all the way around both wings. Last, you block the piece, wrap the center tightly, and add the hanging loop.
Finished Size and Construction
- Finished size: 4.5 in (11.4 cm) wide x 1.75 in (4.4 cm) tall
- Skill level: Intermediate (thread work, basic shaping)
- Terminology: US crochet terms
- Yarn weight: Size 3 cotton crochet thread
- Hook: 1.75 mm (US steel 4)
- Number of pieces: 2 wings
- Layout: 2 wings side by side (1 row x 2 pieces)
- Wing size (Rows 1-4): 2 in (5.1 cm) wide x 1.25 in (3.2 cm) tall
- Size before border: 4 in (10.2 cm) wide x 1.25 in (3.2 cm) tall
- Border depth: about 0.2 in (0.5 cm) along the top, 0.3 in (0.8 cm) along the lower edges, and 0.25 in (0.6 cm) at each outer tip
Materials
Choose a smooth, tightly plied mercerized cotton thread in size 3. Mercerized cotton shows stitch definition clearly, holds its shape after blocking, and won’t fuzz on the tree. Avoid soft or fluffy cotton, which blurs the mesh.
Yarn:
– Pale butter yellow, size 3 cotton thread: 5 g, about 15 m (16 yd) per ornament
The quantity includes a margin for your gauge swatch, the center wrap, the hanging loop, and weaving in ends. If you plan a set, multiply by the number of ornaments.
Tools:
– 1.75 mm (US steel 4) crochet hook
– Tapestry needle with an eye that fits size 3 thread
– Small sharp scissors
– Blocking board or foam mat
– Rust-proof pins
– Spray bottle with water
– Optional: fabric stiffener or a light starch solution
Abbreviations (US Terms)
- ch – chain
- sl st – slip stitch
- sc – single crochet
- dc – double crochet
- sk – skip
- st(s) – stitch(es)
- RS / WS – right side / wrong side
- ch-5 loop – the space formed by a chain-5
Special stitch – Fan: sk 1 st, 5 dc in next st, sk 1 st, sc in next st. One fan uses 4 stitches of the previous round and produces 6 new stitches (5 dc + 1 sc).
Gauge and Checkpoints
Make one wing before anything else. It is your gauge swatch.
- Gauge: 21 sc = 2 in (5.1 cm) across Row 1.
- Checkpoint 1 (after Row 1): The wing measures 2 in (5.1 cm) across.
- Checkpoint 2 (after Row 4): The wing measures 2 in (5.1 cm) across the top and 1.25 in (3.2 cm) from the top edge to the bottom of the Row 4 loops, lightly stretched.
- Checkpoint 3 (after joining): The pair measures 4 in (10.2 cm) across.
- Checkpoint 4 (after border and blocking): The ornament measures 4.5 in (11.4 cm) x 1.75 in (4.4 cm).
If your wing is too big, go down to a 1.5 mm hook. If it is too small, go up to a 2.0 mm hook. Thread gauge is sensitive, so even half a millimeter makes a visible difference. Don’t change the stitch counts; all the border math depends on them.
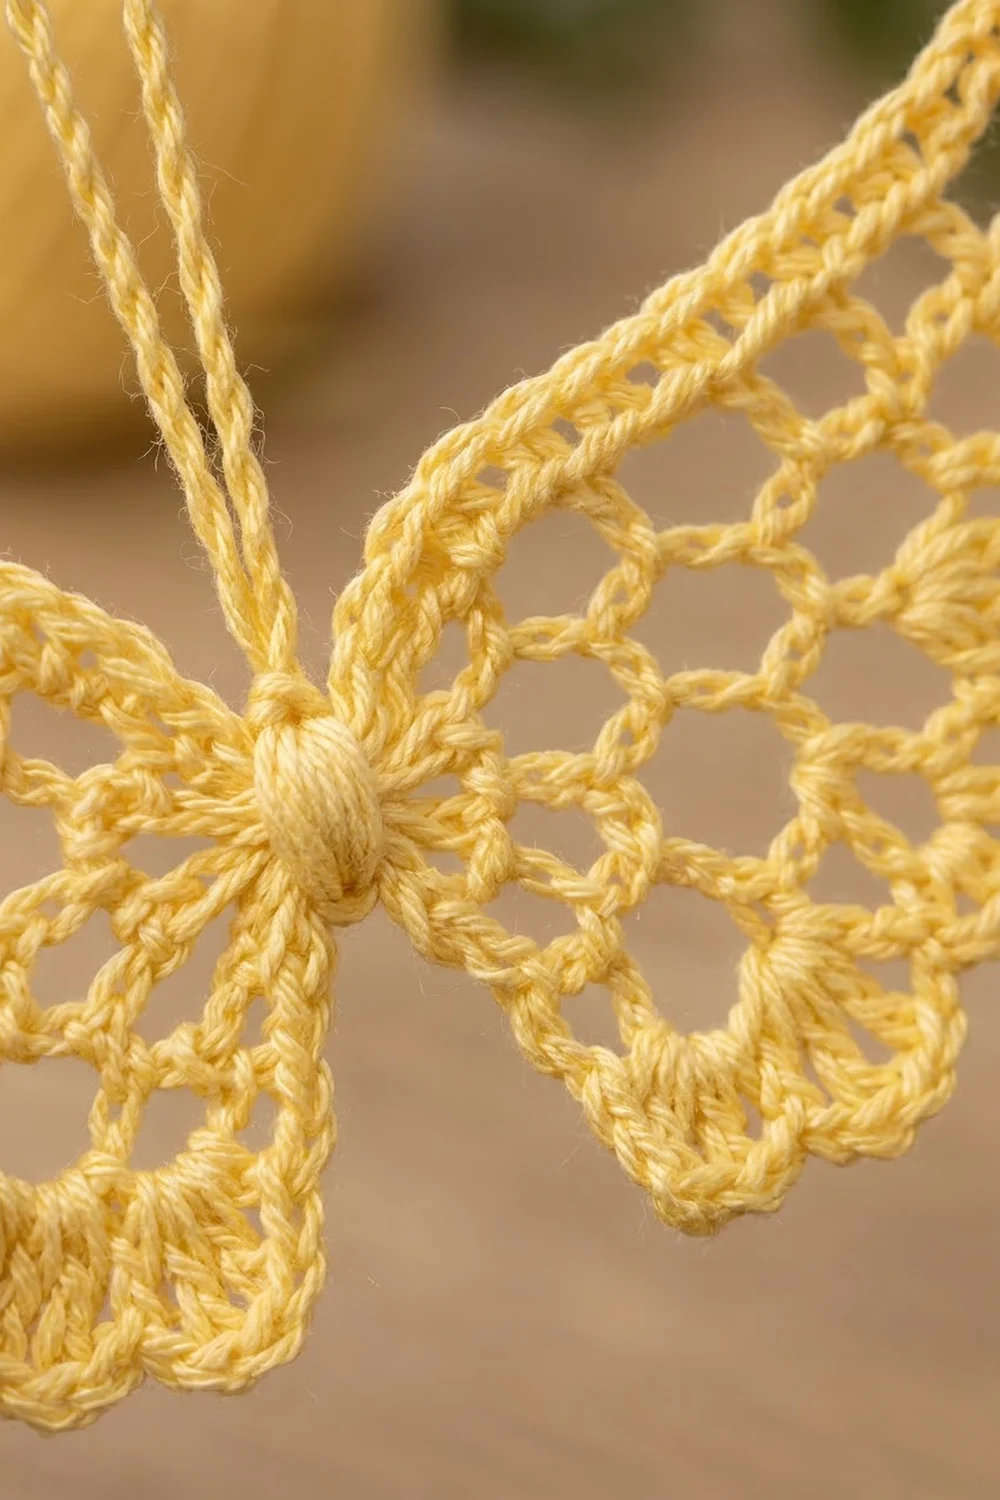
Wing (Make 2)
Each wing is worked flat in rows, starting at the long top edge and working down. Every mesh row loses one ch-5 loop, so the wing gets narrower toward the bottom.
Foundation: Ch 22.
Row 1 (RS): Sc in 2nd ch from hook and in each ch across, turn. (21 sc)
Row 2 (WS): Ch 1, sc in first sc, ch 5, sk 3 sts, sc in next st; repeat from * 4 more times, turn. (5 ch-5 loops, 6 sc)
Check the math: 1 sc + 5 x (3 skipped + 1 sc) = 21 stitches used. The last sc lands in the last sc of Row 1.
Row 3: Sl st in first sc and in next 3 ch (you are now at the center of the first loop), ch 1, sc in same loop, ch 5, sc in next ch-5 loop; repeat from * 3 more times, turn. Leave the rest of the row unworked. (4 ch-5 loops, 5 sc)
Row 4: Sl st in first sc and in next 3 ch, ch 1, sc in same loop, ch 5, sc in next ch-5 loop; repeat from * 2 more times. (3 ch-5 loops, 4 sc)
Fasten off, leaving a 6 in (15.2 cm) tail on the first wing only. Make the second wing exactly the same way.
The slip stitches at the start of Rows 3 and 4, plus the unworked half-loops at their ends, create small steps along each side. These outer half-loops of Rows 2 and 3 stay exposed. You will work into them during the border, and they become the slanted lower edges of the wing.
Make All Pieces
You need 2 wings in pale butter yellow, both worked from the same instructions. One is simply flipped to become the left wing.
Layout grid (RS facing):
[ Left Wing ] [ Right Wing ]
      top edges on one straight line
Lay both wings RS up with their foundation (top) edges along one line. Flip one wing so that the Row 1 starting ends of both wings meet at the center. These touching ends are the “root” ends; the opposite ends become the pointed tips.
Joining
The wings are joined only at the top center, so their lower edges can fan out and form a V below the center, as real wings do.
- Thread the 6 in (15.2 cm) tail onto the tapestry needle.
- Hold the wings RS up, root ends touching, top edges level.
- Whipstitch the end of Row 1 on one wing to the end of Row 1 on the other wing, working 3 small stitches through the side of the end sc of each wing.
- Make one more stitch joining the ends of the Row 2 sc on each wing, just below Row 1.
- Weave in and trim the tail.
Stitch-to-stitch logic: You are joining row ends to row ends, not stitch tops. No foundation loops are used, and no new stitches are created. Each wing still has its full 21 foundation loops free along the top for the border.
Tension: Pull the stitches just snug enough to close the gap. If they are too tight, the top edge puckers at the center. If they are too loose, the wings flop apart.
Size checkpoint: The joined pair measures 4 in (10.2 cm) across the top, tip to tip.
Border
The border is worked in two rounds around the outside of the joined pair. Round 1 sets an exact stitch count. Round 2 keeps the top edge as a smooth ridge and turns the lower edges into fans.
Border gauge: Round 1 keeps the same gauge as Row 1, so 42 sc = 4 in (10.2 cm) along the top.
Where the counts come from:
- Top side: 2 wings x 21 foundation loops = 42 sc. No stitches are added at the seam.
- Lower edge of each wing (tip to center): 3 sc in the exposed outer half-loop of Row 2 + 3 sc in the exposed outer half-loop of Row 3 + 4 sc in each of the 3 Row 4 loops (12 sc) + 3 sc in the exposed root half-loop of Row 3 + 3 sc in the exposed root half-loop of Row 2 = 24 sc.
Round 1 (RS): With RS facing and the top edge up, join thread with a sc in the first free foundation loop at the left wing tip.
- Top: Sc in each remaining foundation loop across the left wing, then across the right wing. (42 sc along the top: 21 per wing)
- Right wing lower edge: Working down the tip side, along the bottom, and up the root side, work 3 sc in the outer half-loop of Row 2, 3 sc in the outer half-loop of Row 3, 4 sc in each Row 4 loop, 3 sc in the root half-loop of Row 3, and 3 sc in the root half-loop of Row 2. (24 sc)
- Left wing lower edge: Working from the center out to the tip, work the same sequence in reverse: 3 sc in the root half-loop of Row 2, 3 sc in the root half-loop of Row 3, 4 sc in each Row 4 loop, 3 sc in the outer half-loop of Row 3, and 3 sc in the outer half-loop of Row 2. (24 sc)
- Sl st to first sc to join. (90 sc total: 42 + 24 + 24)
At the center bottom, go straight from the right wing’s last sc to the left wing’s first sc without chaining. The wings sit close together there, and the gap will be hidden by the center wrap.
Round 2: Ch 1, sc in same st as join and in each of next 41 sc across the top. (42 sc)
- Right wing lower edge: Work 6 fans over the 24 sc. (36 sts: 6 x [5 dc + 1 sc])
- Left wing lower edge: Work 6 fans over the 24 sc. (36 sts)
- Sl st to first sc to join. (114 sts total: 42 + 36 + 36)
Fasten off and weave in the ends.
Why the math works: One fan uses exactly 4 stitches. Each lower edge has 24 sc, and 24 ÷ 4 = 6, so the fans end with a sc in the last stitch of each edge. That sc anchors the fan pattern right at the center and right at the tip, with no half fans. The top count of 42 is exactly 2 x 21 because the seam joins row ends and adds no stitches.
Final Blocking
- Spray the ornament lightly with water until it is damp all the way through. For a stiffer ornament, dip it in diluted fabric stiffener instead and blot off the excess.
- Lay it RS up on the blocking board.
- Pin the two tips first, 4.5 in (11.4 cm) apart, with the top edges forming a gentle upward curve toward each tip.
- Pin the center top so the full height is 1.75 in (4.4 cm).
- Pin the tip of each fan to make a crisp scalloped edge.
- Open every ch-5 loop with a pin so the honeycomb mesh is even.
- Let the ornament dry completely, then unpin.
- Center wrap: Cut a 12 in (30.5 cm) length of thread. Pinch the wings together at the center seam and wrap the thread tightly around the center 10 to 12 times, until it forms a small, firm bump. Knot the ends tightly at the back, but don’t trim them yet.
- Hanging loop: Ch 60, about 6 in (15.2 cm) long, and fasten off. Fold the chain in half, slip both ends under the center wrap at the back, and knot them securely with the wrap tails. This gives you a doubled loop about 3 in (7.6 cm) tall. Weave in all ends and trim.
Final Quality-Control Checklist
- Each wing has 21 sc in Row 1, then 5, 4, and 3 ch-5 loops in Rows 2 to 4.
- Border Round 1 has 90 sc (42 + 24 + 24).
- Border Round 2 has 114 sts, with 6 fans on each wing.
- No half fans at the tips or the center.
- The top ridge is smooth and continuous across the seam.
- The center wrap is tight, round, and centered.
- The hanging loop is centered so the ornament hangs level.
- The finished ornament measures 4.5 in (11.4 cm) x 1.75 in (4.4 cm).
- All ends are hidden, with no tails showing from the front.
Troubleshooting
The top edge ruffles. Your Round 1 sc are too loose, or there are extra stitches. Recount to 42 and go down a hook size for the border only.
The fans don’t end evenly. One lower edge doesn’t have exactly 24 sc. Check the 3-3-12-3-3 sequence.
The mesh looks stringy. Your ch-5 loops are too loose. Chain more firmly, or try 4 ch per loop with a slightly larger hook.
The wings droop on the tree. Use fabric stiffener when blocking, and make the center wrap tighter.
The ornament tilts. Move the hanging loop until it is exactly at the center wrap.
The seam gapes. Add one more whipstitch through the Row 1 ends before working the border.
Care
Hand wash in cool water with mild soap, press out the water in a towel, and re-block flat to dry. Store flat between tissue paper so the fans and tips keep their shape.
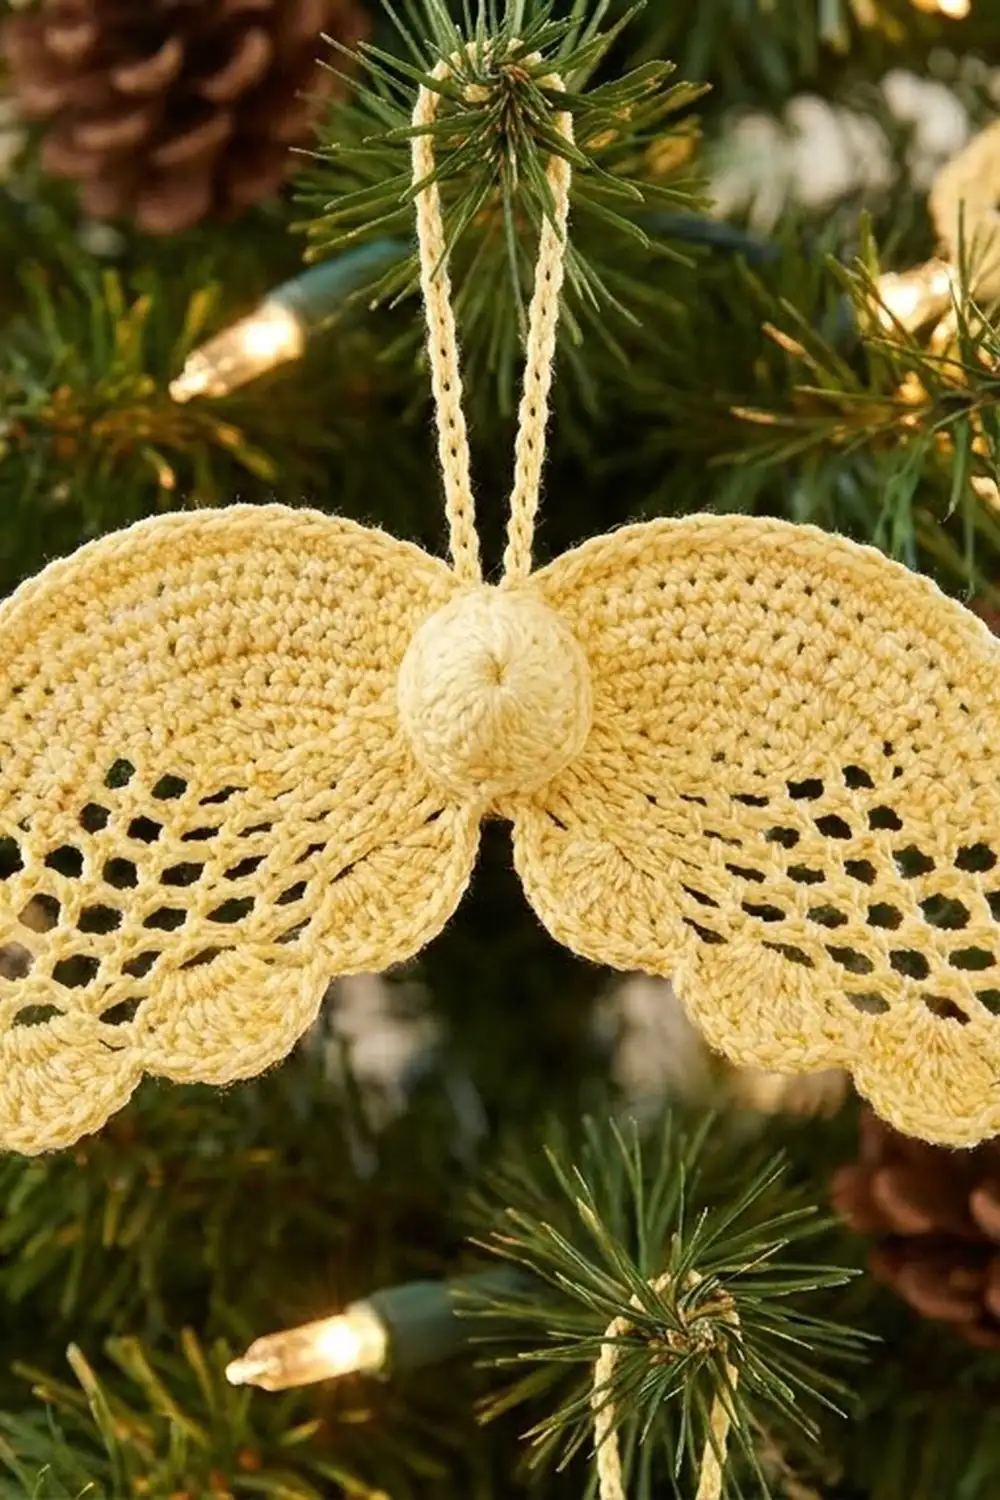
Final Notes
Every measurement in this pattern builds on the one before it. Row 1 sets the gauge at 21 sc = 2 in (5.1 cm). Two wings make 4 in (10.2 cm) and 42 top stitches. Each lower edge has exactly 24 sc for 6 fans per wing. The border brings the ornament to 4.5 in (11.4 cm) x 1.75 in (4.4 cm). Check each stage as you go, and the finished wings will come out even and ready for the tree.
Happy crocheting!