

This little lantern is a flat ornament in warm gold with a cream filet-mesh window and a tiny candle in the middle. The candle is a small cream rectangle and the flame is a rust teardrop. Both are sewn on top of the mesh so they stand out clearly against the open grid.
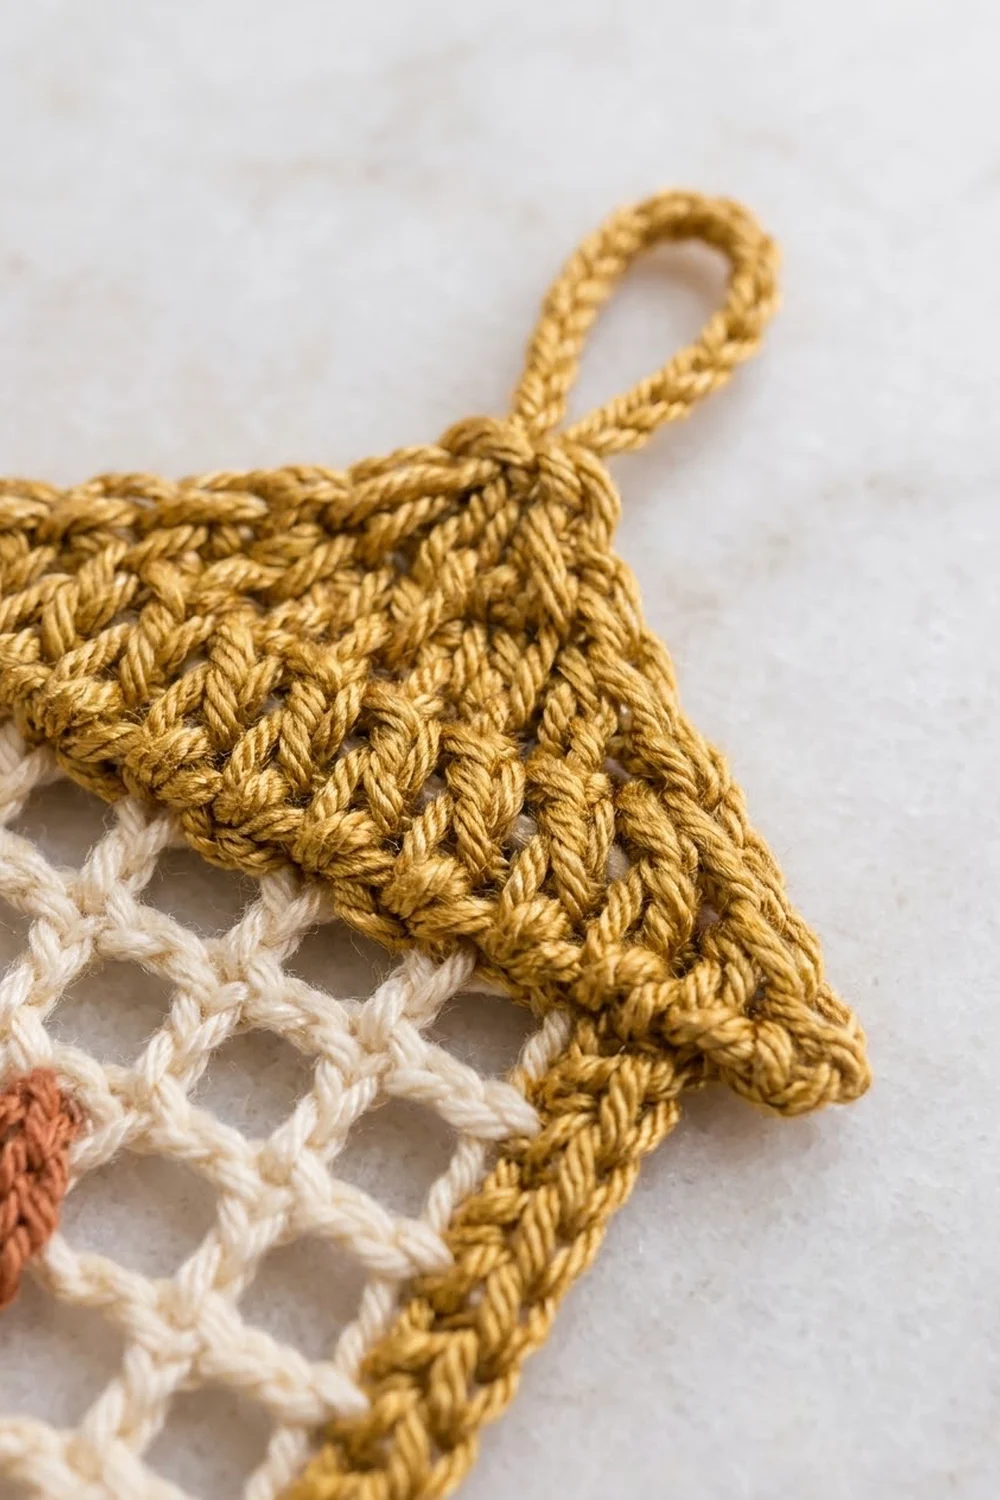
The style is cozy and a little vintage. A pointed roof with flared eaves sits on top and a stepped base with a matching ledge sits below. A sturdy loop at the peak lets it hang on a tree branch, a door handle or a gift.
The pattern uses US crochet terms. The finished lantern is about 4.5 in (11.4 cm) wide at the eaves and base ledge. It is 7 in (17.8 cm) tall from the base to the roof peak, and the hanging loop adds 1.5 in (3.8 cm).
Construction is simple. You crochet the cream mesh window first and add two gold border rounds to frame it. Then you work the base down from the bottom edge and the roof up from the top edge. Last, you make the candle and flame and stitch them in place.
Finished Size and Construction
- Finished size: 4.5 in (11.4 cm) wide x 7 in (17.8 cm) tall, plus a 1.5 in (3.8 cm) loop
- Skill level: Easy (advanced beginner)
- Terminology: US crochet terms
- Yarn weight: DK (weight 3)
- Hook: 3.5 mm (E-4)
- Number of pieces: 1 lantern body, plus 2 small appliqués (candle and flame)
- Layout: single ornament, no assembly grid
- Mesh window size (before border): 2.5 x 2.75 in (6.4 x 7.0 cm)
- Framed window size (after border): 3.5 x 3.75 in (8.9 x 9.5 cm)
- Border depth: 0.5 in (1.3 cm) on each side, 2 rounds
Materials
Choose a smooth DK yarn with good stitch definition, about 230 m per 100 g. Cotton or a cotton blend gives the crispest mesh. A soft acrylic also works well and has a gentle sheen in gold.
- Gold (main color): 10 g, about 23 m
- Cream (window and candle): 5 g, about 12 m
- Rust (flame): 2 g, about 5 m
These amounts include extra yarn for testing gauge and for tails.
Tools:
- 3.5 mm (E-4) crochet hook
- Tapestry needle
- Scissors
- 2 locking stitch markers
- Rust-proof pins and a foam blocking mat
- Spray bottle with water
Abbreviations (US Terms)
- ch – chain
- sl st – slip stitch
- sc – single crochet
- hdc – half double crochet
- dc – double crochet
- sk – skip
- sp – space
- st(s) – stitch(es)
- RS / WS – right side / wrong side
- rep – repeat
- sc3tog – single crochet 3 together: (insert hook in next st, yarn over, pull up a loop) 3 times, yarn over, pull through all 4 loops
- dc2tog – double crochet 2 together: (yarn over, insert hook in next st, yarn over, pull up a loop, yarn over, pull through 2 loops) 2 times, yarn over, pull through all 3 loops
- dc3tog – double crochet 3 together: work as dc2tog, but repeat the bracket 3 times, then yarn over and pull through all 4 loops
Special stitch – filet mesh square: ch 1, sk 1 st or ch, dc in next st. Each square is 2 sts wide and 1 dc row tall.
Gauge and Checkpoints
Make the mesh window first and measure it before you go on. It is small, so it doubles as your gauge swatch.
- Mesh gauge: 5 mesh squares (11 sts) = 2.5 in (6.4 cm) wide; 6 mesh rows = 2.75 in (7.0 cm) tall
- Border gauge: 13 sc = 3 in (7.6 cm); 2 sc rounds = 0.5 in (1.3 cm) deep
Checkpoints:
- Mesh window: 2.5 x 2.75 in (6.4 x 7.0 cm)
- After the border: 3.5 x 3.75 in (8.9 x 9.5 cm)
- After the base: 5 in (12.7 cm) tall
- After the roof: 7 in (17.8 cm) tall and 4.5 in (11.4 cm) wide at the eaves
- Candle: 1 x 1.25 in (2.5 x 3.2 cm); flame: 0.5 x 0.75 in (1.3 x 1.9 cm)
If your window is too big, go down to a 3.25 mm hook. If it is too small, go up to a 3.75 mm hook. Being off by up to 0.25 in (0.6 cm) is fine for an ornament. Just keep the same hook for the whole lantern so the candle still sits centered.
Mesh Window (Cream)
With cream, ch 14.
Row 1 (RS): Dc in 6th ch from hook (the 5 skipped ch count as dc and ch-1), ch 1, sk 1 ch, dc in next ch; rep from * 3 more times. Turn. (6 dc, 5 ch-1 sps = 11 sts; 5 mesh squares)*
Row 2: Ch 4 (counts as dc and ch-1), sk first ch-1 sp, dc in next dc, ch 1, sk ch-1 sp, dc in next dc; rep from * 2 more times, ch 1, sk next ch, dc in top of beginning ch. Turn. (6 dc, 5 ch-1 sps = 11 sts)*
Rows 3–6: Ch 4 (counts as dc and ch-1), sk first ch-1 sp, dc in next dc, ch 1, sk ch-1 sp, dc in next dc; rep from * 2 more times, ch 1, sk next ch, dc in 3rd ch of turning ch-4. Turn. (11 sts per row; 5 squares wide)*
You now have a grid of 5 x 6 open squares. Fasten off and weave in the ends.
Checkpoint: 2.5 x 2.75 in (6.4 x 7.0 cm). If the squares look skewed, pin the window flat now.
Candle (Cream)
With cream, ch 5.
Row 1: Sc in 2nd ch from hook and in each ch across. Turn. (4 sc)
Rows 2–6: Ch 1, sc in each sc across. Turn. (4 sc)
Fasten off, leaving a 10 in (25.4 cm) tail for sewing.
Checkpoint: 1 x 1.25 in (2.5 x 3.2 cm).
Flame (Rust)
The flame is a small teardrop worked around both sides of a chain. It has a pointed tip at the top and a rounded bottom.
With rust, ch 6.
Round 1: Sc in 2nd ch from hook, hdc in next ch, dc in next 2 ch, 5 dc in last ch (rounded bottom). Working along the other side of the foundation ch, dc in next 2 ch, hdc in next ch, sc in last ch, ch 2 (pointed tip), sl st in first sc. (13 sts plus ch-2 tip)
Fasten off, leaving a 10 in (25.4 cm) tail. The foundation chain shows as a thin line down the center, like the inner glow of a flame.
Checkpoint: 0.5 x 0.75 in (1.3 x 1.9 cm).
Border (Gold Frame, Base, Roof and Loop)
The gold border is what turns the mesh into a lantern. Two frame rounds go all the way around the window. Then you work the base and roof in rows straight off the frame’s bottom and top edges, so the whole lantern body is one continuous piece.
Border gauge: 13 sc = 3 in (7.6 cm); 2 rounds = 0.5 in (1.3 cm) deep.
Corner rule: Each corner is 3 sc worked into one st, and the middle sc of that group is the corner st. Side counts below run from corner st to corner st and include both corner sts.
Frame Round 1
With RS facing, join gold with a sl st in the first st of Row 6 (the top edge).
Ch 1, 3 sc in same st (corner), sc in next 9 sts (one sc in each dc and each ch-1 sp), 3 sc in last st (corner). Working down the row ends, 2 sc in each of the 6 row ends (12 sc). Working across the 11 base ch of the foundation, 3 sc in first ch (corner), sc in next 9 ch, 3 sc in last ch (corner). Working up the row ends, 2 sc in each of the 6 row ends (12 sc). Sl st in first sc to join.
Count: 54 sc. Top and bottom = 13 sts each (corner st + 1 + 9 + 1 + corner st). Each side = 16 sts (corner st + 1 + 12 + 1 + corner st). Check: 13 + 13 + 16 + 16 = 58, minus 4 shared corner sts = 54.
Frame Round 2
Ch 1, sc in first sc, *3 sc in corner st, sc in each sc to next corner st; rep from * 3 more times, ending with sc in each remaining sc. Sl st in first sc to join.
Count: 62 sc. Top and bottom = 15 sts each. Each side = 18 sts. Check: 15 + 15 + 18 + 18 = 66, minus 4 shared corner sts = 62. Fasten off.
Checkpoint: 3.5 x 3.75 in (8.9 x 9.5 cm).
Base
Turn the frame upside down so the bottom edge is at the top. With RS facing, join gold with a sl st in the right-hand corner st.
Row 1: Ch 1, 2 sc in same st, sc in next 13 sts, 2 sc in next corner st. Turn. (17 sc)
Row 2: Ch 1, 2 sc in first sc, sc in next 15 sc, 2 sc in last sc. Turn. (19 sc; this is the ledge)
Row 3: Ch 1, sl st in first 2 sc, ch 2 (does not count as a st), dc in next 15 sc; leave last 2 sc unworked. Turn. (15 dc)
Row 4: Ch 2 (does not count), dc2tog, dc in next 11 dc, dc2tog. (13 sts)
Fasten off. The 2 unworked sc at each end of Row 2 form the flared lip, and Row 4 narrows the foot.
Checkpoint: the lantern now measures 5 in (12.7 cm) tall.
Roof
Turn the lantern right side up. With RS facing, join gold with a sl st in the right-hand top corner st.
Row 1: Ch 1, 2 sc in same st, sc in next 13 sts, 2 sc in next corner st. Turn. (17 sc)
Row 2: Ch 1, 2 sc in first sc, sc in next 15 sc, 2 sc in last sc. Turn. (19 sc; these are the eaves)
Row 3: Ch 2 (does not count), dc3tog, dc in next 13 sc, dc3tog. Turn. (15 sts)
Row 4: Ch 2 (does not count), dc3tog, dc in next 9 sts, dc3tog. Turn. (11 sts)
Row 5: Ch 2 (does not count), dc3tog, dc in next 5 sts, dc3tog. Turn. (7 sts)
Row 6: Ch 1, sc3tog, sc in next st, sc3tog. (3 sts)
Do not fasten off.
Hanging Loop
Sl st in the center st of Row 6. Ch 20, then sl st in the same center st to form a ring. Ch 1, work 26 sc over the ch-20 ring, then sl st in the center st again. Fasten off.
Checkpoint: 7 in (17.8 cm) tall without the loop; the loop adds 1.5 in (3.8 cm).
Why the Math Works
The mesh has 11 sts across the top and 11 base chains across the bottom. Each frame round adds 2 sts per side, one extra sc on each side of each corner. So the top and bottom go from 11 to 13 to 15. The base and roof both start on those same 15 sts, so they line up exactly with the frame.
On the sides, 2 sc per dc row end gives 12 sc for 6 rows. That lies flat because a dc row is about twice as tall as a sc. Adding 4 sts per round brings each side to 16 and then 18. The roof loses 4 sts per dc row (19, 15, 11, 7), so both slopes are even.
Final Blocking
- Weave in all ends except the candle and flame sewing tails.
- Pin the lantern RS up on a blocking mat at 4.5 in (11.4 cm) wide and 7 in (17.8 cm) tall.
- Pin each mesh square open, keeping the grid lines straight and the frame sides parallel.
- Pin the eaves and base ledge so they flare evenly on both sides.
- Mist with water until damp but not soaked, then let it dry completely.
- Pin the candle at 1 x 1.25 in (2.5 x 3.2 cm) and the flame at 0.5 x 0.75 in (1.3 x 1.9 cm). Mist them and let them dry.
- Center the candle over the middle mesh column, with its bottom edge on the inner edge of the frame. Whipstitch around all 4 sides with the cream tail.
- Place the flame tip-up, about 0.1 in (0.3 cm) above the top of the candle. Sew around its edge with the rust tail, then weave in both tails on the WS.
Final Quality-Control Checklist
- The mesh is 5 squares wide and 6 squares tall, and every square is open and even.
- Frame Round 2 has 62 sc: 15 sts on the top and bottom and 18 sts on each side.
- Base rows count 17, 19, 15, 13; roof rows count 17, 19, 15, 11, 7, 3.
- The eaves and base ledge stick out by the same amount on both sides.
- The candle is centered and straight, and the flame tip points straight up.
- The loop is firm and centered on the roof peak.
- Final size is 4.5 x 7 in (11.4 x 17.8 cm), plus the 1.5 in (3.8 cm) loop.
Troubleshooting
- Mesh squares lean or look like rectangles: Make sure every ch-1 skips exactly one st, and keep your chains the same size as your dc tops.
- Frame ruffles on the sides: Check that you worked exactly 2 sc per row end, not 3. If the count is right, go down one hook size for the frame only.
- Frame pulls the mesh inward: Your sc are too tight. Loosen your tension or use a 3.75 mm hook for the 2 frame rounds.
- Roof is lopsided: Recount between the dc3tog decreases. Each dc row must lose exactly 2 sts at each end.
- Candle sits off-center: Before sewing, measure from each inner frame side to the candle edge. Both gaps should be 0.75 in (1.9 cm).
- Loop twists: Block it flat and keep the sc around the ring at an even, firm tension.
Care
Hand wash in cool water with mild soap, press out the water in a towel and dry flat. Re-pin the mesh squares if they lose their shape.

Final Notes
The whole lantern follows one measurement chain:
- Mesh window: 2.5 x 2.75 in (6.4 x 7.0 cm)
- Framed: 3.5 x 3.75 in (8.9 x 9.5 cm)
- With the base: 5 in (12.7 cm) tall
- With the roof: 4.5 x 7 in (11.4 x 17.8 cm)
If every checkpoint matches, the candle and flame will sit exactly where they belong.
Make one for your tree, tie one onto a gift, or crochet a few in different colors for a warm little collection.
Happy crocheting!