

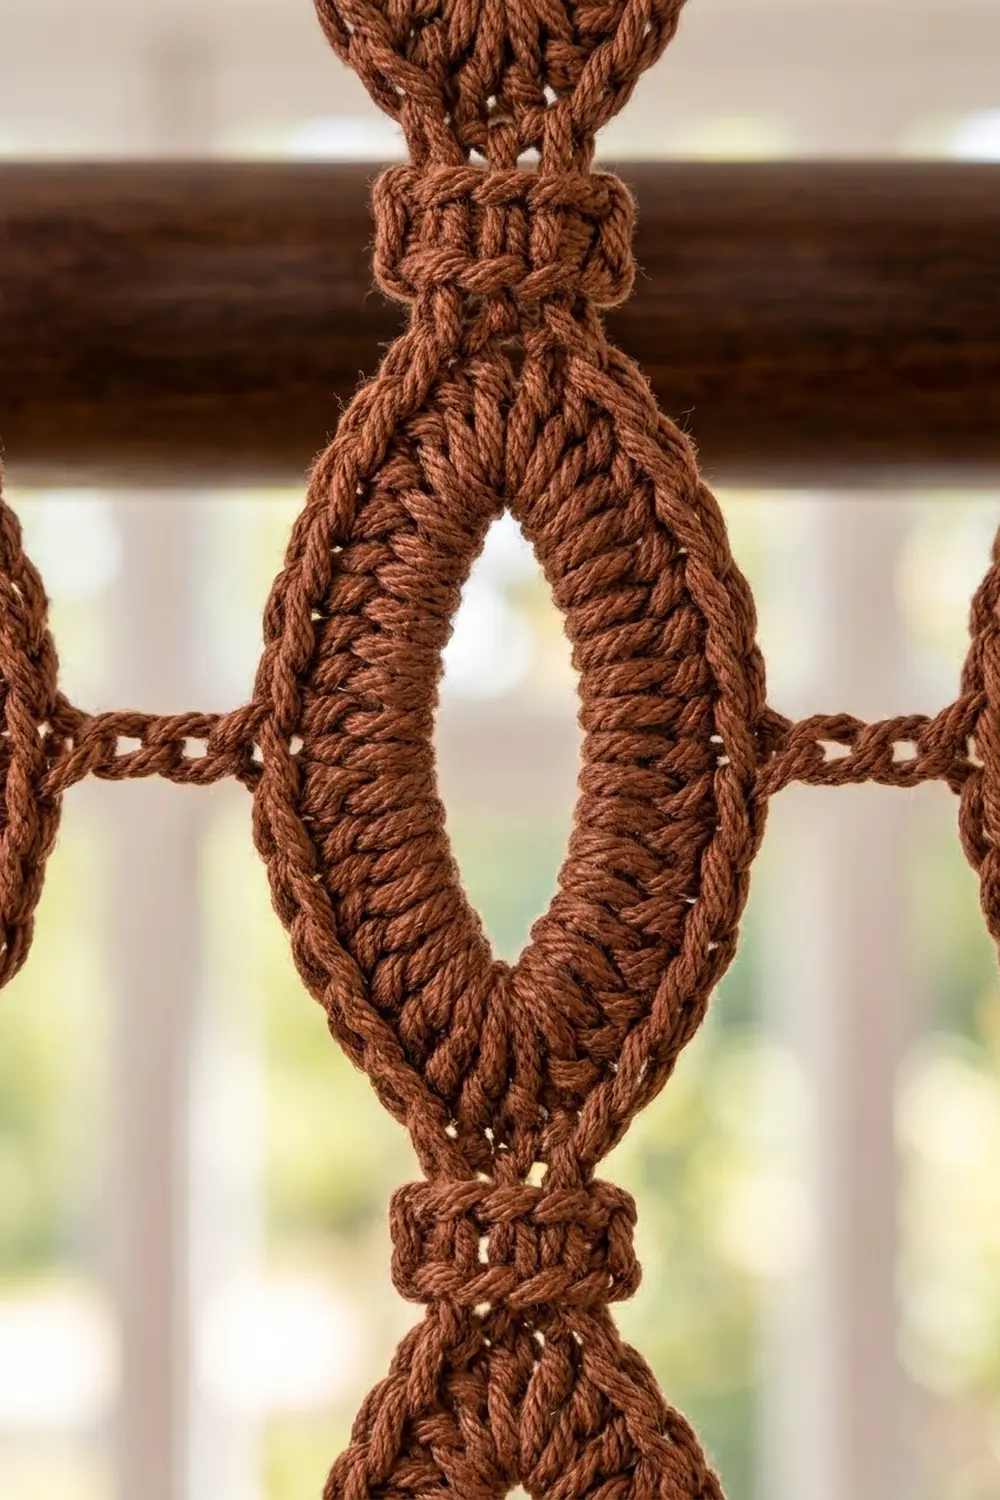
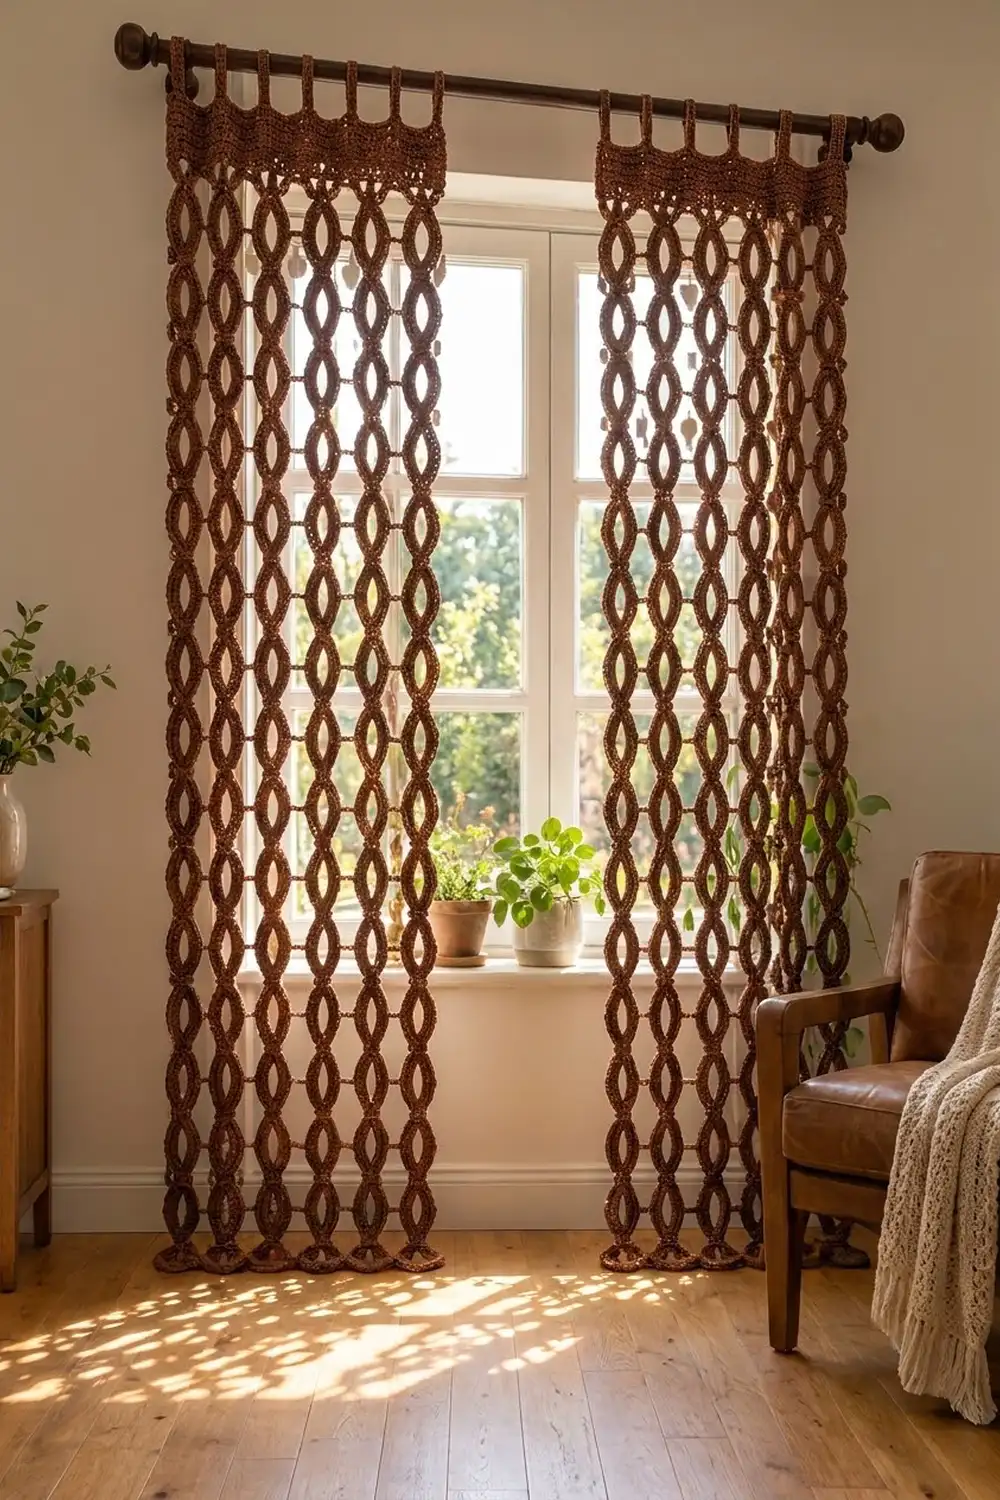
These boho curtain panels are made from chains of almond-shaped links. They let soft, patterned light into a room while still giving it a warm, finished look. Each link has a thick, rope-like outline around an open almond center. The links meet tip to tip at small, solid “waist” bands.
The set is two matching panels in one rust-chestnut brown. Each panel has six vertical strands joined by short chain bridges and topped with a solid header band and five tab loops. This pattern uses US crochet terms throughout.
Each finished panel measures about 18.3 in (46.5 cm) wide and 79.5 in (201.9 cm) long, not counting the tab loops. You make each strand in one continuous piece. First you work down one side of every link, then you come back up the other side, so each strand has only two yarn ends. Strands 2–6 join to the previous strand as you go, and the header is worked across the top at the end.
Finished Size and Construction
- Finished size (per panel): 18.3 in (46.5 cm) wide × 79.5 in (201.9 cm) long, excluding tabs
- Skill level: Intermediate
- Terminology: US crochet terms
- Yarn weight: Worsted (#4), cotton or cotton blend
- Hook: 5.0 mm (H-8)
- Number of pieces: 2 panels, each made of 6 strands (12 strands total)
- Layout per panel: 6 strands side by side, joined by 13 chain bridges per seam
- Piece size (one strand): 2.6 in (6.6 cm) wide × 77 in (195.6 cm) long
- Size before border: 18.3 in (46.5 cm) across the link edges × 77 in (195.6 cm)
- Border (header) depth: 2.5 in (6.4 cm), plus five tabs, each 2.3 in (5.8 cm) wide
Materials
Yarn: Use a smooth, firmly twisted worsted-weight cotton or cotton blend. Firm cotton gives the links their crisp, rope-like edge and won’t stretch out much while hanging. Avoid fluffy or very stretchy yarns, because long hanging strands made with them will grow.
- Rust Brown (Chestnut): 350 g / 640 m (700 yd) for both panels
This quantity includes a margin of about 15% for gauge differences and a test link.
Tools:
– 5.0 mm (H-8) crochet hook
– Tapestry needle
– Locking stitch markers
– Measuring tape
– Scissors
– Spray bottle and a clear floor or table area for blocking
Abbreviations (US Terms)
- ch – chain
- sl st – slip stitch
- sc – single crochet
- hdc – half double crochet
- dc – double crochet
- st(s) – stitch(es)
- RS – right side
Special technique – working into the ring: Insert your hook into the center of the chain ring and work each stitch around the whole chain, not into individual chain stitches. This covers the chain completely and gives the link its solid, corded outline.
Link side sequence (18 sts): 2 sc, 2 hdc, 10 dc, 2 hdc, 2 sc, all worked into the ring. The short stitches at each end form the pointed tips, and the dc in the middle bulge outward to make the almond curve.
Gauge and Checkpoints
Gauge: 14 sc and 16 rows = 4 in (10.2 cm).
Before you start a full strand, make one test unit: a band, one complete link (both sides) and a second band. Check these measurements:
- Band: 3 sc wide × 4 rows = 0.9 in (2.3 cm) wide × 1 in (2.5 cm) tall
- Link: 4.5 in (11.4 cm) tall tip to tip × 2.6 in (6.6 cm) wide
- One repeat (link + band): 5.5 in (14.0 cm)
- Bridge: 8 ch = 2.3 in (5.8 cm), measured with light tension
If your link is too big, go down half a hook size or tighten your ring chain. If it’s too small, go up half a hook size. If only the length is off, change the ring from ch 30 to ch 28 or ch 32, but keep the 18-st side sequence the same.
Check again after the first 3 repeats (16.5 in / 41.9 cm plus the top band). Small errors add up over 14 links.
Strand Pattern (Make 12)
You make each strand from the top down. The downward pass builds the top band, all 14 rings and side 1 of each link, plus the 13 bands between links. The upward pass then works side 2 of every link and climbs back up along the band edges.
Top Band
Ch 4.
Row 1: Sc in 2nd ch from hook and in next 2 ch. (3 sc)
Rows 2–4: Ch 1, turn, sc in each sc across. (3 sc)
Don’t fasten off. The free loops of the starting chain will hold the header later.
Downward Pass
Set up ring: Sl st back into the center sc of Row 4. Ch 30, then sl st into the same center sc to close the ring. (Ring of 30 ch)
Side 1: Working into the ring, work 2 sc, 2 hdc, 10 dc, 2 hdc, 2 sc. (18 sts, which covers half the ring and brings you to the bottom tip)
Next band: Ch 4. Work Rows 1–4 the same as the Top Band. (3 sc per row, 4 rows)
Repeat the ring set-up, Side 1 and Next Band 12 more times. Then work the ring set-up and Side 1 once more. You now have 14 rings with side 1 worked and 13 bands between links.
Checkpoint: Each repeat should measure about 5.5 in (14.0 cm). The strand will look lopsided, with every link only half covered. That’s expected at this stage.
Upward Pass
At the bottom tip of Link 14, ch 1 to turn the corner.
Side 2 of Link 14: Working into the uncovered half of the ring, work 2 sc, 2 hdc, 10 dc, 2 hdc, 2 sc. (18 sts; this link now has 36 sts in total)
Climb the band: Sl st in the center sc of the band’s Row 4, then sl st in the edge sc. Sl st into the side of each of the 4 row ends going up the band. (6 sl sts) This brings you to the bottom tip of the link above.
Side 2 of the next link: Sl st into the tip. Working into the uncovered half of the ring, work the 18-st side sequence.
Repeat “Climb the band” and “Side 2” until Link 1 is finished. Then climb the Top Band (6 sl sts) and fasten off. Weave in the ends.
Stitch count per strand: 14 links × 36 sts = 504 link sts; 14 bands × 12 sc = 168 band sc.
Checkpoint: Lay the strand flat without stretching it. It should measure 77 in (195.6 cm): 1 in (2.5 cm) for the top band + 14 × 4.5 in (11.4 cm) + 13 × 1 in (2.5 cm). Each link should be 2.6 in (6.6 cm) wide, with a symmetrical almond-shaped opening.
Make All Pieces
- Rust Brown: 12 strands (6 per panel), about 20 g each
- Rust Brown: 2 headers with tabs, about 30 g each
Text layout for one panel, viewed from the front. S = strand, = = chain bridge at a band:
[        HEADER BAND + 5 TABS        ]
 S1 = S2 = S3 = S4 = S5 = S6   ← top bands (no bridges)
 S1 = S2 = S3 = S4 = S5 = S6   ← band 1 (bridged)
 ...                           ← bands 2–12 (bridged)
 S1 = S2 = S3 = S4 = S5 = S6   ← band 13 (bridged)
 S1   S2   S3   S4   S5   S6   ← Link 14 tips (free)
Joining (Join-As-You-Go)
Make Strand 1 exactly as written. For Strands 2–6, work the downward pass as written. Before you start the upward pass, lay the finished strand along the side you’ll be climbing, with the top bands lined up.
Bridge (worked during “Climb the band,” for each of the 13 inner bands only): After the sl st into the 2nd row end, ch 8. Sl st into the 2nd row end of the matching band on the previous strand. Sl st back along each of the 8 ch, then sl st into the same row end on the current strand. Finish the climb as written.
Stitch-to-stitch logic: The bridges connect band to band, so every strand stays level. Each bridge sits halfway up a band, between Rows 2 and 3, and spans 8 ch, which is 2.3 in (5.8 cm). The centers of neighboring bands end up 11 sts apart (3 band sts + 8 bridge sts), which is 3.1 in (7.9 cm). The links sit about 0.5 in (1.3 cm) apart with no overlap.
Tension: Keep the bridge chain relaxed and match the chain gauge. Tight bridges pull the links into a cupped wave, and loose bridges make the strands sag apart.
Checkpoint: Measure across the joined panel at the widest part of a link row. It should be 18.3 in (46.5 cm) from the outer edge of Strand 1’s link to the outer edge of Strand 6’s link.
Border: Header Band and Tabs
Border gauge: Same as the main gauge, 14 sc = 4 in (10.2 cm).
Row 1 (RS): Hold the panel upside down so the free loops of the top-band starting chains face you. Ch 4. Sc in the 2nd ch from hook and in the next 2 ch (3 edge sc). Then:
- 3 sc across Strand 1’s top band, worked into the free loops
- ch 8, 3 sc across the next strand’s top band; repeat from * 4 more times
- ch 3 for the edge extension
Count: 3 edge sc + (6 strands × 3 sc) + (5 gaps × 8 ch) + 3 ch = 64 sts.
Row 2: Ch 1, turn. Sc in each of the 3 ch, then sc in every sc and every ch across. (64 sc)
Rows 3–10: Ch 1, turn, sc in each sc across. (64 sc)
Fasten off. The header is 2.5 in (6.4 cm) deep.
Why the math works: The strands span 6 × 3 band sts + 5 × 8 gap sts = 58 sts, which is 16.6 in (42.2 cm) across the outer band edges. The links stick out about 0.9 in (2.3 cm), or 3 sts, beyond each outer band. Adding 3 sts at each end gives 64 sts, which is 18.3 in (46.5 cm). That matches the panel’s measured width, so the header neither gathers nor flares the links. No extra stitches are added at the seams, and every stitch is counted above.
Tabs (make 5 per panel): On Row 10, mark sts 1–8, 15–22, 29–36, 43–50 and 57–64. That leaves gaps of 6 sts between tabs.
Join the yarn in the first marked st of each set.
Tab Rows 1–20: Sc in each of the 8 sts, then ch 1 and turn at the end of every row. (8 sc)
Each tab is 2.3 in (5.8 cm) wide × 5 in (12.7 cm) long. Fold each tab to the back and whipstitch its last row across the back of header Row 6.
Final Blocking
- Weave in all remaining ends along band edges or inside the dc of the links.
- Lay each panel flat on towels or a clean floor, RS up.
- Spray it evenly until it’s damp but not dripping.
- Smooth each link into a symmetrical almond shape, pressing the tips to sharp points with your fingers.
- Straighten all bridges so they’re horizontal and each strand runs straight.
- Square the header to 18.3 in (46.5 cm) × 2.5 in (6.4 cm), and pin the corners.
- Let it dry completely, then hang it for 24 hours before hemming expectations: cotton relaxes slightly once it hangs.
Final Quality-Control Checklist
- Every link has 36 sts (18 per side), and both sides are fully covered
- Every strand measures 77 in (195.6 cm)
- 13 bridges per seam, all at band level and all level with each other
- Header Rows 2–10 have exactly 64 sc
- Panel is 18.3 in (46.5 cm) wide × 79.5 in (201.9 cm) long
- Five tabs per panel, evenly spaced, securely stitched
- Both panels match in length to within 0.5 in (1.3 cm)
Troubleshooting
Links look round, not almond-shaped: The tips have too many stitches or your dc are too short. Keep exactly 2 sc at each tip, and pinch the tips while blocking.
Chain shows through the link: Your stitches are too tight around the ring. Push stitches along as you work, or go up half a hook size.
Strand twists: Make sure side 2 is worked from the same face as side 1. Block the strand flat before joining it.
Panel narrows at the bridges: The bridges were chained too tightly. Redo them with a looser chain.
Header ripples: Recount Row 1. It needs exactly 64 sts.
Panel too long: Remove one repeat to shorten it by 5.5 in (14.0 cm).
Care
Hand wash in cool water with a mild detergent, and gently squeeze out the water without wringing. Dry flat and reshape the links before you hang the panels again.
Final Notes
The measurement chain is simple. A 0.9 in (2.3 cm) band and a 4.5 in × 2.6 in (11.4 × 6.6 cm) link make a 5.5 in (14.0 cm) repeat. Fourteen links give a 77 in (195.6 cm) strand. Six strands bridged with 8 chains give an 18.3 in (46.5 cm) panel, and a 2.5 in (6.4 cm) header brings each panel to 79.5 in (201.9 cm). If you check each stage, the two panels will hang evenly with sharp, clear almond links.
Happy crocheting!