

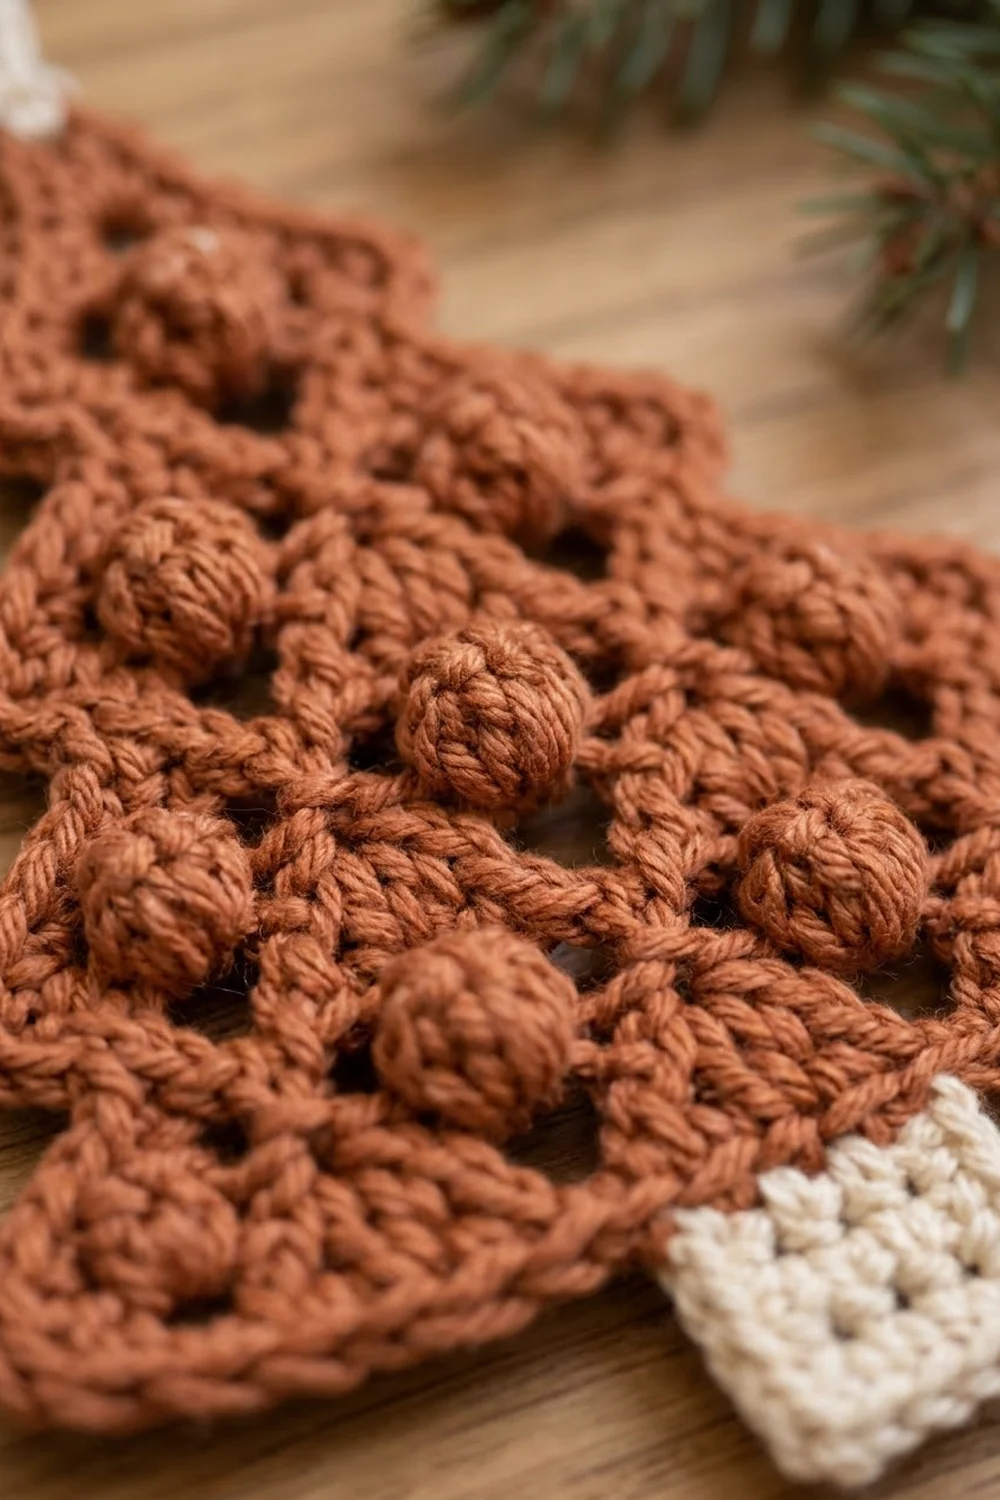
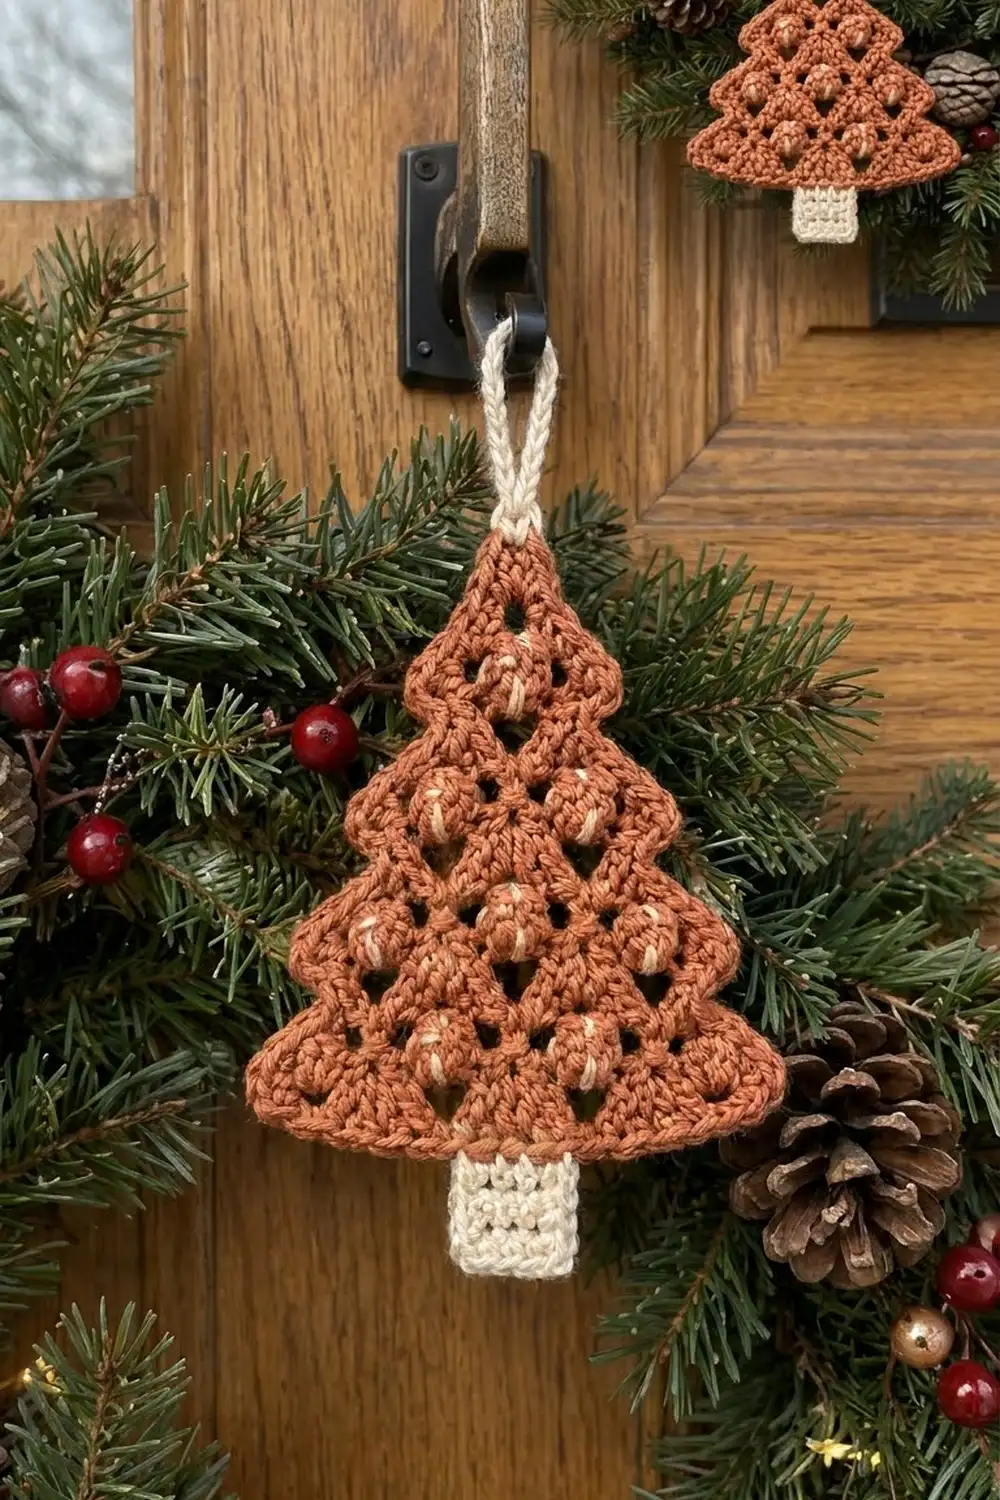
The Cinnamon Bobble Tree is a flat Christmas tree ornament made in one piece from a warm rust-terracotta yarn. It has a cream trunk and a cream hanging loop. Ten raised bobbles sit in a neat 4-3-2-1 triangle, and small open eyelets frame each one. The sides step out into three gentle tiers, each with a small pointed tip.
The look is rustic and cozy. It suits a wreath, a door handle, a gift tag, or a tree branch. The pattern uses US crochet terms throughout.
The finished tree body measures 4.9 in (12.4 cm) wide by 4.2 in (10.7 cm) tall. With the trunk it is 5.2 in (13.2 cm) tall, and the loop adds another 1.5 in (3.8 cm).
You work the tree in rows from the bottom up. Open mesh rows alternate with single crochet rows that carry the bobbles, and you lose one stitch at each side on every row until you reach the tip. Two border rounds then smooth the edges and shape the tier points. Last, you add the trunk in rows from the bottom edge and make a firm hanging loop at the tip.
Finished Size and Construction
- Finished size: 4.9 in (12.4 cm) wide x 5.2 in (13.2 cm) tall including trunk; 6.7 in (17.0 cm) including loop
- Skill level: Advanced beginner / easy intermediate
- Terminology: US crochet terms
- Yarn weight: DK (light #3), cotton or cotton blend
- Hook: 3.5 mm (US E-4)
- Number of pieces: 1 (trunk and loop are worked directly onto the tree)
- Layout: One flat tree, trunk centered at the bottom, loop at the tip
- Tree body before border: 4.2 in (10.7 cm) wide x 3.5 in (8.9 cm) tall
- Border depth: 2 rounds, about 0.35 in (0.9 cm) on each edge
- Trunk: 1.4 in (3.6 cm) wide x 1.0 in (2.5 cm) tall
Materials
Choose a smooth, tightly plied DK cotton or cotton blend. Cotton gives crisp stitch definition and round bobbles that hold their shape. Avoid fuzzy or loosely spun yarns, because they hide the eyelets.
- Color A (rust/terracotta): 10 g, about 25 m (27 yd)
- Color B (cream): 4 g, about 10 m (11 yd)
Tools:
- 3.5 mm (US E-4) crochet hook
- Tapestry needle
- Scissors
- 4 locking stitch markers
- Ruler or tape measure
- Blocking mat, rustproof pins, and a spray bottle or steamer
These quantities include a small extra margin for the gauge check and for weaving in ends.
Abbreviations (US Terms)
- ch – chain
- sl st – slip stitch
- sc – single crochet
- dc – double crochet
- sp – space
- st(s) – stitch(es)
- RS / WS – right side / wrong side
- [ ] – repeat the steps in brackets the stated number of times
Special stitch – Bobble: [Yarn over, insert hook in the stated space, yarn over and pull up a loop, yarn over and draw through 2 loops] 5 times in the same space (6 loops on hook). Yarn over and draw through all 6 loops. You work bobbles on WS rows so they pop out on the RS. A bobble counts as 1 stitch.
Counting rule: In mesh rows, each dc counts as 1 st and each ch-1 sp counts as 1 st. The ch-4 at the start of a mesh row counts as 1 dc plus 1 ch-1 sp.
Gauge and Checkpoints
Gauge: 20 sc and 24 sc rows = 4 in (10.2 cm). One mesh row (dc with ch-1 spaces) is 0.5 in (1.3 cm) tall.
The ornament is small, so use Rows 1–4 as your test piece. Measure flat, without stretching.
Checkpoints:
- Row 1: 21 sc = 4.2 in (10.7 cm) wide
- After Row 4: about 1.3 in (3.3 cm) tall
- After Row 8: about 2.7 in (6.9 cm) tall
- After Row 11: 3.5 in (8.9 cm) tall
- After Border Round 2: 4.9 in (12.4 cm) wide x 4.2 in (10.7 cm) tall
- After trunk: 5.2 in (13.2 cm) total height
If Row 1 is more than 0.2 in (0.5 cm) too wide, change to a 3.25 mm hook. If it is too narrow, change to a 3.75 mm hook. If the width is right but the mesh rows are too tall, pull up the first loop of each dc a little shorter. A slightly different size is fine for an ornament, but keep your tension steady so the sloped sides stay straight.
Tree Body
Use Color A. Every row loses 1 st at each side. At the start of the row, sl sts take away the first stitch(es). At the end of the row, you leave the last stitch unworked.
Foundation: Ch 22.
Row 1 (WS): Sc in 2nd ch from hook and in each ch across. (21 sc)
Row 2 (RS, mesh): Turn, sl st in first 2 sc, ch 4 (counts as dc + ch-1), skip next sc, [dc in next sc, ch 1, skip next sc] 8 times, dc in next sc, leave last sc unworked. (19 sts: 10 dc + 9 ch-1 sps)
Row 3 (WS, 4 bobbles): Turn, sl st in first dc, ch 1 (does not count), sc in next ch-1 sp, sc in next dc, [bobble in next ch-1 sp, sc in next dc, sc in next ch-1 sp, sc in next dc] 3 times, bobble in next ch-1 sp, sc in next dc, sc in next ch-1 sp, leave turning ch unworked. (17 sts: 4 bobbles + 13 sc)
Row 4 (RS, mesh): Turn, sl st in first 2 sts, ch 4, skip next st, [dc in next st, ch 1, skip next st] 6 times, dc in next st, leave last st unworked. (15 sts: 8 dc + 7 ch-1 sps)
Each bobble now has a ch-1 space directly above it, which forms its eyelet.
Checkpoint: About 1.3 in (3.3 cm) tall.
Row 5 (WS, 3 bobbles): Turn, sl st in first dc, ch 1, sc in next ch-1 sp, sc in next dc, [bobble in next ch-1 sp, sc in next dc, sc in next ch-1 sp, sc in next dc] 2 times, bobble in next ch-1 sp, sc in next dc, sc in next ch-1 sp, leave last st unworked. (13 sts: 3 bobbles + 10 sc)
Row 6 (RS, mesh): Turn, sl st in first 2 sts, ch 4, skip next st, [dc in next st, ch 1, skip next st] 4 times, dc in next st, leave last st unworked. (11 sts: 6 dc + 5 ch-1 sps)
Row 7 (WS, 2 bobbles): Turn, sl st in first dc, ch 1, sc in next ch-1 sp, sc in next dc, bobble in next ch-1 sp, sc in next dc, sc in next ch-1 sp, sc in next dc, bobble in next ch-1 sp, sc in next dc, sc in next ch-1 sp, leave last st unworked. (9 sts: 2 bobbles + 7 sc)
Row 8 (RS, mesh): Turn, sl st in first 2 sts, ch 4, skip next st, [dc in next st, ch 1, skip next st] 2 times, dc in next st, leave last st unworked. (7 sts: 4 dc + 3 ch-1 sps)
Checkpoint: About 2.7 in (6.9 cm) tall.
Row 9 (WS, 1 bobble): Turn, sl st in first dc, ch 1, sc in next ch-1 sp, sc in next dc, bobble in next ch-1 sp, sc in next dc, sc in next ch-1 sp, leave last st unworked. (5 sts: 1 bobble + 4 sc)
Row 10 (RS, mesh): Turn, sl st in first 2 sts, ch 4, skip next st, dc in next st, leave last st unworked. (3 sts: 2 dc + 1 ch-1 sp)
Row 11 (WS, tip): Turn, sl st in first dc, ch 1, sc in next ch-1 sp, leave last st unworked. (1 sc)
Do not fasten off. The body now measures 4.2 in (10.7 cm) wide x 3.5 in (8.9 cm) tall and has 10 bobbles in a 4-3-2-1 triangle.
Border
Border gauge: 5 sc per inch (2.54 cm) along every edge. The bottom edge holds 21 sc = 4.2 in (10.7 cm). Each slanted side is about 4.0 in (10.2 cm) long and holds 20 sc.
Round 1 (RS): Ch 1, turn so the RS faces you, then work (sc, ch 2, sc) in the Row 11 sc for the tip. Work down the first slanted side from Row 10 to Row 1, with 3 sc in the end of each mesh row and 1 sc in the end of each sc row. (20 sc) Ch 1 for the corner. Work 1 sc in the unused loop of each foundation ch. (21 sc) Ch 1 for the corner. Work up the second side the same way, from Row 1 to Row 10. (20 sc) Join with sl st to first sc.
Round 1 total: 63 sc (2 tip + 20 + 21 + 20), plus 1 ch-2 tip sp and 2 ch-1 corner sps.
Number the side stitches before you start Round 2.
- First side, counting down from the top: a1–a3 (Row 10), a4 (Row 9), a5–a7 (Row 8), a8 (Row 7), a9–a11 (Row 6), a12 (Row 5), a13–a15 (Row 4), a16 (Row 3), a17–a19 (Row 2), a20 (Row 1).
- Second side, counting up from the bottom: b1 (Row 1), b2–b4 (Row 2), b5 (Row 3), b6–b8 (Row 4), b9 (Row 5), b10–b12 (Row 6), b13 (Row 7), b14–b16 (Row 8), b17 (Row 9), b18–b20 (Row 10).
Place markers in a4, a12, b9, and b17.
Round 2 (RS, tiers): Ch 1, sc in first tip sc, (sc, ch 2, sc) in tip ch-2 sp, sc in next tip sc.
- First side (22 sts): Sc in a1–a3, (sc, ch 2, sc) in a4, sl st in a5, sc in a6–a11, (sc, ch 2, sc) in a12, sl st in a13, sc in a14–a20.
- Corner: 3 sc in ch-1 sp.
- Bottom (21 sts): Sc in each sc.
- Corner: 3 sc in ch-1 sp.
- Second side (22 sts): Sc in b1–b7, sl st in b8, (sc, ch 2, sc) in b9, sc in b10–b15, sl st in b16, (sc, ch 2, sc) in b17, sc in b18–b20.
Join with sl st to first sc. Fasten off.
Round 2 total: 75 sts (71 sc + 4 sl st), plus 5 ch-2 sps (1 tip + 4 tier points). By section, that is 4 tip sc + 22 + 3 + 21 + 3 + 22.
Why the math works:
- Sc rows: each one is about one sc tall, so it takes 1 sc.
- Mesh rows: each one is 0.5 in (1.3 cm) tall and also steps in by one stitch. It takes 3 sc to cover both the height and the step.
- Slanted sides: that gives 20 sc per side, which matches 4.0 in (10.2 cm) at 5 sc per inch, so the edges lie flat without ruffling or pulling in.
- Bottom: the 21 foundation chains take 21 sc.
- Round 2: works 1 st into each st. The only added stitches are the 3-sc corners and the (sc, ch 2, sc) points.
- Tiers: at the bottom of the Row 5 and Row 9 tiers, a point followed by a sl st makes the edge stick out and then dip in. This creates the stepped, three-tier shape.
Trunk
With the RS facing, turn the tree upside down. Find the 21 bottom sc of Round 2, not counting the corner groups. Skip the first 7 and join Color B in the 8th sc.
Row 1: Ch 1, sc in same st and in each of next 6 sc. (7 sc)
Rows 2–6: Ch 1, turn, sc in each sc across. (7 sc)
Fasten off. The trunk measures 1.4 in (3.6 cm) wide x 1.0 in (2.5 cm) tall, with 7 bottom sc left free on each side.
Hanging Loop
Join Color B with a sl st in the Round 2 tip ch-2 sp. Ch 18, then sl st in the same tip sp to form a ring. Work 24 sc over the ring, packing them tightly to make a firm, rounded cord. Sl st in the tip sp again and fasten off. The loop stands about 1.5 in (3.8 cm) above the tip.
Final Blocking
- Weave in all ends through stitches of the same color.
- Spray the ornament lightly until it is damp, or hold a steamer just above it. Never press an iron onto the bobbles.
- Pin the bottom edge straight at 4.9 in (12.4 cm).
- Pin the tip so the body is 4.2 in (10.7 cm) tall and centered above the bottom edge.
- Pin out the 4 tier points and 2 bottom corners so the points on each side line up with each other.
- Pin the trunk square at 1.4 in (3.6 cm) x 1.0 in (2.5 cm).
- Push each bobble gently from the WS so it stands out on the RS.
- Leave it pinned until it is completely dry, with the loop held upright by one pin.
Final Quality-Control Checklist
- Body is 4.9 in (12.4 cm) wide x 4.2 in (10.7 cm) tall
- Total height with trunk is 5.2 in (13.2 cm)
- 10 bobbles in rows of 4, 3, 2, and 1, all on the RS
- Every bobble has a ch-1 eyelet directly above it
- Round 1 has 63 sc; Round 2 has 75 sts plus 5 ch-2 sps
- Tier points line up across from each other
- Trunk is centered, with 7 free sc on each side
- Loop is firm, upright, and centered on the tip
- No yarn ends show on the RS
Troubleshooting
Bobbles appear on the back. They were worked on an RS row. Work bobbles only on odd-numbered (WS) rows.
Tree leans to one side. You probably skipped a starting sl st or worked into the last stitch. Each row must be exactly 2 sts shorter than the one before it.
Sides ruffle. Your mesh rows are shorter than the gauge. Work 2 sc into each mesh-row end instead of 3.
Sides pull in. Your mesh rows are taller than the gauge. Work the border more loosely, or use a hook one size larger for the border only.
Tiers are hard to see. Pull the sl st below each point snug, and pin the points out firmly when you block.
Trunk is off-center. Recount the 21 bottom sc without the corner groups, and start in the 8th sc.
Loop flops over. Work up to 26 sc over the ring to make the cord stiffer.
Care
Hand wash in cool water with mild soap, roll in a towel to remove the water, and dry flat, pinning it again if needed. Store flat or hanging so the bobbles don’t get crushed.
Final Notes
Each stage builds on the one before:
- The 21-sc foundation sets the width at 4.2 in (10.7 cm).
- Eleven rows, each 2 sts shorter than the last, bring the body to 3.5 in (8.9 cm) tall.
- Two border rounds add 0.35 in (0.9 cm) to each edge, for 4.9 in (12.4 cm) x 4.2 in (10.7 cm).
- The 1.0 in (2.5 cm) trunk brings the height to 5.2 in (13.2 cm).
- The 1.5 in (3.8 cm) loop completes the ornament.
If your Row 1 width matches the gauge, every tree you make will come out the same size.
Happy crocheting!