

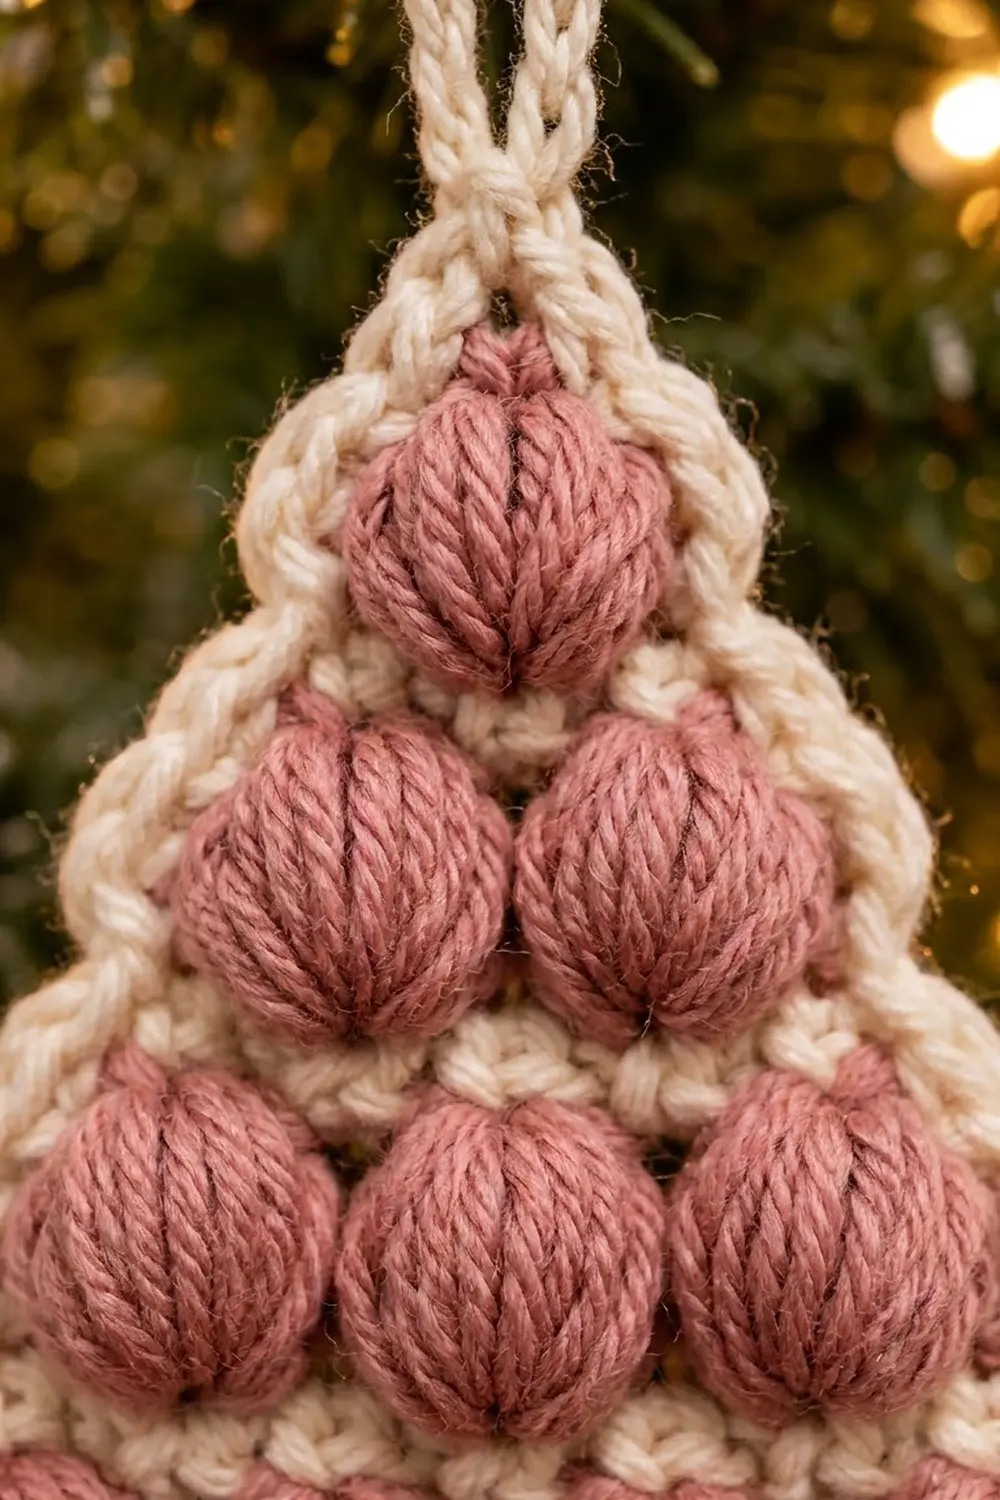
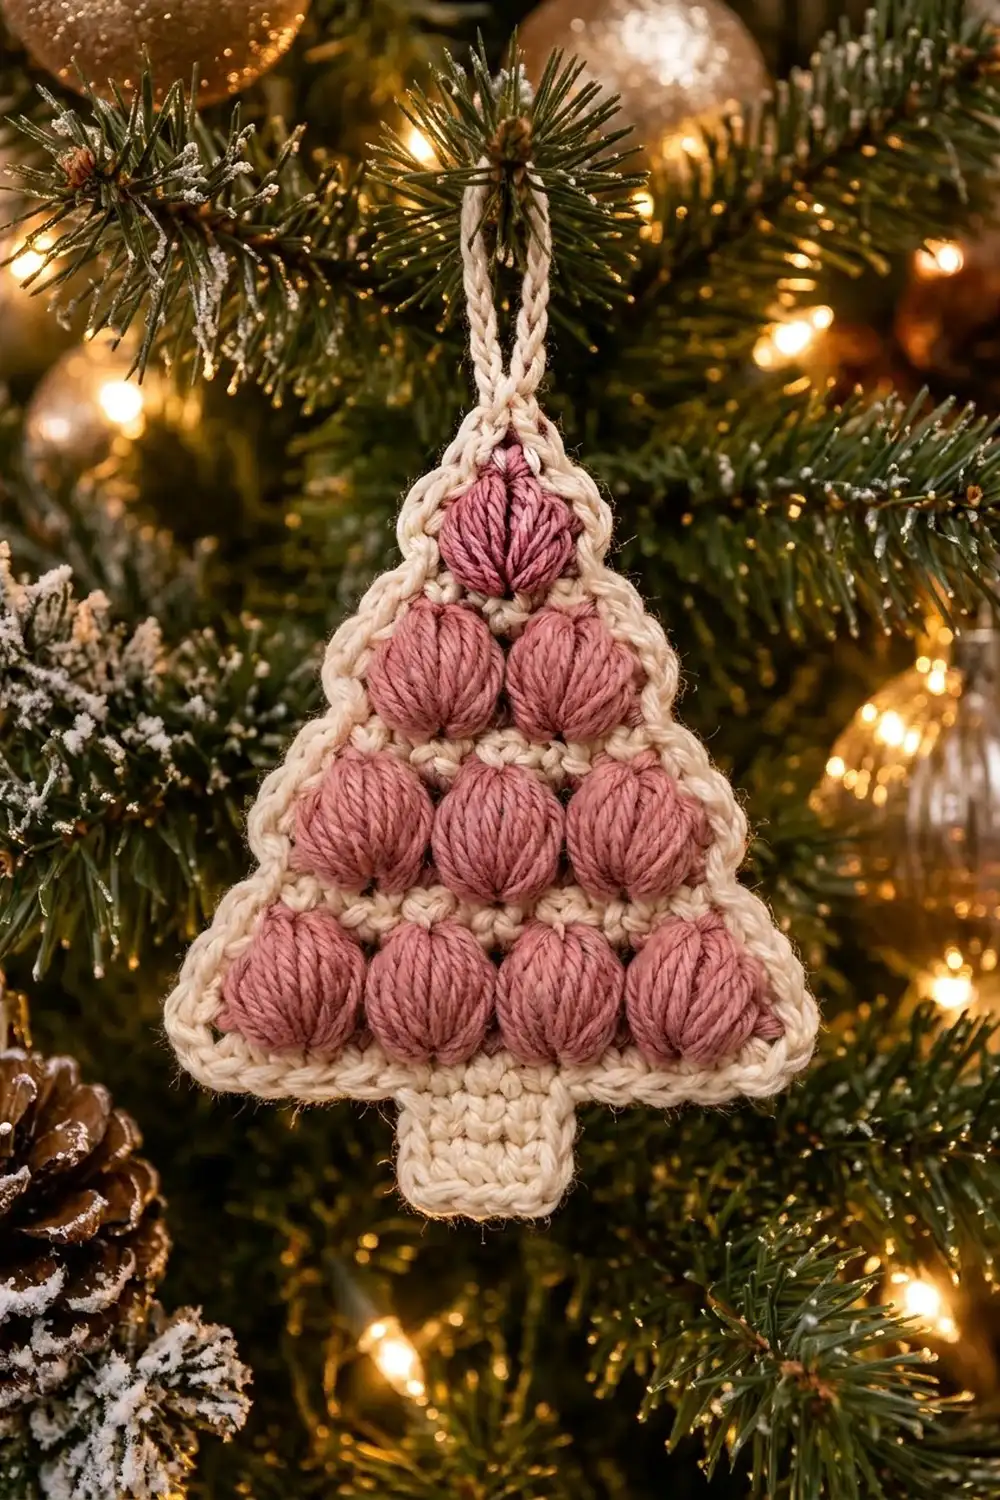
This little Christmas tree ornament is made of soft, rounded puff stitches stacked in four tiers: four puffs at the bottom, then three, two, and a single puff at the tip. Thin cream lines run between the tiers, a cream single crochet border outlines the whole shape, and a square cream trunk and a chain hanging loop finish it off.
The palette is dusty rose and cream, which gives a cozy, vintage look that stands out against green branches, gold baubles, and warm lights. It also works well as a gift topper or a package tie-on.
The pattern uses US crochet terms. The finished ornament measures about 3.25 in (8.3 cm) wide and 4.3 in (10.9 cm) tall without the loop, or about 5.5 in (14.0 cm) tall with the loop.
The tree is worked flat in rows from the bottom up. Cream single crochet rows and dusty rose puff rows alternate, with decreases at the edges so each tier has one puff fewer than the one below it. The trunk is then worked down from the foundation chain, and one cream border round with a hanging loop goes around everything.
Finished Size and Construction
- Finished size: 3.25 in (8.3 cm) wide x 4.3 in (10.9 cm) tall; about 5.5 in (14.0 cm) tall with the loop
- Skill level: Easy / advanced beginner
- Terminology: US crochet terms
- Yarn weight: Worsted (#4)
- Hook: 4.5 mm (US 7)
- Number of pieces: 1 (single flat ornament)
- Layout: Triangular tree with 4 tiers of puffs (4-3-2-1), a centered trunk, and a top hanging loop
- Piece size before border: 2.75 in (7.0 cm) wide x 3.8 in (9.7 cm) tall
- Border depth: 0.25 in (0.6 cm) on each side, adding 0.5 in (1.3 cm) to width and height
Materials
Choose a smooth worsted-weight yarn so the puffs look full and rounded. Cotton-acrylic blends and soft acrylics both work well. Very fuzzy or splitty yarn hides the puff shapes and makes the puff loops harder to pull through.
- Color A, dusty rose: about 6 g / 12 m (13 yd), for the puff rows
- Color B, cream: about 5 g / 10 m (11 yd), for the separator rows, trunk, border, and loop
These amounts include a margin for gauge swatching and tails. One small ball of each color is enough for several ornaments.
Tools:
– 4.5 mm (US 7) crochet hook
– Tapestry needle
– Scissors
– Stitch marker (optional)
– Ruler or tape measure
– Pins and a blocking surface or folded towel
– Spray bottle with water
Abbreviations (US Terms)
- ch – chain
- sl st – slip stitch
- sc – single crochet
- sc2tog – single crochet 2 together (1 stitch decreased)
- sc3tog – single crochet 3 together (2 stitches decreased)
- st(s) – stitch(es)
- RS / WS – right side / wrong side
- puff – puff stitch (see below)
Puff stitch (puff): (Yarn over, insert hook in the stitch, yarn over and pull up a loop to about 0.5 in / 1.3 cm tall) 4 times in the same stitch, giving 9 loops on the hook. Yarn over and pull through all 9 loops, then ch 1 to close. The closing ch 1 does not count as a stitch. Each puff counts as 1 stitch.
Sc3tog: (Insert hook in next st, yarn over, pull up a loop) 3 times, yarn over, pull through all 4 loops.
Gauge and Checkpoints
Make the first few rows and measure before you go further. Puff size depends heavily on how tall you pull up the loops, so check carefully.
- Gauge: A puff row of 9 sts (4 puffs) = 2.75 in (7.0 cm) wide.
- Row height: One puff row = 0.5 in (1.3 cm) tall; one sc row = 0.2 in (0.5 cm) tall.
Checkpoints:
1. After Row 2: width 2.75 in (7.0 cm).
2. After Row 9 (tree body done): height 3.0 in (7.6 cm), measured from the foundation edge to the tip.
3. After the trunk: total height 3.8 in (9.7 cm); trunk about 0.9 in (2.3 cm) wide.
4. After the border: 3.25 in (8.3 cm) wide x 4.3 in (10.9 cm) tall.
If your piece is too big: go down to a 4.0 mm hook, or pull the puff loops up a little shorter.
If your piece is too small: go up to a 5.0 mm hook, or pull the puff loops up a little taller.
Since this is a single ornament, small differences are fine. The important thing is that the puff rows and sc rows lie flat together without cupping or ruffling.
Tree Body
Work in rows and turn at the end of each row. Ch 1 at the start of a row does not count as a stitch. Change colors on the last yarn over of the previous row: pull the new color through to finish the last stitch, then cut the old color, leaving a 4 in (10.2 cm) tail. Work over these tails in the border, or weave them in at the end.
Cream (Color B) rows are odd-numbered. Dusty rose (Color A) puff rows are even-numbered and are always RS rows, so all the puffs sit on the front.
Foundation: With Color B, ch 10.
Row 1 (WS, Color B): Sc in 2nd ch from hook and in each ch across. Change to Color A. Turn. (9 sts)
Row 2 (RS, Color A): Ch 1, sc in first st, puff in next st, sc in next st; repeat from * 3 more times. Change to Color B. Turn. (9 sts: 4 puffs + 5 sc)*
Row 3 (WS, Color B): Ch 1, sc2tog, sc in next 5 sts, sc2tog. Change to Color A. Turn. (7 sts)
The decreases take 1 st off each edge, so the next row of puffs lands between the puffs below. This gives the staggered tiers.
Row 4 (RS, Color A): Ch 1, sc in first st, puff in next st, sc in next st; repeat from * 2 more times. Change to Color B. Turn. (7 sts: 3 puffs + 4 sc)*
Row 5 (WS, Color B): Ch 1, sc2tog, sc in next 3 sts, sc2tog. Change to Color A. Turn. (5 sts)
Row 6 (RS, Color A): Ch 1, sc in first st, puff in next st, sc in next st; repeat from * once more. Change to Color B. Turn. (5 sts: 2 puffs + 3 sc)*
Row 7 (WS, Color B): Ch 1, sc2tog, sc in next st, sc2tog. Change to Color A. Turn. (3 sts)
Row 8 (RS, Color A): Ch 1, sc in first st, puff in next st, sc in last st. Change to Color B. Turn. (3 sts: 1 puff + 2 sc)
Row 9 (WS, Color B): Ch 1, sc3tog. (1 st – this is the tip)
Fasten off, leaving a 4 in (10.2 cm) tail.
Checkpoint: The tree body should be a neat triangle, 2.75 in (7.0 cm) wide across the base and 3.0 in (7.6 cm) tall: 4 puff rows x 0.5 in (1.3 cm) + 5 sc rows x 0.2 in (0.5 cm). It has 10 puffs in a 4-3-2-1 layout.
Trunk
The trunk is worked down from the free loops of the foundation chain, across the center 3 of its 9 stitches.
Turn the tree upside down so the foundation chain is on top and the RS is facing. Count the free loops of the foundation chain from the right: there are 9.
Row 1 (RS, Color B): Join Color B with a sl st in the 4th free loop. Ch 1, sc in the same loop and in the next 2 loops. Turn. (3 sts)
Rows 2–4: Ch 1, sc in each st across. Turn. (3 sts)
Fasten off after Row 4.
That leaves 3 free foundation loops on each side of the trunk (loops 1–3 and 7–9). The border will cover these.
Checkpoint: The trunk is 3 sts wide, about 0.9 in (2.3 cm), and 4 rows tall, 0.8 in (2.0 cm). The total height from the trunk bottom to the tree tip is 3.8 in (9.7 cm).
Border and Hanging Loop
Border gauge: One round of cream sc adds 0.25 in (0.6 cm) on every edge. Work 1 sc into the end of each cream row and 2 sc into the end of each taller puff row. This matches the stitch count to the row height, so the edges stay flat.
Round 1 (RS, Color B): Join Color B with a sl st in the tip st (the Row 9 sc3tog). Ch 1. Work as follows:
- Tip: 3 sc in the tip st. (3 sc)
- Right slanted side: Work down the row ends of Rows 8 to 1: 2 sc in each puff-row end (Rows 8, 6, 4, 2) and 1 sc in each cream-row end (Rows 7, 5, 3, 1). (12 sc)
- Bottom right corner: 3 sc in foundation loop 9. (3 sc)
- Bottom right ledge: Sc in loops 8 and 7. (2 sc)
- Trunk right side: 1 sc in each of the 4 trunk row ends. (4 sc)
- Trunk bottom: 2 sc in first st, sc in next st, 2 sc in last st. (5 sc)
- Trunk left side: 1 sc in each of the 4 trunk row ends. (4 sc)
- Bottom left ledge: Sc in loops 3 and 2. (2 sc)
- Bottom left corner: 3 sc in foundation loop 1. (3 sc)
- Left slanted side: Work up the row ends of Rows 1 to 8 with the same 1-or-2 pattern. (12 sc)
Join with a sl st to the first sc. (50 sts total)
Count check: 3 + 12 + 3 + 2 + 4 + 5 + 4 + 2 + 3 + 12 = 50. The corner and tip stitches are counted separately from the side counts here, so nothing is counted twice.
Why the math works: Each slanted side has 4 puff rows and 4 cream rows below the tip. That gives 4 x 2 + 4 x 1 = 12 sc, which spreads stitches evenly along the 3.0 in (7.6 cm) side. The 3-sc groups at the tip and the two base corners turn the sharp points without pulling. The trunk’s 2-sc corners keep its bottom square.
Hanging loop: Sl st into the center sc of the tip’s 3-sc group. Ch 18, then sl st into the same center sc. Turn the work and sl st into each of the 18 ch around the loop to make a firm, corded loop. Sl st into the tip once more and fasten off. The loop stands about 1.25 in (3.2 cm) tall.
Weave in all ends on the WS, running each tail through stitches of its own color so it doesn’t show.
Checkpoint: 3.25 in (8.3 cm) wide x 4.3 in (10.9 cm) tall, plus the loop. That is 5.5 in (14.0 cm) overall.
Final Blocking
- Lay the ornament RS up on a blocking mat or a folded towel.
- Mist it lightly with water until it is damp but not soaked.
- Pat it into shape: 3.25 in (8.3 cm) across the base of the tree and 4.3 in (10.9 cm) from the trunk bottom to the tip.
- Pin the tip, the two base corners, and the two trunk corners. Keep the slanted sides straight.
- Don’t press the puffs flat. Gently pinch each one back into a rounded shape with your fingers.
- Pull the loop straight up and pin it upright.
- Let it dry completely before you unpin it.
Final Quality-Control Checklist
- 10 puffs in a 4-3-2-1 layout, each tier centered between the puffs below
- A cream sc line between every tier, with no rose showing through
- Border has 50 sts, with 3 sc at the tip and at each base corner
- Both slanted sides are straight and the same length
- Trunk is centered, 3 sts wide and 4 rows tall
- Ornament lies flat with no cupping or ruffling
- Hanging loop is firm and centered on the tip
- All tails are woven in and none show on the RS
- Finished size is about 3.25 x 4.3 in (8.3 x 10.9 cm)
Troubleshooting
Puffs look flat or thin: Pull the loops up taller and keep them even before closing. Make sure you yarn over 4 times.
Puffs lean or split: Hold the loops on the hook with your index finger as you build them, and close with a firm ch 1.
Tree cups or bowls: The cream rows are too tight. Loosen your tension or work only the cream rows with a 5.0 mm hook.
Edges wave or ruffle: There are too many border sc on the sides. Use exactly 12 per slanted side.
Edges pull in: There are too few border sc, or they’re too tight. Check that each puff-row end got 2 sc.
Trunk is off-center: Recount the foundation loops. The trunk must start in loop 4 so that 3 loops are free on each side.
Color dots show at changes: Finish the last st with the new color, then tug the old tail snug before you continue.
Care
Hand wash in cool water and lay flat to dry, reshaping the puffs while damp. Store flat or hanging so the puffs don’t crush.
Final Notes
The measurement chain is simple. A 9-st puff row sets the width at 2.75 in (7.0 cm). Four puff rows and five sc rows make a 3.0 in (7.6 cm) tree body, and the 4-row trunk brings it to 3.8 in (9.7 cm). The 50-st border adds 0.25 in (0.6 cm) all around, for 3.25 x 4.3 in (8.3 x 10.9 cm), and the loop brings the overall height to about 5.5 in (14.0 cm). If you check your gauge on the first puff row, everything after it falls into place.
Happy crocheting!