

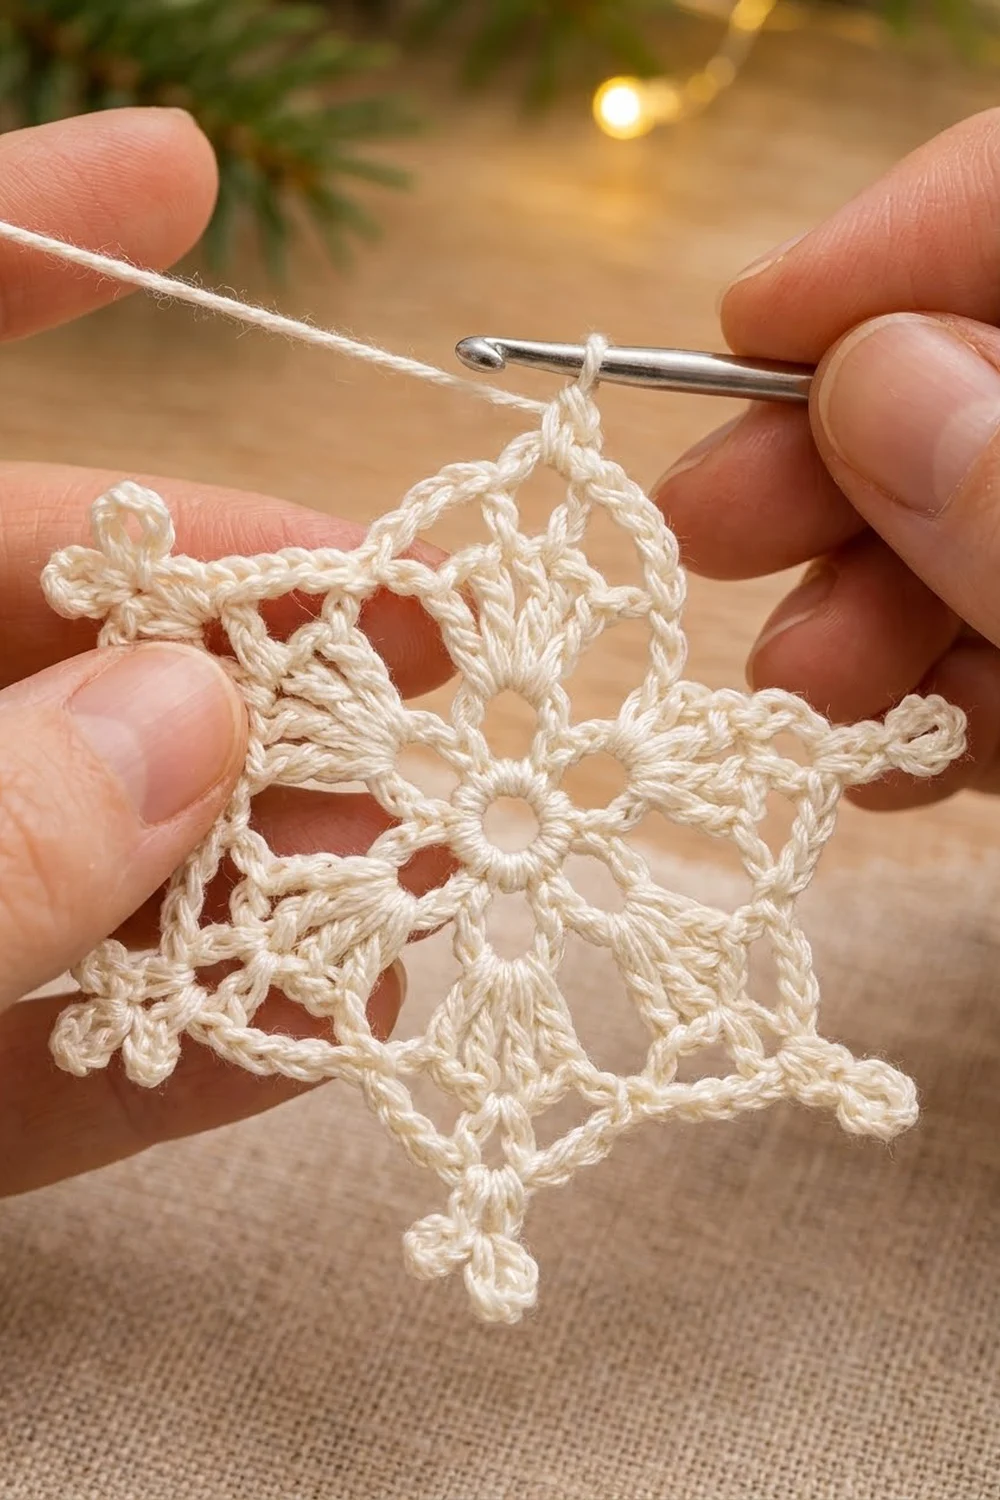
This Starlight Card Snowflake is a small, crisp lace motif made to sit flat on the front of a holiday card. It has a tidy open center, six solid fan spokes, and a star-shaped outline that ends in six little trefoil points.
The sample uses one color: a soft cream cotton thread. On a deep navy card it looks like frost on a winter night. It works just as well on red, green, or kraft paper, or as a hanging ornament.
The pattern uses US crochet terms. The finished snowflake measures about 4 in (10.2 cm) from point to point and about 3 in (7.6 cm) across between opposite inner V’s.
Construction is simple: one piece, five rounds, worked in the round without turning. You make a ring, a round of chain petals, a round of fans, a chain frame, and a final edging round that covers the frame and adds the trefoil points. Then you block and stiffen it so it stays flat.
Finished Size and Construction
- Finished size: 4 in (10.2 cm) point to point; 3 in (7.6 cm) inner V to inner V
- Skill level: Easy-intermediate (thread work, chain counting)
- Terminology: US crochet terms
- Yarn weight: Size 3 cotton crochet thread (Lace to Super Fine, category 0–1)
- Hook: 2.25 mm (US B-1)
- Number of pieces: 1 single motif
- Layout: Single six-pointed snowflake; no joining
- Piece size: 4 in (10.2 cm) point to point after blocking
- Size before border (after Round 4): 3.25 in (8.3 cm) point to point
- Border depth (Round 5): about 0.375 in (1.0 cm) at each point
Materials
Thread advice: Choose a mercerized cotton thread in size 3. Mercerized cotton holds a crisp shape, shows each stitch clearly, and takes stiffener well. Avoid fuzzy or very stretchy fibers, because they blur the lace and won’t hold sharp points.
- Cream (main and only color): 5 g, about 8 m (8.7 yd)
This amount includes a margin of about 30% for your gauge swatch, tails, and any ripping back. If you plan to make a set of eight cards, as shown, one standard ball will cover all eight with plenty to spare.
Tools:
- 2.25 mm (US B-1) crochet hook
- Tapestry needle with a small eye
- Small sharp scissors
- Blocking board or foam mat
- Rust-proof pins
- Fabric stiffener, or a 1:1 mix of white glue and water
- Plastic wrap to protect the board
- Optional for display: folded card blank, about 5 x 7 in (12.7 x 17.8 cm), and clear-drying craft glue
Abbreviations (US Terms)
- ch – chain
- sl st – slip stitch
- sc – single crochet
- dc – double crochet
- sp – space
- st(s) – stitch(es)
- rnd – round
- TP – trefoil point (special stitch, below)
Special stitch – Trefoil Point (TP): Ch 3 (stem made). Ch 3, sl st in the 3rd stem ch (the last stem ch made, just below the new chains); repeat from * to * 2 more times. You now have three small ch-3 loops, all anchored in the same stem ch. Sl st in each of the 2 remaining stem ch to travel back down to the base. One TP makes one star point: a short stem with three tiny loops on top.
Gauge and Checkpoints
Thread gauge varies a lot from person to person, so test before you start a batch. Work Rounds 1–3 once as your swatch.
- After Round 1: center ring about 0.5 in (1.3 cm) across, measured at the outer edge
- After Round 2: about 1.25 in (3.2 cm) across, petal tip to petal tip
- After Round 3 (gauge check): 2 in (5.1 cm) across, fan tip to fan tip
- After Round 4: 3.25 in (8.3 cm) point to point
- After Round 5 and blocking: 4 in (10.2 cm) point to point
If your Round 3 is bigger than 2 in (5.1 cm): go down to a 2.0 mm hook, or tighten your chains. A large swatch usually means loose chains, which will also make the frame in Round 4 floppy.
If your Round 3 is smaller than 2 in (5.1 cm): go up to a 2.5 mm hook. A tight swatch will cup when you add the frame.
A difference of 0.125 in (0.3 cm) at Round 3 grows to about 0.25 in (0.6 cm) at the finished points, so fix it early. For a set of cards, use the same hook and thread for every snowflake.
Pattern
Work every round with the right side facing. Do not turn.
Round 1 – Center Ring
Ch 6, sl st in the first ch to form a ring.
Ch 1, work 12 sc into the ring. Sl st in the first sc to join.
Count: 12 sc.
Pull the starting tail gently to firm up the ring, but leave a visible hole in the center. The open center is part of the look.
Round 2 – Petals
Ch 1, sc in the same st as the join, ch 4, skip the next sc. Sc in the next sc, ch 4, skip the next sc; repeat from * to * 4 more times. Sl st in the first sc to join.
Count: 6 sc and 6 ch-4 loops (30 sts including chains).
These six loops are the little petals right around the ring. Each one will hold one fan.
Round 3 – Fans
Sl st into the first ch-4 loop. Ch 3 (counts as the first dc), work 4 dc in the same loop, ch 2. Work 5 dc in the next ch-4 loop, ch 2; repeat from * to * 4 more times. Sl st in the top of the beginning ch-3 to join.
Count: 30 dc (6 fans of 5 dc) and 6 ch-2 sps.
Each fan opens out into a wedge. The ch-2 spaces leave small gaps between the spokes. In the finished piece, these show as the open windows between the fans.
Round 4 – Chain Frame
Sl st in each of the next 2 dc, so you are in the 3rd (center) dc of the first fan.
Ch 1, sc in the same center dc. Ch 6, sc in the next ch-2 sp, ch 6, sc in the center dc of the next fan; repeat from * to * 5 more times. On the last repeat, skip the final sc and sl st in the first sc to join instead.
Count: 12 sc and 12 ch-6 loops (84 sts including chains).
The 6 sc in the fan centers become the star points. The 6 sc in the ch-2 spaces become the inner V’s. Lay the piece flat. You should already see a six-pointed star outline at 3.25 in (8.3 cm) point to point.
Border (Round 5 – Edging and Trefoil Points)
On a single motif, the last edging round acts as the border. It covers the chain frame with firm sc, sharpens the star shape, and adds the trefoil tips.
Border gauge: 7 sc cover one ch-6 loop and should lie flat. Before blocking, they measure about 0.75 in (1.9 cm) along the loop.
Round 5: Ch 1, sc in the same st as the join (a point sc). Work a TP. Work 7 sc in the next ch-6 loop, sc in the next sc (inner V), work 7 sc in the next ch-6 loop, sc in the next sc (point), work a TP; repeat from * to * 4 more times. Work 7 sc in the next ch-6 loop, sc in the next sc (inner V), work 7 sc in the last ch-6 loop. Sl st in the first sc to join. Fasten off, leaving a 6 in (15.2 cm) tail.
Per star segment (point to point):
– 1 sc in the point sc
– 7 sc in the first ch-6 loop
– 1 sc in the inner-V sc
– 7 sc in the second ch-6 loop
– = 16 sc per segment, plus 1 TP at the point
Round total: 6 segments x 16 sc = 96 sc, plus 6 TPs.
Why the math works: Each ch-6 loop gets 7 sc, one more stitch than it has chains. That small extra gives the edge just enough length to lie flat around the outer curve without ruffling. Every segment has the same 16 sc, so all six arms stay identical.
Each TP is worked off its point sc and travels back down its own stem. It adds height (about 0.375 in / 1.0 cm) but no stitches to the edge count. Two opposite points add 0.75 in (1.9 cm) together, which turns 3.25 in (8.3 cm) before the border into 4 in (10.2 cm) after.
The single sc at each inner V keeps the V sharp. Don’t add extra stitches there, or the inner corners will round off.
Final Blocking
Thread lace needs firm blocking to look like the photo. Weave in both tails first, but don’t trim them yet.
- Wet the snowflake in cool water and gently squeeze out the excess. Don’t wring it.
- Soak it in fabric stiffener (or the 1:1 glue-and-water mix) for about one minute. Squeeze out the excess and blot on a towel.
- Cover your blocking board with plastic wrap.
- Pin the center ring open with one pin.
- Pin each fan tip outward so the six fans are evenly spaced, about 60 degrees apart.
- Pin each star point at the base of its trefoil so opposite tips measure 4 in (10.2 cm) apart.
- Pin each inner V inward so it measures 3 in (7.6 cm) across to the opposite V.
- Open each trefoil with a pin tip, spreading the three little loops into a clover shape.
- Use a pin to clear any stiffener film out of the center hole and the fan windows.
- Let it dry completely, at least 12 hours. Unpin, then trim the tails close.
To mount it on a card, put tiny dots of clear-drying glue on the back of the center, the fan tips, and the point bases. Press it onto the card front and lay a light book on top for an hour.
Final Quality-Control Checklist
- Round 1 has 12 sc and an open center hole.
- Round 2 has 6 even ch-4 petals.
- Round 3 has 6 fans of 5 dc each, separated by 6 ch-2 spaces.
- Round 4 has 12 sc and 12 ch-6 loops.
- Round 5 has 96 sc (16 per segment) and 6 TPs.
- Each TP has three open loops of equal size.
- Point to point measures 4 in (10.2 cm).
- Inner V to inner V measures 3 in (7.6 cm).
- The snowflake lies completely flat, with no cupping or ruffling.
- All tails are woven in and trimmed, and no stiffener film blocks the holes.
Troubleshooting
The motif cups after Round 4. Your ch-6 loops are too tight. Redo Round 4 with looser chains, or with a hook one size up for that round only.
The edge ruffles after Round 5. You probably worked 8 sc into some loops. Recount: exactly 7 sc per ch-6 loop.
The points are uneven. Check that every TP starts with a 3-ch stem. Block again, pinning all six points to the same circle.
Trefoil loops twist or collapse. Make sure all three ch-3 loops are anchored in the same top stem ch. Open them with a pin while wet.
Inner V’s look rounded. Pin them sharply inward during blocking. Check that you worked only 1 sc into each inner-V sc.
The center hole closed up. Don’t pull the starting tail too hard. If the hole has closed, push a pencil tip through it while the piece is wet and let it dry open.
Care
Spot clean with a damp cloth only, because water softens stiffened lace. Store it flat between sheets of paper, away from heat and sunlight.

Final Notes
The whole design depends on one short chain of measurements. Round 3 is your gauge check at 2 in (5.1 cm). Round 4 builds the star frame to 3.25 in (8.3 cm). Round 5 adds about 0.375 in (1.0 cm) at each point, for a finished 4 in (10.2 cm) snowflake with 96 sc and 6 trefoil points. If each checkpoint matches, the finished piece will too, and every card in your set will carry a matching star.
Happy crocheting!