

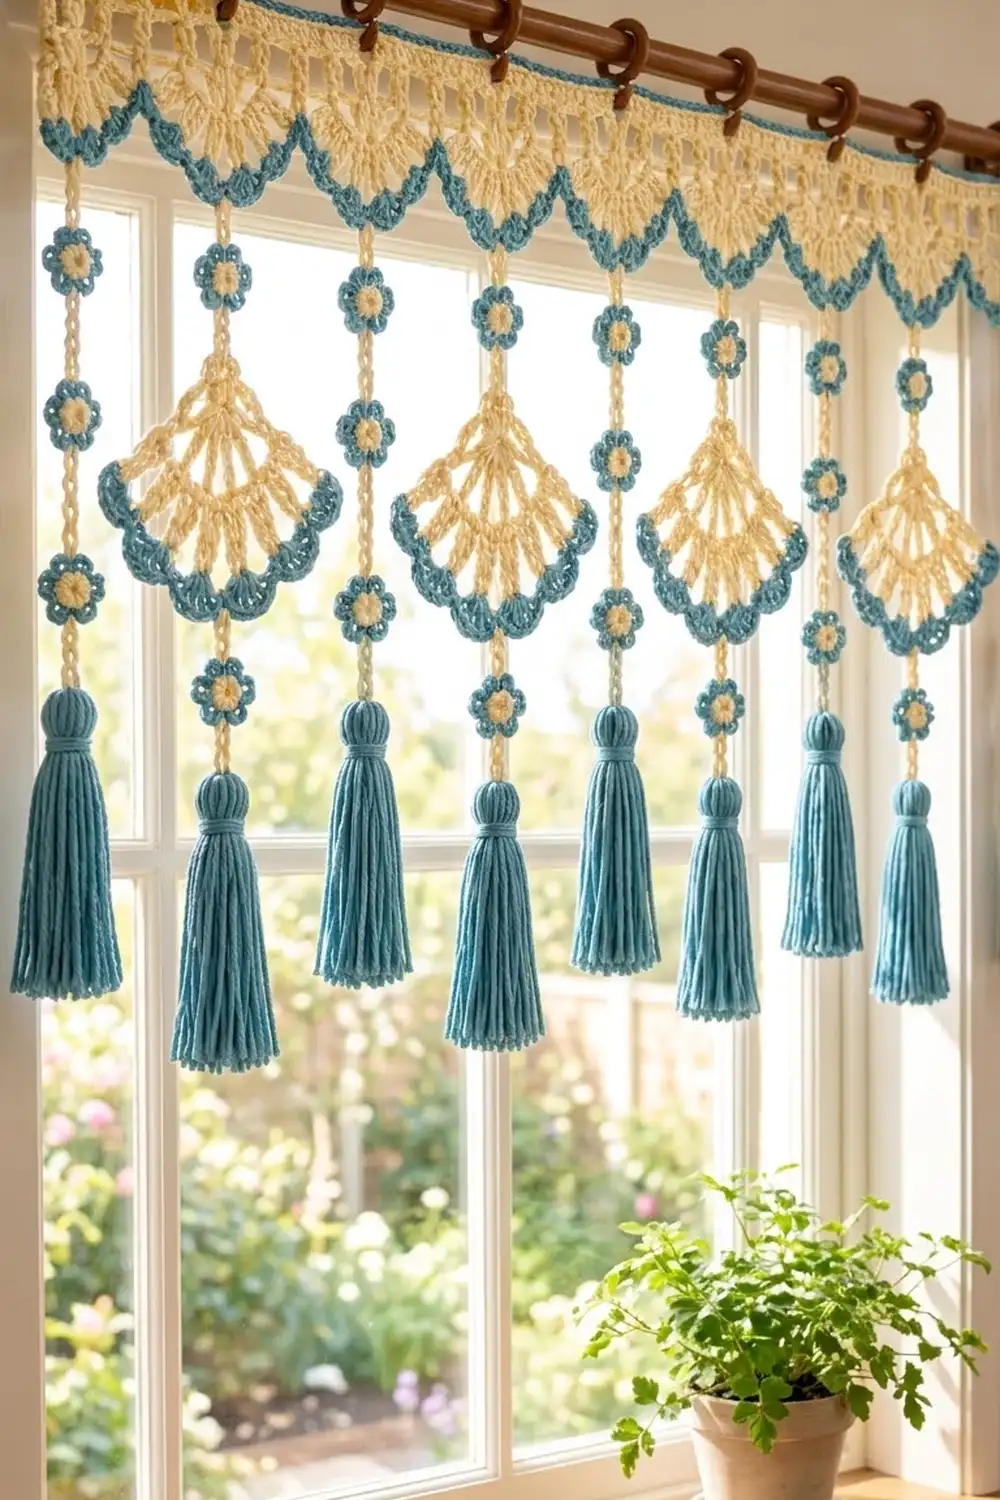
This valance puts a row of lacy cream fans across the top of a window. Six cords hang from it, each decorated with small teal flowers, half-circle fans and full tassels. The look is breezy and a little vintage, and it suits a kitchen, sunroom or any window that needs color without blocking the light.
The palette has two colors: soft cream for the lace and cords, and dusty teal for the trim, flowers and tassels. Every cream edge has a teal finish, which ties the pieces together.
The pattern uses US crochet terms. The finished valance measures 24.5 in (62.2 cm) wide and 19.25 in (48.9 cm) tall from the top edge to the tassel tips. The header alone is 3.75 in (9.5 cm) deep.
You work the header flat in rows and add the teal borders. Then you make the fans, flowers and tassels separately. Each drop is a cream chain cord worked directly from the header, with its motifs sewn on and a tassel tied to the end.
Finished Size and Construction
- Finished size: 24.5 in (62.2 cm) wide × 19.25 in (48.9 cm) tall
- Skill level: Intermediate
- Terminology: US
- Yarn weight: Worsted (#4) cotton
- Hook: 4.5 mm (US 7)
- Number of pieces: 1 header, 6 cords, 3 fans, 18 flowers, 6 tassels
- Layout: 6 drops in one row, 4 in (10.2 cm) apart, alternating flower drops and fan drops
- Header before border: 24.25 in (61.6 cm) × 2.75 in (7.0 cm)
- Border depth: 0.75 in (1.9 cm) at the bottom, 0.25 in (0.6 cm) at the top
- Fan: 6.5 in (16.5 cm) wide × 3.5 in (8.9 cm) tall
- Flower: 1.25 in (3.2 cm) across
- Drop length: 11 in (27.9 cm) of cord plus a 4.5 in (11.4 cm) tassel = 15.5 in (39.4 cm)
Materials
Use a smooth mercerized or matte cotton in worsted weight. Cotton shows the stitches clearly, blocks flat and won’t stretch as the drops hang. Avoid fuzzy or splitty yarns, because they hide the lace.
- Cream (Color A): 100 g / about 170 m for the header, cords, fans and flower centers
- Teal blue (Color B): 100 g / about 170 m for the borders, fan edging, petals and tassels
These quantities include a margin of about 25%. The tassels alone use roughly 56 m of teal.
Tools:
– 4.5 mm (US 7) crochet hook
– Tapestry needle and scissors
– Stiff card, 5 in (12.7 cm) long, for the tassels
– 7 clip curtain rings, about 1 in (2.5 cm)
– Stitch markers
– Rust-proof pins and a blocking mat
– Tape measure
Abbreviations (US Terms)
- ch: chain
- sl st: slip stitch
- sc: single crochet
- dc: double crochet
- sp: space
- st(s): stitch(es)
- RS: right side
- MR: magic ring
Shell: 5 dc in the stitch indicated.
Petal: (sl st, ch 2, 2 dc, ch 2, sl st) in the stitch indicated.
Gauge and Checkpoints
Gauge: 14 dc × 8 rows = 4 in (10.2 cm). Single crochet: 16 sc = 4 in (10.2 cm). Chain: 5 ch = 1 in (2.5 cm).
Make one fan as your test piece before you start the header. It’s small, it uses every stitch in the project, and you need three fans anyway.
Checkpoints:
– Fan after Row 4: 5 in (12.7 cm) wide × 2.75 in (7.0 cm) tall
– Finished fan: 6.5 in (16.5 cm) × 3.5 in (8.9 cm)
– Flower: 1.25 in (3.2 cm) across, with a 0.5 in (1.3 cm) cream center
– Header after Row 4: 24.25 in (61.6 cm) × 1.75 in (4.4 cm)
– Header after Row 6: 24.25 in (61.6 cm) × 2.75 in (7.0 cm) at the scallop centers
– Finished header: 24.5 in (62.2 cm) × 3.75 in (9.5 cm)
If your piece is too big, go down half a hook size. If it’s too small, go up half a size. If the fan is the right size but its edge ruffles, your sc is loose; work the teal edging with a hook one size smaller.
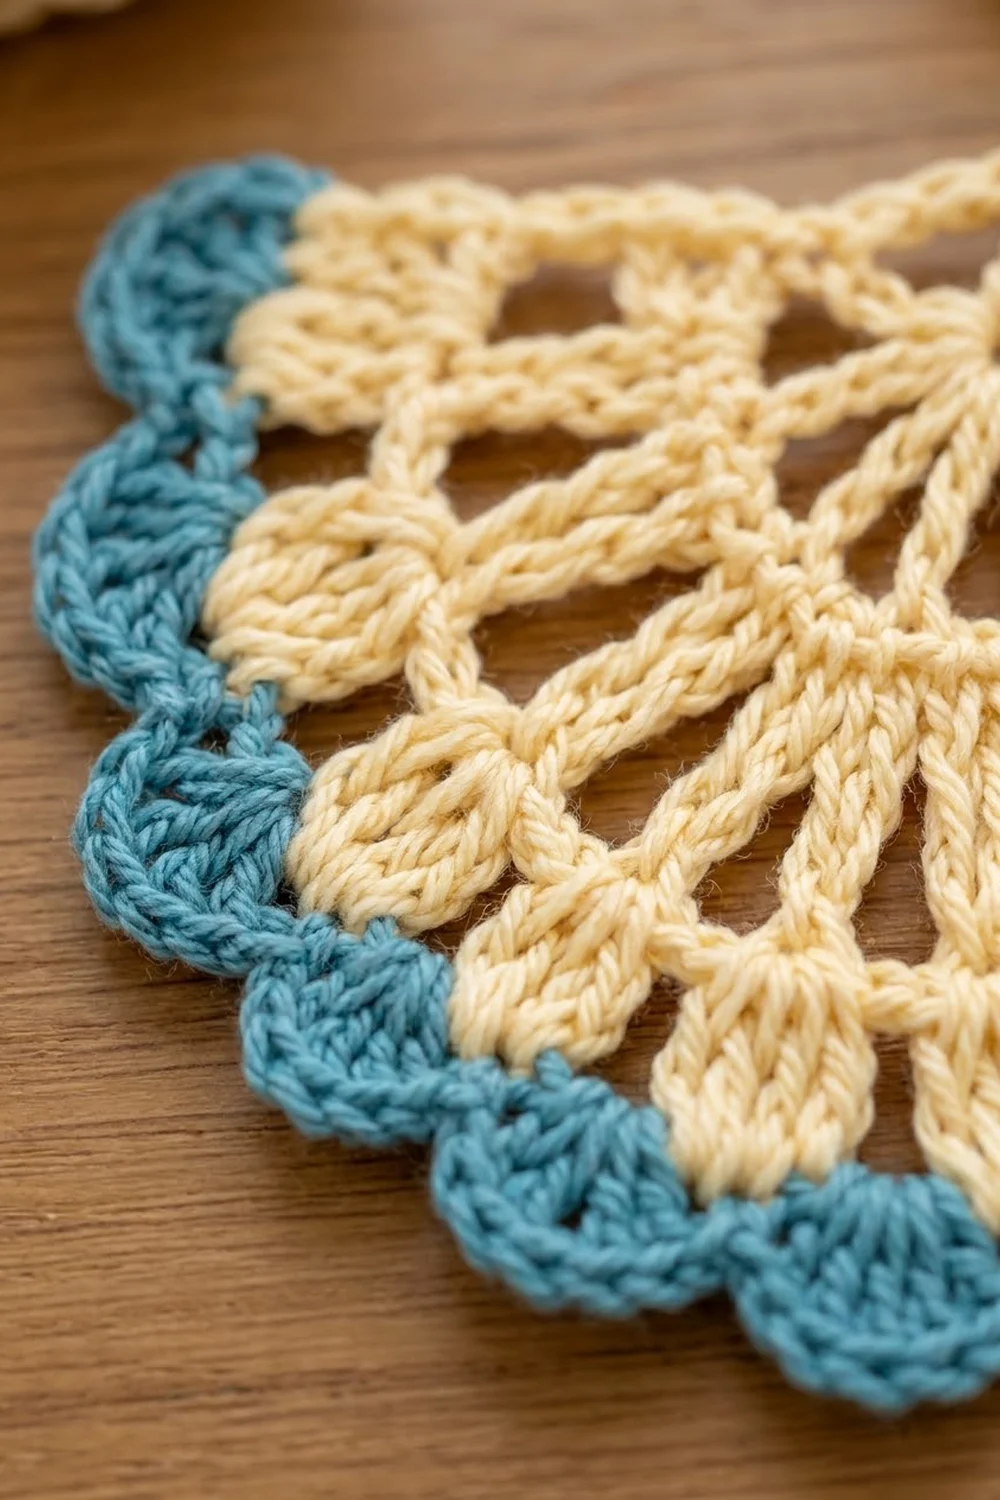
Fan (make 3)
The fan is worked flat from a point at the top and grows outward into a half circle.
Row 1 (Color A): Make a MR. Ch 5 (counts as dc + ch 2). (Dc, ch 2) 4 times in the ring, then dc in the ring. Pull the ring closed and turn. (6 dc, 5 ch-2 sps)
Row 2: Ch 3 (counts as dc), dc in the same st. Ch 2, skip the ch-2 sp, 2 dc in the next dc. Repeat from * 4 more times; the last pair goes into the 3rd ch of the beginning ch-5. Turn. (12 dc in 6 pairs, 5 ch-2 sps)
Row 3: Ch 3, dc in the next dc. Ch 1, dc in the next ch-2 sp, ch 1, dc in each of the next 2 dc. Repeat from * 4 more times and turn. (17 dc, 10 ch-1 sps)
The paired dc form the spokes, with a single dc between each pair.
Row 4: Ch 3, dc in the next dc. Ch 1, 3 dc in the next single dc, ch 1, dc in each of the next 2 dc. Repeat from * 4 more times, then fasten off. (27 dc, 10 ch-1 sps)
Checkpoint: 5 in (12.7 cm) × 2.75 in (7.0 cm).
Row 5 (Color B, conversion row): With RS facing, join Color B in the top of the first dc of Row 4. Ch 1, then work 1 sc in each dc and 1 sc in each ch-1 sp across. Turn. (27 + 10 = 37 sc)
Row 6: Ch 1, sc in the first sc. Skip 2 sc, Shell in the next sc, skip 2 sc, sc in the next sc. Repeat from * 5 more times, then fasten off. (6 shells + 7 sc = 37 sts)
Each shell repeat uses 6 sts, and 6 × 6 + 1 = 37, so the row ends exactly on the last sc. The 4th sc sits at the bottom center of the fan. Mark it for joining.
Flower (make 18)
Round 1 (Color A): Make a MR. Ch 1, 6 sc in the ring, sl st to the first sc and fasten off. (6 sc)
Round 2 (Color B): Join in any sc. Work a Petal in each sc around, sl st to the first sl st and fasten off. (6 petals, 12 dc)
Checkpoint: 1.25 in (3.2 cm) across.
Tassel (make 6)
Wrap Color B 35 times around the 5 in (12.7 cm) card. Slide a 10 in (25.4 cm) strand under the top loops, tie it tightly, and cut the bottom loops.
To make the neck, wrap a 15 in (38.1 cm) strand 6 times around the bundle, 0.75 in (1.9 cm) below the top. Knot it and bury the ends inside the tassel. Trim the tassel to 4.5 in (11.4 cm), and leave the top tie ends long for attaching.
Header
Row 1 (Color A): Ch 86. Sc in the 2nd ch from the hook and in each ch across. Turn. (85 sc)
Row 2: Ch 3 (counts as dc), dc in each st across. Turn. (85 dc)
Row 3 (mesh): Ch 4 (counts as dc + ch 1), skip the next st, dc in the next st. Ch 1, skip 1 st, dc in the next st. Repeat from * across and turn. (43 dc + 42 ch-1 sps = 85 sts)
Row 4: Ch 3, dc in each ch-1 sp and each dc across. Turn. (43 + 42 = 85 dc)
Checkpoint: 24.25 in (61.6 cm) × 1.75 in (4.4 cm).
Row 5 (fan base): Ch 1, sc in the first dc. Ch 3, skip 6 dc, [dc, (ch 2, dc) 4 times] in the next dc, ch 3, skip 6 dc, sc in the next dc. Repeat from * 5 more times and turn. (6 fans of 5 dc and 4 ch-2 sps; 7 sc; 12 ch-3 sps)
Each repeat uses 14 sts. Six repeats plus the first sc gives 6 × 14 + 1 = 85.
Row 6: Ch 1, sc in the first sc. Ch 3, dc in the first dc of the fan, [ch 1, dc in the next ch-2 sp, ch 1, dc in the next dc] 4 times, ch 3, sc in the next sc. Repeat from * 5 more times. Fasten off. (6 fans of 9 dc and 8 ch-1 sps; 7 sc; 12 ch-3 sps)
Checkpoint: 24.25 in (61.6 cm) × 2.75 in (7.0 cm) at the scallop centers.
Make All Pieces
| Piece | Qty | Color A | Color B |
|---|---|---|---|
| Header | 1 | body | borders |
| Fan | 3 | Rows 1–4 | Rows 5–6 |
| Flower | 18 | centers | petals |
| Cord | 6 | all | none |
| Tassel | 6 | none | all |
Layout grid (left to right, 4 in / 10.2 cm apart):
HEADER  [ S1 ][ S2 ][ S3 ][ S4 ][ S5 ][ S6 ]
DROP       B     A     B     A     B     A
Drop A is a flower, a fan, a flower and a tassel. Drop B is four flowers and a tassel. That adds up to 3 fans and 3 × 2 + 3 × 4 = 18 flowers.
Border
Border gauge: 16 sc = 4 in (10.2 cm).
Bottom Border Row 1 (Color B): Join Color B in the first sc of Row 6. Ch 1 and sc in the same sc. 3 sc in the ch-3 sp, sc in each dc and each ch-1 sp across the fan (9 + 8 = 17 sc), 3 sc in the next ch-3 sp, sc in the next sc. Repeat from * 5 more times and turn. (1 + 6 × 24 = 145 sc)
Bottom Border Row 2: Ch 1, sc in the first sc. Skip 1 sc, Shell in the next sc, skip 1 sc, sc in the next sc. Repeat from * across. (36 shells + 37 sc)
Top Border Row: Don’t fasten off. Turn the work so you can work along the side edge. Work 11 sc up the side: 1 sc in the end of each of Border Rows 2 and 1, 1 sc in each of Rows 6 and 5, 2 sc in each of Rows 4, 3 and 2, and 1 sc in Row 1. Then work into the free loops of the foundation chain: 3 sc in the first loop, 1 sc in each of the next 83 loops, and 3 sc in the last loop. Work 11 sc down the other side to match, then fasten off. (11 + 89 + 11 = 111 sc)
The top edge has 89 sc: one for each of the 85 foundation loops, plus 2 extra at each corner. Each corner’s center sc is counted only once. Each side has 11 sc, one count for each of the 11 row ends.
Why the math works: Each header scallop starts as 14 sts and becomes 24 border sc (3 + 17 + 3 + 1). Since 24 divides evenly by the 4-st shell repeat, every scallop gets exactly 6 shells with no partial repeats. The sc between scallops sits directly over the Row 5 sc, so the teal points stay centered.
Joining
Cords: Number the sc of Bottom Border Row 2 from 1 to 37, left to right. The center sc of each scallop is sc 4, 10, 16, 22, 28 and 34. Counting the sc between scallops as the 1st, that’s the 4th sc of each scallop. These sc are 6 apart, so the drops hang 4 in (10.2 cm) apart.
At each center sc, join Color A with a sl st and ch 55, which makes 11 in (27.9 cm) of cord. Fasten off and leave a 6 in (15.2 cm) tail.
Placing motifs (measured from the header):
– Drop A: flower at 1.5–2.75 in (3.8–7.0 cm), fan at 3.75–7.25 in (9.5–18.4 cm), flower at 8.25–9.5 in (21.0–24.1 cm)
– Drop B: flowers at 1.5–2.75 in, 3.75–5 in, 6–7.25 in and 8.25–9.5 in (3.8–7.0, 9.5–12.7, 15.2–18.4 and 21.0–24.1 cm)
Lay each cord behind its motifs. Sew each flower to the cord through its cream center and through its top and bottom petals. Sew each fan at the ring point and at the marked center sc of Row 6, plus one tack at the center of Row 3.
Tension: Sew loosely, because tight stitches shorten the cord and pucker the flowers. Lay each finished drop flat and check that the cord is still 11 in (27.9 cm) long.
Tassels: Thread the cord tail through the top of the tassel, knot it around the top tie, and bury the ends inside the tassel head.
Rings: Clip the 7 rings to the top edge, above the 7 sc between scallops (including both ends).
Size checkpoint: Each drop should measure 15.5 in (39.4 cm), and the whole valance should be 19.25 in (48.9 cm) tall.
Final Blocking
- Soak the header, fans and flowers in cool water with a little wool wash for 10 minutes.
- Roll them in a towel to press out the water. Don’t wring.
- Pin the header to 24.5 in × 3.75 in (62.2 cm × 9.5 cm), pinning every shell point and opening each mesh space.
- Pin each fan to 6.5 in × 3.5 in (16.5 cm × 8.9 cm), with one pin in every shell.
- Lightly steam the tassels and comb the strands straight. If needed, re-trim them to 4.5 in (11.4 cm).
- Let everything dry completely before you hang the valance.
Final Quality-Control Checklist
- The header is 24.5 in (62.2 cm) wide and lies flat with no waves.
- There are 6 header scallops, each with 6 teal shells.
- Each side edge is straight and has 11 sc.
- The drops are 4 in (10.2 cm) apart, in the order B, A, B, A, B, A.
- Each fan has 6 shells and is centered on its cord.
- All cords are 11 in (27.9 cm) long, and all tassels are 4.5 in (11.4 cm).
- All ends are woven in.
Troubleshooting
- The header ruffles at the scallops: The Row 6 chains are too loose. Rework them more firmly.
- The header cups: The foundation chain is too tight. Remake it with a hook one size larger.
- The fan curls into a cone: Row 4 is too tight. Loosen your dc or block the fan more firmly.
- The fan edge ruffles: Work Rows 5–6 with a hook one size smaller.
- The drops twist: Sew all motifs with the RS facing the same way.
- The tassels look thin: Wrap 40 times instead of 35.
Care
Hand wash in cool water, roll in a towel and dry flat, re-pinning the shells while the piece is damp. Brush out the tassels gently once they’re dry.
Final Notes
The measurements build on each other. A gauge of 14 dc = 4 in makes each scallop 4 in (10.2 cm) wide. Six scallops give a 24.25 in (61.6 cm) header, and the border brings it to 24.5 in × 3.75 in (62.2 cm × 9.5 cm). Below the header, the 11 in (27.9 cm) cords and 4.5 in (11.4 cm) tassels bring the total height to 19.25 in (48.9 cm). Check each stage as you go and the valance will hang straight and even.
Happy crocheting!