

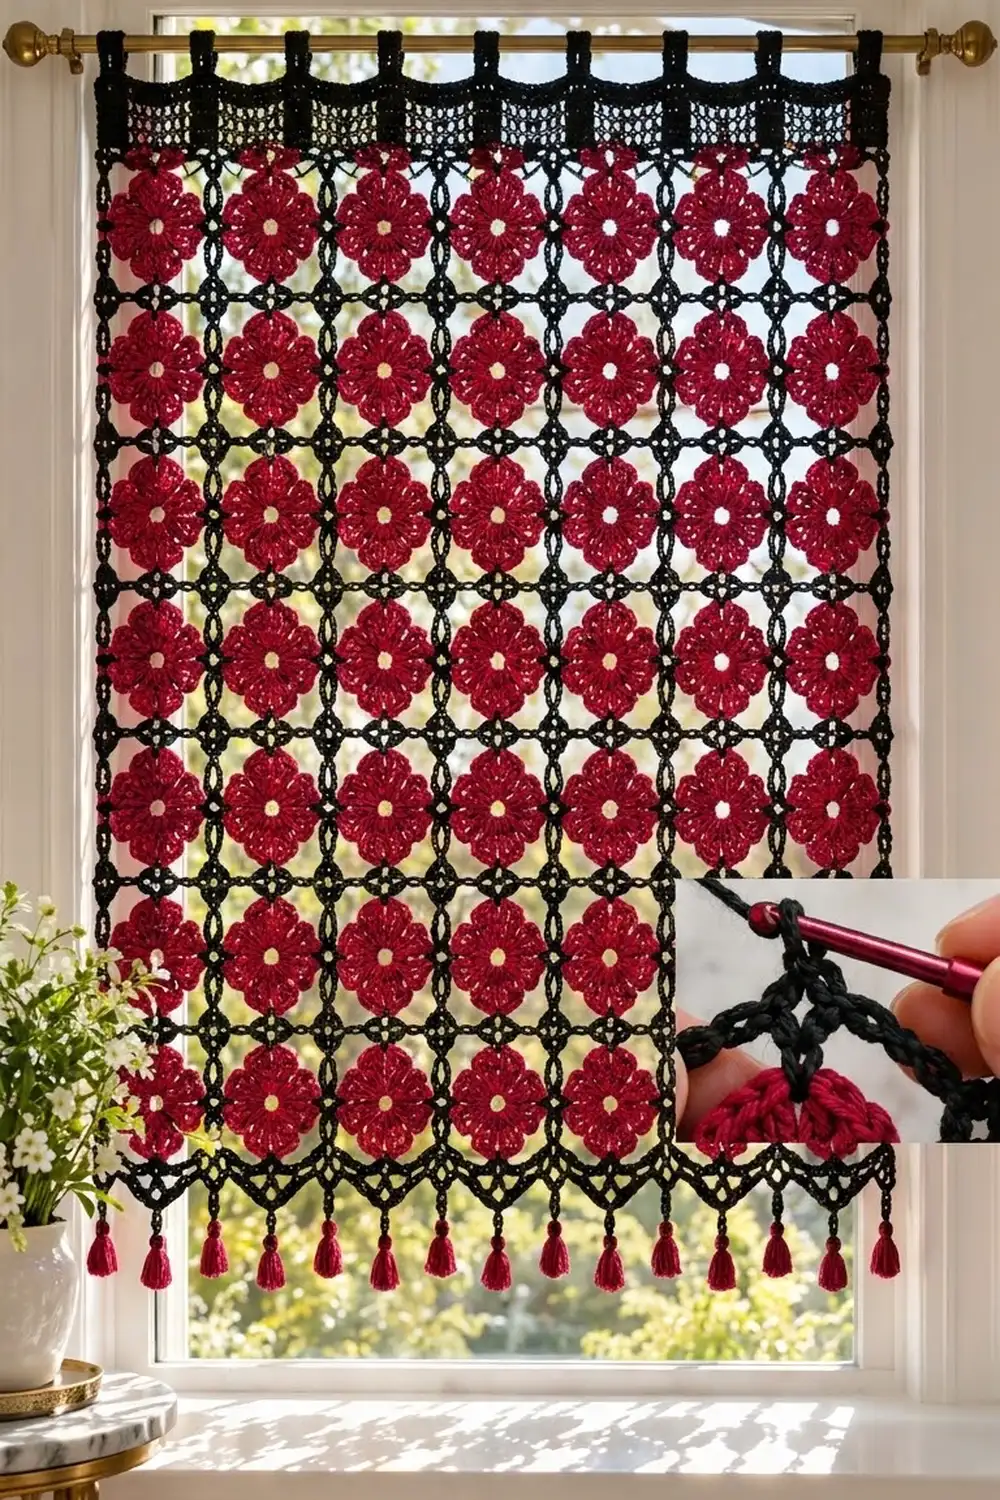
This café-style window curtain has deep crimson flowers set in a crisp black chain lattice. Each red flower is a small round bloom with eight petals and an open center. Black chain loops frame every flower, and where four motifs meet, the joins form a small cross. Light passes through the lattice, so the flowers look like stained glass when the curtain hangs in a sunny window.
The curtain uses two colors. Crimson red is for the flowers and tassels. Black is for the lattice, header, tabs and pointed bottom edge. The style is classic and a little gothic, but it works just as well in a kitchen or bathroom window as in a reading nook.
This pattern uses US crochet terms. The finished curtain measures 32 in (81.3 cm) wide and 36.5 in (92.7 cm) long, from the top of the header to the points of the lower edge. The tabs add 1.5 in (3.8 cm) above, and the tassels add 2 in (5.1 cm) below.
You will make 49 square motifs and join them as you go into a 7 x 7 grid. After that, you add one round of black border, a solid black header with eight hanging tabs, and a pointed bottom edge with 14 red tassels.
Finished Size and Construction
- Finished size: 32 in (81.3 cm) wide x 36.5 in (92.7 cm) long, plus tabs and tassels
- Skill level: Intermediate
- Terminology: US crochet terms
- Yarn weight: DK / light worsted (weight 3) cotton
- Hook: 4.0 mm (G-6)
- Number of pieces: 49 motifs, joined as you go
- Layout: 7 motifs across x 7 motifs down
- Motif size: 4.5 in (11.4 cm) square, blocked
- Size before border: 31.5 in x 31.5 in (80.0 cm x 80.0 cm)
- Border depth: 0.25 in (0.6 cm) all around, plus a 3 in (7.6 cm) header at the top and a 1.5 in (3.8 cm) pointed edge at the bottom
Materials
Use a mercerized or smooth cotton in DK weight. Cotton holds its shape in a window, keeps the lattice crisp and blocks well. Avoid fuzzy yarns, because they fill the chain spaces and blur the lattice.
- Crimson red: 260 g, about 570 m (for 49 flowers and 14 tassels)
- Black: 280 g, about 615 m (for the lattice rounds, border, header, tabs and bottom edge)
The meterage assumes about 110 m per 50 g. Check your yarn label and adjust if yours is different.
Tools:
- 4.0 mm (G-6) crochet hook
- Tapestry needle
- Scissors
- Stitch markers
- Stiff card, 2 in (5.1 cm) wide, for the tassels
- Blocking mats, rustproof pins and a spray bottle
- Measuring tape
Both yarn amounts include a margin of about 10% for differences in gauge and for weaving in ends.
Abbreviations (US Terms)
- ch – chain
- sl st – slip stitch
- sc – single crochet
- dc – double crochet
- sk – skip
- sp(s) – space(s)
- st(s) – stitch(es)
- RS / WS – right side / wrong side
Special stitch – Petal: 5 dc in the same stitch.
Special technique – Joining loop: Use this when a chain loop needs to attach to a finished neighbor.
- For a ch-5 loop: ch 2, sl st into the matching ch-5 sp on the neighbor, ch 2.
- For a ch-7 corner loop: ch 3, sl st into the neighbor’s corner, ch 3.
In both cases, the sl st takes the place of the middle chain.
Gauge and Checkpoints
Make one complete motif first and block it before you start the full curtain. Gauge matters here because small errors add up across 49 motifs.
- After Rnd 1: the center measures 1.25 in (3.2 cm) across.
- After Rnd 2: it measures 2.25 in (5.7 cm) across.
- After Rnd 3 (flower complete): it measures 3.25 in (8.3 cm) from petal tip to petal tip.
- After Rnd 4: it measures 3.75 in (9.5 cm) across.
- After Rnd 5, blocked: it is a 4.5 in (11.4 cm) square, measured side to side through the center.
Border gauge: 22 sc = 4.5 in (11.4 cm), which is about 4.9 sc per inch (1.9 sc per cm).
If your motif is larger than 4.5 in (11.4 cm), use a hook 0.5 mm smaller. If it is smaller, use a hook 0.5 mm larger. A motif that is off by just 0.125 in (0.3 cm) makes the curtain almost 1 in (2.5 cm) off, so correct it before you continue.
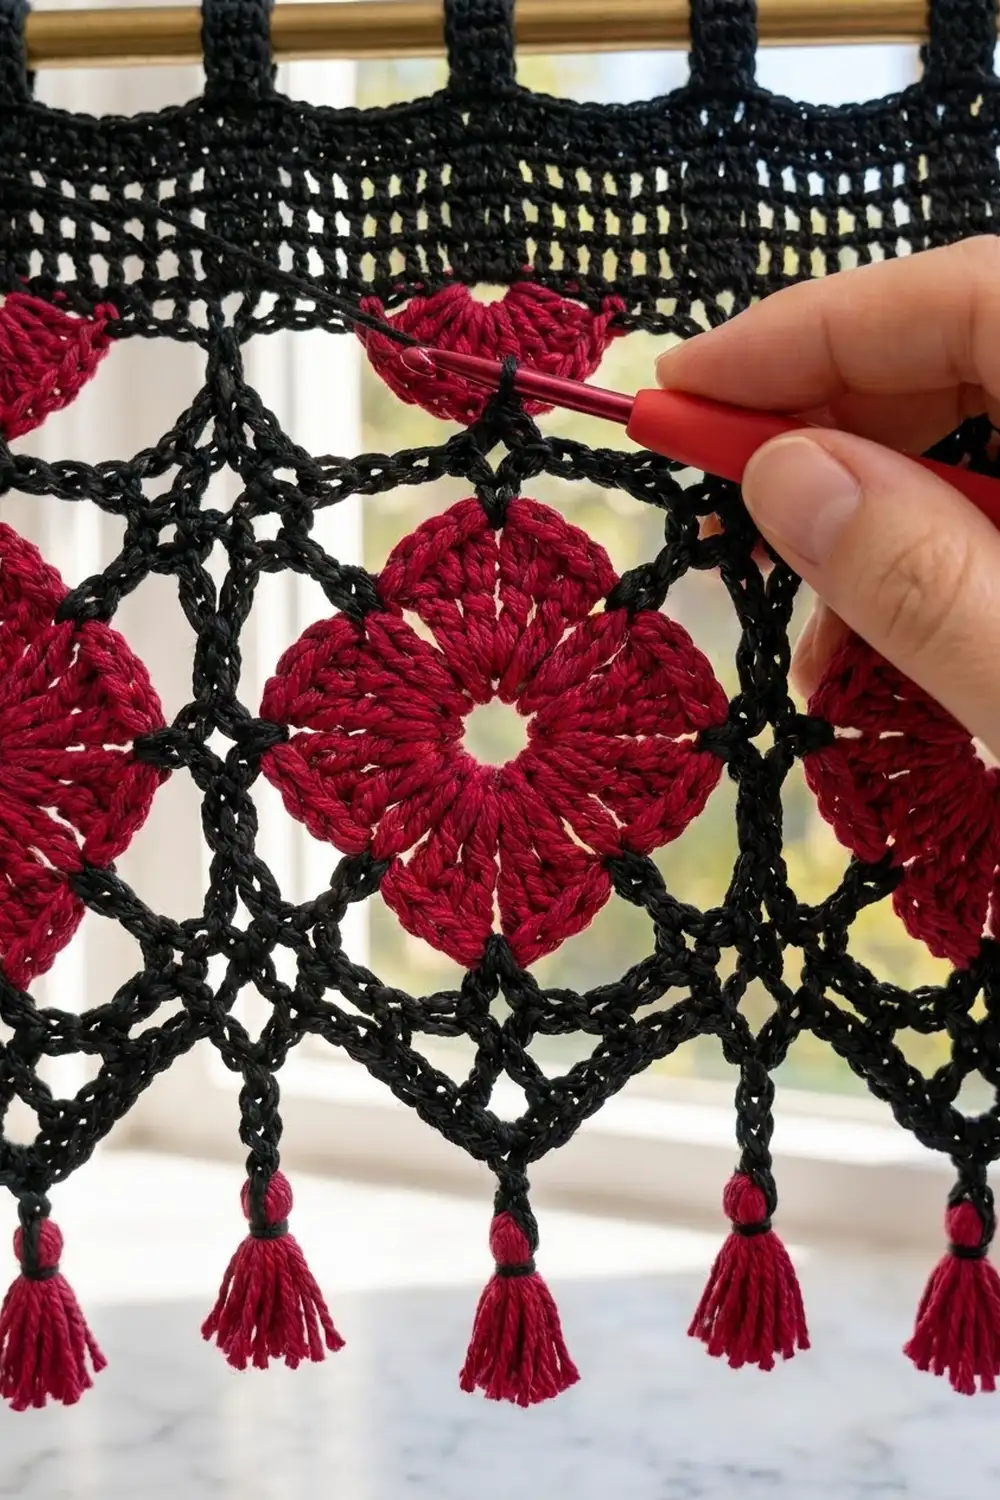
Motif Pattern
Flower (Crimson Red)
Rnd 1: Make a magic ring. Ch 3 (counts as dc) and work 15 dc into the ring. Join with a sl st to the top of the beginning ch-3. (16 dc) Pull the ring snug but leave a small open center.
Rnd 2: Ch 3 (counts as dc) and dc in the same st. Work 2 dc in each st around. Join to the top of the beginning ch-3. (32 dc)
Rnd 3: Sl st in the next st. Sk 1 st, work a Petal in the next st, sk 1 st, sl st in the next st. Work the section from * 8 times in total. The last sl st lands in the first sl st. Fasten off. (8 petals: 40 dc + 8 sl sts)
Each petal uses 4 stitches of Rnd 2. Since 8 x 4 = 32, the petals sit evenly with no gaps or crowding.
Lattice Frame (Black)
Rnd 4: Join black with a sl st in the center (3rd) dc of any petal. Ch 1 and sc in the same st. Ch 5, sc in the center dc of the next petal. Repeat from * 6 more times. Ch 5 and join to the first sc. (8 sc, 8 ch-5 sps)
Rnd 5 (first motif only): Sl st in the first sc, which becomes a corner. Ch 3 (counts as dc), then work (ch 7, dc) in the same st for the first corner.
Ch 5, sc in the next ch-5 sp, ch 5, sc in the next sc (side middle), ch 5, sc in the next ch-5 sp, ch 5.
Work (dc, ch 7, dc) in the next sc for the next corner. Ch 5, sc in the next ch-5 sp, ch 5, sc in the next sc, ch 5, sc in the next ch-5 sp, ch 5. Repeat from * 2 more times. Join to the top of the beginning ch-3 and fasten off.
Stitch count after Rnd 5: 8 dc, 12 sc, 4 ch-7 corner sps and 16 ch-5 sps.
Each side has 4 ch-5 loops between its two corners. The taller dc corners push the round out into a square.
Make All Pieces
You need 49 flowers. On every motif, work Rnds 1–3 in crimson red and Rnd 4 in black. Work Rnd 5 as written on the first motif only. On the other 48 motifs, work Rnd 5 as a joining round (see Joining).
- Crimson red: 49 flowers (Rnds 1–3)
- Black: Rnd 4 on all 49 motifs; Rnd 5 plain on 1 motif and as a joining round on 48 motifs
Layout (7 x 7):
A1 A2 A3 A4 A5 A6 A7
B1 B2 B3 B4 B5 B6 B7
C1 C2 C3 C4 C5 C6 C7
D1 D2 D3 D4 D5 D6 D7
E1 E2 E3 E4 E5 E6 E7
F1 F2 F3 F4 F5 F6 F7
G1 G2 G3 G4 G5 G6 G7
Row A is the top of the curtain. Work each row from left to right, then move on to the next row.
Joining
Method: Join as you go during Rnd 5. Work Rnd 5 as normal until you reach a side that sits next to a finished motif. On that side, use a Joining loop in place of each loop.
Stitch-to-stitch logic: Each shared side has 1 corner loop, 4 ch-5 loops and 1 more corner loop. Join corner to corner, then each ch-5 sp to its matching ch-5 sp, then corner to corner again. The motifs meet loop for loop, so the seam lies flat.
- One neighbor (A2–A7, B1, C1, and so on): Join along 1 side, using 2 corners and 4 ch-5 sps.
- Two neighbors (B2 onward): Join along 2 sides, using 3 corners and 8 ch-5 sps.
- Four-way corners: If a corner already has joins, work your sl st into the sl st of the earlier join, not into a new loop. All four corners then meet at one point and form the small cross at each junction.
Tension advice: Keep your sl sts loose and draw each chain up to full height. Tight joins pucker the lattice and make the seams shorter than the open sides.
Size checkpoint: Three joined motifs should measure 13.5 in (34.3 cm). A finished Row A should measure 31.5 in (80.0 cm) long. If the row is 1 in (2.5 cm) or more short, your joins are too tight.
Border
Border gauge: 22 sc per motif side = 4.5 in (11.4 cm).
Per-side count for one motif: Work 5 sc in each of the 4 ch-5 sps, which gives 20 sc. Add 1 sc in the corner loop at each end, for a total of 22 sc per motif side. This count already includes both corner stitches.
Rnd 1 (black): With the RS facing, join black in the top right corner loop of A7. Ch 1 and work around the curtain as follows:
- At each of the 4 outer corners: work (sc, ch 2, sc) in the corner loop.
- Along each motif side: work 5 sc in each ch-5 sp.
- At each seam: work 1 sc in each motif’s own corner loop, giving 2 sc per seam (one for each motif).
Join to the first sc.
- Top edge: 7 x 22 = 154 sc
- Bottom edge: 7 x 22 = 154 sc
- Each side edge: 7 x 22 = 154 sc
- Total: 616 sc + 4 ch-2 corner sps
Do not fasten off.
Why the math works: Each motif side is 4.5 in (11.4 cm) long, and the border gauge fits exactly 22 sc into that length. The seam corners are already counted in each motif’s 22, and the outer ch-2 sps sit outside the count. Nothing extra is added, so the edge neither ruffles nor pulls in.
Header (Black)
Row 1 (RS): Sl st into the top right corner ch-2 sp. Ch 3 (counts as dc), then dc in each of the 154 top sc. (154 dc) Turn.
Rows 2–6: Ch 3 (counts as dc), dc in each st across, turn. (154 dc)
The header should measure 3 in (7.6 cm) tall. Fasten off.
Tabs (Black)
There are 8 tabs. Each tab is 7 sts wide with 14 sts between tabs, so 8 x 7 + 7 x 14 = 56 + 98 = 154.
First tab: With the RS facing, join black in st 1 of Row 6. Ch 1 and sc in sts 1–7, then turn. (7 sc) For Rows 2–12, ch 1, sc in each of the 7 sts, turn. Fasten off, leaving a 10 in (25.4 cm) tail.
Remaining tabs: Skip 14 sts and make the next tab over the following 7 sts. Repeat until you have 8 tabs. The last tab ends at st 154.
Finishing the loops: Each tab strip is 3 in (7.6 cm) long. Fold it over to the WS and sew its last row to the WS of header Row 4. Each loop stands 1.5 in (3.8 cm) tall and fits a rod up to 1 in (2.5 cm) thick.
Pointed Bottom Edge (Black)
Divide the 154 bottom sc into 14 sections of 11 sts each (14 x 11 = 154).
Row A: With the RS facing, join black in the first bottom sc on the right and ch 1. Sc in st 1 of the section, ch 9, sk the next 9 sts, sc in st 11. Repeat from * across all 14 sections. (28 sc, 14 ch-9 sps) Turn.
Row B: Ch 1. Sc in the next sc, work (5 sc, ch 4, 5 sc) in the ch-9 sp, sc in the next sc. Repeat from * across. (14 x 12 = 168 sc, 14 ch-4 tips) Fasten off.
Each 9-chain loop holds 10 sc, which pushes its center outward into a point. Each point is 1.5 in (3.8 cm) deep.
Tassels (Crimson Red)
- Wrap red yarn 20 times around the 2 in (5.1 cm) card.
- Slide a 6 in (15.2 cm) strand under the wraps at the top and tie it tightly.
- Cut through the loops at the bottom.
- Wrap a second strand around the tassel 0.5 in (1.3 cm) below the top and knot it.
- Trim the ends even.
Make 14 tassels and tie one to each ch-4 tip.
Final Blocking
- Weave in all ends along the black chains so they don’t show against the light.
- Soak the curtain, then press out the water gently. Do not wring it.
- Lay it flat on blocking mats with the RS up.
- Pin the outer corners so the body measures 32 in (81.3 cm) wide and 32 in (81.3 cm) tall, from the bottom of the header to the top of the points.
- Pin the four-way junctions into a straight grid, one every 4.5 in (11.4 cm).
- Open each flower’s petals so they sit evenly.
- Pin out each bottom point and straighten the header edge.
- Let the curtain dry completely. Comb out the tassels and trim them to 2 in (5.1 cm).
Final Quality-Control Checklist
- 49 flowers, each with 8 petals and an open center
- Every motif is 4.5 in (11.4 cm) square
- Every junction forms a neat cross, with no loops left unjoined
- Border Rnd 1 has 154 sc on each side
- The header has 6 rows of 154 dc and is 3 in (7.6 cm) tall
- 8 tabs, evenly spaced and the same height
- 14 points, each with one tassel
- The curtain measures 32 in x 36.5 in (81.3 cm x 92.7 cm)
Troubleshooting
- Petals cup: Rnd 2 is too tight. Go up one hook size for Rnds 2–3.
- Motif is round instead of square: Check that the corners use dc and ch 7, then pin the corners out firmly when blocking.
- Seams pucker: The joining sl sts are too tight. Loosen them and keep the chains at full height.
- Border ruffles: You may have added extra sc at the seams. Recount to 22 per motif side.
- Header flares: Use a hook 0.5 mm smaller for the dc rows only.
- Tabs lean: Center each tab over its 7 sts and sew the fold on straight.
Care
Hand wash in cool water with a mild detergent and dry flat, blocking as you did before. Keep the curtain out of strong all-day sun to keep the crimson bright.
Final Notes
The whole curtain depends on one chain of measurements. A 3.25 in (8.3 cm) flower becomes a 4.5 in (11.4 cm) motif. Seven motifs make 31.5 in (80.0 cm), and 22 sc per motif side give 154 border stitches that lie flat. Those 154 stitches carry the header, the 8 tabs and the 14 points. If your test motif measures correctly, the rest of the curtain will come out right.
Happy crocheting!