

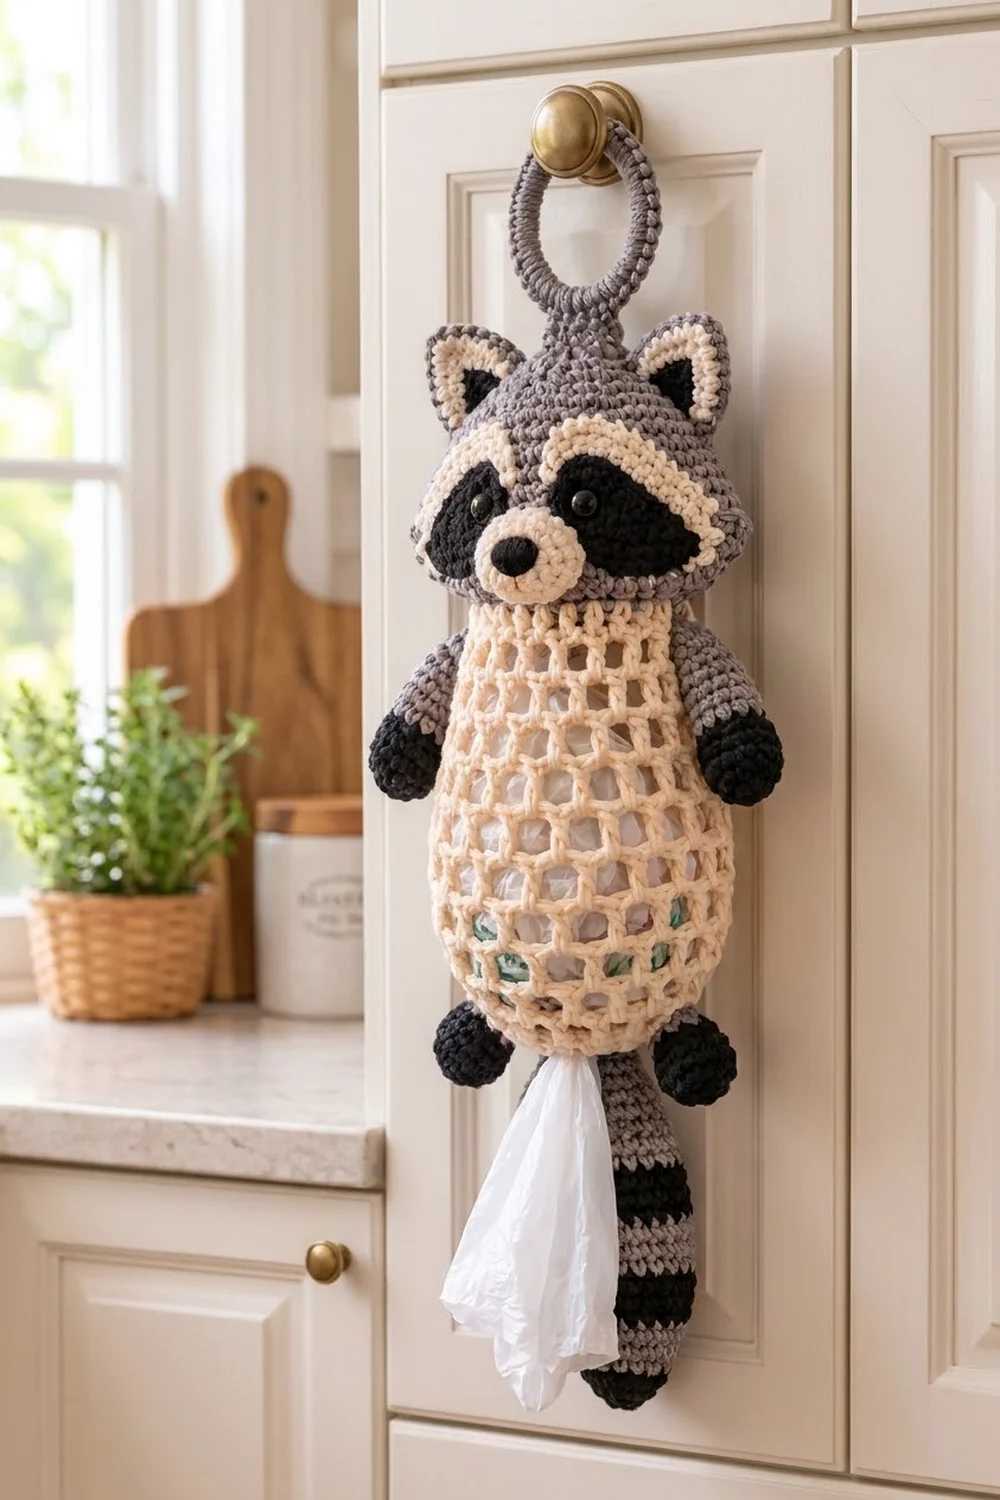
Meet the Pantry Bandit, a cheerful raccoon that hangs on a cabinet knob and keeps your plastic grocery bags under control. You push bags in behind his head and pull them out one at a time from the opening beside his striped tail.
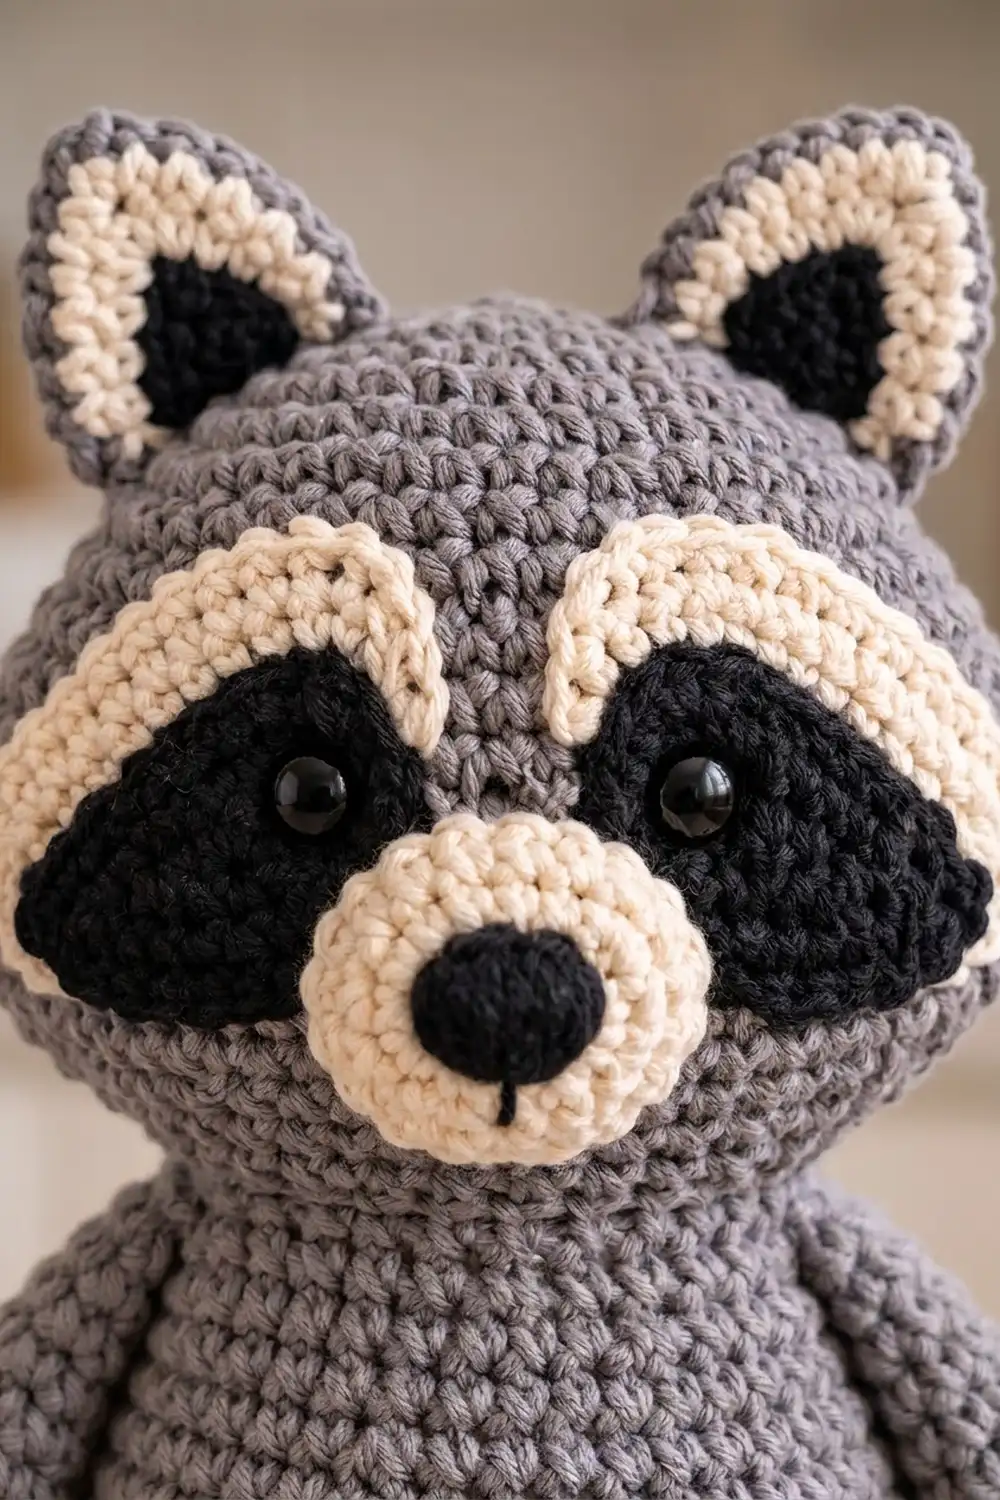
The body is an open cream mesh, so you can see how many bags are left. The head, arms and tail stripes are medium grey. Black is used for the mask, paws, feet, nose and the other tail stripes. A cream face patch and muzzle give him the classic bandit look.
This pattern uses US terms. The finished holder is about 21 in (53.3 cm) tall from the top of the ring to the tail tip. The body is 8 in (20.3 cm) wide when laid flat.
You work the body from the top down in joined rounds. It starts with a single crochet neck band, then becomes a double crochet mesh that widens, runs straight and narrows, and ends with a single crochet trim. The head is two flat ovals with layered appliqués. The small parts are worked in spiral rounds and sewn on.
Finished Size and Construction
- Finished size: about 21 in (53.3 cm) tall; body 8 in (20.3 cm) wide when flat
- Skill level: Intermediate
- Terminology: US
- Yarn weight: Worsted (#4) cotton
- Hook: 4.5 mm (US 7)
- Number of pieces: one holder made from 15 sewn parts, plus a covered ring
- Layout: ring on top, head over the neck, arms at the sides, feet and tail at the bottom
- Head size: about 6 in x 4 1/4 in (15.2 cm x 10.8 cm)
- Body length before the bottom trim: about 10.7 in (27.2 cm)
- Bottom trim depth: 2 rounds, about 1/2 in (1.3 cm)
Materials
Choose a smooth worsted cotton or cotton blend. Cotton keeps the mesh crisp and limits stretching once it’s full of bags.
- Cream: 120 g, about 190 m (body, face patch, muzzle, ear edging)
- Medium grey: 70 g, about 110 m (head, ears, arms, tail, ring)
- Black: 40 g, about 65 m (mask, paws, feet, nose, tail, inner ears)
These quantities include a margin of about 15 percent.
Tools:
- 4.5 mm (US 7) hook
- Two 12 mm black safety eyes
- One 2 in (5.1 cm) plastic or wooden ring
- Fiberfill
- Stitch markers
- Tapestry needle
- Scissors
- Pins
Colorway option: Use taupe in place of grey and dark brown in place of black.
Abbreviations (US Terms)
- ch: chain
- sl st: slip stitch
- sc: single crochet
- hdc: half double crochet
- dc: double crochet
- yo: yarn over
- sc2tog / sc3tog: single crochet 2 / 3 together
- inc: 2 sc in the same stitch
- st(s): stitch(es)
- sp: space
- MR: magic ring
- Rnd(s): round(s)
Special stitches:
- Mesh unit: dc in the next dc, ch 1. One unit is as wide as 2 stitches.
- Mesh inc: dc in the next dc, ch 1, dc in the next ch-1 sp, ch 1. This turns 1 unit into 2.
- Mesh dec:
- Yo, insert hook in the next dc, pull up a loop, yo, pull through 2 loops.
- Skip the ch-1 sp.
- Yo, insert hook in the next dc, pull up a loop, yo, pull through 2 loops.
- Yo, pull through all 3 loops, ch 1.
This turns 2 units into 1.
Gauge and Checkpoints
- Single crochet: 16 sts x 18 rnds = 4 in (10.2 cm)
- Mesh: 8 units x 7 rnds = 4 in (10.2 cm)
Crochet one arm first as a quick test piece. It should measure about 2.9 in (7.4 cm) long. If it comes out longer, go down a hook size. If it comes out shorter, go up a hook size.
Body checkpoints (measured from the top edge):
- After Rnd 2: about 1/2 in (1.3 cm)
- After Rnd 5: about 2.2 in (5.6 cm)
- After Rnd 17: about 9 in (22.9 cm)
- After Rnd 20: about 10.7 in (27.2 cm)
If your mesh comes out too big, change to a smaller hook and redo the mesh rounds. If it’s too small, use a larger hook. Differences under 1/4 in (0.6 cm) don’t matter.
Body (Cream)
Ch 48 and join with a sl st to form a ring. Make sure the chain isn’t twisted.
Rnd 1: Ch 1, sc in each ch around. Join. (48 sc)
Rnd 2: Ch 1, sc in each st around. Join. (48 sc)
This band is 12 in (30.5 cm) around, or 6 in (15.2 cm) flat. That matches the head width.
Rnd 3 (conversion round):
- Ch 4 (counts as dc + ch 1), skip the next st.
- Dc in the next st, ch 1, skip the next st; repeat from * around.
- Join to the 3rd ch of the beginning ch-4.
(24 dc + 24 ch-1 sps = 24 units)
Rnd 4: Ch 4. This counts as the first mesh unit of the first repeat. Work [mesh unit] 5 times, mesh inc, 4 times in total. Join. (28 units)
Each repeat uses 6 old units and makes 7 new ones.
Rnd 5: [Mesh unit] 6 times, mesh inc, 4 times in total. (32 units)
The body is now 16 in (40.6 cm) around, or 8 in (20.3 cm) flat.
Rnds 6–17: Mesh unit around, working each dc into the dc below. (32 units in each round)
Rnd 18: [Mesh unit] 6 times, mesh dec, 4 times in total. (28 units)
Rnd 19: [Mesh unit] 5 times, mesh dec, 4 times in total. (24 units)
Rnd 20: [Mesh unit] 2 times, mesh dec, 6 times in total. (18 units)
These last 3 rounds make the rounded, egg-shaped bottom. Continue with the Border section below.
Head (Grey, Make 2)
Rnd 1:
- Ch 9. Sc in the 2nd ch from the hook, sc in the next 6 ch, 3 sc in the last ch.
- Working along the other side of the chain, sc in the next 6 ch, then 2 sc in the first ch.
(18 sts) Mark the first st and work in a spiral.
Rnd 2: Inc, sc 6, inc 3 times, sc 6, inc 2 times. (24)
Rnd 3: Sc 1, inc, sc 6, (sc 1, inc) 3 times, sc 6, (sc 1, inc) 2 times. (30)
Rnd 4: Sc 2, inc, sc 6, (sc 2, inc) 3 times, sc 6, (sc 2, inc) 2 times. (36)
Rnd 5: Sc 3, inc, sc 6, (sc 3, inc) 3 times, sc 6, (sc 3, inc) 2 times. (42)
Rnd 6: Sc 4, inc, sc 6, (sc 4, inc) 3 times, sc 6, (sc 4, inc) 2 times. (48)
Rnd 7: Sc 5, inc, sc 6, (sc 5, inc) 3 times, sc 6, (sc 5, inc) 2 times. (54)
Rnd 8: Sc 6, inc, sc 6, (sc 6, inc) 3 times, sc 6, (sc 6, inc) 2 times. (60)
Rnd 9: Sc 7, inc, sc 6, (sc 7, inc) 3 times, sc 6, (sc 7, inc) 2 times. (66)
Sl st and fasten off. Each oval should measure about 6 in x 4 1/4 in (15.2 cm x 10.8 cm). On one oval, leave a long tail for sewing.
Face Appliqués
Face patch (cream): Ch 13.
- Rnd 1: Sc in the 2nd ch from the hook, sc in the next 10 ch, 3 sc in the last ch. Along the other side of the chain, sc 10, then 2 sc in the first ch. (26)
- Rnd 2: Inc, sc 10, inc 3 times, sc 10, inc 2 times. (32)
- Rnd 3: Sc 1, inc, sc 10, (sc 1, inc) 3 times, sc 10, (sc 1, inc) 2 times. (38)
Fasten off. The patch measures about 4 1/4 in x 1 1/2 in (10.8 cm x 3.8 cm).
Mask pieces (black, make 2):
- Rnd 1: 6 sc in MR. (6)
- Rnd 2: Inc 6 times. (12)
- Rnd 3: (Sc 1, inc) 6 times. (18)
- Point: Sc in the next st, (hdc, dc) in the next st, ch 2, sl st in the 2nd ch from the hook, (dc, hdc) in the next st, sc in the next st, sl st in the next st.
Fasten off. Each mask piece is a teardrop about 1 3/4 in (4.4 cm) long. Push a safety eye through the center of each piece, but leave the backs off for now.
Muzzle (cream): Work Rnds 1–3 of the mask. (18) Fasten off. The muzzle is about 1 1/4 in (3.2 cm) across.
Nose (black):
- Rnd 1: 6 sc in MR. (6)
- Rnd 2: (Sc 1, inc) 3 times. (9)
Fasten off. The nose is about 0.6 in (1.5 cm) across.
Ears (Make 2)
Outer ear (grey):
- Rnd 1: 4 sc in MR. (4)
- Rnd 2: (Sc 1, inc) 2 times. (6)
- Rnd 3: (Sc 1, inc) 3 times. (9)
- Rnd 4: (Sc 2, inc) 3 times. (12)
- Rnd 5: (Sc 3, inc) 3 times. (15)
- Rnd 6: Sc 15.
Fasten off. Flatten it into a triangle; don’t stuff it.
Inner ear (black): Ch 6.
- Row 1: Sc in the 2nd ch from the hook and in the next 4 ch. (5)
- Row 2: Ch 1, turn, sc2tog, sc 1, sc2tog. (3)
- Row 3: Ch 1, turn, sc3tog. (1)
Edging (cream): Join at one base corner and work around the triangle:
- Sc 5 across the base.
- Work 3 sc along the first side.
- Work (sc, ch 2, sc) in the tip.
- Work 3 sc along the second side.
- Join with a sl st.
(13 sc + ch-2 tip) Sew the inner ear to the outer ear.
Arms (Make 2)
- Rnd 1 (black): 6 sc in MR. (6)
- Rnd 2: Inc 6 times. (12)
- Rnds 3–4: Sc 12.
- Rnd 5 (switch to grey): (Sc 2, sc2tog) 3 times. (9)
- Rnds 6–13: Sc 9.
Stuff the paw lightly, flatten the top and fasten off. Each arm is about 2.9 in (7.4 cm) long.
Feet (Black, Make 2)
- Rnd 1: 6 sc in MR. (6)
- Rnd 2: Inc 6 times. (12)
- Rnds 3–5: Sc 12.
- Rnd 6: (Sc 2, sc2tog) 3 times. (9)
Stuff lightly and flatten. Each foot is about 1.3 in (3.3 cm) long.
Tail
- Rnd 1 (black): 6 sc in MR. (6)
- Rnd 2: Inc 6 times. (12)
- Rnd 3: (Sc 1, inc) 6 times. (18)
- Rnds 4–20: Sc 18 in each round. Change color as follows:
- Rnds 4–6: black
- Rnds 7–9: grey
- Rnds 10–12: black
- Rnds 13–15: grey
- Rnds 16–18: black
- Rnds 19–20: grey
- Rnd 21 (grey): (Sc 4, sc2tog) 3 times. (15)
- Rnds 22–23 (black): Sc 15.
- Rnd 24 (black): (Sc 3, sc2tog) 3 times. (12)
- Rnds 25–26 (grey): Sc 12.
Stuff firmly and flatten the top. The tail is about 5.8 in (14.7 cm) long.
Ring and Tab (Grey)
Ring: Work about 50 tight sc over the ring until it’s fully covered. Join and fasten off.
Tab: Ch 5. Sc in the 2nd ch from the hook and in the next 3 ch. (4) Work 5 more rows of 4 sc. Fasten off.
Assembly
- Face patch: Sew it to one head oval, slightly below center. Push the eye posts through the patch and the head, then lock on the backs.
- Mask: Sew the mask pieces in place with the points angled outward and downward.
- Muzzle and nose: Sew the muzzle over the inner mask ends. Sew the nose to the top of the muzzle.
- Head: Place the two ovals wrong sides together. Whipstitch around the edge, adding a little stuffing before you close it.
- Ears: Sew them to the top edge, about 1 1/2 in (3.8 cm) apart.
- Ring: Fold the tab over the covered ring and sew both ends to the top center of the back oval.
- Body to head: Flatten the body so the round joins sit at one side. Sew the front 24 sts of the neck band to the back oval, 3/4 in (1.9 cm) above the head’s lower edge. Leave the back 24 sts open; this is where you load the bags.
- Arms: Sew one arm to each side of the body, over Rnds 4–6.
- Feet and tail: Sew the feet to the bottom trim at the lower front corners. Sew the tail just left of center, overlapping the trim by 1 1/4 in (3.2 cm).
Border (Bottom Opening Trim)
Border gauge: 16 sc = 4 in (10.2 cm). Work this trim straight after Rnd 20 of the body.
Rnd 21 (conversion round): Ch 1, sc in each dc and in each ch-1 sp around. Join. (18 + 18 = 36 sc)
Rnd 22: Ch 1, sc in each st around. Join and fasten off. (36 sc)
Why the math works: Each mesh unit is 2 stitches wide, so 18 units become 36 sc without puckering. At this gauge, 36 sc measure 9 in (22.9 cm) around, or 4 1/2 in (11.4 cm) flat. That’s wide enough to pull one bag out and narrow enough to hold the rest. The neck follows the same logic: 48 sc = 24 units = 12 in (30.5 cm) around.
Final Blocking
- Weave in all the ends.
- Lightly mist the mesh body with water. Keep the stuffed parts dry.
- Lay the holder flat and shape the body into a smooth egg, 8 in (20.3 cm) at its widest point.
- Square up the holes with your fingertips so the columns run straight.
- Pin the bottom trim flat at 4 1/2 in (11.4 cm).
- Let it dry completely.
Final Quality-Control Checklist
- Neck band 48 sc; widest mesh round 32 units; bottom trim 36 sc
- Body 8 in (20.3 cm) wide and about 11.2 in (28.4 cm) long
- Head about 6 in x 4 1/4 in (15.2 cm x 10.8 cm)
- Safety eye backs are fully locked
- The tab holds firmly when you tug the ring
- The loading gap at the back of the neck opens freely
Troubleshooting
- Mesh slants: You’re working into the ch-sps. Place each dc into the dc below.
- Head ruffles: Go down a hook size.
- Head cups: Go up a hook size.
- Bags fall out: Rework Rnd 22 with a smaller hook.
- Head tips forward: Sew the tab lower on the back oval.
Care
Remove the bags, hand wash in cool water and lay flat to dry. Don’t wring the mesh.
Final Notes
Here is the full measurement chain:
- The 48 sc neck band is 12 in (30.5 cm) around and becomes 24 mesh units.
- The mesh grows to 32 units, 8 in (20.3 cm) flat, then narrows to 18 units.
- Those 18 units become a 36 sc trim, 4 1/2 in (11.4 cm) flat.
- A 6 in (15.2 cm) head sits on top, for a holder about 21 in (53.3 cm) tall.
Happy crocheting!