

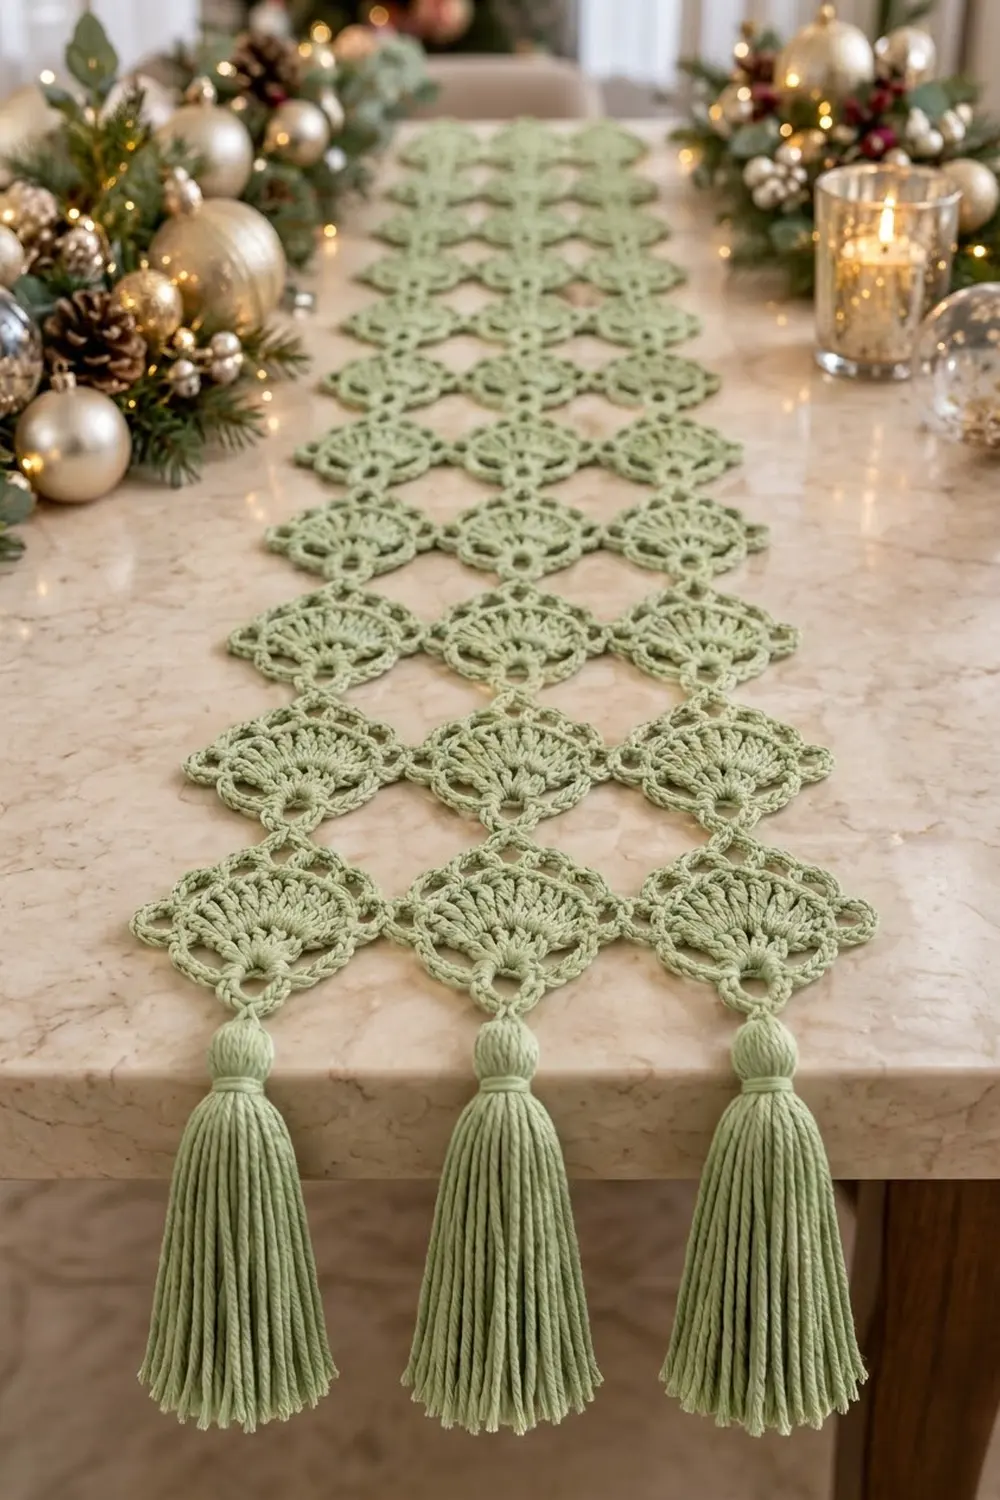
The Evergreen Fan Lace Table Runner is a light, open runner built from small diamond motifs. Each diamond holds a fan of double crochet ribs rising from a tiny ring. A frame of corded arches and loops surrounds the fan, so the finished runner looks like rows of lace fans on point.
It’s worked in one calm sage green, which goes with gold, cream, and natural greenery. It fits a holiday table but isn’t limited to the holidays.
This pattern uses US crochet terms. The finished runner is 13.5 in (34.3 cm) wide and 54 in (137.2 cm) long, not counting tassels. With a 4 in (10.2 cm) tassel at each end, the total length is 62 in (157.5 cm).
You make one motif in a short sequence: a ring, four fan rows, a chain frame, and a final single crochet round. From the second motif on, you join each motif to its neighbors during that last round, so there’s no sewing. You finish with six tassels, three on each end.
Finished Size and Construction
- Finished size: 13.5 in x 54 in (34.3 cm x 137.2 cm); 62 in (157.5 cm) long with tassels
- Skill level: Intermediate
- Terminology: US crochet terms
- Yarn weight: DK (#3), cotton or cotton blend
- Hook: 4.0 mm (G-6)
- Number of pieces: 36 motifs + 6 tassels
- Layout: 3 motifs wide x 12 motifs long, set on point
- Piece size: 4.5 in (11.4 cm) point to point, both directions
- Size before border: 13.5 in x 54 in (34.3 cm x 137.2 cm)
- Border depth: 0 in (0 cm). The motif edges are the finished edge, and the ends get tassels.
Materials
Yarn: Use a smooth DK cotton or cotton blend with good stitch definition. Mercerized or matte cotton both work. Avoid fuzzy yarns, because they blur the fan ribs and the open arches.
- Sage green: 220 g / 500 m (547 yd). That’s five 50 g balls of about 115 m (126 yd) each.
Each motif uses about 10 m (11 yd), and each tassel uses about 6 m (6.6 yd). The quantity above includes roughly a 25% margin for your gauge swatch, tension differences, and a spare tassel.
Tools:
- 4.0 mm (G-6) crochet hook
- Tapestry needle
- Scissors
- Stiff card 4 in (10.2 cm) tall, for tassels
- Rust-proof pins and a blocking mat or folded towels
- Spray bottle or steamer
- Measuring tape
Abbreviations (US Terms)
- ch – chain
- sl st – slip stitch
- sc – single crochet
- dc – double crochet
- sk – skip
- sp – space
- tch – turning chain
- RS – right side
- WS – wrong side
Special technique – join sl st: Remove the hook from your working loop. Insert the hook from front to back through the named stitch on the neighboring motif, then pick up the dropped loop and pull it through. The join sl st doesn’t count as a stitch.
Gauge and Checkpoints
Make one complete motif before you start the runner. Measure it unblocked, then pin it gently and measure again.
- After Rnd 1: ring is 1 in (2.5 cm) across
- After Row 1: fan base is 1.75 in (4.4 cm) wide
- After Row 2: fan is 2.25 in (5.7 cm) wide
- After Row 3: fan is 3 in (7.6 cm) wide
- After Row 4: scalloped fan top is 3.25 in (8.3 cm) wide
- After Rnd 6: motif is 4.5 in (11.4 cm) from point to point, side to side and top to bottom
If your motif is too big (over 4.75 in / 12.1 cm), go down to a 3.5 mm hook. If it’s too small (under 4.25 in / 10.8 cm), go up to a 4.5 mm hook. Every 0.25 in (0.6 cm) of error per motif changes the runner length by 3 in (7.6 cm), because there are 12 motifs along the length. Fix gauge before you make more motifs.
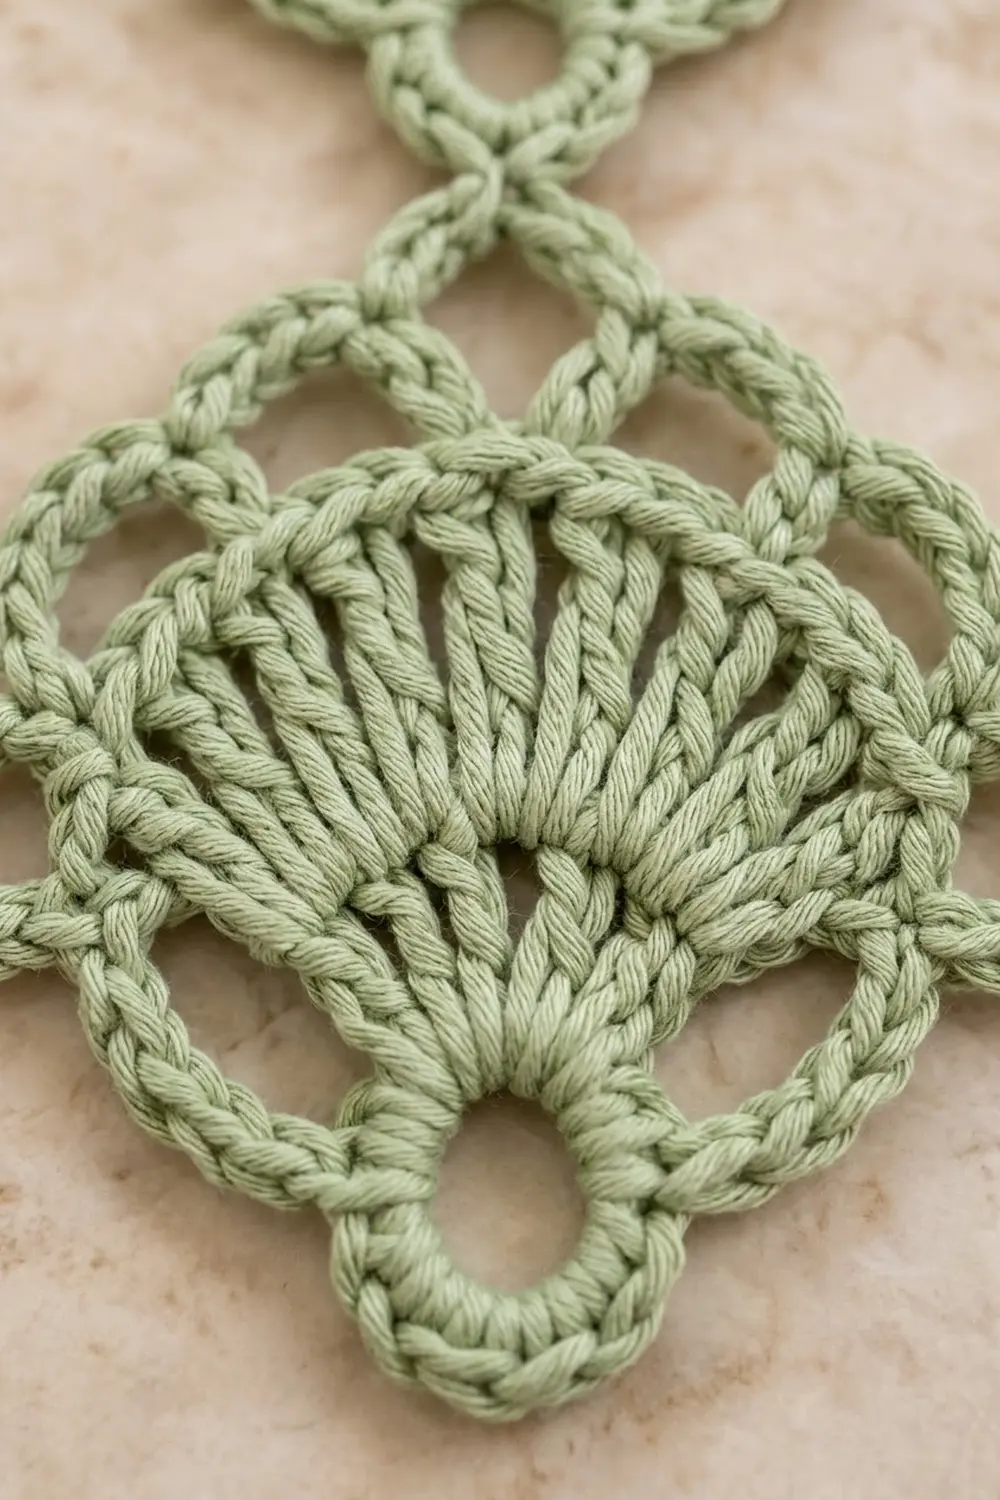
Motif (Make 36)
Ring and Fan
Foundation: Ch 8, sl st in first ch to form a ring.
Rnd 1: Ch 1, 16 sc in ring, sl st in first sc. (16 sc)
Number these stitches 1 to 16 in the order you worked them. Sts 1–8 carry the fan. Sts 9–16 form the bottom point.
Row 1: Ch 4 (counts as dc and ch 1), [dc in next sc, ch 1] 6 times, dc in next sc. (8 dc, 7 ch-1 sps) This row uses sts 1–8.
Row 2: Ch 3 (counts as dc), turn. Sk first dc, 2 dc in each ch-1 sp across, dc in 3rd ch of tch. (16 dc: 1 + 14 + 1)
Row 3: Ch 4 (counts as dc and ch 1), turn. Sk first dc, [dc in next dc, ch 1] 14 times, dc in top of tch. (16 dc, 15 ch-1 sps) These ch-1 spaces open up the ribs and give the fan its radiating look.
Row 4 (scallop trim): Ch 1, turn. Sc in first dc, [sc in next ch-1 sp, sc in next dc] 15 times, working the last sc in the 3rd ch of tch. (31 sc: 16 worked 1-per-dc + 15 added in the spaces)
You finish Row 4 directly above st 1 of the ring. Call this last sc sc A. The first sc of Row 4, above st 8, is sc B. Do not fasten off.
Chain Frame
Rnd 5: Do not turn.
- Side loop A: Ch 8, sl st in sc A.
- Lower arch A: Ch 9, sk sts 16 and 15 of Rnd 1, sl st in st 14.
- Bottom point: Sl st in each of sts 13, 12, and 11.
- Lower arch B: Ch 9, sk sts 10 and 9, sl st in sc B.
- Side loop B: Ch 8, sl st in sc B.
- Upper arch B: Ch 10.
- Top loop: Ch 6, sl st in 6th ch from hook.
- Upper arch A: Ch 10, sl st in sc A.
The frame now outlines a diamond. The side loops form the left and right points, the top loop forms the top point, and the ring with its 4 sl sts forms the bottom point.
Final Round
Rnd 6: Sl st into side loop A, ch 1. Work these in order:
- 10 sc in side loop A
- 11 sc in lower arch A
- 1 sc in each of the 4 bottom sl sts
- 11 sc in lower arch B
- 10 sc in side loop B
- 12 sc in upper arch B
- 8 sc in top loop
- 12 sc in upper arch A
Sl st in first sc to close. (78 sc: 10 + 11 + 4 + 11 + 10 + 12 + 8 + 12)
The side facing you during Rnd 6 is the RS. Fasten off and weave in the ends along the arches.
Check the motif against the 4.5 in (11.4 cm) checkpoint before you continue.
Make All Pieces
You need 36 motifs, all in sage green, at about 10 m (11 yd) each, plus 6 tassels at about 6 m (6.6 yd) each.
Make Motif 1 completely as written. Make every later motif the same way through Rnd 5, then work Rnd 6 with joins as described below.
Layout (3 columns x 12 rows, worked bottom to top, left to right):
Row 12:  34  35  36
Row 11:  31  32  33
Row 10:  28  29  30
Row 9:   25  26  27
Row 8:   22  23  24
Row 7:   19  20  21
Row 6:   16  17  18
Row 5:   13  14  15
Row 4:   10  11  12
Row 3:    7   8   9
Row 2:    4   5   6
Row 1:    1   2   3
Every motif sits with its top loop pointing toward Row 12 and its ring pointing toward Row 1.
Joining (Join-As-You-Go in Rnd 6)
All joins happen while you work Rnd 6, so the finished joins are flat and nearly invisible. A join sl st replaces nothing and adds nothing, so every motif still has exactly 78 sc.
Side join (motif beside a finished motif): When you reach the side loop that faces the neighbor, work 5 sc. Join sl st into the 5th sc of the neighbor’s facing side loop, then work 5 sc. (10 sc in the loop)
Vertical join (motif above a finished motif): When you reach the 4 bottom sc, work 1 sc in each of the first 2 sl sts. Join sl st into the 4th sc of the top loop of the motif below, then work 1 sc in each of the last 2 sl sts. (4 sc at the bottom point)
Which joins each motif needs:
- Motifs 2 and 3: one side join each
- Motifs 4, 7, 10, and so on (left column): one vertical join
- All other motifs above Row 1: one vertical join plus one side join
That makes 24 side joins and 33 vertical joins in total.
The arches and side loops on the outer edges stay free. The gaps between touching motifs form the diamond-shaped openings.
Tension advice: Pull each join sl st snug, but not tight. If a join pulls, the points pucker and the openings close up. Lay the work flat after every row of 3 to check that the motifs sit point to point without overlapping.
Size checkpoint: After Row 1 of motifs, the strip measures 13.5 in (34.3 cm) wide. After Row 4, it measures 18 in (45.7 cm) long. After Row 12, it measures 54 in (137.2 cm) long.
Border (Edge Finish)
There is no added border. The scalloped edge is formed by the motifs themselves, and a solid border would fill the scallops and flatten the points.
Edge gauge: Each free arch and loop holds the stitch count from Rnd 6, which works out to about 7 sc per 1 in (2.5 cm) along the curve.
Long sides: Each edge motif shows one lower arch, one side loop, and one upper arch: 11 + 10 + 12 = 33 sc. With 12 motifs, that’s 12 x 33 = 396 edge sc per long side. Nothing is added at the joins, because the vertical joins are inside the 4 bottom sc and the top loop.
Bottom end: Each motif shows one lower arch, the bottom point, and the other lower arch: 11 + 4 + 11 = 26 sc. With 3 motifs, that’s 3 x 26 = 78 edge sc.
Top end: Each motif shows one upper arch, the top loop, and the other upper arch: 12 + 8 + 12 = 32 sc. With 3 motifs, that’s 3 x 32 = 96 edge sc.
Why the math works: Each motif is a fixed 78 sc, and joins add no stitches. So the runner’s size is simply the motif size times the motif count: 3 x 4.5 in = 13.5 in (34.3 cm) wide, and 12 x 4.5 in = 54 in (137.2 cm) long.
Tassels (Make 6)
- Wrap yarn 25 times around the 4 in (10.2 cm) card.
- Slide a 10 in (25.4 cm) strand under the wraps at the top and tie it tightly. Keep the tails for attaching.
- Cut the wraps at the bottom edge and remove the card.
- To form the rounded head, wrap a separate strand 6 times around the bundle, 0.75 in (1.9 cm) below the top. Knot it and bury the tails inside the tassel.
- Trim the bottom evenly to 4 in (10.2 cm).
Attach one tassel through the center hole of the ring on each Row 1 motif (1, 2, 3). Attach one through each top loop of the Row 12 motifs (34, 35, 36). Tie securely and hide the tails inside the head.
Final Blocking
- Weave in any remaining ends before blocking.
- Spray the runner evenly until it’s damp, or soak it in cool water and press it in a towel until damp.
- Lay it on a mat and measure to 13.5 in x 54 in (34.3 cm x 137.2 cm).
- Pin the 4 points of every motif along the outer edges first, then pin the corner motifs square.
- Open each fan by pinning the scallop edge gently into a curve.
- Pin the side loops and top loops into round shapes.
- Let it dry completely, at least 12 hours.
- Unpin, comb the tassels straight, and steam the tassels lightly if they’re kinked.
Final Quality-Control Checklist
- 36 motifs, each with 78 sc in Rnd 6
- Each fan has 16 dc ribs
- 24 side joins and 33 vertical joins, all flat
- Outer side loops and arches free and rounded
- Width is 13.5 in (34.3 cm) and length is 54 in (137.2 cm)
- 6 tassels, each 4 in (10.2 cm), securely tied
- All ends woven in and invisible from the RS
- All motifs face RS up, top loops pointing the same way
Troubleshooting
Fan cups or curls up: Your dc are too tight. Loosen your yarn-overs, or use a larger hook for Rows 2–3 only.
Fan ruffles: Check that Row 2 has exactly 16 dc and Row 3 has 15 ch-1 spaces.
Arches look stretched or tight: You’ve probably packed too few sc into the chain spaces. Recount Rnd 6 against the 78 total.
Arches ripple: Your chains are too loose. Chain a little more firmly in Rnd 5.
Runner is narrower at one end: Your gauge drifted. Measure every 3 rows of motifs and rework any outlier.
Joins pucker: Redo the join sl st with a looser loop.
Tassel head is loose: Add 2 more neck wraps and knot them tightly.
Care
Hand wash in cool water with mild soap, press out the water in a towel, and dry flat, reshaping the motifs as you go. Don’t tumble dry. Steam lightly to freshen it up.
Final Notes
The measurement chain is simple. A 1 in (2.5 cm) ring grows into a 3 in (7.6 cm) fan, the frame brings each motif to 4.5 in (11.4 cm), and 36 motifs in a 3 x 12 layout make a 13.5 in x 54 in (34.3 cm x 137.2 cm) runner. Adding 4 in (10.2 cm) tassels at each end brings the total to 62 in (157.5 cm). Check the size at each stage, keep the joins relaxed, and block every point. Each motif will then open into a clean lace fan.
Happy crocheting!