

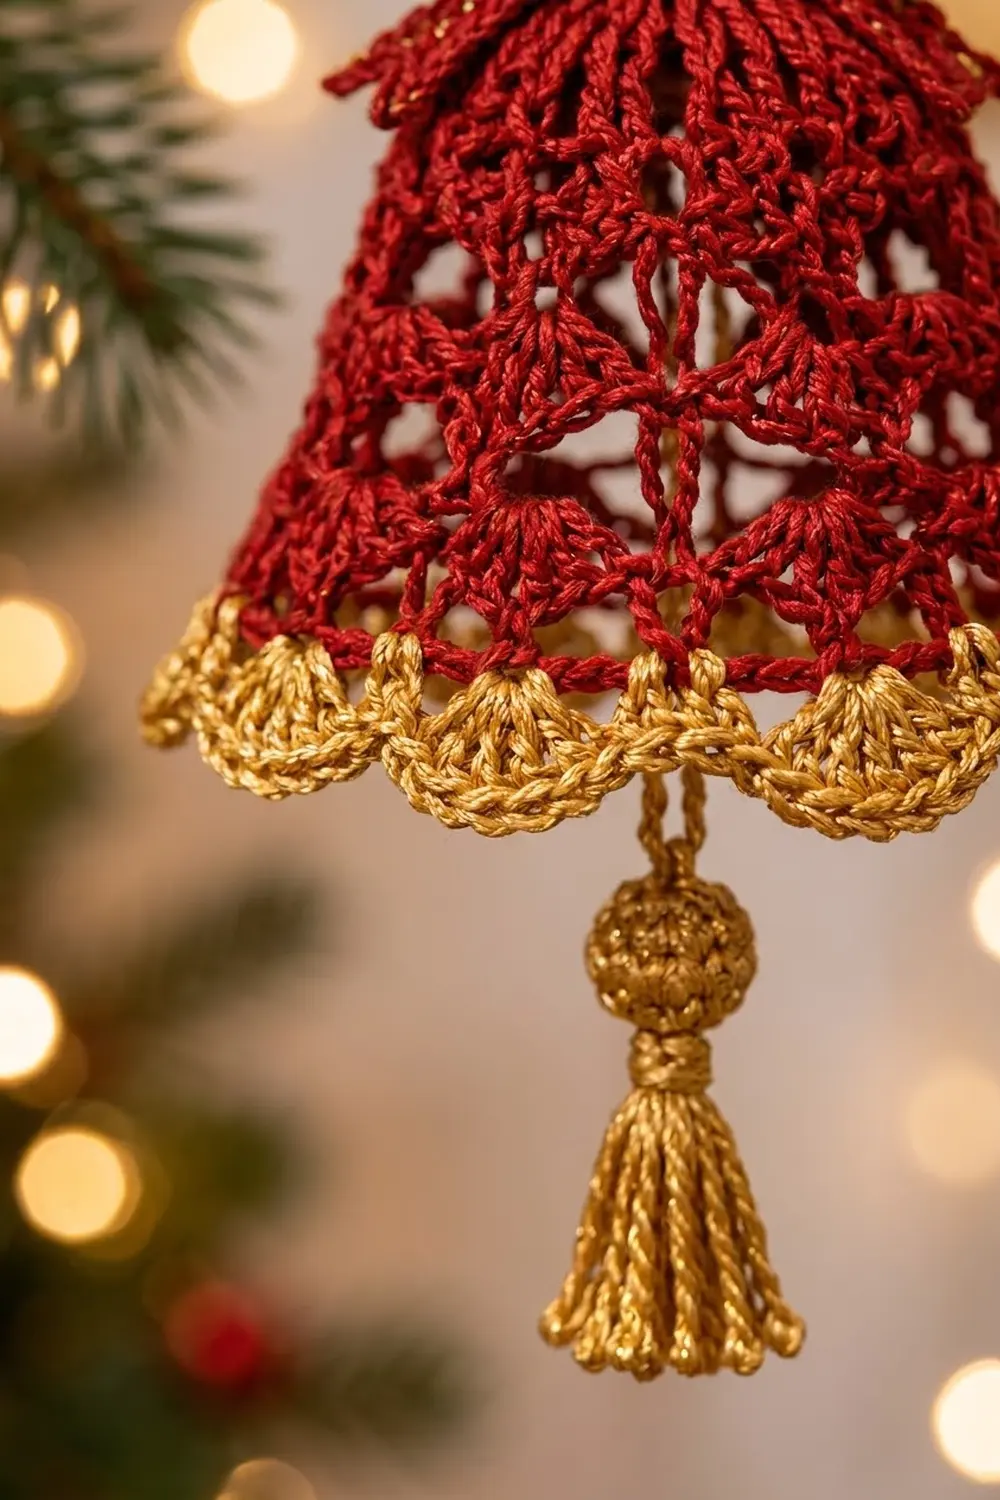
The Golden Chime Lace Bell is a small, flat Christmas bell ornament in deep red thread with a bright gold scalloped hem. A red bow sits at the top. A round gold bead and a soft gold tassel hang below it like a clapper. It looks delicate, but the body uses just two row types that repeat.
The red body alternates open mesh rows with solid double crochet rows. That gives the bell its lacy windows while keeping a clean outline. The gold hem adds a ruffled edge that catches the light, especially in a metallic-blend thread.
This pattern uses US crochet terms. The finished bell body measures about 3.6 in (9.1 cm) wide at the hem and 3.5 in (8.9 cm) tall. With the bead and tassel, the ornament is about 6 in (15.2 cm) long, not counting the hanging loop.
You work the red body flat in rows from the top down, adding 2 stitches in every row. A red edging tidies the sides and top. Next you add the gold hem border, then make a separate bow, bead and tassel and sew them on.
Finished Size and Construction
- Finished size: 3.6 in (9.1 cm) wide x 3.5 in (8.9 cm) tall (bell body with border)
- Total length: about 6 in (15.2 cm) including bead and tassel
- Skill level: Easy to intermediate
- Terminology: US crochet terms
- Yarn weight: Size 3 crochet thread (fingering, weight 1)
- Hook: 2.25 mm (US B-1)
- Number of pieces: 1 bell ornament (body, with bow, bead and tassel sewn on)
- Layout: single motif, hung vertically
- Piece size before border: 3.4 in (8.6 cm) wide at the hem x 3 in (7.6 cm) tall
- Border depth: 0.5 in (1.3 cm)
Materials
Use a smooth, mercerized cotton thread in size 3. It shows the lace clearly and keeps a crisp shape after blocking. For the gold, use a cotton or a cotton-metallic blend in the same weight. Avoid very slippery, pure metallic threads, because they make the scallops floppy.
- Red (MC): 10 g, about 27 m
- Gold (CC): 6 g, about 16 m
Quantities include a comfortable margin for a gauge swatch and the tassel.
Tools:
- 2.25 mm (US B-1) crochet hook
- Tapestry needle
- Scissors
- A pinch of fiberfill or thread scraps for the bead
- A piece of cardboard 1.5 in (3.8 cm) wide for the tassel
- Rust-proof pins and a foam blocking mat
- Spray bottle and light starch (optional)
Abbreviations (US Terms)
- ch – chain
- sl st – slip stitch
- sc – single crochet
- dc – double crochet
- sc2tog – single crochet 2 together
- sk – skip
- st(s) – stitch(es)
- sp – space
- MR – magic ring
- RS / WS – right side / wrong side
Special stitch – Scallop: 5 dc worked into the same stitch.
Stitch counting note: In the bell body, every dc AND every ch-1 counts as 1 stitch. The beginning ch 3 always counts as 1 dc.
Gauge and Checkpoints
Gauge: 14 dc = 2 in (5.1 cm) and 6 dc rows = 2 in (5.1 cm) with a 2.25 mm hook. That is 7 sts and 3 rows per 1 in (2.5 cm).
Make one bell body and measure it before you make a set. Exact gauge matters less on an ornament than consistency, but these checkpoints keep the shape right.
Checkpoints:
- After Row 1: 7 sts, about 1 in (2.5 cm) wide
- After Row 5: 15 sts, about 2.1 in (5.3 cm) wide and 1.7 in (4.3 cm) tall
- After Row 9: 23 sts, about 3.3 in (8.4 cm) wide and 3 in (7.6 cm) tall
- After side edging: about 3.4 in (8.6 cm) wide at the hem, 1.2 in (3.0 cm) at the top
- After gold border: about 3.6 in (9.1 cm) wide and 3.5 in (8.9 cm) tall
If your piece is too big, switch to a 2.0 mm hook. If it is too small, switch to a 2.5 mm hook. If only the height is off, check that you pull every dc up to the same height. Tall, loose dc are the usual cause.
Bell Body (Red)
Work the body flat in rows, from the narrow top to the wide hem. Every row adds 1 stitch at each edge, so each row has 2 more stitches than the row before.
There are only two row types after Row 1.
Mesh row (even rows): Ch 3 (counts as dc), dc in first st. Ch 1, sk next st, dc in next st; repeat from * as stated. Ch 1, sk next st, 2 dc in last st (top of turning ch). Turn.
Solid row (odd rows): Ch 3 (counts as dc), dc in first st. Dc in each dc and in each ch-1 sp across to the last st. 2 dc in last st (top of turning ch). Turn.
Each ch-1 sp takes exactly 1 dc in the solid row, so the counts stay exact.
Row 1 (RS): With red, ch 9. Dc in 4th ch from hook and in each remaining ch across. Turn. (7 sts)
The 3 skipped chains count as the first dc.
Row 2 (WS, mesh): Work a mesh row, repeating from * 2 times. (9 sts: 6 dc + 3 ch-1 sps)
Row 3 (RS, solid): Work a solid row. (11 sts)
Row 4 (WS, mesh): Work a mesh row, repeating from * 4 times. (13 sts: 8 dc + 5 ch-1 sps)
Row 5 (RS, solid): Work a solid row. (15 sts)
Checkpoint: about 2.1 in (5.3 cm) wide and 1.7 in (4.3 cm) tall.
Row 6 (WS, mesh): Work a mesh row, repeating from * 6 times. (17 sts: 10 dc + 7 ch-1 sps)
Row 7 (RS, solid): Work a solid row. (19 sts)
Row 8 (WS, mesh): Work a mesh row, repeating from * 8 times. (21 sts: 12 dc + 9 ch-1 sps)
Row 9 (RS, solid): Work a solid row, but do not turn at the end. (23 sts)
Checkpoint: about 3.3 in (8.4 cm) wide at the hem and 3 in (7.6 cm) tall. The edges should slant out evenly into a bell outline, with four open lace bands.
Side and Top Edging (Red)
This edging hides the row ends and firms the outline. It does not touch the 23 hem stitches of Row 9, so the border count stays the same.
Edging: Ch 1. Rotate to work along the side edge. Work 2 sc around the post of each row end up the side, ending at the top corner: 18 sc (9 rows x 2). Work across the opposite side of the foundation chain: 3 sc in the first corner, 5 sc across, 3 sc in the last corner: 11 sc. Work 2 sc around each row end down the other side: 18 sc. Sl st to the top of the beginning ch-3 of Row 9. Fasten off. (47 sc: 18 + 11 + 18)
Checkpoint: about 3.4 in (8.6 cm) wide at the hem and 1.2 in (3.0 cm) wide at the top.
Hanging Loop (Gold)
With RS facing, join gold with a sl st in the center sc of the top edge (the 6th of the 11 top sc). Ch 30, sl st in the same sc. Fasten off and weave in the ends.
The loop stands about 1.5 in (3.8 cm) above the bell. The bow will cover the base.
Bow (Red)
Bow loops: With red, ch 31. Sc in 2nd ch from hook and in each ch across. Fasten off, leaving a 6 in (15.2 cm) tail. (30 sc)
Sew the two short ends together to make a ring. Flatten it with the seam at the center back.
Center wrap: Pinch the center. Wrap gold tightly 8 to 10 times around the pinch and tie off at the back. The bow is about 2 in (5.1 cm) wide and 1 in (2.5 cm) tall.
Tails: With red, ch 21. Sl st in 2nd ch from hook and in each ch across. Fasten off. (20 sl sts) Fold the strip in half at an angle so the two tails hang down in an upside-down V. Each tail is about 1 in (2.5 cm) long.
Sew the fold of the tails behind the bow center. Then sew the bow to the top center of the bell, over the base of the hanging loop.
Gold Hem Border
The border is worked across the 23 sts of Row 9 only.
Border gauge: One scallop repeat (sk 1, 5 dc, sk 1, sc) spans 4 sc, or about 0.6 in (1.5 cm) of hem.
Border Row 1 (RS): With RS facing, join gold in the top of the beginning ch-3 of Row 9. Ch 1, 2 sc in same st, sc in each of next 21 sts, 2 sc in last st. Turn. (25 sc: 23 worked one per stitch + 2 extra)
Border Row 2 (WS): Ch 1, sc in first sc. Sk next sc, 5 dc in next sc, sk next sc, sc in next sc; repeat from * 5 more times. Fasten off. (6 scallops: 30 dc + 7 sc = 37 sts)
Why the math works: Each scallop repeat uses exactly 4 sc. Six repeats use 24 sc, plus the first sc, for 25 total. Row 9 has 23 sts, so Border Row 1 adds 1 extra sc at each corner to reach 25. The extra sc also round the corners, so the scallops don’t pull the hem in.
The scallops fan out, so the hem grows from 3.4 in (8.6 cm) to about 3.6 in (9.1 cm). The border adds about 0.5 in (1.3 cm) of height.
Bead (Gold)
Round 1: With gold, 6 sc in MR. Do not join; work in a spiral. (6 sc)
Round 2: 2 sc in each st around. (12 sc)
Rounds 3–4: Sc in each st around. (12 sc)
Stuff firmly with a pinch of fiberfill or thread scraps.
Round 5: Sc2tog 6 times. (6 sts)
Fasten off, leaving a 6 in (15.2 cm) tail. Thread the tail through the front loops of the last 6 sts and pull closed. The bead is about 0.6 in (1.5 cm) across.
Tassel (Gold)
Wrap gold 20 times around the 1.5 in (3.8 cm) cardboard. Slide a 6 in (15.2 cm) strand under the wraps at the top and tie tightly. Cut through the wraps at the bottom.
Wrap another strand 4 times around the tassel 0.25 in (0.6 cm) below the top tie. Knot it and hide the ends inside. Trim the bottom evenly.
Assembly of the Clapper
Join gold with a sl st in the center sc of Border Row 2. This is the 4th of the 7 sc, between scallops 3 and 4. Ch 3 and fasten off, leaving a long tail.
Use the tail to sew the bead to the end of the chain. Pass the tassel’s top tie through the bottom of the bead and knot it inside. The bead should sit about 0.25 in (0.6 cm) below the hem.
Weave in all ends along stitches of the same color.
Final Blocking
- Soak the bell in cool water for 5 minutes. Press out the water in a towel; do not wring.
- Lay it RS up on the blocking mat.
- Pin the top center, then the two top corners 1.2 in (3.0 cm) apart.
- Pin the hem corners 3.4 in (8.6 cm) apart at the base of the scallops.
- Pin the top of each scallop so the hem reaches about 3.6 in (9.1 cm) wide. Keep the scallops evenly rounded.
- Check that the height from the top edge to the scallop tips is 3.5 in (8.9 cm).
- Open each mesh window with a pin tip so the lace bands look even.
- For a stiffer bell, spray lightly with starch.
- Fluff the bow loops and tassel by hand. Let everything dry completely before unpinning.
Final Quality-Control Checklist
- Row 9 has 23 sts and the edging has 47 sc.
- Both side edges slant out evenly, with no steps or bumps.
- Each mesh row shows a neat line of ch-1 windows.
- Border Row 1 has 25 sc; Border Row 2 has 6 even scallops.
- The bead hangs from the exact center of the hem.
- The bow is centered and covers the base of the hanging loop.
- All ends are woven in and invisible from the RS.
- The bell measures 3.6 in (9.1 cm) x 3.5 in (8.9 cm).
Troubleshooting
The bell looks like a rectangle at the top. You missed an edge increase. Each row must start with 2 sts in the first st and end with 2 dc in the last st.
The mesh windows don’t line up. Count the ch-1 sps after each mesh row. Row 2 has 3, Row 4 has 5, Row 6 has 7, Row 8 has 9.
The scallops run out early or late. Recount Border Row 1. It must have 25 sc for 6 even repeats.
The hem ruffles too much. Use a smaller hook for the border only, or work 4 dc per scallop instead of 5.
The hem cups inward. Your sc are too tight. Go up 0.25 mm for Border Row 1.
The side edges wave. Use 2 sc per row end, never 3. Block with pins along a straight line.
The bow flops forward. Wrap the gold center tighter and tack the bow to the bell at both loop ends.
Care
Hand wash in cool water with a mild soap and lay flat to dry, re-pinning if needed. Store flat or hanging, away from direct sunlight, so the red stays bright.

Final Notes
The measurement chain is simple. Row 1 sets the top at 1 in (2.5 cm) with 7 sts. Nine rows at +2 sts per row bring the hem to 23 sts and 3.3 in (8.4 cm) wide by 3 in (7.6 cm) tall. The red edging finishes it at 3.4 in (8.6 cm). The 25-stitch gold border adds 6 scallops, 0.5 in (1.3 cm) of depth and a little flare, for a finished bell of 3.6 in (9.1 cm) x 3.5 in (8.9 cm). The bead and tassel bring the full ornament to about 6 in (15.2 cm).
Check each number as you go and the bell will come out right every time. Happy crocheting!