

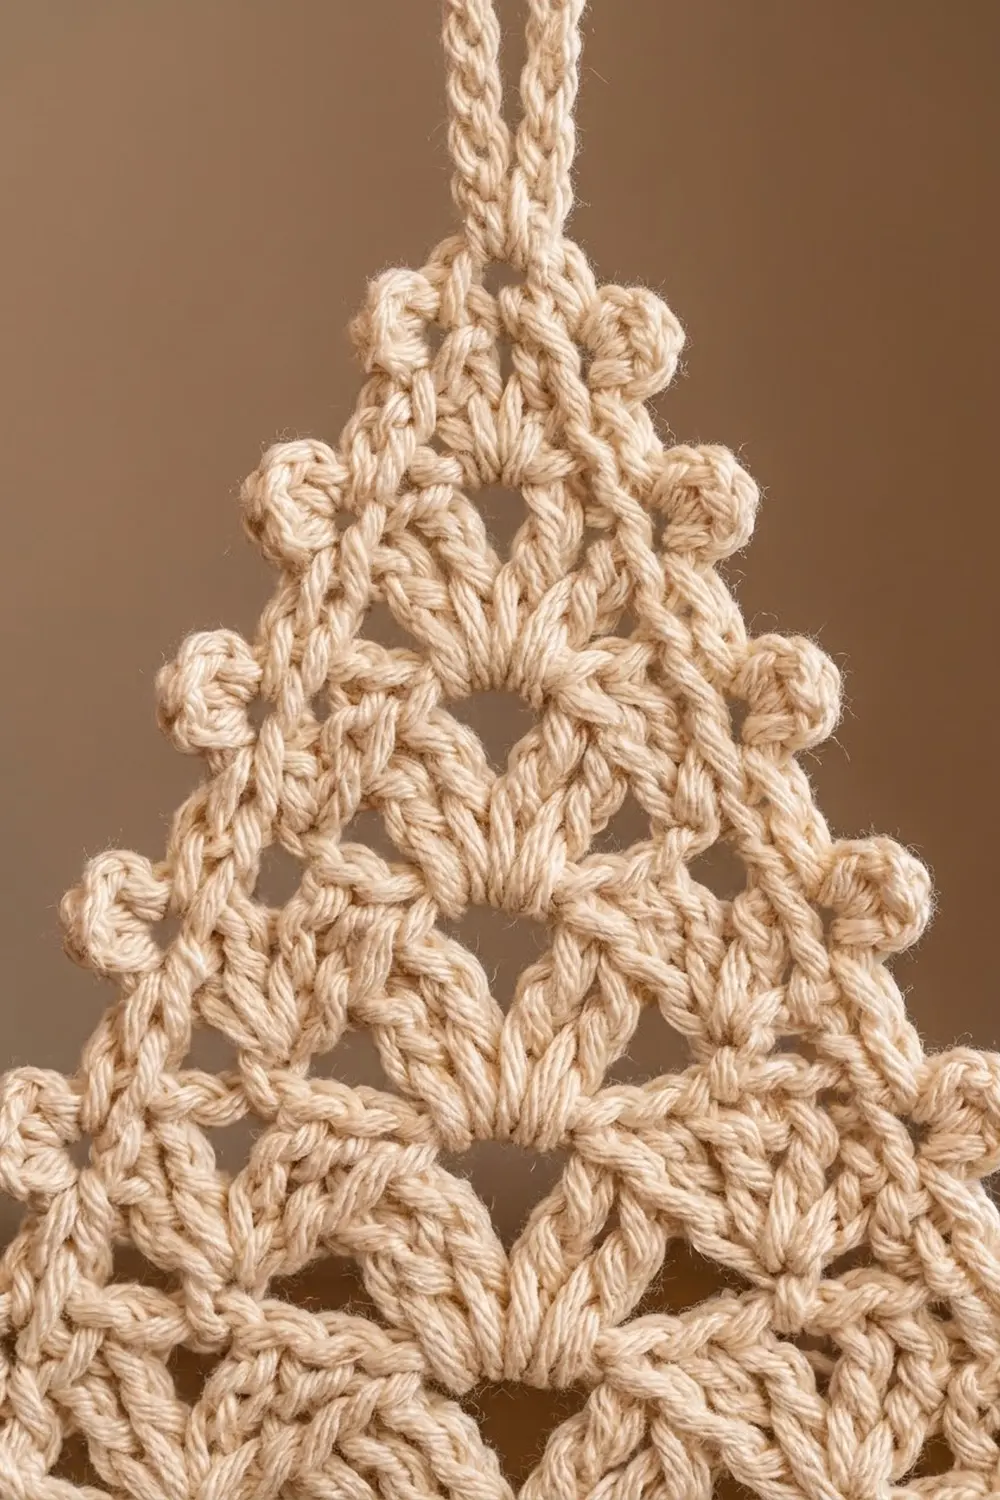
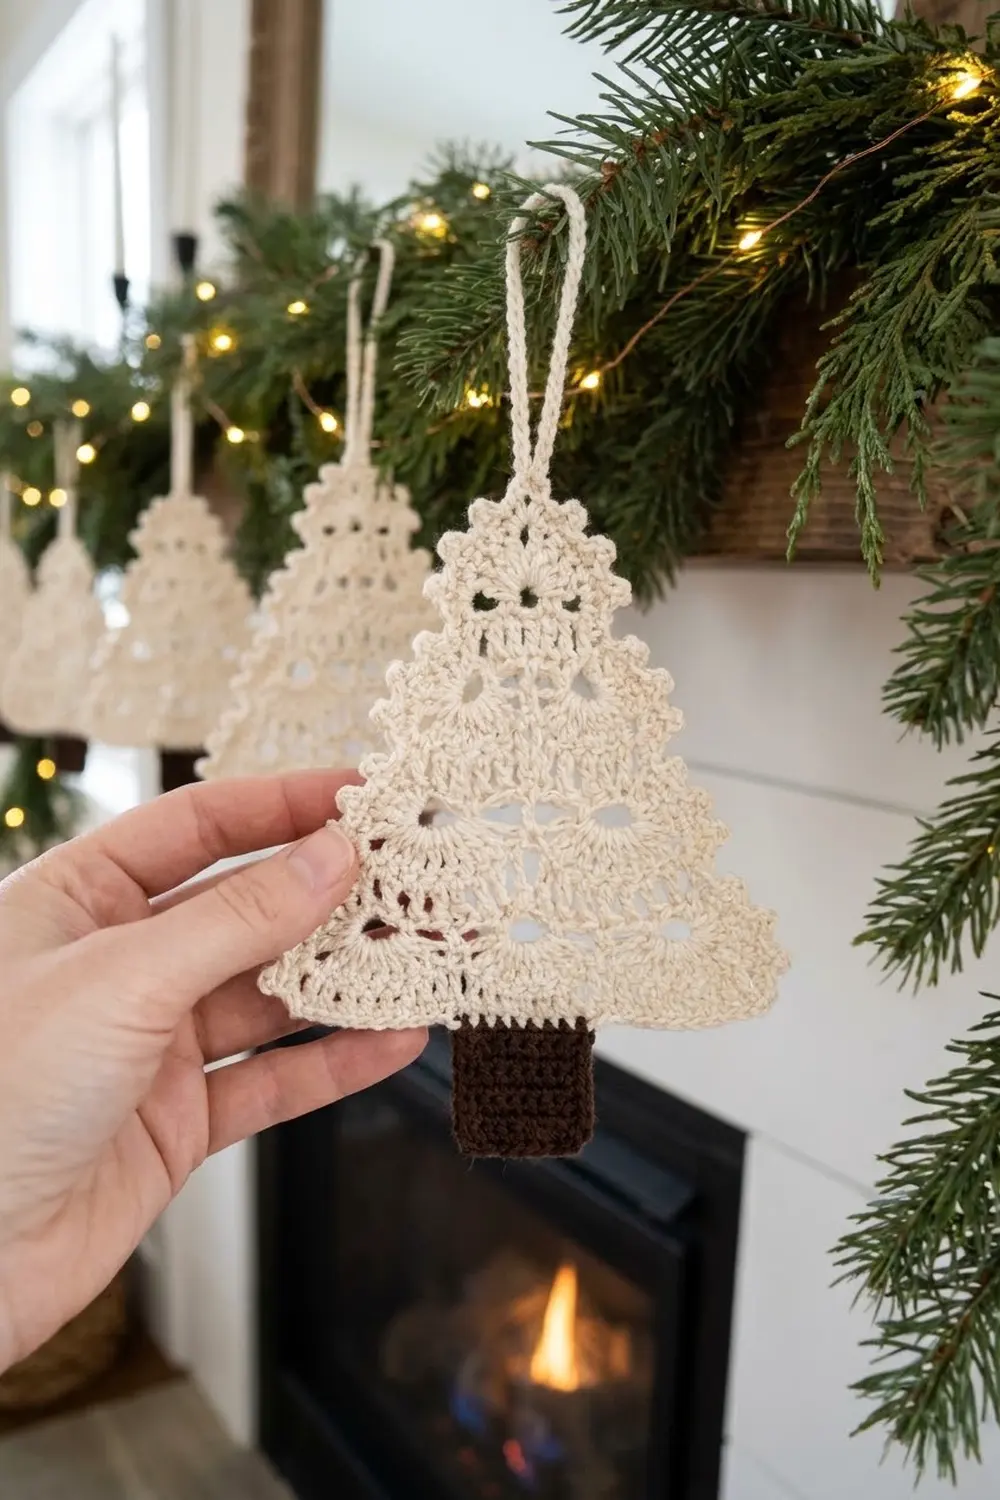
This little lace tree is made for hanging. It is a flat cream triangle made of tiers of open fans. Tiny picot bobbles trim the sides, and a solid chocolate-brown trunk finishes it. It looks delicate, but it’s quick to make and sturdy once blocked.
There are only two colors: a warm cream for the tree and a dark brown for the trunk. The openwork shows up clearly against greenery, candlelight, or a white mantel.
The pattern uses US crochet terms. The finished ornament is about 4.5 in (11.4 cm) wide at the base and 4.7 in (11.9 cm) tall from the bottom of the trunk to the tip. The hanging loop adds about 1.5 in (3.8 cm).
The whole ornament is one piece. You work the tree flat from the bottom up in rows, and it narrows because each fan tier has one fewer fan. One picot border round goes all the way around and forms the hanging loop at the tip. Last, you work the brown trunk directly onto the center of the bottom edge.
Finished Size and Construction
- Finished size: 4.5 in (11.4 cm) wide x 4.7 in (11.9 cm) tall, plus a 1.5 in (3.8 cm) loop
- Skill level: Easy / advanced beginner
- Terminology: US crochet terms
- Yarn weight: DK (light worsted, #3) cotton or cotton blend
- Hook: 3.5 mm (US E-4)
- Number of pieces: 1 (the trunk is worked onto the tree, not sewn on)
- Layout: a single ornament, no joining
- Tree body before border: 4.2 in (10.7 cm) wide x 3.3 in (8.4 cm) tall
- Tree with border: 4.5 in (11.4 cm) wide x 3.7 in (9.4 cm) tall
- Border depth: about 0.2 in (0.5 cm) of single crochet; the picots stick out about 0.3 in (0.8 cm) beyond the body
- Trunk: 1.2 in (3.0 cm) wide x 1.0 in (2.5 cm) tall
Materials
Choose a smooth, tightly plied DK yarn in cotton or a cotton-acrylic blend. Cotton keeps the fan shapes crisp after blocking and doesn’t fuzz. Avoid fluffy or brushed yarns, which fill in the V-shaped holes and hide the lace.
Yarn:
- Cream (Color A): 10 g, about 21 m
- Dark brown (Color B): 3 g, about 6 m
These amounts include a margin for checking gauge and weaving in ends. One ornament uses about 7 g of cream and 2 g of brown.
Tools:
- 3.5 mm (US E-4) crochet hook
- Tapestry needle
- Scissors
- Stitch marker (optional, to mark the RS)
- Rust-proof pins and a foam blocking mat
- Spray bottle of water; light spray starch (optional)
- Ruler or tape measure
Abbreviations (US Terms)
- ch – chain
- sl st – slip stitch
- sc – single crochet
- dc – double crochet
- tr – treble crochet
- sk – skip
- sp(s) – space(s)
- st(s) – stitch(es)
- rep – repeat
- RS / WS – right side / wrong side
Special stitches:
- Fan: 5 dc worked into the same stitch.
- Picot: ch 3, then sl st into the front loop and left leg of the sc you just made. This makes a small round bump.
Gauge and Checkpoints
Gauge: 6 sc = 1 in (2.5 cm); 5 rows of sc = 1 in (2.5 cm). One fan row is 0.4 in (1.0 cm) tall, and one tr spacer row is 0.5 in (1.3 cm) tall.
Because the ornament is a single small piece, it serves as its own test piece. Work Rows 1–4, then measure before you continue.
Checkpoints:
- After Row 1: 25 sc measure 4.2 in (10.7 cm) across.
- After Row 2: each fan plus its sc covers 6 sts, about 1 in (2.5 cm). The four fans still span 4.2 in (10.7 cm).
- After Row 4: the piece is 1.5 in (3.8 cm) tall.
- After Row 8: the body is 3.3 in (8.4 cm) tall and 4.2 in (10.7 cm) wide at the base.
- After the border: 4.5 in (11.4 cm) wide and 3.7 in (9.4 cm) tall.
- After the trunk: 4.7 in (11.9 cm) total height.
If your piece is too big, switch to a 3.25 mm (US D-3) hook. If it’s too small, switch to a 3.75 mm (US F-5) hook. A difference of up to 0.25 in (0.6 cm) in base width is fine. Larger differences change how the fans spread and can make the sides ripple or pull in.
Tree Body
Work in rows with Color A. The fan rows (the even rows) are the RS. Turning chains don’t count as stitches.
Foundation: With Color A, ch 26.
Row 1 (WS): Sc in 2nd ch from hook and in each ch across. Turn. (25 sc)
Row 2 (RS, 4 fans): Ch 1, sc in first sc, sk 2 sc, fan in next sc, sk 2 sc, sc in next sc; rep from * 3 more times. Turn. (4 fans and 5 sc = 25 sts)*
Each repeat uses exactly 6 sts of Row 1: 2 skipped, 1 for the fan, 2 skipped, 1 sc. Four repeats plus the first sc = 4 x 6 + 1 = 25.
Row 3 (WS, spacer): Sl st in each of the first 3 dc of the first fan, which puts you in the center dc. Ch 1, sc in same center dc, ch 3, tr in next sc (between fans), ch 3, sc in center dc of next fan; rep from * 2 more times. Leave the rest of the row unworked. Turn. (4 sc, 3 tr, 6 ch-3 sps)*
The tr stitches make the tall V-shaped openings between the fans. Each sc anchors to the center of a fan, so the row steps in by half a fan on each side.
Row 4 (RS, 3 fans): Ch 1, sc in first sc, sk ch-3 sp, fan in next tr, sk ch-3 sp, sc in next sc; rep from * 2 more times. Turn. (3 fans and 4 sc = 19 sts)*
Each new fan now sits directly above the gap between two fans of Row 2. The piece should be 1.5 in (3.8 cm) tall.
Row 5 (WS, spacer): Sl st in each of the first 3 dc (the center of the first fan). Ch 1, sc in same dc, ch 3, tr in next sc, ch 3, sc in center dc of next fan; rep from * once more. Turn. (3 sc, 2 tr, 4 ch-3 sps)*
Row 6 (RS, 2 fans): Ch 1, sc in first sc, sk ch-3 sp, fan in next tr, sk ch-3 sp, sc in next sc; rep from * once more. Turn. (2 fans and 3 sc = 13 sts)*
Row 7 (WS, spacer): Sl st in each of the first 3 dc. Ch 1, sc in same dc, ch 3, tr in next sc, ch 3, sc in center dc of next fan. Turn. (2 sc, 1 tr, 2 ch-3 sps)
Row 8 (RS, 1 fan): Ch 1, sc in first sc, sk ch-3 sp, fan in tr, sk ch-3 sp, sc in last sc. (1 fan and 2 sc = 7 sts)
Fasten off and weave in the tails. You’ll rejoin Color A at the bottom for the border.
Body height: Row 1 is 0.2 in (0.5 cm). The four fan rows add 1.6 in (4.1 cm), and the three spacer rows add 1.5 in (3.8 cm). That makes 3.3 in (8.4 cm) in total.
Border with Picots and Hanging Loop
The border is one round of sc worked with Color A and the RS facing. It smooths the stepped sides, adds the picot bobbles, and makes the hanging loop.
Border gauge: 6 sc = 1 in (2.5 cm) along the bottom edge. Along the slanted sides, each picot takes up about as much space as 1 sc.
Call the two bottom corners Corner A and Corner B. Hold the tree upside down with the RS facing you; Corner A is the one on your right.
Border Round:
- Corner A: Join Color A in the first free loop of the foundation chain at Corner A. Ch 1, (sc, picot, sc) in same loop.
- Bottom edge: Sc in each of the next 23 free loops. (23 sc)
- Corner B: (sc, picot, sc) in the last free loop.
- First slanted side: Working up the side: 3 sc evenly along the outer half of the Row 2 fan, picot, 2 sc along the Row 3 step, picot, 3 sc along the outer half of the Row 4 fan, picot, 2 sc along the Row 5 step, picot, 3 sc along the outer half of the Row 6 fan, picot, 2 sc along the Row 7 step, picot, 3 sc along the outer half of the Row 8 fan. (18 sc, 6 picots)
- Tip and hanging loop: In the center dc of the Row 8 fan, work (sc, ch 20, sc). (2 sc, 1 ch-20 loop)
- Second slanted side: Working down: 3 sc along the outer half of the Row 8 fan, picot, 2 sc along the Row 7 step, picot, 3 sc along the Row 6 fan, picot, 2 sc along the Row 5 step, picot, 3 sc along the Row 4 fan, picot, 2 sc along the Row 3 step, picot, 3 sc along the Row 2 fan. (18 sc, 6 picots)
- Sl st in the first sc of the round to join. Fasten off and weave in the ends.
Round total: 23 (bottom) + 18 + 18 (sides) + 2 + 2 (bottom corners) + 2 (tip) = 65 sc, plus 14 picots and 1 hanging loop.
Why the math works: The bottom edge has 25 free loops. The two corner loops get 2 sc each and the 23 loops between them get 1 sc each. That keeps the bottom flat at 4.2 in (10.7 cm), and the corner pairs turn each corner cleanly.
Each slanted side is about 3.9 in (9.9 cm) long. The 18 sc plus 6 picots fill about 24 sc-widths. At 6 sc per inch, 24 sc-widths equal 4 in (10.2 cm). That’s just enough to ease around the curved fan edges without stretching or ruffling.
Each side follows [3 sc, picot, 2 sc, picot] three times, then 3 sc: 3 x 5 + 3 = 18 sc and 3 x 2 = 6 picots. Fans always get 3 sc and steps always get 2 sc, so the picots fall at each fan tip and each step.
Trunk
Work the trunk in rows of sc directly into the bottom border, with the tree upside down.
The bottom edge has 23 sc between the corner pairs, and the 12th sc is the center. The trunk uses sc 9 through 15: the center stitch plus 3 on each side.
Row 1: With the RS facing and the tree upside down, join Color B in the 9th bottom-edge sc. Ch 1, sc in same st and in the next 6 sc. Turn. (7 sc)
Rows 2–5: Ch 1, sc in each sc across. Turn. (7 sc)
Fasten off after Row 5. Weave the brown ends into the trunk only, so no brown shows through the cream lace.
Trunk check: 7 sc at 6 sc per inch = 1.2 in (3.0 cm) wide. 5 rows at 5 rows per inch = 1.0 in (2.5 cm) tall. The trunk should be a small square, with 8 bottom-edge sc showing on each side of it.
Final Blocking
- Weave in every end before blocking. Hide cream tails inside the border sc and brown tails inside the trunk.
- Soak the ornament in cool water for 5 minutes. Press out the water gently in a towel; don’t wring it.
- Lay it RS up on your blocking mat.
- Pin the two bottom corners 4.5 in (11.4 cm) apart, keeping the bottom edge straight.
- Pin the tip 3.7 in (9.4 cm) above the center of the bottom edge.
- Pin each picot outward so the slanted sides form two straight lines.
- Open each fan and V-shaped hole with your fingertips, keeping the fans even.
- Pin the trunk square at 1.2 in (3.0 cm) wide x 1.0 in (2.5 cm) tall.
- Lay the hanging loop straight up from the tip.
- For a stiffer ornament, mist lightly with spray starch. Let it dry completely before you unpin it.
Final Quality-Control Checklist
- Row 2 has 4 fans, and Rows 4, 6, and 8 have 3, 2, and 1 fans.
- Every fan has exactly 5 dc.
- Each fan sits centered above a V-shaped gap in the row below.
- The border has 65 sc and 14 picots: 6 on each slanted side and 1 at each bottom corner.
- The hanging loop is centered at the tip and isn’t twisted.
- The trunk is 7 sc wide and centered, with 8 sc showing on each side.
- After blocking, the body measures 4.5 in (11.4 cm) wide x 3.7 in (9.4 cm) tall.
- The total height without the loop is 4.7 in (11.9 cm).
- All ends are woven in securely and out of sight.
Troubleshooting
The bottom edge ruffles. Your fans may be too loose. Use a smaller hook for Row 2 only, and make sure you skip exactly 2 sc on each side of every fan.
The tree is lopsided. Check that each spacer row starts with exactly 3 sl sts and that you leave half of the last fan unworked.
The fans look flat. Keep your dc loops an even height, and work each fan into the tr, not into a ch-3 space.
The sides pull in or curl. The border is too tight. Add 1 sc to each fan section, or work the picots a little looser.
The sides wave. The border is too loose. Work 2 sc instead of 3 along each fan section and keep the same number of picots.
The trunk is off-center. Count the bottom-edge sc again. There should be 8 sc on each side of the trunk.
Care
Hand wash in cool water with mild soap, press dry in a towel, and reshape flat to dry. Store flat or hanging, away from heavy objects that could crush the fans.
Final Notes
The measurements build in a simple chain. Row 1 sets the base at 25 sc, or 4.2 in (10.7 cm). Four fan tiers and three spacer rows bring the body to 3.3 in (8.4 cm) tall. The border adds the picots and the loop, making the tree 4.5 in (11.4 cm) wide x 3.7 in (9.4 cm) tall. The 7-sc trunk adds 1.0 in (2.5 cm), for a finished height of 4.7 in (11.9 cm).
Once your gauge is right, each ornament takes well under an hour. Hang one on the tree or tie it to a gift.
Happy crocheting!