

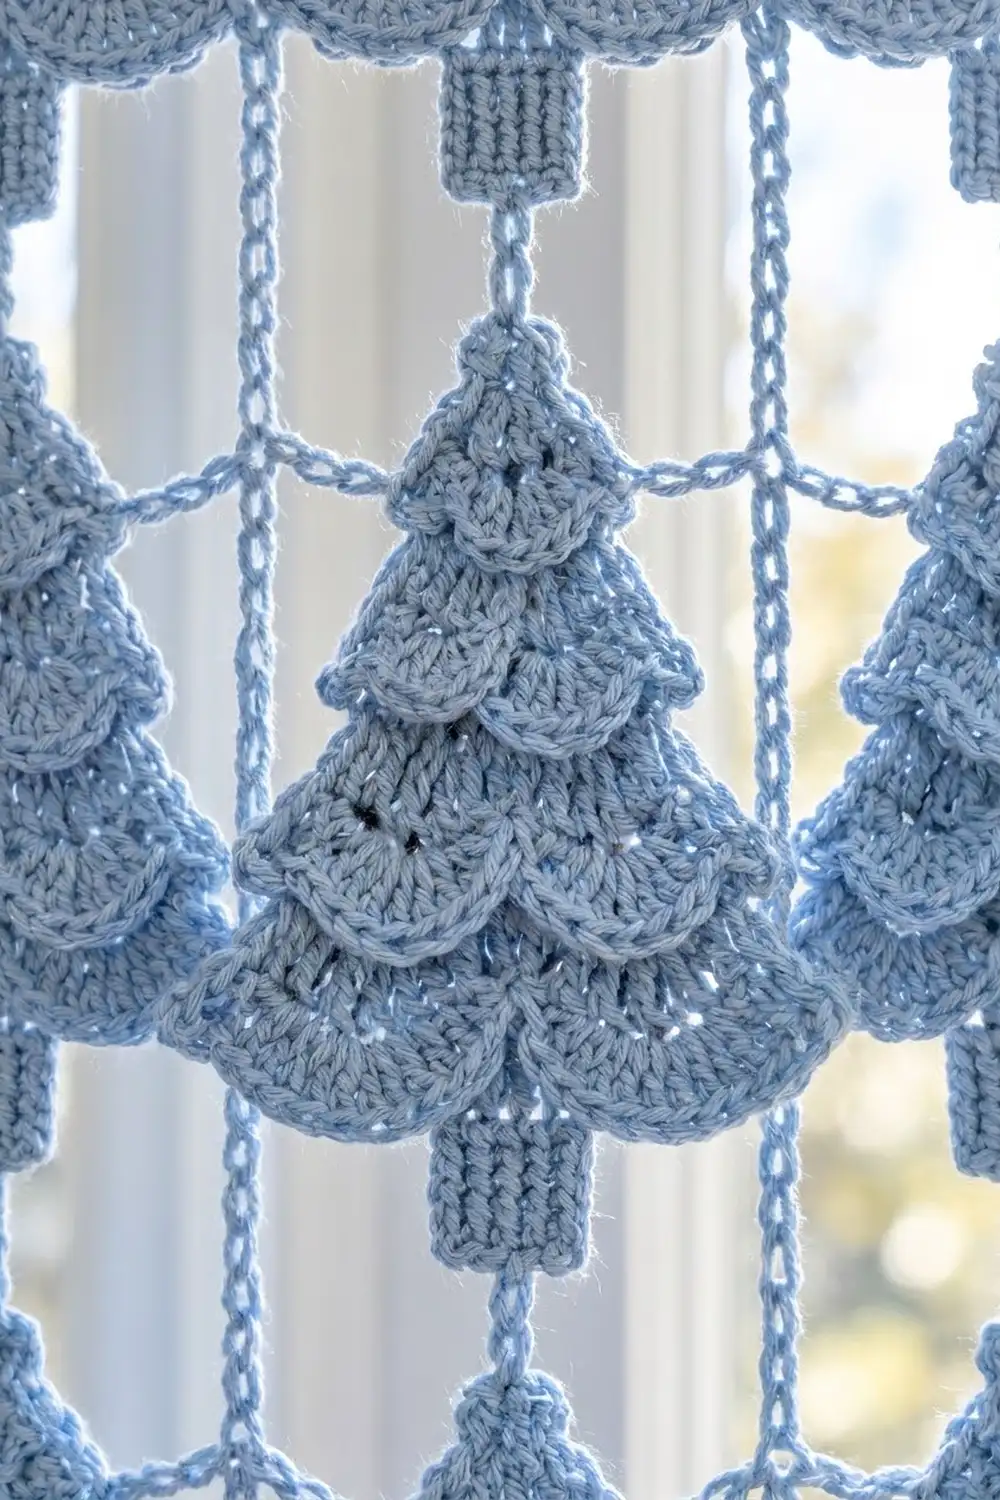
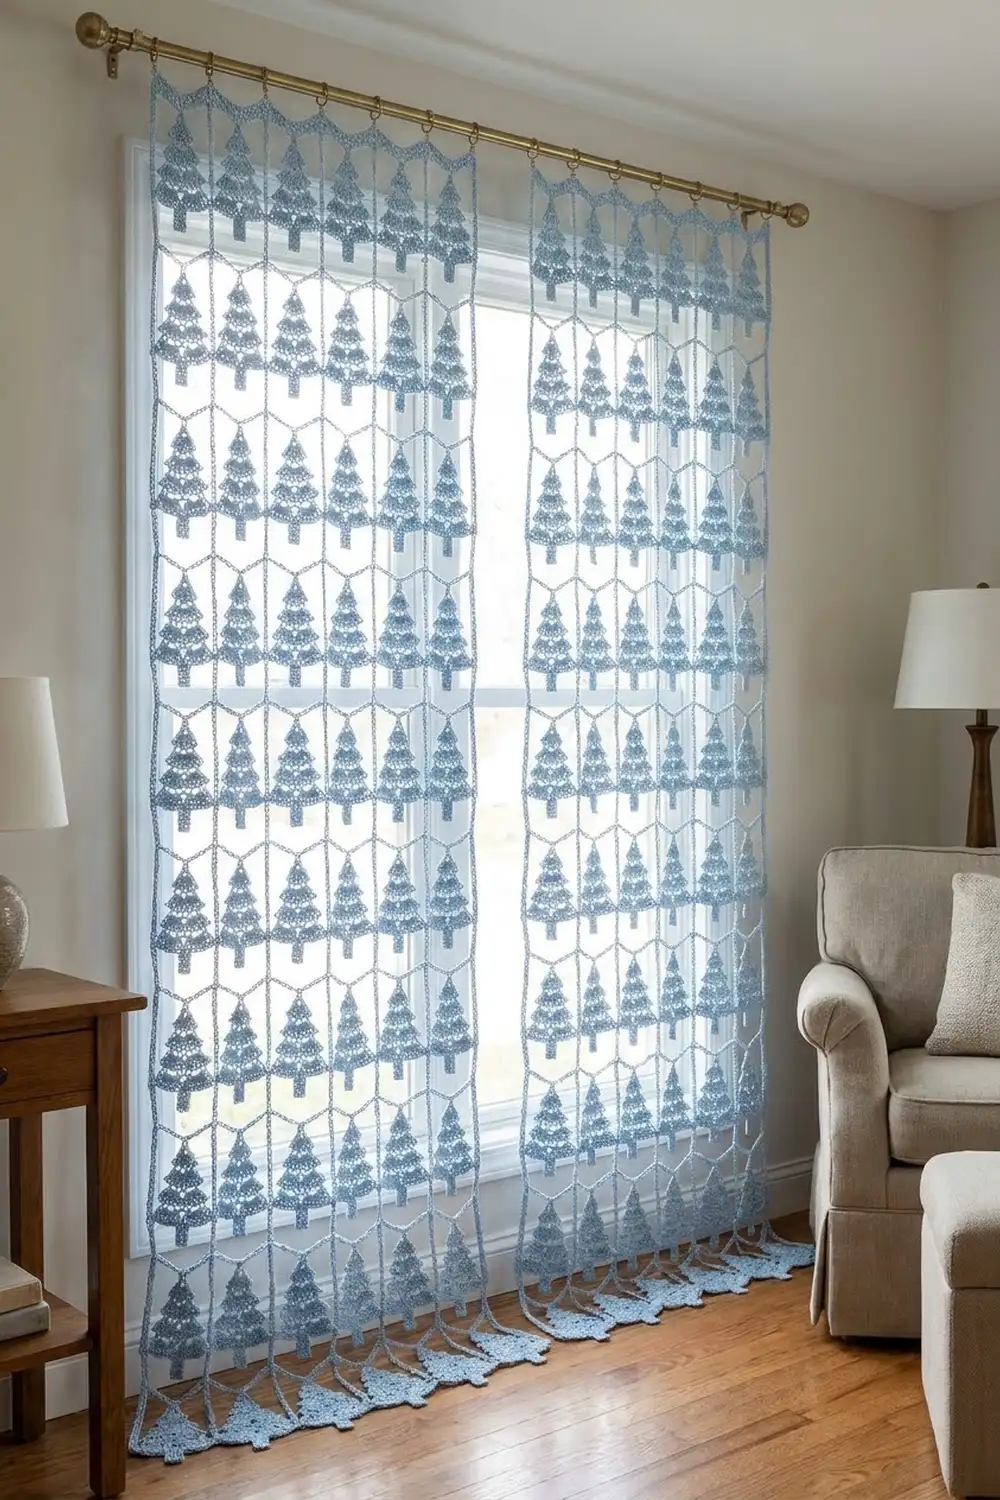
Frosted Pines is a lace curtain made of small layered Christmas trees hung in neat columns. Each tree has four tiers of rounded shell scallops, a short trunk and a pointed tip. Light chain links connect the trees, so the panel stays airy and lets daylight through.
The sample uses one soft powder-blue cotton for a calm, wintry look. The trees look just as good in white, sage or pale gray. The pattern uses US crochet terms.
One finished panel measures 28.2 in (71.6 cm) wide and 82.7 in (210.1 cm) tall, plus hanging tabs. The photo shows a pair, so make two identical panels.
Here’s how it’s built. Each tree is worked top-down in rows of single crochet. Three rows are worked in the back loop only, which leaves free front loops for the shell tiers. The bottom tier finishes the body, and the trunk is worked into the back loops behind it. Trees in each row are joined to each other as you go, and the vertical links are sewn later. A single crochet heading with chain tabs finishes the top of the panel.
Finished Size and Construction
- Finished panel size: 28.2 in (71.6 cm) wide x 82.7 in (210.1 cm) tall, not counting tabs
- Skill level: Intermediate
- Terminology: US
- Yarn weight: DK (3), cotton or cotton blend
- Hook: 3.5 mm (E-4)
- Number of pieces: 84 tree motifs per panel, 168 for the pair
- Layout: 6 columns x 14 rows per panel
- Single tree size: 3.8 in (9.7 cm) wide x 4.8 in (12.2 cm) tall, from tip to bottom of trunk
- Size before border: 28.2 in (71.6 cm) x 81.5 in (207.0 cm)
- Border (heading) depth: 1.2 in (3.0 cm), plus 2.2 in (5.6 cm) tab loops
Materials
Use a smooth, mercerized or combed DK cotton with good stitch definition. Cotton keeps the scallops crisp and hangs straight. Avoid fuzzy or very stretchy yarns, because a long curtain will grow under its own weight.
- Powder blue: 700 g / about 1,610 m per panel. That’s 1,400 g / about 3,220 m for the pair, or roughly fourteen 50 g balls per panel.
These quantities include about a 15% margin. One tree uses about 7 g (16 m). The heading uses about 25 g (58 m) per panel.
Tools:
– 3.5 mm (E-4) crochet hook
– Tapestry needle
– Stitch markers
– Rust-proof pins and a blocking surface
– Spray bottle
– Tape measure
– Small kitchen scale (optional, for checking yarn use)
Abbreviations (US Terms)
- ch – chain
- sl st – slip stitch
- sc – single crochet
- tr – treble crochet
- st(s) – stitch(es)
- BLO – back loop only
- FLO – front loop only
- RS / WS – right side / wrong side
Special stitch – Shell: work 5 tr into the same stitch or loop.
Scallop repeat: sc in a loop, skip 1 loop, Shell in the next loop, skip 1 loop. Each repeat uses 4 loops, and you finish every tier with 1 sc in the last loop. A tier needs (4 x shells) + 1 loops.
Gauge and Checkpoints
Gauge: 18 sc and 20 rows = 4 in (10.2 cm) in sc worked in rows. The chain links work out to 5 ch = 1.1 in (2.8 cm).
Make one complete tree before you start a whole row. Measure it after blocking lightly with steam or a spray of water.
Checkpoints:
– After Row 4: 5 sts = 1.1 in (2.8 cm) wide
– After Row 8: 9 sts = 2 in (5.1 cm) wide, 1.6 in (4.1 cm) tall
– After Row 12: 13 sts = 2.9 in (7.4 cm) wide
– After Row 16: 17 sts = 3.8 in (9.7 cm) wide, 3.2 in (8.1 cm) tall
– After the trunk: 4.8 in (12.2 cm) total height
If your tree comes out bigger, go down half a hook size. If it’s smaller, go up half a size. Even a 0.2 in (0.5 cm) difference per tree adds up to 1.2 in (3.0 cm) across the width of the panel and almost 3 in (7.6 cm) down its length, so it’s worth matching gauge.
Tree Motif (Make 84 per Panel)
Odd rows are RS rows. Use a stitch marker to mark the RS of Row 1.
Body
Row 1 (RS): Ch 2, sc in 2nd ch from hook, turn. (1 sc)
Row 2 (WS): Ch 1, 3 sc in the sc, turn. (3 sc)
Row 3: Ch 1, sc in each st across, turn. (3 sc)
Row 4: Ch 1, 2 sc in first st, sc in next st, 2 sc in last st, turn. (5 sc)
Row 5 (BLO row): Ch 1, sc in BLO of each st across, turn. (5 sc) The 5 front loops of Row 4 are now free on the RS. They are for Tier A.
Row 6: Ch 1, 2 sc in first st, sc in each st to last st, 2 sc in last st, turn. (7 sc)
Row 7: Ch 1, sc in each st across, turn. (7 sc)
Row 8: Repeat Row 6. (9 sc)
Row 9 (BLO row): Ch 1, sc in BLO of each st across, turn. (9 sc) This leaves 9 free front loops on Row 8 for Tier B.
Row 10: Repeat Row 6. (11 sc)
Row 11: Repeat Row 7. (11 sc)
Row 12: Repeat Row 6. (13 sc)
Row 13 (BLO row): Ch 1, sc in BLO of each st across, turn. (13 sc) This leaves 13 free front loops on Row 12 for Tier C.
Row 14: Repeat Row 6. (15 sc)
Row 15: Repeat Row 7. (15 sc)
Row 16 (WS): Repeat Row 6. (17 sc) For the first tree in each row, turn. For every other tree, work the side link first (see Joining) and then turn.
Tier D (Bottom Scallops)
Row 17 (RS): Ch 1, working in FLO of Row 16: sc in first loop, skip 1, Shell in next loop, skip 1, sc in next loop. Repeat from * 3 more times. You now have 4 Shells and 5 sc (25 sts on 17 loops). Fasten off.
The back loops of Row 16 are still free behind Tier D.
Trunk
Row T1: Hold the tree with the RS facing and the tip pointing up. Count to the 7th st of Row 16 from either end, and join the yarn in its remaining back loop. Ch 1, sc in BLO of the same st and the next 4 sts, turn. (5 sc) That puts the trunk on the center 5 sts (sts 7–11).
Rows T2–T8: Ch 1, sc in each st across, turn. (5 sc)
Stem link: Ch 1, sl st in the first 3 sts so you end at the center stitch. Ch 5, then fasten off with an 8 in (20.3 cm) tail. For trees in the bottom row of the panel, skip the link: fasten off after T8 and weave in the end.
The trunk is 1.1 in (2.8 cm) wide and 1.6 in (4.1 cm) long. Tier D covers the top 0.7 in (1.8 cm) of it.
Tiers A, B and C
Work these after the body. Hold the tree with the RS facing and the tip pointing up. Work from right to left.
Tier A: Join the yarn in the first free front loop of Row 4. Sc in the same loop, skip 1, Shell in next loop, skip 1, sc in last loop. (1 Shell, 2 sc; 7 sts on 5 loops) Fasten off.
Tier B: Join in the first free front loop of Row 8. Sc in the same loop, skip 1, Shell in next, skip 1, sc in next. Repeat from * once more. (2 Shells, 3 sc; 13 sts on 9 loops) Fasten off.
Tier C: Join in the first free front loop of Row 12. Work as for Tier B, but repeat from * 2 more times. (3 Shells, 4 sc; 19 sts on 13 loops) Fasten off.
Fold each tier down toward the trunk. Each Shell is 0.7 in (1.8 cm) deep, and there are 0.8 in (2.0 cm) between tier rows, so each tier reaches the base of the next one and overlaps it once blocked. Weave in all ends except the stem-link tails.
Make All Pieces
Each panel has 84 trees, all in powder blue. For the pair, make 168. Trees in Rows 1–13 of the panel get a stem link (78 per panel). The 6 trees in Row 14 do not.
Column:  6    5    4    3    2    1
Row 1:   T -- T -- T -- T -- T -- T
         |    |    |    |    |    |
Row 2:   T -- T -- T -- T -- T -- T
  ...    (repeat for 14 rows)
Row 14:  T -- T -- T -- T -- T -- T   (no stem links)
In the grid, T is one tree, — is a 5-ch side link and | is a 5-ch stem link. The grid is shown from the RS. Make each row of trees starting with Column 1, on the right.
Joining
Side links (join-as-you-go): Make the first tree of a row (Column 1) as written. For each new tree, finish Row 16. Your hook is now at the RS-right corner. Ch 5, then sl st into the first st of Row 16 of the tree on the right, which is its left corner as seen from the RS. Ch 5, sl st in the last sc of the new tree’s Row 16, turn, and continue with Row 17.
That makes a doubled 5-ch bar that joins corner stitch to corner stitch. The link chains don’t count as stitches, so Row 16 still has 17 sc.
Stem links: Lay two finished rows of trees RS up. Thread the stem-link tail of each tree onto the needle. Pass it through both loops of the Row 1 tip sc of the tree directly below, then back through the last ch. Repeat once and weave the tail in. That joins the stem’s last chain to the tip stitch.
Tension: Keep the link chains the same size as your sc. If they’re tight, the panel puckers. If they’re loose, it sags. Let the trees hang straight without stretching them as you sew.
Size checkpoint: One joined row should measure 6 x 17 sts + 5 x 5 ch = 127 sts = 28.2 in (71.6 cm) across. Two joined rows should measure 4.8 + 1.1 + 4.8 = 10.7 in (27.2 cm) tall. The full lattice is 14 x 4.8 in + 13 x 1.1 in = 67.2 + 14.3 = 81.5 in (207.0 cm).
Border (Top Heading)
The heading is worked only across the top. The sides and bottom stay as open lattice, like the curtain in the photo. Work the heading at the same 18 sc = 4 in (10.2 cm) gauge.
Row 1 (RS): Make a slip knot. Ch 8, sc in the tip st of the Row 1 tree in Column 1. Ch 21, sc in the tip of the next tree. Repeat from * across, ending at Column 6. Ch 8 and turn. (127 sts: 8 ch + 6 sc + 5 x 21 ch + 8 ch)
Here’s why the math works. Each tree is 17 sts wide with its tip on the center (9th) st, so it takes up 8 sts + tip + 8 sts. Each 21-ch span is 8 + 5 + 8: half a tree, one 5-st gap, then half a tree. So the row is 6 trees x 17 + 5 gaps x 5 = 127. No extra stitches are added at the seams.
Row 2: Ch 1, sc in each ch and sc across, turn. (127 sc)
Rows 3–5: Ch 1, sc in each st across, turn. (127 sc)
Row 6 (tabs): Ch 1, sc in first st, ch 20, sl st in that sc. Sc in next 9 sts, ch 20, sl st in last sc made. Repeat from * 13 more times. (127 sc, 15 tab loops) Fasten off.
The tabs sit 2 in (5.1 cm) apart: 1 + 14 x 9 = 127. Each 20-ch loop is 4.4 in (11.2 cm) of chain, which folds into a 2.2 in (5.6 cm) loop for the rod. With the 6 heading rows, the panel is 81.5 + 1.2 = 82.7 in (210.1 cm) tall.
Final Blocking
- Weave in any remaining ends along the sc rows, never through the link chains.
- Lay the panel RS up on towels or blocking mats, working one section of about 3–4 rows at a time.
- Spray each section until it’s damp but not soaking.
- Pin each tree at its tip, at both Row 16 corners and at the bottom of its trunk. Check that each tree is 3.8 in (9.7 cm) wide.
- Smooth every tier down so the Shells overlap the tier below. Open each Shell into a round fan.
- Straighten the links into 1.1 in (2.8 cm) gaps.
- Let each section dry completely before you move along the panel.
Final Quality-Control Checklist
- Every tree has 4 tiers with 1, 2, 3 and 4 Shells
- The trunks are centered on sts 7–11
- All the trees in a row are joined at their Row 16 corners
- Every vertical gap is 1.1 in (2.8 cm), and every column hangs straight
- The heading counts 127 sc and has 15 tabs
- The panel is 28.2 in (71.6 cm) x 82.7 in (210.1 cm)
- Both panels match within 0.5 in (1.3 cm)
Troubleshooting
- The tiers flip upward: Steam them and pin them pointing down. Check that the BLO rows were RS rows.
- The tree is lopsided: You missed an increase. Rows 6, 8, 10, 12, 14 and 16 each add exactly 2 sts.
- The Shells don’t fit the tier: Count the free loops. You need 5, 9, 13 and 17.
- The trunk is off center: Re-count to the 7th st from the edge before you join.
- The panel leans: All the trees in a row weren’t made right to left. Redo the side links for that row.
- The panel stretches when it hangs: Your chain tension is too loose. Rework the links one ch shorter.
Care
Hand wash in cool water with a mild detergent and press the water out gently. Dry flat and re-pin the tiers if needed. Don’t hang the curtain while it’s wet.
Final Notes
Everything comes back to the measurement chain. If you match gauge, each tree is 3.8 x 4.8 in (9.7 x 12.2 cm). Six trees with 5-ch links make 127 sts, or 28.2 in (71.6 cm). Fourteen rows with 1.1 in (2.8 cm) stems make 81.5 in (207.0 cm). The 1.2 in (3.0 cm) heading brings the panel to 82.7 in (210.1 cm). Check each step and both panels will hang evenly.
Happy crocheting!