

These curtain panels are made of square daisy motifs. Each motif has a deep red center, a ring of twelve oval cream petals, and a sage green lacy frame. Tall stitches fan into each corner of the frame, and a band of mesh windows runs around the outside edge. Once the motifs are joined, the frames meet in a green lattice of fans and small diamond openings, so the daisies look like they are floating in a trellis.
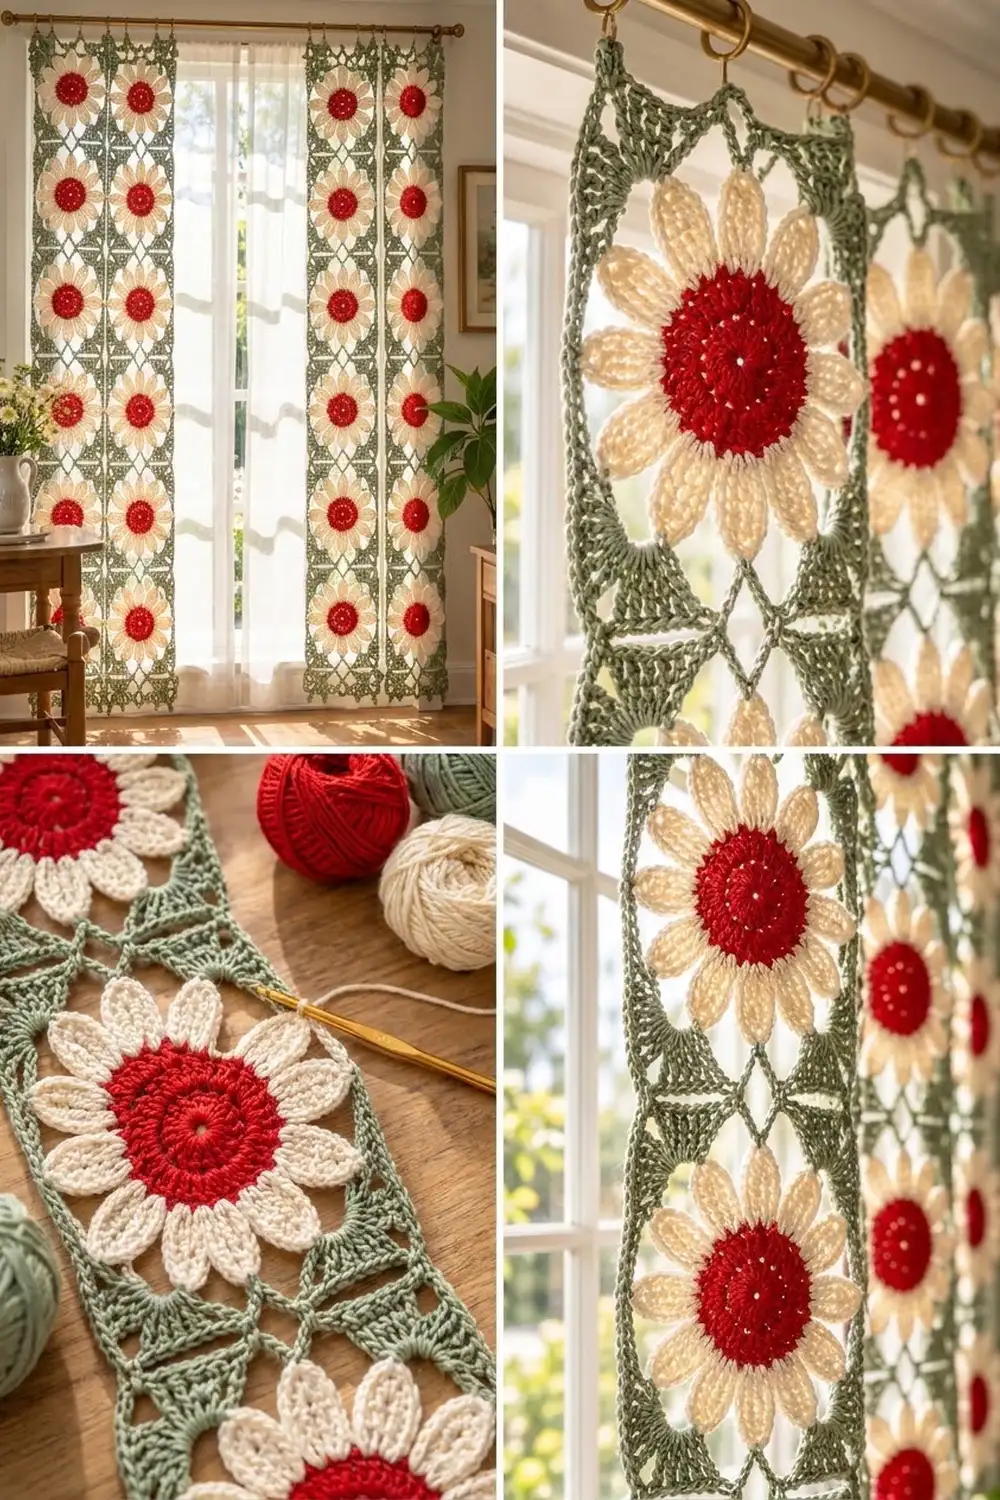
The pattern makes a pair of panels. Each panel is 2 motifs wide and 6 motifs tall, has a simple green border, and has five hanging tabs across the top. Hang them from a curtain rod and the light comes through the mesh and the gaps around the petals. The look is cottage and vintage garden, and it works well in a kitchen, a sunroom, or a bedroom window.
The pattern uses US crochet terms. One motif measures 8 in (20.3 cm) square. Each finished panel measures 17 in (43.2 cm) wide by 49 in (124.5 cm) tall, not counting the tabs.
Here is how it goes together. You work each motif in the round from the center out, in three colors. Next you join the motifs with a flat slip stitch seam, stitch to stitch. Then you add two rounds of border and the tabs, and you block the panel.
Finished Size and Construction
- Finished panel size: 17 in x 49 in (43.2 cm x 124.5 cm), plus tabs
- Skill level: Intermediate
- Terminology: US crochet terms
- Yarn weight: Worsted (#4), cotton or cotton blend
- Hook: 5.0 mm (H-8)
- Number of pieces: 24 motifs total (12 per panel, 2 panels)
- Layout: 2 motifs wide x 6 motifs tall per panel
- Motif size: 8 in (20.3 cm) square
- Panel size before border: 16 in x 48 in (40.6 cm x 121.9 cm)
- Border depth: 0.5 in (1.3 cm) on each side
Materials
Choose a smooth mercerized or matte cotton in worsted weight. Cotton shows the petal ridges and the mesh clearly, it does not stretch out much while hanging, and it stands up to sun and washing. Pick a sage that is soft and muted so the red and cream stand out.
- Red (center): 150 g, about 285 m
- Cream (petals): 200 g, about 380 m
- Sage green (frame, joining, border, tabs): 400 g, about 760 m
These amounts are for both panels and include a margin of roughly 15–20% for gauge differences and swatching.
Tools:
- 5.0 mm (H-8) crochet hook
- Tapestry needle
- Stitch markers
- Scissors
- Measuring tape
- Blocking mats and rust-proof pins
- Spray bottle
Abbreviations (US Terms)
- ch – chain
- sl st – slip stitch
- sc – single crochet
- hdc – half double crochet
- dc – double crochet
- tr – treble crochet (yo twice)
- dtr – double treble crochet (yo three times)
- sk – skip
- sp(s) – space(s)
- st(s) – stitch(es)
- BLO – back loop only
- RS / WS – right side / wrong side
Special stitch – Petal: Ch 7. Working back along the chain toward the center, sc in 2nd ch from hook, hdc in next ch, dc in next 2 ch, hdc in next ch, sc in last ch (6 sts). The skipped ch is the petal tip.
Gauge and Checkpoints
Gauge in this pattern is checked on a motif, not on a flat swatch. Make one full motif first and block it before you start the rest.
- After Round 3: red center is 3 in (7.6 cm) across.
- After Round 5: flower is 5.25 in (13.3 cm) across, petal tip to petal tip.
- After Round 7: frame is about 6.5 in (16.5 cm) across, side to side.
- After Round 9: motif is 8 in (20.3 cm) square, with 27 sc per side. That works out to about 3.4 sc per inch along the edge.
Motif too big? Go down to a 4.5 mm hook. Motif too small? Go up to a 5.5 mm hook. If only the flower is off, change hooks for Rounds 1–5 only. All 24 motifs need to be within 0.25 in (0.6 cm) of each other, or the seams will pucker.
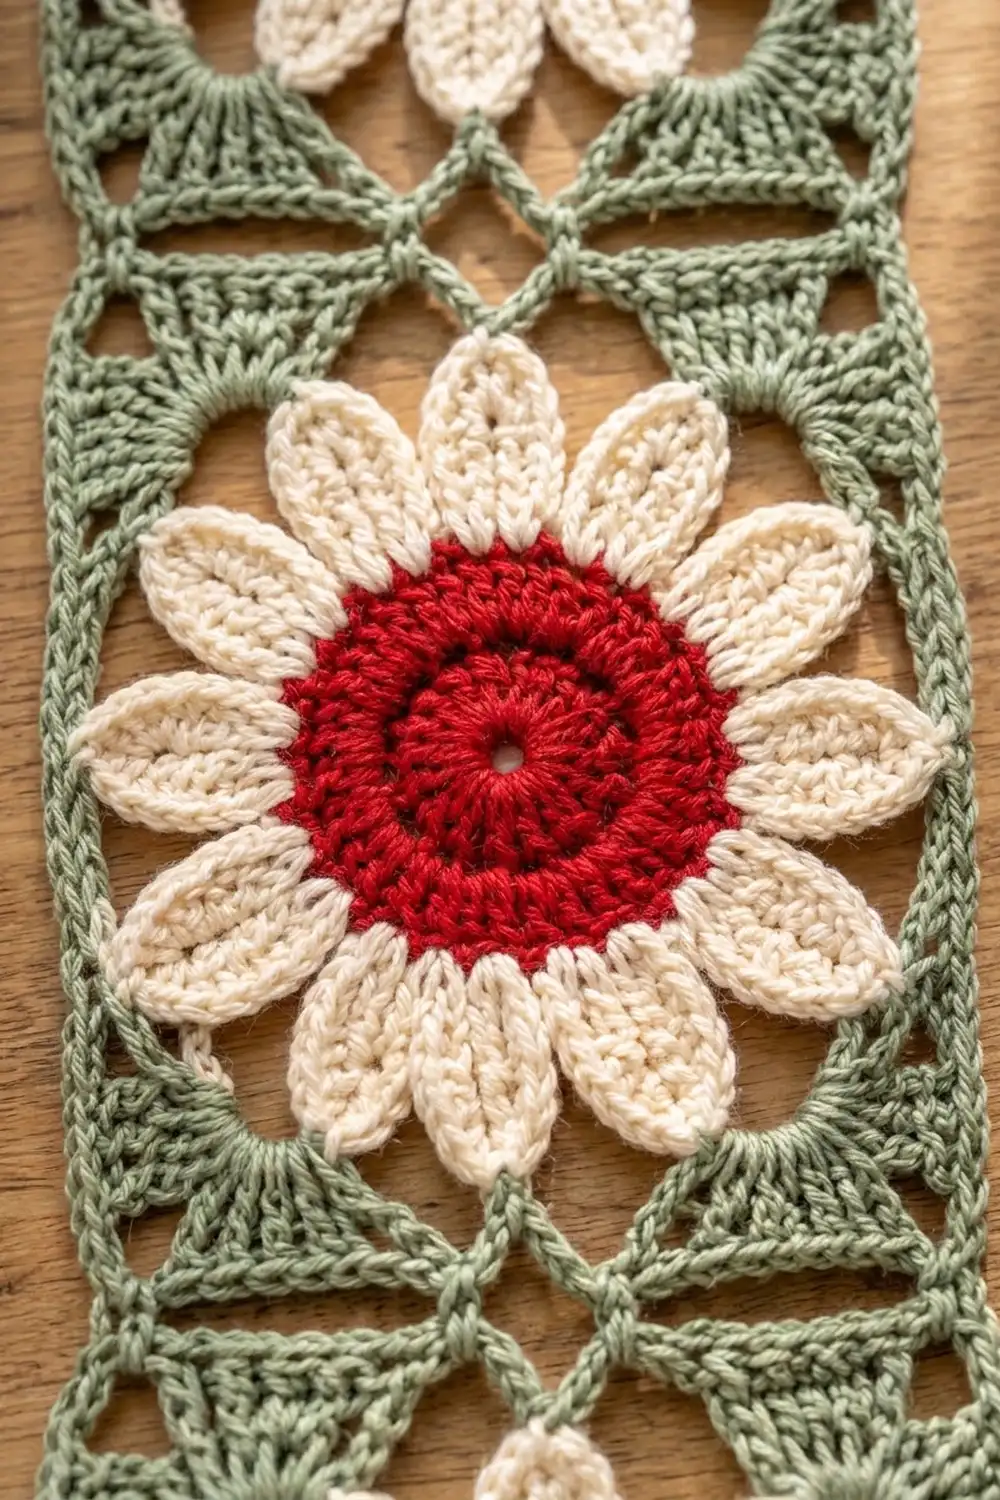
Motif (Make 24)
Center (Red)
Round 1: Make a magic ring. Ch 3 (counts as dc), then 11 dc in the ring. Join with sl st to the top of ch-3. Pull the ring tight but leave a small hole in the middle. (12 dc)
Round 2: Ch 3 (counts as dc), dc in the same st. Work 2 dc in each st around. Join. (24 dc)
Round 3: Ch 3 (counts as dc), 2 dc in next st. Dc in next st, 2 dc in next st; repeat from * around. Join. (36 dc)
Fasten off red. Check that the center measures 3 in (7.6 cm).
Petals (Cream)
Round 4: Join cream with sl st in any st of Round 3. Petal, sk next 2 sts, sl st in next st; repeat from * 11 more times. The last sl st goes into the joining st. (12 petals; each repeat uses 3 sts of Round 3, and 12 x 3 = 36)
Round 5 (outline): Do not fasten off. For each petal: work 6 sc evenly up the first edge, 3 sc in the tip ch, 6 sc down the second edge, then sl st in the sl st between petals. Work the edge that runs along the foundation chain into its free loops, and the other edge into the petal sts. (15 sc per petal, 180 sc total, plus 12 sl sts)
This round adds the raised spine down the middle of each oval petal. The center sc of each 3-sc tip group is the tip st. Fasten off cream. The flower should measure 5.25 in (13.3 cm) across.
Frame (Sage Green)
Round 6: Join green with sc in the tip st of any petal. Ch 5, sc in tip st of next petal; repeat from * 10 more times, ch 5, and join with sl st to the first sc. (12 sc, 12 ch-5 sps)
Number the ch-5 sps 1–12, starting with the sp right after the joining sc. Sps 1, 4, 7, and 10 are the corner sps. The rest are side sps.
Round 7: Sl st into sp 1. Ch 4 (counts as tr), then work (tr, 2 dtr, ch 3, 2 dtr, 2 tr) in the same sp. Dc in next sc, 4 dc in next sp, dc in next sc, 4 dc in next sp, dc in next sc, then (2 tr, 2 dtr, ch 3, 2 dtr, 2 tr) in next corner sp; repeat from * 2 more times. Dc in next sc, 4 dc in next sp, dc in next sc, 4 dc in next sp, dc in next sc. Join to the top of ch-4.
Per side: 2 tr + 2 dtr (half corner) + 11 dc (3 dc in the sc’s + 8 dc in the sps) + 2 dtr + 2 tr (half corner) = 19 sts. Total: 76 sts and 4 corner ch-3 sps.
The tall stitches packed into each corner sp make the triangular fans that fill the space between the round flower and the square corner.
Round 8 (mesh): Sl st in the next 3 sts and into the corner ch-3 sp. Ch 3 (counts as dc), then (dc, ch 3, 2 dc) in the same sp. Dc in the first st of the side, then (ch 1, sk 1, dc in next st) 9 times, then (2 dc, ch 3, 2 dc) in the next corner sp. Repeat from * 3 more times, leaving off the last corner group. Join to the top of ch-3.
Per side: 2 corner dc + 19 positions (10 dc and 9 ch-1 sps) + 2 corner dc = 23 sts and sps, plus 4 corner ch-3 sps. The 9 ch-1 sps on each side are the small mesh windows.
Round 9 (edge): Ch 1. Sc in each dc and each ch-1 sp, and work 3 sc in each corner ch-3 sp. Join to the first sc. The middle sc of each 3-sc group is the corner st.
Per side, including both corner sts: 1 + 1 + 23 + 1 + 1 = 27 sc. Total: (4 x 23) + (4 x 3) = 104 sc. Check: 4 x 27 = 108, minus the 4 corner sts that are shared by two sides, = 104.
Fasten off and weave in the ends. The motif measures 8 in (20.3 cm) square.
Make All Pieces
- Per panel: 12 motifs
- Both panels: 24 motifs
All motifs are the same, so each color is used the same way in every one: red for Rounds 1–3, cream for Rounds 4–5, and green for Rounds 6–9. Block all 24 motifs to 8 in (20.3 cm) square before you join them.
Layout per panel (A = daisy motif):
Row 1:  A  A
Row 2:  A  A
Row 3:  A  A
Row 4:  A  A
Row 5:  A  A
Row 6:  A  A
Joining
Method: Flat slip stitch join through the BLO, in green, with RS facing up.
- Pairs: Lay two motifs side by side with RS up. Sl st through the inside back loop of each motif together, starting at one corner st and ending at the other. That is 27 sts per motif, matched 1 to 1, so 27 sl sts. Make 6 pairs.
- Rows: Line up two pairs along their long 16 in (40.6 cm) edge. Join 27 sts on the first motif, then the next 27 sts on the second motif, for 54 sl sts per seam. Where the corner sts meet the vertical seam, join them together and do not add any extra sts. Make 5 seams like this.
Work one sl st per pair of sts, and never skip or double a st. Keep your tension loose enough that each sl st is the same length as a sc. If the seam pulls in, go up a hook size for the joining only.
Checkpoint: The joined panel lies flat at 16 in x 48 in (40.6 cm x 121.9 cm). At every corner where four motifs meet, you will see a small diamond opening.
Border
Border gauge: The border sc must match the motif edge, about 3.4 sc per inch. Each sc round adds about 0.25 in (0.6 cm) of depth.
Starting counts per side (each motif side is 27 sts, including its corners):
- Top and bottom: 2 x 27 = 54 sts
- Long sides: 6 x 27 = 162 sts
- Total around: 2 x (54 + 162) – 4 shared panel corners = 428 sts
At each seam, both corner sts from the two motifs stay as separate edge sts. They are already counted in the 54 and 162, so you add nothing at the seams.
Border Round 1: With RS facing, join green in any st. Sc in each st, and work 3 sc in each of the 4 panel corner sts. Join.
Per side, including the new corners: top/bottom 56, long sides 164. Total: 436 sc (428 + 8).
Border Round 2: Ch 1. Sc in each st, and work 3 sc in each corner st. Join.
Per side: top/bottom 58, long sides 166. Total: 444 sc (436 + 8). Fasten off.
Why the math works: All of the new stitches go only at the four corners, where the edge turns. Along each straight side the sc count stays the same as the edge count, one to one. That keeps the border at the same gauge as the motifs, so the edges stay flat and do not ruffle. Two rounds add 0.5 in (1.3 cm) all around, for a panel of 17 in x 49 in (43.2 cm x 124.5 cm).
Hanging Tabs (top edge only)
The 58 sts across the top split into 5 tabs of 6 sts each with 4 gaps of 7 sts each: (5 x 6) + (4 x 7) = 58.
For each tab, join green in the first st of the tab. Work sc in each of the 6 sts. Then ch 1, turn, and sc in each of the 6 sts. Repeat from * until you have 12 rows, about 3 in (7.6 cm). Fasten off and leave a long tail. Fold the tab to the WS and sew it to Border Round 1. This makes a loop about 1.5 in (3.8 cm) deep. Each tab is about 1.75 in (4.4 cm) wide.
Final Blocking
- Weave in all ends, keeping each end within its own color.
- Lay the panel on blocking mats, RS up.
- Pin it to 17 in x 49 in (43.2 cm x 124.5 cm). Check that each motif is 8 in (20.3 cm) square.
- Pin out each corner fan, and pin each petal into a smooth oval.
- Spray until the panel is damp but not soaked, and pat the mesh open.
- Let it dry completely before you unpin, at least 24 hours.
Final Quality-Control Checklist
- Each motif has 12 petals, 27 sc per side, and 104 sc around.
- All motifs are 8 in (20.3 cm) square, give or take 0.25 in (0.6 cm).
- Every seam is stitch to stitch: 27 per motif side, with no extra sts.
- The border has 58 / 166 sts per side and 444 sts total.
- There are 5 tabs evenly spaced across the top, each the same length.
- The panel lies flat at 17 in x 49 in (43.2 cm x 124.5 cm).
- No ends show through the mesh from the RS.
Troubleshooting
- Petals cup or curl: Your Round 5 outline is too tight. Go up 0.5 mm for that round.
- Flower ruffles: You may have more than 12 petals. Check that you skipped exactly 2 sts between petals.
- Corners don’t reach square: Make sure the corner sps hold dtr, not tr. Block them hard.
- Mesh side count off: Count 19 sts per side on Round 7 before you start Round 8.
- Seam puckers: Use a looser join or a bigger hook, and check that the motifs are the same size.
- Border waves: You added sts along a side. Remove them so the side matches its starting count.
- Panel lengthens when hung: This is normal with cotton. Block it again and let it dry flat.
Care
Hand wash or machine wash cold on a gentle cycle in a mesh bag. Reshape the panels and dry them flat. Take them down now and then so they do not hang stretched for months at a time.
Final Notes
Every measurement in this pattern builds on the one before it. The 3 in (7.6 cm) center leads to the 5.25 in (13.3 cm) flower and then to the 8 in (20.3 cm) motif with 27 sts per side. Twelve motifs joined stitch to stitch make 16 in x 48 in (40.6 cm x 121.9 cm). Two border rounds bring each panel to 17 in x 49 in (43.2 cm x 124.5 cm). If the first motif measures right, the rest of the pair will too.
Happy crocheting!