

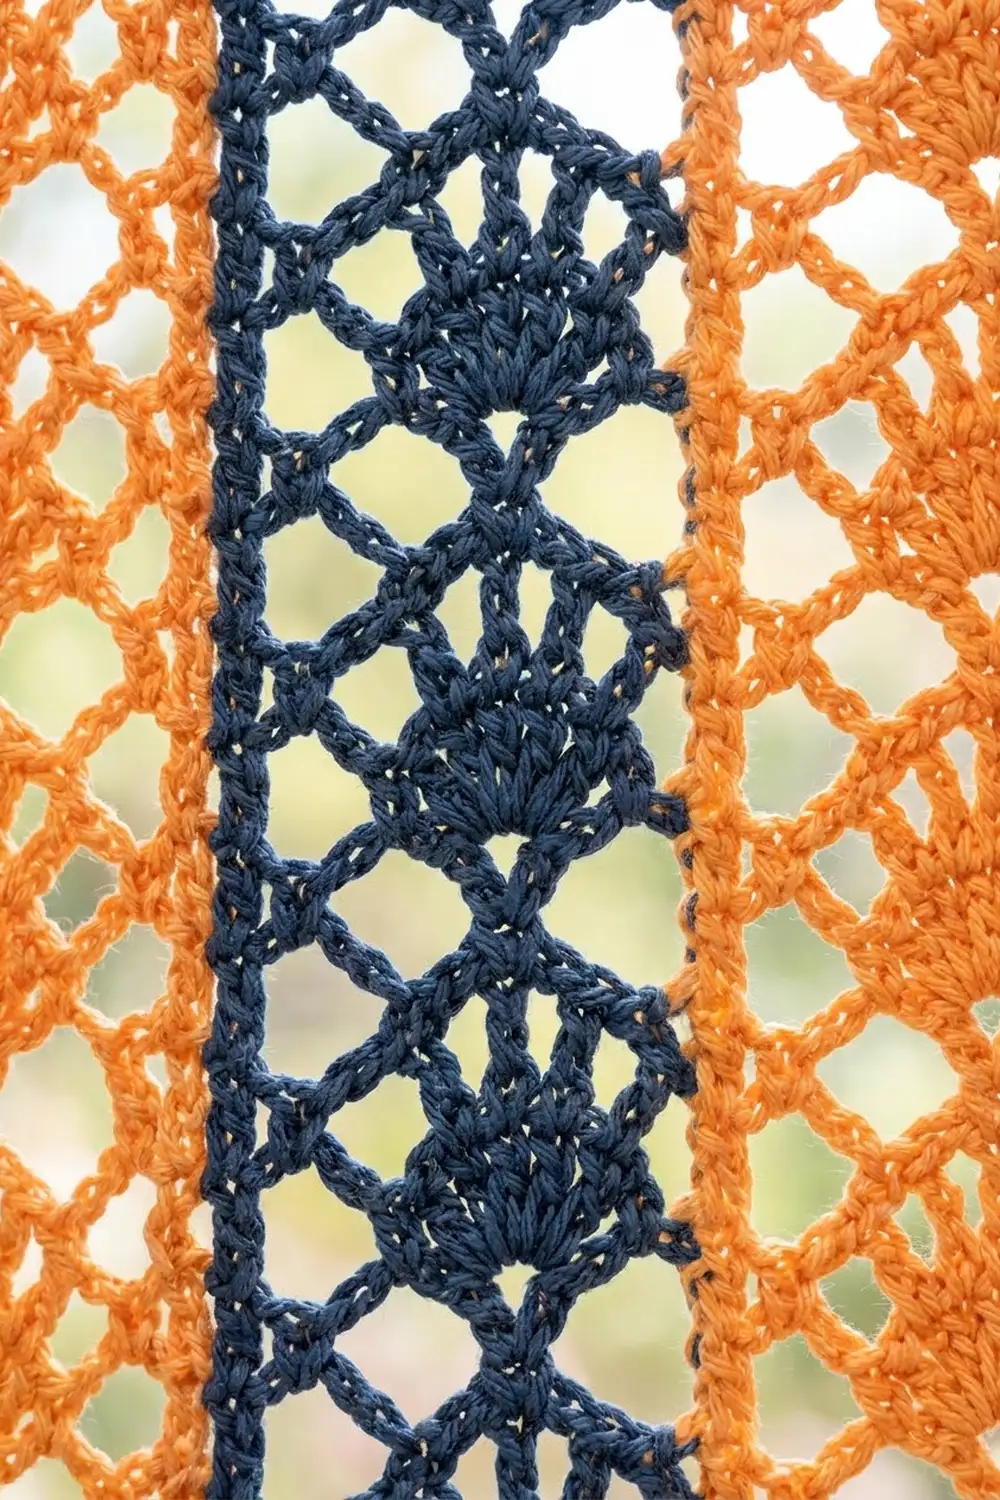
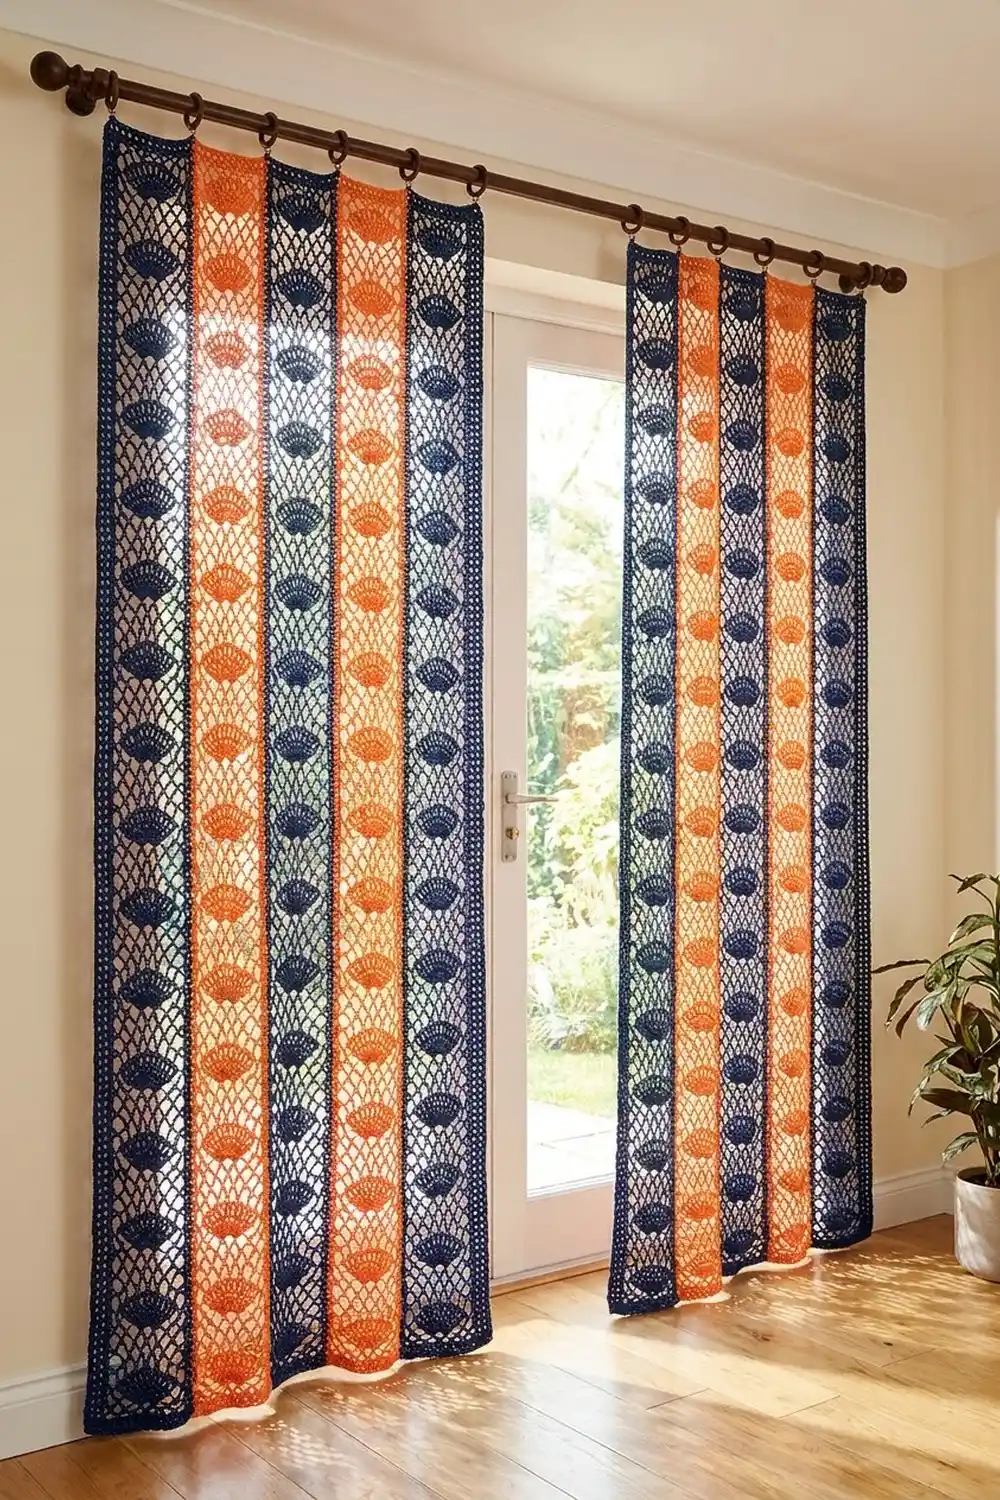
These curtains are made of long, narrow lace strips in deep navy and warm tangerine orange. Each strip has a center line of solid fans set inside an open diamond net, with a neat double crochet column along each side. Once the strips are joined, the colors form bold vertical stripes, and light passes through the mesh.
The style is modern boho: graphic stripes and classic fan lace in a light cotton fabric. It works well over French doors, a patio door, or a tall window. The pattern uses US crochet terms throughout.
Each finished panel measures 25.8 in (65.5 cm) wide by 81.8 in (207.8 cm) long after blocking. You make two panels, so the pair covers 51.6 in (131.1 cm) of width.
Construction is simple. You crochet each strip in rows across its short width, and the rows stack up the length. Then you join five strips into a panel with slip stitch seams and work a two-round single crochet border around the whole panel.
Finished Size and Construction
- Finished panel size: 25.8 in x 81.8 in (65.5 cm x 207.8 cm)
- Skill level: Intermediate
- Terminology: US crochet terms
- Yarn weight: DK (light worsted, #3) cotton
- Hook: 3.5 mm (E-4)
- Number of pieces: 10 strips total, 5 per panel, 2 panels
- Layout per panel: 5 strips side by side, navy / orange / navy / orange / navy
- Single strip size: 5 in x 81 in (12.7 cm x 205.7 cm)
- Panel size before border: 25 in x 81 in (63.5 cm x 205.7 cm)
- Border depth: 0.4 in (1.0 cm) on every side
Materials
Use a smooth mercerized or combed cotton in DK weight. Cotton holds the lace shape, shows the fans clearly, and won’t stretch much over time. Avoid fuzzy or very soft yarns, because they blur the diamond net.
The quantities below assume about 120 m per 50 g ball:
- Navy: 750 g (about 1,800 m), for 6 strips, all seams, and both borders
- Tangerine orange: 450 g (about 1,080 m), for 4 strips
Both quantities include a margin of about 15% for gauge differences and swatching.
Tools:
– 3.5 mm (E-4) crochet hook
– Tapestry needle
– Stitch markers (at least 10)
– Measuring tape
– Blocking mats or a large clean towel-covered floor area
– Rust-proof pins
– Spray bottle
– 22 curtain ring clips (11 per panel)
Abbreviations (US Terms)
- ch – chain
- sl st – slip stitch
- sc – single crochet
- dc – double crochet
- sk – skip
- sp(s) – space(s)
- st(s) – stitch(es)
- RS / WS – right side / wrong side
Special stitch – Fan: 9 dc worked into the same sc. On the next row, the fan opens up as [dc in next dc, ch 1] repeated between its stitches.
Edge column: The first 2 sts and last 2 sts of every row, worked as ch 3 (counts as first dc) and dc in next st at the start, and dc in each of the last 2 sts at the end.
Gauge and Checkpoints
Gauge: 20 dc and 8 rows = 4 in (10.2 cm) over the foundation dc row and pattern.
Strip width: Row 1 (25 dc) = 5 in (12.7 cm).
Pattern repeat: One 3-row repeat (Rows 3–5) = 1.5 in (3.8 cm). Every row averages 0.5 in (1.3 cm).
Start with one full strip and check it before making the rest. Measure at these points:
- After Row 1: width is 5 in (12.7 cm).
- After Row 2: height is 1 in (2.5 cm).
- After 10 repeats (Row 32): height is 16 in (40.6 cm).
- After 26 repeats (Row 80): height is 40 in (101.6 cm).
- After Row 162: height is 81 in (205.7 cm).
If your strip is too wide or your rows are too tall, switch down to a 3.25 mm hook. If it’s too narrow or too short, switch up to a 3.75 mm hook. Measure lace lightly stretched, the way it will hang, not scrunched up. Width matters most, because five strips multiply any error by five.
Lace Strip (Make 10)
Each strip uses one color only. Make 6 in navy and 4 in orange.
Ch 27.
Row 1 (RS): Dc in 4th ch from hook (the skipped chs count as first dc) and in each ch across. Turn. (25 dc)
Row 2 (net row): Ch 3 (counts as dc here and throughout), dc in next dc, ch 5, sk next 4 dc, sc in next dc (st 7), ch 5, sk next 5 dc, sc in next dc (st 13, the center), ch 5, sk next 5 dc, sc in next dc (st 19), ch 5, sk next 4 dc, dc in last 2 sts. Turn.
(4 dc, 3 sc, 4 ch-5 sps)
Check the skip math: 2 edge sts + 4 + 1 + 5 + 1 + 5 + 1 + 4 + 2 edge sts = 25.
Row 3 (fan row): Ch 3, dc in next dc, ch 5, sc in first ch-5 sp, ch 2, work Fan (9 dc) in center sc, ch 2, sc in last ch-5 sp, ch 5, dc in last 2 sts. Turn.
(13 dc: 4 edge + 9 fan; 2 sc; 2 ch-5 sps; 2 ch-2 sps)
The two middle ch-5 sps of Row 2 are covered by the fan. You don’t work into them.
Row 4 (fan-opening row): Ch 3, dc in next dc, ch 5, sc in next ch-5 sp, ch 3, sk ch-2 sp, [dc in next dc, ch 1] 8 times, dc in last dc of fan, ch 3, sk ch-2 sp, sc in next ch-5 sp, ch 5, dc in last 2 sts. Turn.
(13 dc: 4 edge + 9 fan; 8 ch-1 sps; 2 ch-3 sps; 2 sc; 2 ch-5 sps)
Row 5 (net row): Ch 3, dc in next dc, ch 5, sc in next ch-5 sp, ch 5, sk ch-3 sp and first 4 fan dc, sc in 5th (center) dc of fan, ch 5, sk remaining 4 fan dc and ch-3 sp, sc in next ch-5 sp, ch 5, dc in last 2 sts. Turn.
(4 dc, 3 sc, 4 ch-5 sps)
Row 5 has the same structure as Row 2: four ch-5 loops with a sc in the center. The next fan grows straight up from the center dc of the fan below, so the fans stack in one line down the middle. The long ch-5 loops on either side pull into diamonds around them.
Rows 6–161: Repeat Rows 3–5 another 52 times. That gives 53 repeats in total, from Row 3 through Row 161, and you finish on a net row.
Row 162 (closing row): Ch 3, dc in next dc, 4 dc in next ch-5 sp, dc in next sc, 5 dc in next ch-5 sp, dc in center sc, 5 dc in next ch-5 sp, dc in next sc, 4 dc in last ch-5 sp, dc in last 2 sts.
(25 dc = 7 sts worked 1-per-existing-st [4 edge dc + 3 sc] + 18 dc added in the ch-5 sps [4 + 5 + 5 + 4])
Fasten off, leaving a 6 in (15.2 cm) tail. Weave in all ends.
Strip totals: 162 rows, 25 sts across the top and bottom, and 162 row-ends along each long edge. The strip measures 5 in x 81 in (12.7 cm x 205.7 cm).
Make All Pieces
- Navy strips: 6 (3 per panel)
- Orange strips: 4 (2 per panel)
Lay out each panel like this, viewed from the RS with Row 1 at the bottom:
Panel A                          Panel B
[N] [O] [N] [O] [N]              [N] [O] [N] [O] [N]
 1   2   3   4   5                1   2   3   4   5
N = navy   O = orange
Lightly block all strips to 5 in x 81 in (12.7 cm x 205.7 cm) before joining. Strips of matching length make seams easier and keep the hem straight.
Joining
Method: Flat slip stitch seam in navy, worked on the WS.
Place two neighboring strips side by side with the WS facing you and Row 1 of both at the bottom. Put markers every 20 rows on both edges so the rows stay aligned as you go.
Stitch-to-stitch logic: Each long edge has 162 row-ends, and each row-end is the post of an edge dc. Match row-end 1 to row-end 1, row-end 2 to row-end 2, and so on.
Join navy at the bottom corner. Insert the hook through the edge row-end of the left strip and then the matching row-end of the right strip, and work a sl st. Work 2 sl sts per matched row-end pair, so each seam has 324 sl sts. Fasten off.
Join strips 1–2, then 2–3, then 3–4, then 4–5. Each panel has 4 seams.
Tension: Keep the seam slightly loose, about as stretchy as the dc columns. If a seam is tight, the panel puckers lengthwise. If it’s loose, it gapes. Every 20 rows, pause and lay the work flat.
Size checkpoint: A joined panel measures 25 in x 81 in (63.5 cm x 205.7 cm). The seam takes up the edge columns and adds no measurable width.
Border
The border is worked in navy around each panel.
Border gauge: 5 sc = 1 in (2.5 cm). This matches the strip’s horizontal gauge of 25 sts per 5 in (12.7 cm).
In this border, “sts per side” means the sc between the corner ch-2 sps. The corner spaces are counted separately.
Round 1 (RS): Join navy in the top right corner st. Work along the top edge first.
- Top edge: sc in each st across all 5 strips, 25 per strip, for 125 sc. Ch 2 at the corner.
- Long side: work along the row-ends of the outer strip with [2 sc in next row-end, 3 sc in next row-end] 81 times, for 405 sc. Ch 2 at the corner.
- Bottom edge: 1 sc in the base of each Row 1 dc, 25 per strip, for 125 sc. Ch 2 at the corner.
- Second long side: same as the first long side, 405 sc. Ch 2 at the corner.
Sl st to the first sc.
(1,060 sc + 4 corner ch-2 sps)
Round 2: Ch 1, sc in each sc around, and work (sc, ch 2, sc) in each corner ch-2 sp. Sl st to the first sc. Fasten off.
(top and bottom 127 sc each; long sides 407 sc each; 1,068 sc + 4 corner ch-2 sps)
Why the math works: The top edge is 5 strips x 25 sts = 125, with nothing added at the seams, because the seams sit on the row-ends and not on the top stitches. At 5 sc per inch, 125 sc spans exactly 25 in (63.5 cm).
On the long sides, each row is 0.5 in (1.3 cm) tall, and 2.5 sc per row gives 5 sc per inch. Over 162 rows that’s 405 sc, which spans 81 in (205.7 cm).
Because the border matches the fabric gauge on all four sides, the edges lie flat without ruffling or pulling in. The two rounds add 0.4 in (1.0 cm) on every side. The panel finishes at 25.8 in x 81.8 in (65.5 cm x 207.8 cm).
Final Blocking
- Lay the panel RS up on mats or a towel-covered floor.
- Mist it evenly with water until it’s damp all the way through. Don’t soak it.
- Pin the four corners to exactly 25.8 in x 81.8 in (65.5 cm x 207.8 cm).
- Pin along each long edge every 4 in (10.2 cm), keeping the edge straight.
- Pin each seam line straight, measuring 5 in (12.7 cm) between seams.
- Gently open each fan with your fingertips and square the diamonds around it.
- Let it dry completely, usually 24 hours, before unpinning.
- Repeat with the second panel, and compare the two panels side by side.
Final Quality-Control Checklist
- Each strip has 25 sts at the top and bottom and 162 rows.
- The fans line up in one straight column down the center of every strip.
- The color order is navy / orange / navy / orange / navy on both panels.
- The Row 1 edges sit at the bottom of every strip, so all the fans point the same direction.
- Each seam has 324 sl sts and lies flat.
- Border counts are 127 / 407 / 127 / 407 sc.
- Each panel measures 25.8 in x 81.8 in (65.5 cm x 207.8 cm).
- All ends are woven in securely along the dc columns.
- Clip 11 rings to the top border of each panel: one at each corner, one at each seam, and one at each strip’s center, about 2.5 in (6.4 cm) apart.
Troubleshooting
Fans lean to one side: You worked the fan into the wrong sc. In Rows 2 and 5, always count to the center sc, which is the second of the three sc.
Strip is narrowing: Your ch-5 loops are too tight. Chain more loosely, or make the chains with a 3.75 mm hook.
Strips are different lengths: Count rows, not inches. Every strip must have exactly 162 rows.
Panel ripples along a seam: The seam is tighter than the fabric. Pull it out and redo it with a looser hand or a hook one size up.
Border flares: You have extra sc on that side. Count them, and adjust to 405 on the long sides and 125 on the top and bottom in Round 1.
Diamonds look uneven: Block them more firmly and pin each fan tip if needed.
Care
Hand wash or machine wash gently in cool water, then reshape and dry flat. Keep the panels away from long hours of harsh direct sun to protect the navy dye.
Final Notes
The measurement chain runs like this. 25 dc = 5 in (12.7 cm), and 162 rows = 81 in (205.7 cm). Five strips make 25 in x 81 in (63.5 cm x 205.7 cm). A 0.4 in (1.0 cm) border on every side brings each panel to 25.8 in x 81.8 in (65.5 cm x 207.8 cm). Check your first strip carefully, and the rest of the curtain follows from it.
Happy crocheting!