

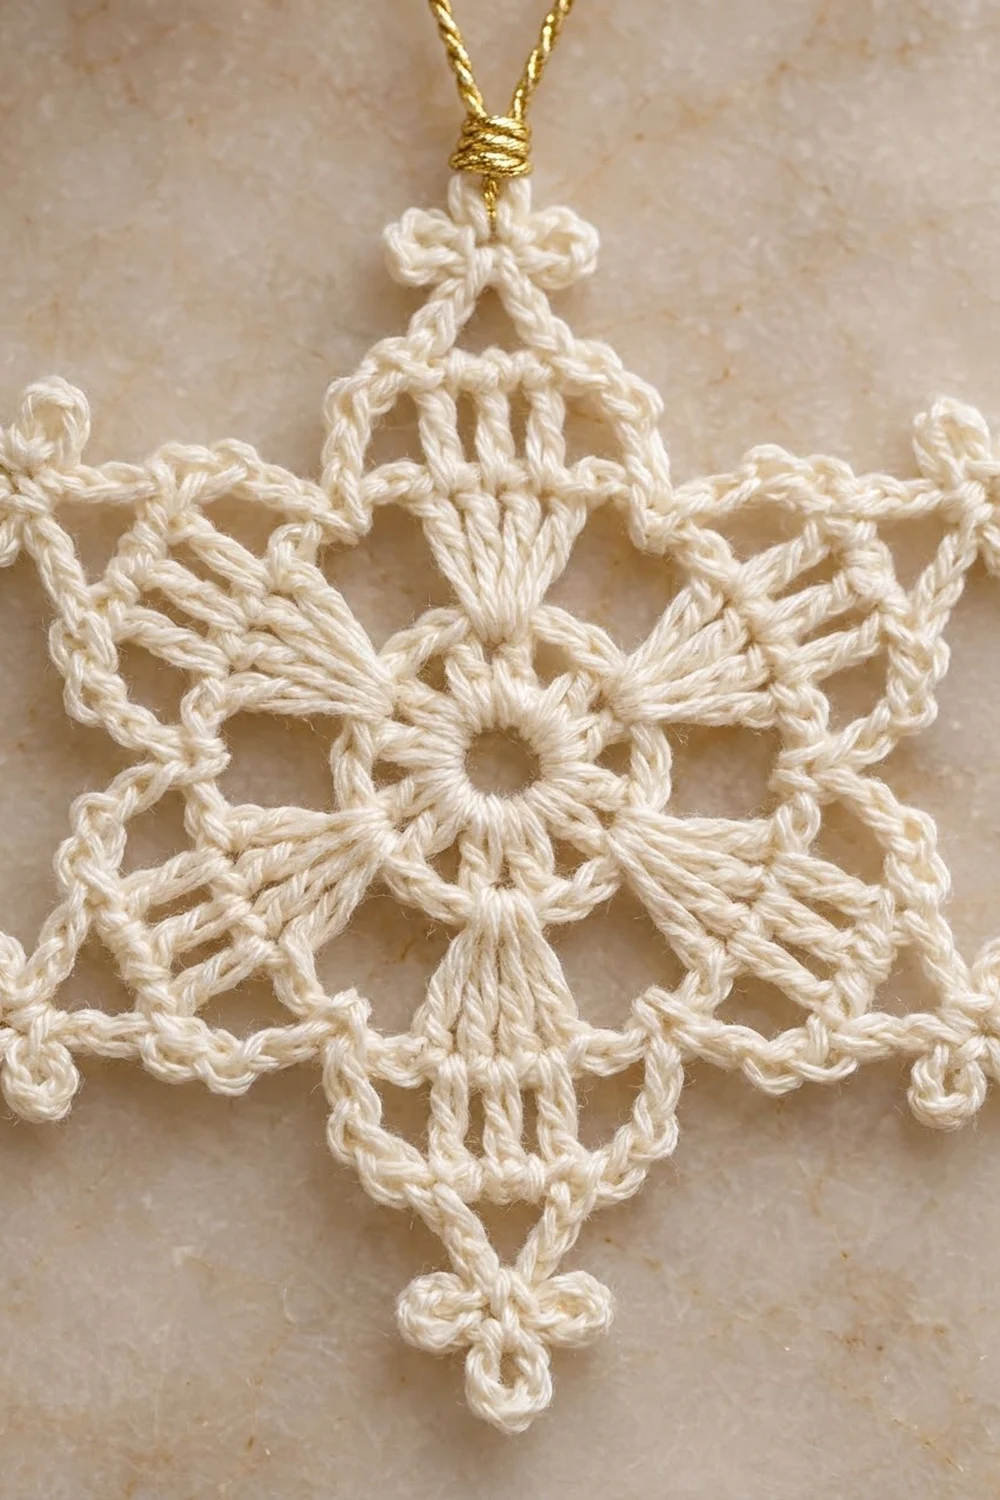
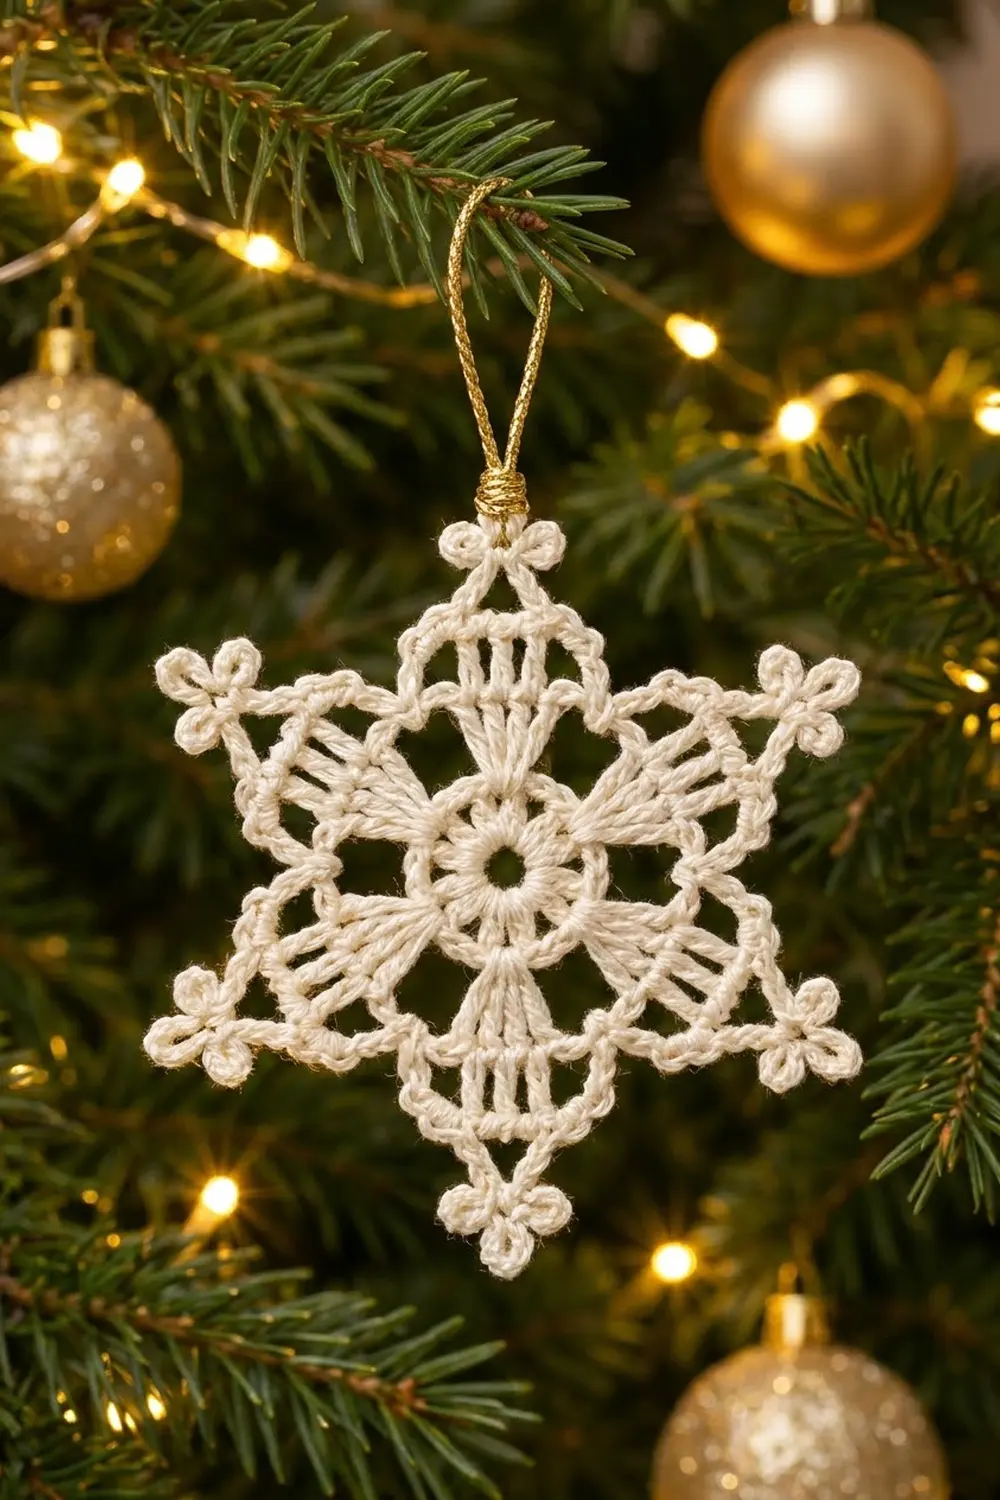
The Ivory Frost Snowflake is a lacy six-point star made in creamy ivory thread. Each arm starts as a fan of long stitches at the center ring. The fan narrows into a sharp point, and a three-loop clover picot sits at the tip. A twisted gold loop finishes it as a tree ornament.
It has a simple, classic style that suits natural, white-and-gold, or Scandinavian decorations. A smooth mercerized cotton thread gives clear stitches and a slight sheen. Once it is blocked, it holds its points well.
This pattern uses US crochet terms. The finished snowflake is about 4 in (10.2 cm) from tip to tip, measured across opposite clover picots. The gold hanging loop adds about 2 in (5.1 cm) above the top point.
You work the snowflake in one piece, in 5 joined rounds. Round 1 makes the center ring, Round 2 makes the six fans, and Rounds 3 and 4 build the columns and chain frames for the arms. Round 5 is a single-crochet edging with clover picots at the tips. After that, you block the snowflake flat and add the gold loop.
Finished Size and Construction
- Finished size: 4 in (10.2 cm) tip to tip, including picots
- Skill level: Easy–Intermediate (you need to be comfortable with treble crochet and clusters)
- Terminology: US crochet terms
- Yarn weight: Lace (0), size 3 crochet thread
- Hook: 2.25 mm (US B-1)
- Number of pieces: 1 (a single snowflake)
- Layout: Six-point star with radial symmetry
- Piece size before the edging (after Round 4): 3.5 in (8.9 cm) tip to tip
- Edging depth (Round 5 plus picots): about 0.25 in (0.6 cm) on each side
- Hanging loop: 2 in (5.1 cm) gold metallic loop
Materials
Yarn advice: Use a smooth, tightly twisted, mercerized cotton thread in size 3. Cotton blocks crisply, and its points stay sharp. Avoid fuzzy or acrylic threads, because the lace will look soft and the points will relax over time.
- Ivory / cream, size 3 cotton thread: 7 g, about 20 m
- Gold metallic thread or fine metallic cord: 1 g, about 1 m (for the loop and the wrapping)
These quantities include a margin of about 30% for the gauge swatch and the weaving-in.
Tools:
– 2.25 mm (US B-1) crochet hook
– Tapestry needle with a small eye
– Sharp scissors
– Blocking mat or a piece of foam board
– Stainless steel pins (rustproof)
– Spray bottle, plus spray starch or a fabric stiffener (optional)
– Ruler or tape measure
Abbreviations (US Terms)
- ch: chain
- sl st: slip stitch
- sc: single crochet
- dc: double crochet
- tr: treble crochet (yarn over twice)
- sk: skip
- sp: space
- st(s): stitch(es)
- rep: repeat
- tr2tog: treble 2 together. (Yarn over twice, insert hook in the next st, pull up a loop, [yarn over, pull through 2 loops] twice) in each of the next 2 sts, then yarn over and pull through all 3 loops on the hook.
- tr3tog: treble 3 together. Same as tr2tog, but work it over the next 3 sts, then yarn over and pull through all 4 loops on the hook.
Special stitch – clover picot: (Ch 4, sl st in 4th ch from hook) 3 times, then sl st in the same st where the picot cluster began. This makes three small rings that sit side by side like a clover leaf.
Gauge and Checkpoints
Gauge for lace isn’t strict, but the measurements below keep the arms in proportion. Work Rounds 1 and 2 first and measure them, then lay the piece flat without stretching it.
- After Round 1: the ring is 1 in (2.5 cm) across, and the center hole is about 0.4 in (1.0 cm) across.
- After Round 2: 2 in (5.1 cm) across the tops of opposite fans.
- After Round 3: 2.75 in (7.0 cm) across opposite columns.
- After Round 4: 3.5 in (8.9 cm) tip to tip.
- After Round 5, blocked: 4 in (10.2 cm) tip to tip, including picots.
If your piece is too big: change to a 2 mm hook and check Round 2 again. If the trebles look loose and loopy, tighten the yarn-overs rather than the chains.
If your piece is too small: change to a 2.5 mm hook. Also check that you aren’t pulling the chains tight. The ch-5 and ch-7 spaces must be long enough to lie flat.
If the piece cups: your chains are probably too short, or you are working them too tightly. Loosen the chains a little.
If the piece ruffles: your trebles are probably too tall for your chains. Pull each treble up to its natural height without lifting the hook.
Pattern
Round 1: Center Ring
Ch 6, sl st in the first ch to form a ring.
Ch 3 (counts as the first dc), work 17 dc in the ring. Join with a sl st to the top of the beginning ch-3.
Count: 18 dc.
Pull the beginning tail gently to close the hole to about 0.4 in (1.0 cm). Keep it open, because the open hole is part of the look. The ring should measure 1 in (2.5 cm) across.
Round 2: Six Fans
Ch 4 (counts as the first tr), tr in the same st as the join, tr in the next st, 2 tr in the next st, ch 3.
*2 tr in the next st, tr in the next st, 2 tr in the next st, ch 3; rep from * 4 more times. Join with a sl st to the top of the beginning ch-4.
Count: 30 tr (6 fans of 5 tr each) and 6 ch-3 sps, for 48 sts in total.
Each fan uses 3 dc from Round 1, and 6 × 3 = 18, so every stitch is used once. The fans open outward from the ring, and the ch-3 spaces between them mark where the V-notches will be. The piece should measure 2 in (5.1 cm) across.
Round 3: Arm Columns and Side Chains
Sl st in the next tr, so you are now in the 2nd tr of the first fan.
Ch 3 (counts as the first dc), dc in the next 2 tr. This makes a 3-dc column on tr 2 to 4 of the fan. Ch 5, sk the last tr of the fan, sc in the next ch-3 sp, ch 5.
*Sk the first tr of the next fan, dc in the next 3 tr, ch 5, sc in the next ch-3 sp, ch 5; rep from * 4 more times. Join with a sl st to the top of the beginning ch-3. (In the first fan, the first tr was already skipped when you slipped into the 2nd tr.)
Count: 18 dc (6 columns of 3), 6 sc, 12 ch-5 sps.
Per arm: 3 dc + 5 ch + 1 sc + 5 ch = 14 sts. 14 × 6 = 84 sts.
Skipping the first and last tr of each fan narrows the arm. That narrowing is what turns the round shape into a star. The piece should measure 2.75 in (7.0 cm) across opposite columns.
Round 4: Points and Outline Chains
Ch 3 and tr2tog over the next 2 dc. The beginning ch-3 and the tr2tog together act as the first tr3tog. Ch 7, sc in the next sc, ch 7.
*Tr3tog over the next 3 dc, ch 7, sc in the next sc, ch 7; rep from * 4 more times. Join with a sl st to the top of the first tr2tog.
Count: 6 tr3tog, 6 sc, 12 ch-7 sps.
Per arm: 1 cluster + 7 ch + 1 sc + 7 ch = 16 sts. 16 × 6 = 96 sts.
The tr3tog gathers the 3-dc column into one point, so each arm now has long, straight bars running from the fan to the tip. The ch-7 spaces form the long outer edges of the star. The sc anchored in Round 3 pulls each edge in to make the V-notch. The piece should measure 3.5 in (8.9 cm) tip to tip.
Round 5: Edging with Clover Picots
Ch 1, sc in the same st (the top of the first cluster), clover picot.
8 sc in the next ch-7 sp, sc in the next sc, 8 sc in the next ch-7 sp.
*Sc in the top of the next tr3tog, clover picot, 8 sc in the next ch-7 sp, sc in the next sc, 8 sc in the next ch-7 sp; rep from * 4 more times. Join with a sl st to the first sc. Fasten off, leaving a 6 in (15.2 cm) tail.
Count: 108 sc and 6 clover picots.
Per arm: 1 sc at the tip + 8 sc + 1 sc in the notch + 8 sc = 18 sc. 18 × 6 = 108 sc.
Edging Math
Round 5 is the edging, and its depth is about 0.25 in (0.6 cm) on each edge. The clover picots add a little extra length at each tip.
Why 8 sc in a ch-7 space? If you work exactly one sc per chain, the edge pulls tight and the arms cup. If you work two or more extra stitches, the edge ruffles. One extra stitch (7 ch + 1 = 8 sc) lets the edge follow the slight curve of the chain frame while it lies flat.
Corner logic: Each arm has exactly one tip stitch, the sc in the cluster, and exactly one notch stitch, the sc in the Round 4 sc. The tip sc and the notch sc are not counted again inside the 8-sc groups.
Edging gauge: about 9 sc per 1 in (2.5 cm) along the corded edge. Each edge from tip to notch is about 0.9 in (2.3 cm) long, so 8 sc fit along it without crowding.
Hanging Loop
- Cut 10 in (25.4 cm) of gold metallic thread.
- Fold it in half, twist the two strands firmly in one direction, and let them twist back on themselves to make a cord.
- Thread the cut ends through the top clover picot from front to back.
- Adjust the cord so the loop stands 2 in (5.1 cm) above the tip.
- Knot the ends at the base of the loop.
- Wrap a separate 8 in (20.3 cm) strand of gold thread tightly around the base 6 to 8 times. This makes the neat gold collar shown on the finished ornament.
- Tie off the wrapping thread, thread the ends into the wrapping, and trim them.
Attach the loop after blocking so that it isn’t stiffened out of shape.
Final Blocking
- Weave in the beginning and ending tails along the backs of the stitches, then trim them.
- Soak the snowflake in cool water for 5 minutes. Gently press out the water in a towel; don’t wring it.
- Draw a 4 in (10.2 cm) circle on paper and mark six points evenly around it, 60° apart. Lay the paper under clear plastic on your blocking mat.
- Pin the top of each clover picot onto one of the six marks.
- Pin each V-notch toward the center, about 1.5 in (3.8 cm) from the center of the hole.
- Open each clover picot so its three rings sit flat and evenly spaced.
- Spray with starch, or brush on fabric stiffener for a firmer ornament.
- Leave it pinned until it is completely dry, usually 6 to 12 hours. Then remove the pins and add the hanging loop.
Final Quality-Control Checklist
- The center hole is open and round, about 0.4 in (1.0 cm) across.
- All six fans have 5 tr each and are evenly spaced.
- Each arm has a 3-bar column that ends in one tr3tog point.
- Round 5 has 108 sc, with exactly 18 sc per arm.
- All six clover picots have three rings that lie flat.
- The piece measures 4 in (10.2 cm) tip to tip on all three axes.
- The V-notches are all the same depth.
- No tails show on the front.
- The gold loop is 2 in (5.1 cm) tall, with a neat wrapped base.
Troubleshooting
The arms are different sizes. Recount Round 3, because one column may have 2 or 4 dc. Each column must sit on tr 2 to 4 of its fan.
The center won’t lie flat. Round 1 may be too crowded. Remake the ring with ch 7 instead of ch 6.
The points are blunt. Pull the tr3tog closed firmly. When you block, pin at the top of the clover picot, not at its base.
The edges wave. Use 7 sc in each ch-7 sp, making 16 sc per arm and 96 sc in total. Your chains are probably on the short side.
The edges cup inward. Use 9 sc in each ch-7 sp instead, or loosen your chains.
The clover rings are uneven. Make each ch 4 at the same relaxed tension, and close each ring with a sl st in the 4th ch exactly.
The center hole is too large. Tug the beginning tail before weaving it in, then secure it with a backstitch.
Care
Hand wash in cool water only. Reshape the snowflake and pin it flat to dry, then re-starch it if it softens after storage. Store it flat between sheets of tissue paper.
Final Notes
The measurement chain is what keeps the star even:
- Round 1 gives a 1 in (2.5 cm) ring of 18 dc.
- Round 2 makes 6 fans of 5 tr and measures 2 in (5.1 cm) across.
- Round 3 narrows the fans into 3-dc columns and measures 2.75 in (7.0 cm).
- Round 4 makes the six tr3tog points and measures 3.5 in (8.9 cm).
- Round 5 adds 108 sc of edging and six clover picots, which brings the blocked snowflake to 4 in (10.2 cm).
If you check each stage before moving on, every arm will match and the points will block evenly. Make one in ivory, then try a few more in white or gold for a whole set on the tree.
Happy crocheting!