

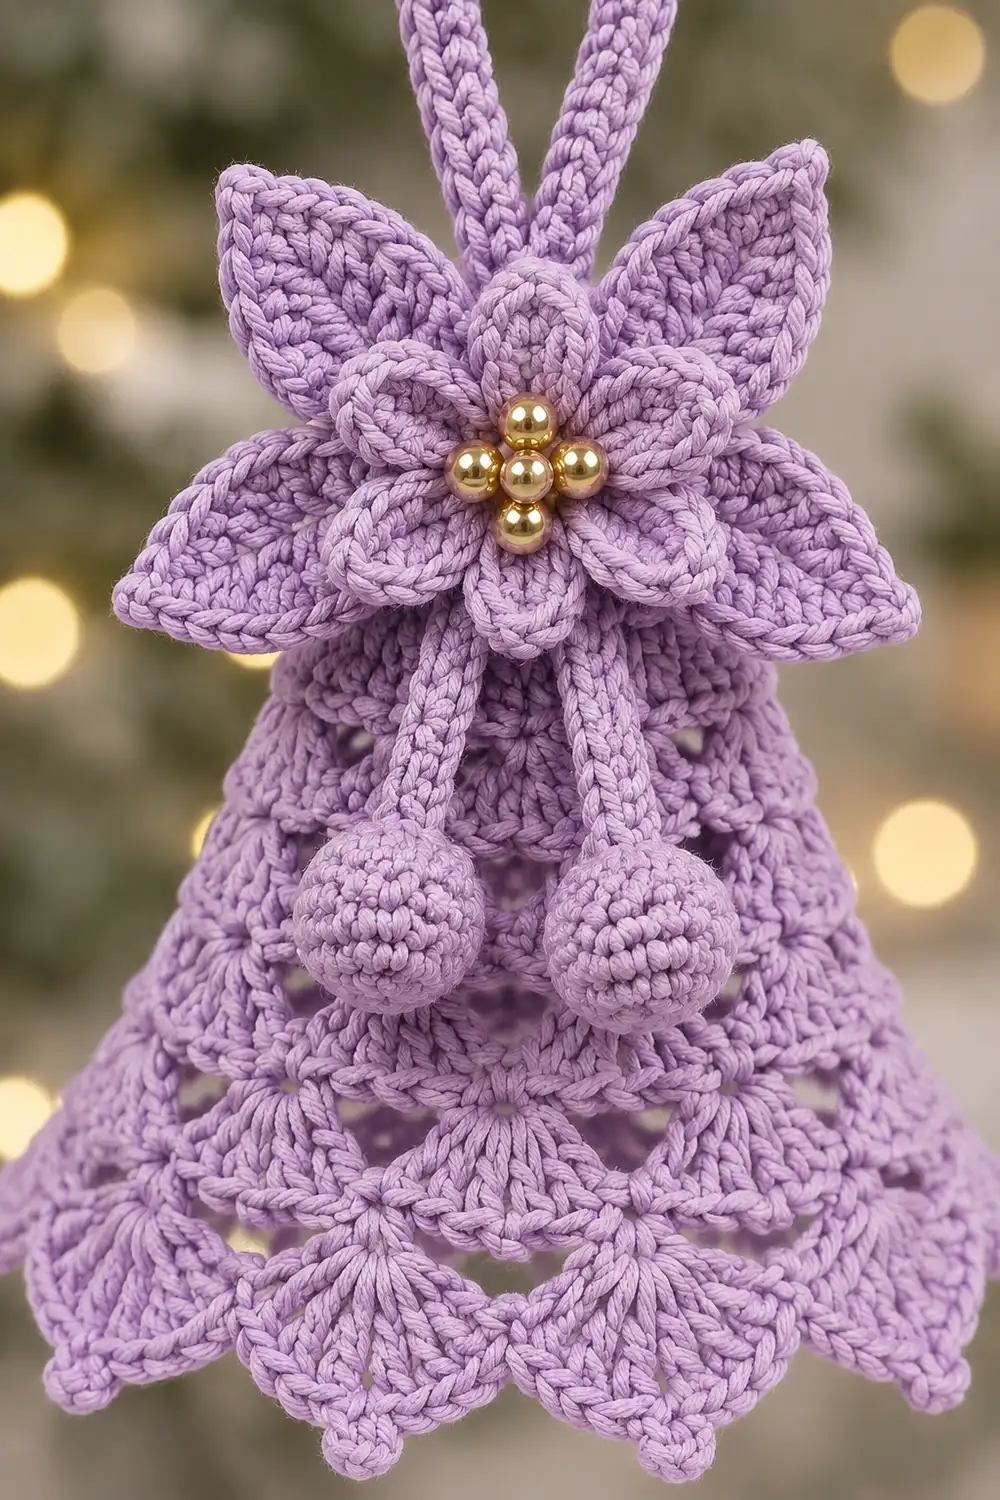
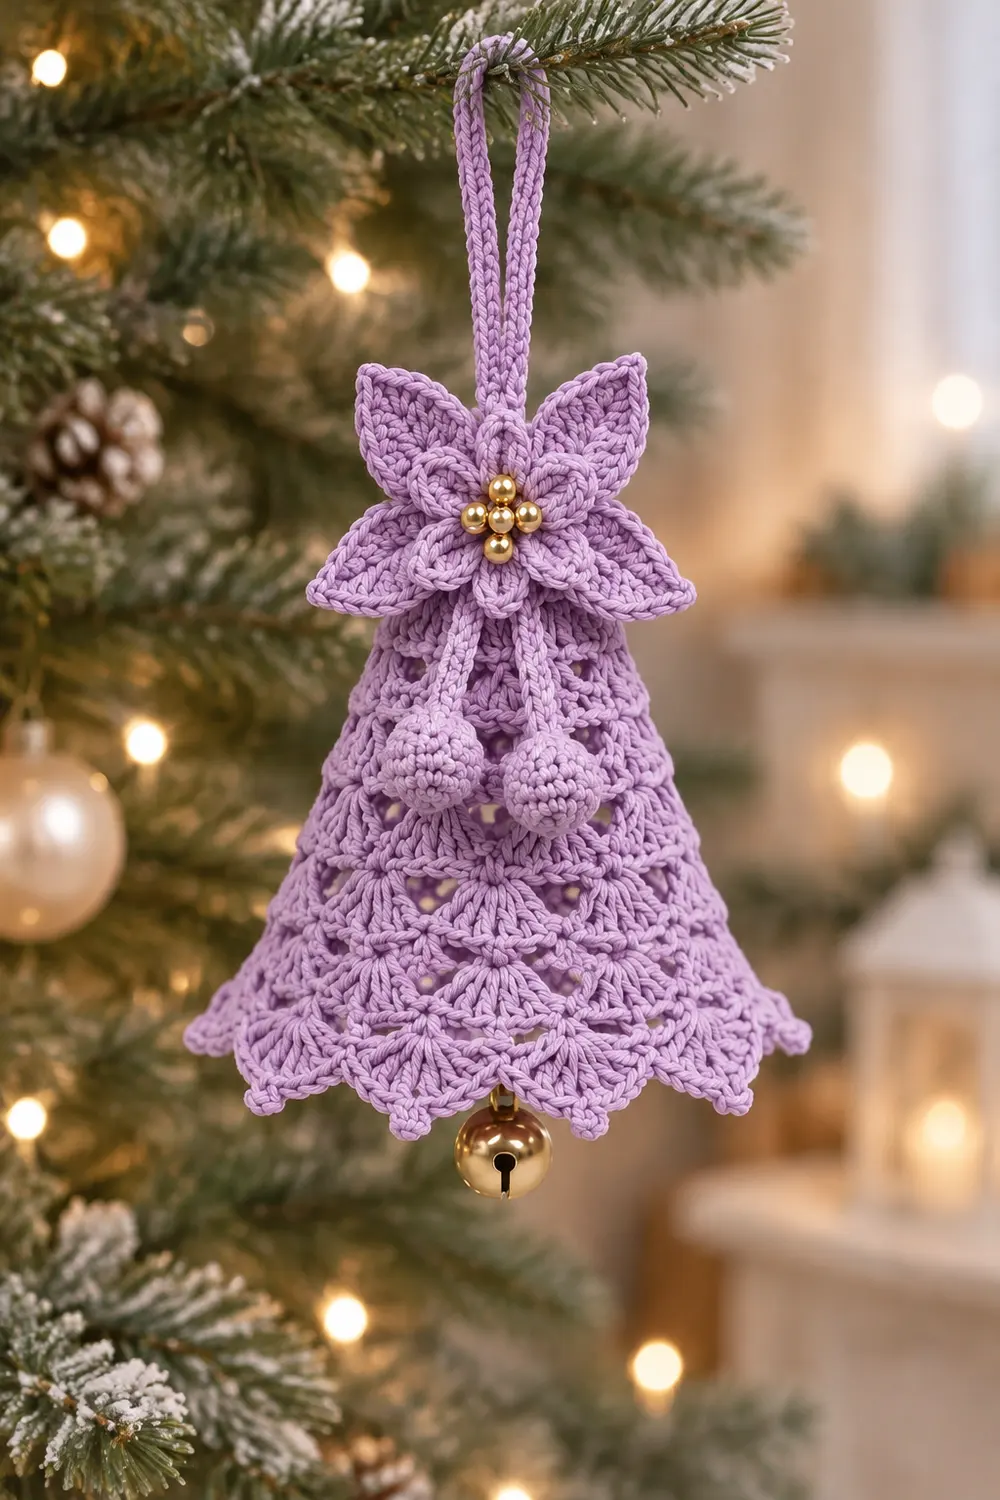
This little bell ornament is worked in soft lavender cotton. Its body is built from tiers of fan-shaped shells that grow wider toward the rim, which gives it a full, triangular bell shape. A small gold jingle bell hangs at the bottom, just below the pointed scallops.
On top sits a four-petal flower with a popcorn-stitch center and small gold beads. Four pointed leaves fan out from the flower base. Two round berries hang below it on thin chains, and a twisted-look slip-stitch cord forms the hanging loop.
The pattern uses US crochet terms. The finished ornament is about 3.5 in (8.9 cm) tall from the bell rim to the top of the leaves, not counting the loop or jingle bell. The bell body is about 2.25 in (5.7 cm) tall and about 3.1 in (7.9 cm) across at the rim.
Construction is simple. You work the bell top-down in joined rounds, starting with a small flat cap. You then work three shell tiers with lacy V-stitch spacer rounds between them and finish with a picot border. The flower, leaves, berries and loop are small elements that you sew to the top of the bell to complete the one ornament.
Finished Size and Construction
- Finished size: 3.5 in (8.9 cm) tall, excluding loop and jingle bell
- Bell body: 2.25 in (5.7 cm) tall, rim about 3.1 in (7.9 cm) across
- Skill level: Intermediate
- Terminology: US
- Yarn weight: Super fine (#1) cotton, fingering weight
- Hook: 2.25 mm (US B/1)
- Number of pieces: 1 ornament. The bell body is worked in one piece, and the small topper elements are sewn on.
- Layout: Single ornament with the flower topper centered on top of the bell
- Size before border: 2.1 in (5.3 cm) tall after Round 8
- Border depth: about 0.15 in (0.4 cm)
Materials
Choose a smooth, mercerized cotton in super fine (#1) weight. Cotton holds the shell definition and takes stiffener well. Avoid fuzzy or very stretchy yarns, because the scallops and leaf points will blur.
- Lavender: 10 g, about 35 m (38 yd)
The quantity includes a margin for your gauge swatch and sewing tails.
Tools:
- 2.25 mm (US B/1) hook
- Tapestry needle
- Sewing needle and matching thread
- 5 gold beads, 4 mm
- 1 gold jingle bell, 1.0 cm (0.4 in)
- Small amount of fiberfill or lavender scrap yarn
- Stitch marker
- Fabric stiffener or starch
- Plastic wrap
- A small cone for blocking (rolled cardstock works)
- Rust-proof pins
- Scissors
Abbreviations (US Terms)
- ch – chain
- sl st – slip stitch
- sc – single crochet
- hdc – half double crochet
- dc – double crochet
- sc2tog – single crochet 2 together
- MR – magic ring
- sp – space
- st(s) – stitch(es)
- V-st – (dc, ch X, dc) in the same stitch, with the ch count given in the round
- picot – ch 3, sl st in 3rd ch from hook
Popcorn (pc): Work 4 dc in the same stitch. Remove your hook from the loop. Insert the hook from front to back into the first dc of the group, pick up the dropped loop and pull it through. Ch 1 to secure. The ch 1 is not counted as a stitch.
Gauge and Checkpoints
Work Rounds 1–2 of the bell first as your test piece. Measured flat, it should be 1 in (2.5 cm) across.
Then check these measurements as you go. Measure the bell standing on its rim, cap up.
- After Round 4: 0.75 in (1.9 cm) tall
- After Round 6: 1.4 in (3.6 cm) tall
- After Round 8: 2.1 in (5.3 cm) tall
- After Round 9: 2.25 in (5.7 cm) tall, rim about 3.1 in (7.9 cm) across
If your piece is too big, go down to a 2.0 mm hook. If it is too small, go up to a 2.5 mm hook.
Recheck the cap measurement before you continue. Small differences grow with each tier.
Bell Body
Work in joined rounds and do not turn. The ch 3 at the start of a round counts as a dc.
Round 1: MR, ch 3, 11 dc in ring, sl st to top of ch-3 to join. (12 dc)
Round 2: Ch 3, dc in same st, 2 dc in each st around, join. (24 dc)
Round 3 (shoulder): Ch 3, dc in each st around, join. (24 dc)
There is no increase in this round. That lets the cap begin to dome.
Round 4 (Tier 1): Ch 1, sc in same st. Skip 1 st, 5 dc in next st, skip 1 st, sc in next st. Repeat from * 5 more times, but omit the final sc. Join to the first sc. (6 sc, 30 dc = 36 sts; 6 shells)
Each repeat uses 4 stitches of Round 3, so 6 × 4 = 24.
Round 5 (spacer): Sl st in the next 3 dc, which puts you in the center dc of the shell. Ch 1, sc in the same st. Ch 3, (dc, ch 2, dc) in next sc, ch 3, sc in center dc of next shell. Repeat from * 5 more times, omitting the final sc. Join. (6 sc, 6 V-sts)
Round 6 (Tier 2): Ch 1, sc in same st. Ch 1, 7 dc in next ch-2 sp, ch 1, sc in next sc. Repeat from * 5 more times, omitting the final sc. Join. (6 sc, 42 dc = 48 sts, plus 12 ch-1 sps)
The ch-3 bars from Round 5 are not worked into. They stay as the open lacy windows between tiers. These shells sit between the Tier 1 shells, so the tiers are staggered.
Round 7 (spacer): Sl st in the next ch-1 sp and the next 4 dc, which puts you in the center dc. Ch 1, sc in same st. Ch 4, (dc, ch 3, dc) in next sc, ch 4, sc in center dc of next shell. Repeat from * 5 more times, omitting the final sc. Join. (6 sc, 6 V-sts)
Round 8 (Tier 3): Ch 1, sc in same st. Ch 1, 9 dc in next ch-3 sp, ch 1, sc in next sc. Repeat from * 5 more times, omitting the final sc. Join. (6 sc, 54 dc = 60 sts, plus 12 ch-1 sps)
The shells grow from 5 dc to 7 dc to 9 dc. That graduated width is what creates the flared, triangular silhouette.
Do not fasten off. Continue with the border.
Flower Topper
Round 1: MR, ch 1, 8 sc in ring, join. (8 sc)
Round 2: Ch 1. Sc in next st, pc in next st. Repeat from * 3 more times. Join. (4 sc, 4 pc)
Round 3: Ch 1. Sc in next sc, ch 3, skip pc. Repeat from * 3 more times. Join. (4 sc, 4 ch-3 sps)
Round 4: In each ch-3 sp, work (sc, hdc, 2 dc, ch 1, 2 dc, hdc, sc). Join and fasten off, leaving a 12 in (30.5 cm) tail. (4 petals, 32 sts)
The flower should measure about 1.25 in (3.2 cm) across.
Leaves (make 4)
Ch 10.
Side 1: Sl st in 2nd ch from hook, sc in next ch, hdc in next ch, dc in next 3 ch, hdc in next ch, sc in next ch, sl st in last ch. (9 sts)
Side 2: Ch 1. Working in the free loops on the other side of the chain: sc in next ch, hdc in next ch, dc in next 3 ch, hdc in next ch, sc in next ch, sl st in next ch. (8 sts)
Tip: Picot, then sl st in the first sl st of Side 1.
Fasten off, leaving a 6 in (15.2 cm) tail. Each leaf has 17 stitches plus the picot tip and is about 1 in (2.5 cm) long.
Berries (make 2)
Round 1: MR, 6 sc. (6 sc)
Round 2: 2 sc in each st. (12 sc)
Round 3: Sc in each st. (12 sc)
Round 4: Sc2tog 6 times. (6 sc)
Stuff firmly with fiberfill or scrap yarn. Close the hole and fasten off. Each berry is about 0.5 in (1.3 cm) across.
Stem: Join yarn at the closed end of a berry. Ch 9, then sl st in the back bump of each ch back toward the berry. Fasten off, leaving a 6 in (15.2 cm) tail at the stem top. The stem is about 1 in (2.5 cm) long.
Hanging Loop
Ch 36. Sl st in the back bump of the 2nd ch from hook and in each ch across. (35 sl sts)
Fasten off, leaving tails at both ends. The slip-stitch cord has a firm, braided look.
Assembly
- Flower: Center the flower on the cap and sew it over Rounds 1–2.
- Beads: Sew the 5 beads at the popcorn center, with 1 in the middle and 4 around it in a cross.
- Leaves: Tuck the base of each leaf under the flower and sew it in place. Point two leaves up and out at angles and two leaves straight out to the sides.
- Berries: Sew both stem tops under the lower petals so the berries hang down the front of the bell, slightly apart.
- Loop: Fold the cord and sew both ends behind the flower so the loop stands about 1.5 in (3.8 cm) above the topper.
- Jingle bell: On the inside of the bell, join yarn at the center of Round 1. Ch 18, which is about 2.25 in (5.7 cm). Fasten off, then sew the jingle bell to the end of the chain. It should hang centered, with its lower half just below the pointed rim.
Border
Border gauge: 8 sc = 1 in (2.5 cm).
Round 9: Ch 1, sc in same st. Sc in next ch-1 sp, sc in next 4 dc, (sc, picot, sc) in next dc, sc in next 4 dc, sc in next ch-1 sp, sc in next sc. Repeat from * 5 more times, omitting the final sc on the last repeat. Join and fasten off. (78 sc, 6 picots)
Per repeat: 1 sc in the ch-1 sp, 4 sc, 2 sc at the center, 4 sc, 1 sc in the ch-1 sp and 1 sc in the sc. That is 13 sc per repeat, with 1 picot at the center of each shell.
Count breakdown: This is a conversion round, not a growth round.
- 60 sc are worked 1 into each existing stitch (6 sc + 54 dc).
- 12 sc are worked 1 into each ch-1 sp.
- 6 extra sc are added at the shell centers.
- The total is 60 + 12 + 6 = 78 sc.
Why the math works: At 8 sc per inch, 78 sc measures 9.75 in (24.8 cm) around the rim. Divided by π, that is about 3.1 in (7.9 cm) across, which matches the target rim.
The extra sc at each shell center lets the edge come to a point under the picot without cupping. One repeat measures about 1.6 in (4.1 cm) along the edge.
Final Blocking
- Weave in all tails except any you still need for sewing.
- Saturate the bell body with fabric stiffener and gently squeeze out the excess.
- Wrap the cone in plastic wrap. Slide the bell onto it so the rim is about 3.1 in (7.9 cm) across.
- Pin each picot downward so the scallops come to clean points.
- Open each shell into an even fan and line up the lacy windows.
- Dab stiffener on the leaves and press them flat, pointing the tips.
- Let everything dry fully, which takes about 24 hours. Then remove the pins and lift the bell off the cone.
Final Quality-Control Checklist
- [ ] The ornament is 3.5 in (8.9 cm) tall, excluding the loop and jingle bell
- [ ] The bell body is 2.25 in (5.7 cm) tall
- [ ] The rim is about 3.1 in (7.9 cm) across
- [ ] There are 6 shells in each of the three tiers (5 dc, 7 dc and 9 dc)
- [ ] The border has 78 sc and 6 picots
- [ ] The flower has 4 petals and 4 popcorns, with the 5 beads secure
- [ ] There are 4 leaves, evenly placed with pointed tips
- [ ] The 2 berries hang evenly on 1 in (2.5 cm) stems
- [ ] The loop is about 1.5 in (3.8 cm) tall and firmly sewn
- [ ] The jingle bell hangs centered below the rim
Troubleshooting
The rim ruffles. Your border is too loose. Rework Round 9 with a 2.0 mm hook.
The rim cups inward. Your border is too tight. Rework Round 9 with a 2.5 mm hook.
The tiers are not staggered. Check that each V-st sits in an sc, not in a shell center.
The lacy windows sag. Your spacer chains are too loose. Keep them snug and even.
The popcorns sink into the flower. Push them forward from the back before you sew on the beads.
The leaf tips are rounded. Tighten the picot and pin the tip during blocking.
The ornament tilts. Recenter the loop behind the flower and move one berry slightly.
Care
Spot clean only with cool water. Store the ornament flat or hanging, away from heat, so it keeps its stiffened shape.
Final Notes
Here is the measurement chain from start to finish:
- The cap measures 1 in (2.5 cm) after Round 2.
- The bell is 0.75 in (1.9 cm) tall after Round 4, 1.4 in (3.6 cm) after Round 6 and 2.1 in (5.3 cm) after Round 8.
- The border brings it to 2.25 in (5.7 cm), with a 3.1 in (7.9 cm) rim.
- The topper brings the finished ornament to 3.5 in (8.9 cm).
If you check the cap first, every measurement after it falls into place.
Optional: Make several in different pastels for a tree cluster.
Happy crocheting!