

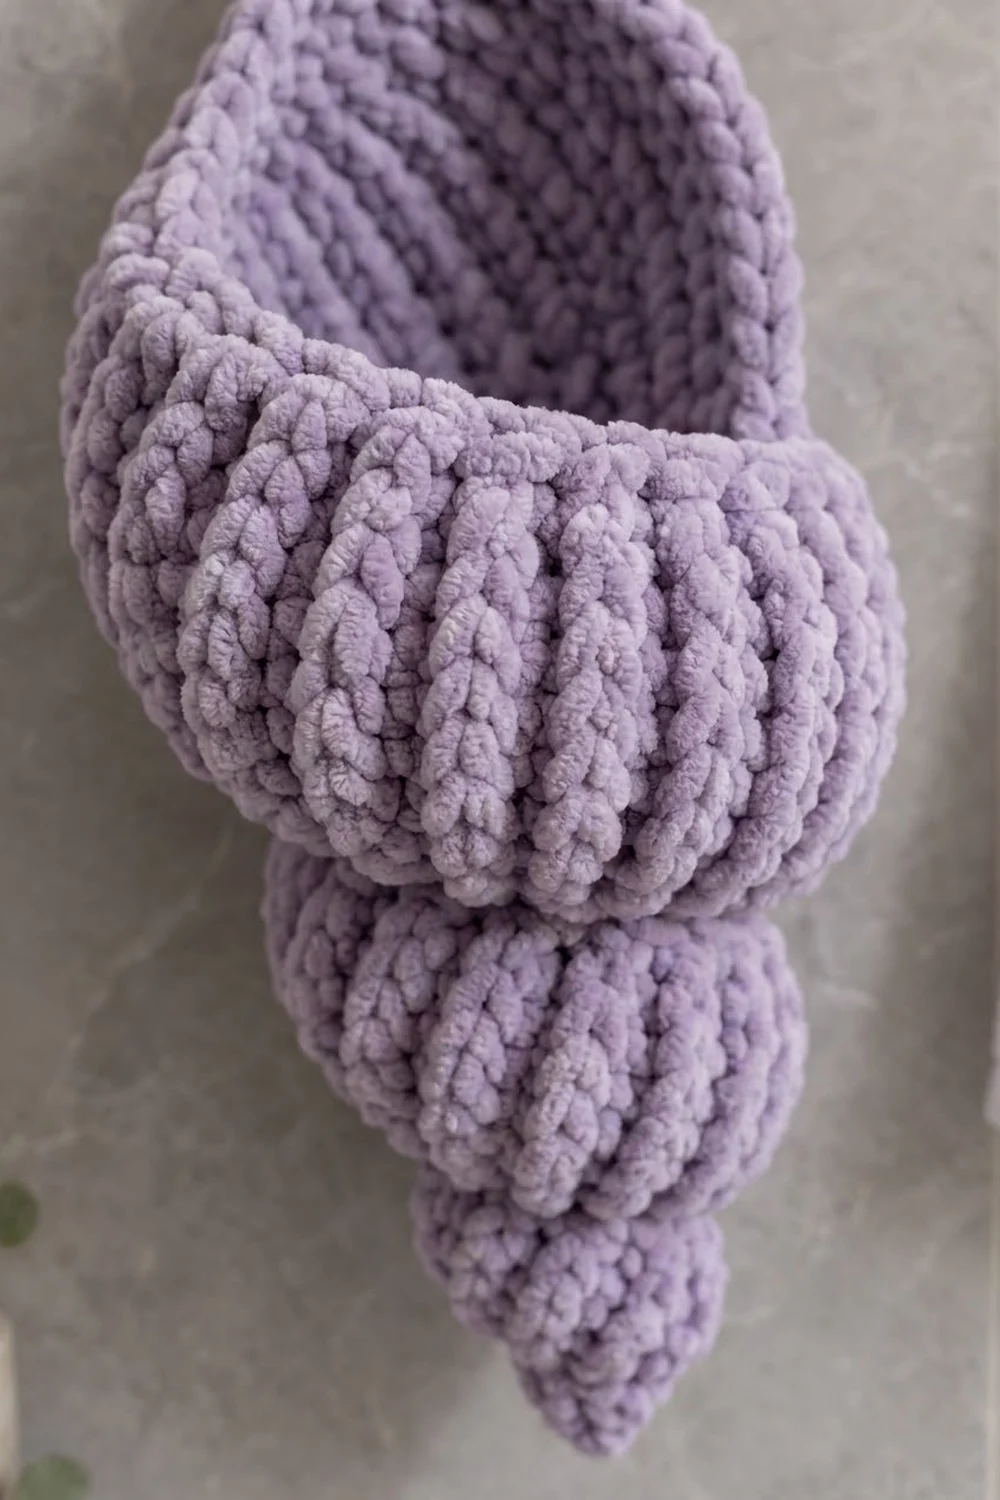
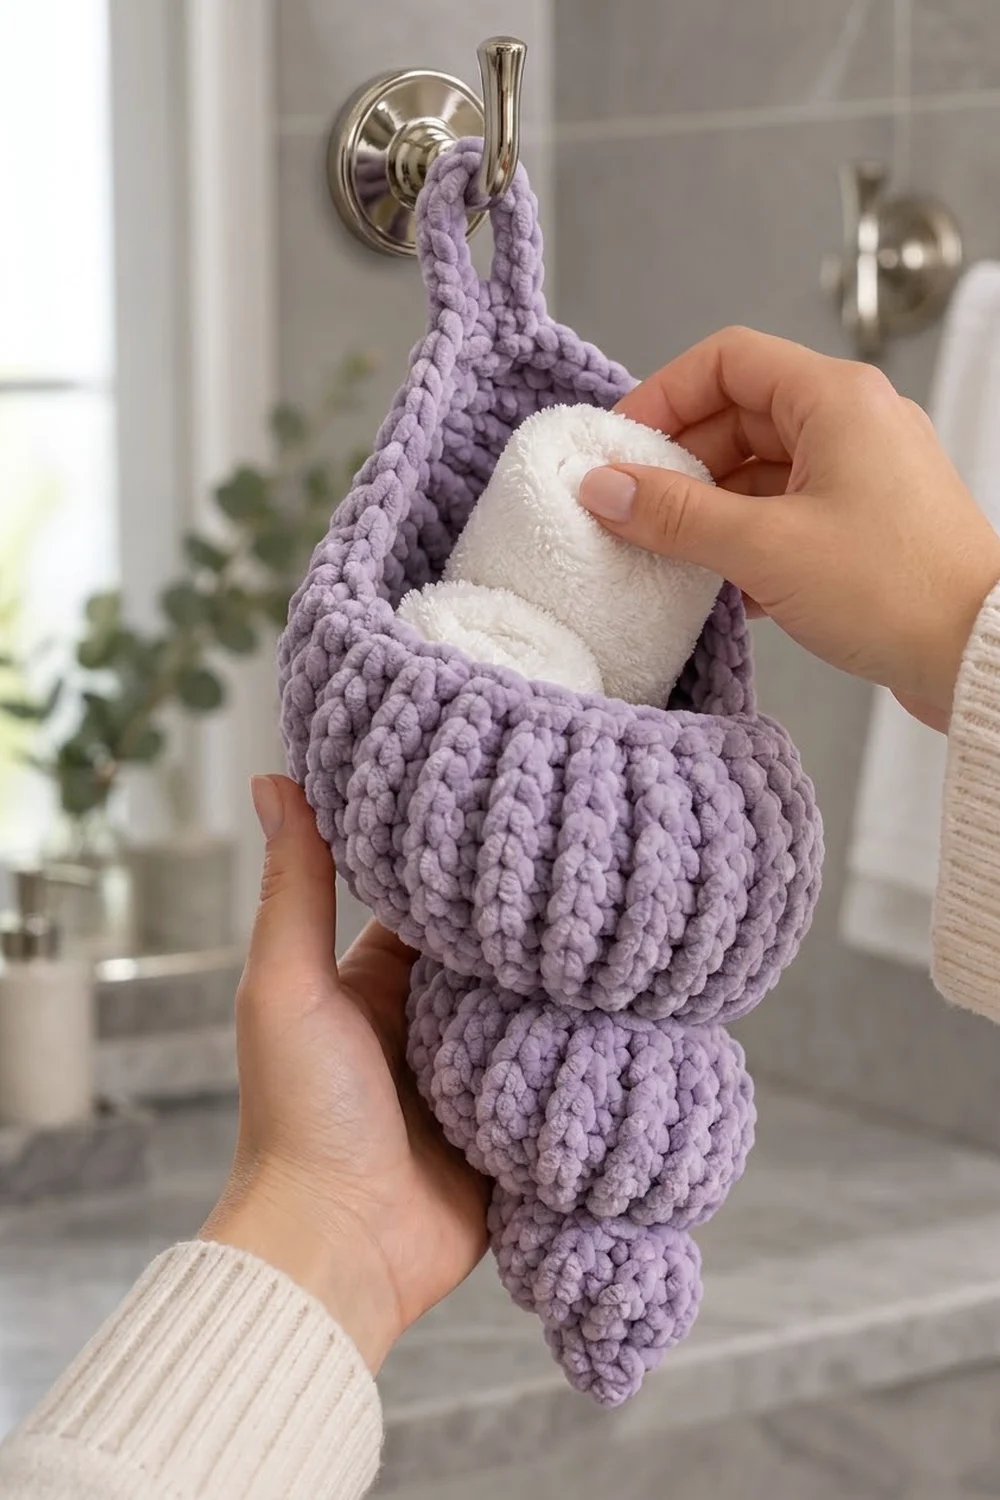
This seashell hanging basket is a soft, sculptural wall pocket shaped like a conch shell. It is worked in one solid lavender color in plump chenille yarn, and the stacked, bulging whorls give it a strong spiral silhouette. A tall teardrop back panel rises behind the opening and ends in a sturdy hanging loop.
The surface is crocheted in knit stitch (waistcoat stitch), which makes the neat vertical columns of V’s that look like ribbing on a real shell. The opening, the back panel, and the loop are finished with a twisted rope edge in reverse single crochet. Hang it on a towel hook to hold rolled washcloths, hair ties, or small bathroom supplies.
This pattern uses US crochet terms. The finished basket is about 14 in (35.6 cm) tall from the tip to the top of the loop and about 5.25 in (13.3 cm) across at its widest whorl.
Construction is simple. You work from the pointed tip upward in continuous spiral rounds, shaping three whorls by increasing outward and then pinching in. After a short collar, you work the back panel in rows to a point, chain the hanging loop, and finish with a two-round edging. It is one single piece, so there is no sewing or joining.
Finished Size and Construction
- Finished size: about 14 in (35.6 cm) tall including the loop, 5.25 in (13.3 cm) across at the widest whorl
- Skill level: Intermediate (spiral shaping and knit stitch)
- Terminology: US crochet terms
- Yarn weight: Super bulky (#6) chenille
- Hook: 6 mm (US J-10)
- Number of pieces: 1
- Layout: single 3D piece, worked in the round from the tip, then in rows for the back panel
- Body (tip to collar rim): about 8 in (20.3 cm)
- Size before border: back panel about 4.25 in (10.8 cm) tall above the rim
- Border depth: about 0.5 in (1.3 cm), 2 rounds
- Hanging loop: extends about 1.25 in (3.2 cm) above the panel point
Materials
Choose a super bulky chenille or velvet-style yarn with a soft, rounded strand. Chenille softens the look of individual stitches, but the knit stitch columns still show clearly. Avoid yarns that shed heavily, because the basket will be handled often.
- Lavender: 150 g, about 165 m (180 yd)
- Fiberfill: about 10 g, to lightly fill the lowest two whorls
Tools:
- 6 mm (US J-10) crochet hook
- 1 locking stitch marker
- Tapestry needle with a large eye
- Scissors
- Measuring tape
Quantities include a margin of about 25 percent for your gauge check and differences in tension. The basket itself uses roughly 120 g.
Abbreviations (US Terms)
- ch – chain
- sc – single crochet
- sl st – slip stitch
- st(s) – stitch(es)
- rnd(s) – round(s)
- inc – work 2 sts in the same st
- dec – decrease (ksc2tog in rounds, sc2tog in rows)
- rev sc – reverse single crochet (crab stitch)
- MR – magic ring
Special stitch – knit stitch (ksc, also called waistcoat stitch): Insert the hook through the center of the V of the stitch below, between its two front legs, instead of under the top loops. Yarn over, pull up a loop, yarn over, pull through both loops. Stacked rounds of ksc form vertical columns of V’s.
ksc2tog: Insert the hook into the center of the next st and pull up a loop. Insert into the center of the following st and pull up a loop. Yarn over and pull through all 3 loops.
rev sc: Working from left to right (if you are right-handed), insert the hook into the next st to the right, pull up a loop, yarn over, and pull through both loops.
Gauge and Checkpoints
Gauge: 10 ksc and 11 rnds = 4 in (10.2 cm), worked in the round. Regular sc rows (back panel) should work up to about the same gauge.
Knit stitch is dense and tends to get tighter as you go. Keep your loops relaxed and slightly taller than usual. If your fabric curls hard or feels stiff, go up half a hook size.
Use the tip as your test piece. Work Tier 1 (Rnds 1–8) first and check it against the checkpoints below before you continue.
- After Rnd 7: tip is about 2 in (5.1 cm) across
- After Rnd 8: tip is about 2.5 in (6.4 cm) long
- After Rnd 13: Tier 2 is about 3.75 in (9.5 cm) across
- After Rnd 22: Tier 3 is about 5.25 in (13.3 cm) across
- After Rnd 25: body is about 8 in (20.3 cm) long from tip to rim
- After Row 12: back panel is about 4.25 in (10.8 cm) above the rim
If your piece is too big: use a hook one size smaller, or tighten your yarn-over loops. If it’s too small: use a hook one size larger. Even a small difference matters, because it adds up over 25 rounds.
Pattern: Body (Tiers 1–3)
Work in continuous spirals and do not join rounds. Place the marker in the first st of each round and move it up as you go.
Tier 1 – The Tip
Rnd 1: In MR, 4 sc. Pull the ring tight. (4 sts)
Rnd 2: [Inc, ksc 1] 2 times. (6 sts)
Rnd 3: [Inc, ksc 2] 2 times. (8 sts)
Rnd 4: [Inc, ksc 3] 2 times. (10 sts)
Rnd 5: [Inc, ksc 4] 2 times. (12 sts)
Rnd 6: [Inc, ksc 2] 4 times. (16 sts)
Rnd 7: Ksc in each st around. (16 sts)
Rnd 8: [Dec, ksc 2] 4 times. (12 sts)
The slow increases make the narrow pointed tip. Rnd 8 pinches the fabric in, so the first whorl forms a distinct small cone.
Tier 2 – Middle Whorl
Rnd 9: [Inc, ksc 1] 6 times. (18 sts)
Rnd 10: [Inc, ksc 2] 6 times. (24 sts)
Rnd 11: [Inc, ksc 3] 6 times. (30 sts)
Rnds 12–13: Ksc in each st around. (30 sts)
Rnd 14: [Dec, ksc 3] 6 times. (24 sts)
Rnd 15: [Dec, ksc 2] 6 times. (18 sts)
Lightly fill the tip and Tier 2 with fiberfill now. Push it firmly into the point, but keep the whorl rounded, not packed tight. The filling gives the pocket a firm floor at the base of Tier 3.
Tier 3 – Large Whorl and Collar
Rnd 16: [Inc, ksc 2] 6 times. (24 sts)
Rnd 17: [Inc, ksc 3] 6 times. (30 sts)
Rnd 18: [Inc, ksc 4] 6 times. (36 sts)
Rnd 19: [Inc, ksc 5] 6 times. (42 sts)
Rnds 20–22: Ksc in each st around. (42 sts)
Rnd 23: [Dec, ksc 5] 6 times. (36 sts)
Rnds 24–25: Ksc in each st around. (36 sts)
Rnd 23 tucks the large whorl in slightly. Rnds 24–25 form the rounded collar that becomes the pocket rim. Sl st in the next st, and do not fasten off.
Check: 36 sts around the rim, and the body is about 8 in (20.3 cm) long.
Pattern: Back Panel
The back panel is worked in rows of regular sc over half of the rim. The other 18 sts become the front lip of the pocket. The spiral has no fixed seam, so the side where you start simply becomes the back.
Row 1: Ch 1, sc in the next 18 sts, turn. (18 sts)
Row 2: Ch 1, sc in each st across, turn. (18 sts)
Row 3: Ch 1, sc2tog, sc 14, sc2tog, turn. (16 sts)
Row 4: Ch 1, sc in each st across, turn. (16 sts)
Row 5: Ch 1, sc2tog, sc 12, sc2tog, turn. (14 sts)
Row 6: Ch 1, sc2tog, sc 10, sc2tog, turn. (12 sts)
Row 7: Ch 1, sc2tog, sc 8, sc2tog, turn. (10 sts)
Row 8: Ch 1, sc2tog, sc 6, sc2tog, turn. (8 sts)
Row 9: Ch 1, sc2tog, sc 4, sc2tog, turn. (6 sts)
Row 10: Ch 1, sc2tog, sc 2, sc2tog, turn. (4 sts)
Row 11: Ch 1, [sc2tog] 2 times, turn. (2 sts)
Row 12: Ch 1, sc2tog. (1 st)
The straight rows at the base and Row 4 give the panel rounded shoulders. The steady decreases from Row 5 onward make the teardrop point.
Hanging Loop
Ch 10, then sl st into the top of the Row 12 st to form the loop. Do not fasten off. The border starts from here.
Border
Border gauge: 1 sc per row end along the panel sides, and 1 sc per st along the front lip.
Rnd 1: Ch 1. Working down the left side of the back panel, sc in the end of each row (12 sts). Sc in each of the 18 front rim sts (18 sts). Working up the right side of the panel, sc in the end of each row (12 sts). Work 14 sc into the ch-10 loop (14 sts). Sl st to the first sc. (56 sts)
Rnd 2: Ch 1, rev sc in each st around, sl st to the first st. (56 sts) Fasten off.
Counts per section, for both rounds: left side 12, front lip 18, right side 12, loop 14 = 56.
Why the math works: At this gauge, one sc row is almost exactly as tall as one sc is wide, so 1 sc per row end lies flat with a little ease. The front lip keeps its original 18 sts, so the pocket mouth doesn’t pucker or flare. The loop gets 14 sc over 10 ch because the outside curve of a loop is longer than the chain itself. The extra 4 sts cover it fully and make it strong. Rnd 2 keeps the same 56 sts, so the rope edge sits evenly without ruffling.
Weave in all ends securely on the inside, splitting the chenille plies so the ends don’t work loose.
Final Blocking
Chenille doesn’t respond well to heavy steam or wet blocking, so block gently.
- Fill the pocket with a rolled hand towel so the collar and Tier 3 are fully rounded.
- Shape each whorl with your fingers, pushing the widest rounds outward so the tiers stack cleanly.
- Press the back panel flat with your hands and smooth the teardrop point upward.
- Hold a steam iron about 2 in (5.1 cm) above the surface and give one light burst of steam. Never press the iron onto the yarn.
- Let the basket dry completely with the towel inside, ideally hanging from its loop.
- Measure it: about 14 in (35.6 cm) tall overall and 5.25 in (13.3 cm) across Tier 3.
Final Quality-Control Checklist
- Three distinct whorls, each wider than the one below it
- Tip is pointed and firmly filled
- Knit stitch columns run straight from tip to rim
- Rim has 36 sts: 18 in the back panel and 18 in the front lip
- Back panel ends in a single-st point
- Border Rnd 1 and Rnd 2 each have 56 sts
- Hanging loop is fully covered and doesn’t twist
- All ends are woven in on the inside
Troubleshooting
Knit stitch is too tight to work into. Pull each loop up taller, or go up half a hook size. Tension often loosens after a few rounds.
The columns lean into a spiral. Some lean is normal in continuous rounds. Make sure you insert the hook through the center of the V every time, not under the top loops.
The whorls look flat. Check that you worked the decrease rounds (Rnds 8, 14–15, and 23). They create the pinch between tiers.
The front lip flares. You probably added sts in border Rnd 1. Recount: the lip should have exactly 18 sts.
The back panel flops forward. Work a line of surface sl sts up the center back, or slip a piece of plastic canvas behind the panel.
The loop stretches. Rework Rnd 1 with all 14 sc packed tightly onto the chain.
Care
Hand wash in cool water with mild soap, press the water out in a towel, and dry flat or hanging. Don’t tumble dry, because heat can mat chenille.
Final Notes
The measurement chain is simple. A gauge of 10 sts per 4 in (10.2 cm) gives a 2 in (5.1 cm) tip, a 3.75 in (9.5 cm) middle whorl, and a 5.25 in (13.3 cm) large whorl. The body reaches 8 in (20.3 cm). The back panel adds 4.25 in (10.8 cm), the border adds 0.5 in (1.3 cm), and the loop adds 1.25 in (3.2 cm), for about 14 in (35.6 cm) overall. Check each stage as you go and your shell will come out just right.
Happy crocheting!