
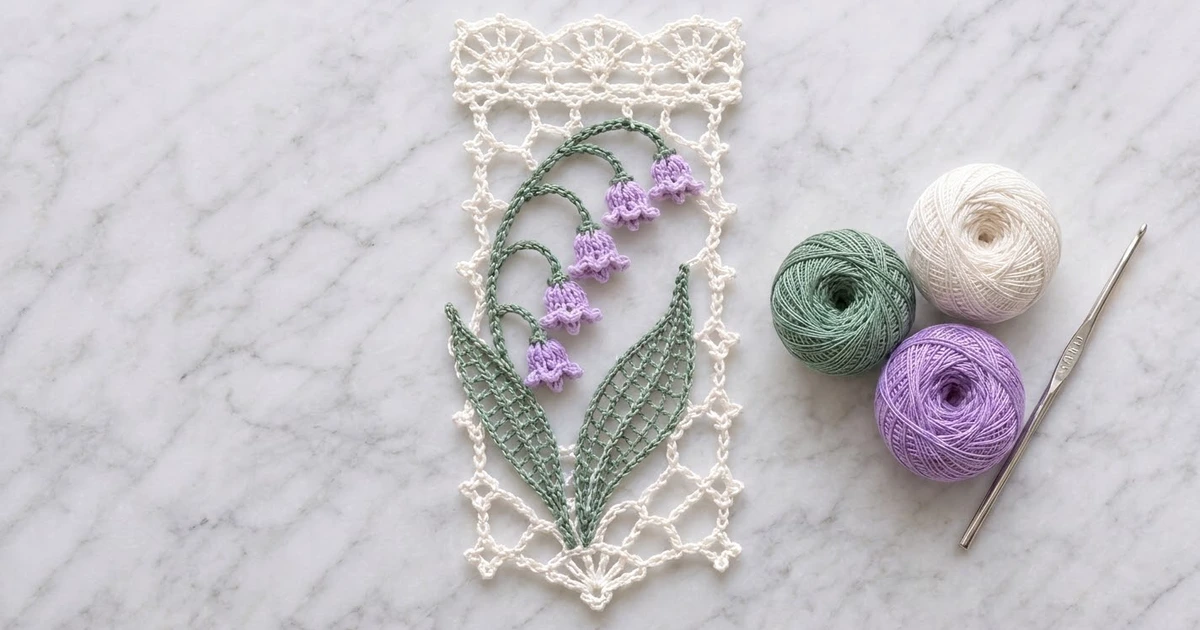
The Lily Bell Lace Panel is one tall rectangle of ivory chain-loop net with an open window in the middle. Inside the window, a sage-green stem arches to the upper right and carries five lilac bell flowers. Two long lattice leaves fan out from its base. The panel looks like vintage Irish crochet, but every part has exact stitch counts.
It uses three soft colors: ivory for the lace, sage green for the foliage and lilac for the bells. After blocking, the panel measures 6.5 x 11.25 in (16.5 x 28.6 cm).
The pattern is written in US crochet terms throughout.
The panel is built in stages. You crochet the ivory frame in the round, working outward from a chain ring. Next you make the base fan, the stem, five bells and two leaves, place them in the window and secure them with short ivory tie bars. Last, you add a picot trim on three sides and a fan band along the top.
Finished Size and Construction
- Finished size: 6.5 x 11.25 in (16.5 x 28.6 cm)
- Skill level: Intermediate
- Terminology: US
- Yarn weight: Fingering-weight (size 3) mercerized cotton thread
- Hook: 2.25 mm (US B-1)
- Number of pieces: 1 panel (frame plus 9 small motifs assembled into one piece)
- Layout: Single vertical rectangle, with the flower spray arching to the upper right
- Window opening: 3 x 7 in (7.6 x 17.8 cm)
- Size before border: 6 x 10 in (15.2 x 25.4 cm)
- Border depth: 0.25 in (0.6 cm) on the sides and bottom; 1 in (2.5 cm) along the top
Materials
Use a smooth mercerized cotton in fingering weight (size 3 crochet thread), about 170 m per 50 g. Mercerized cotton gives crisp picots and blocks flat. Avoid fuzzy or brushed blends, because they blur the net.
- Ivory (frame, fan, tie bars, border): 30 g, about 102 m
- Sage green (stem, leaves): 10 g, about 34 m
- Lilac (bells): 5 g, about 17 m
All quantities include a margin of about 20 percent for swatching and tie bars.
Tools:
– 2.25 mm (US B-1) crochet hook
– Tapestry needle
– 4 stitch markers
– Rustproof pins and a blocking board
– Spray bottle
– Ruler or tape measure
Abbreviations (US Terms)
- ch – chain
- sl st – slip stitch
- sc – single crochet
- hdc – half double crochet
- dc – double crochet
- sk – skip
- sp – space
- BLO – back loop only
- RS – right side
- st(s) – stitch(es)
Picot: ch 3, sl st in the 3rd ch from the hook.
Back-bump sl st cord: Work back along a chain by inserting the hook into the bump on the back of each chain and making a sl st. This gives a firm, rounded cord.
Gauge and Checkpoints
Gauge: 6 sc and 7 sc rows = 1 in (2.5 cm); 7 ch = 1 in (2.5 cm). Each net round adds about 0.5 in (1.3 cm) on every side.
Make one bell and one leaf first. They are quick to make and show your tension clearly.
- One bell: 0.75 in (1.9 cm) long
- One leaf: 4.5 x 1.25 in (11.4 x 3.2 cm)
- Frame after Rnd 1: window opening 3 x 7 in (7.6 x 17.8 cm)
- Frame after Rnd 4: 6 x 10 in (15.2 x 25.4 cm)
- Frame after Rnd 5: 6.5 x 10.5 in (16.5 x 26.7 cm)
- Finished panel: 6.5 x 11.25 in (16.5 x 28.6 cm)
If your pieces come out too big, go down 0.25 mm in hook size. If they come out too small, go up 0.25 mm. Measure the window after Rnd 1. If it is off by more than 0.25 in (0.6 cm), restart with the adjusted hook before you work the net.

Frame (Ivory)
Foundation: Ch 112 and sl st to the first ch to form a ring, without twisting. Place markers in 4 corner chs so the sides between them are 15 ch, 39 ch, 15 ch and 39 ch. Check: 15 + 39 + 15 + 39 + 4 corner chs = 112.
Rnd 1: Ch 1. Work into the back bump of each ch so the front Vs stay free along the window edge. Sc in each side ch and 3 sc in each marked corner ch. Sl st to the first sc, then move each marker to the center sc of its corner group. (120 sc: 108 side sc + 4 corner groups of 3)
Counting from one corner center sc to the next, there are 18 sts along each short side and 42 sts along each long side. Both numbers divide by 3, so the net lands exactly on the corners.
Checkpoint: the window measures 3 x 7 in (7.6 x 17.8 cm).
Rnd 2: Sl st to the nearest corner center sc. Ch 1 and sc in the same st. [Ch 5, sk 2, sc in next st] across the side, which ends on the next corner center sc; ch 5, sc in the same corner center sc (corner loop). Repeat from * around, ending with a sl st to the first sc instead of the last sc. (44 loops: 6 per short side, 14 per long side, 4 corner loops)
Rnd 3: Sl st to the center of the first corner loop. Ch 1, then (sc, ch 5, sc) in the corner loop. [Ch 5, sc in next loop] across the side; ch 5, (sc, ch 5, sc) in the next corner loop. Repeat around and sl st to the first sc. (48 loops: 7 per short side, 15 per long side, 4 corner loops)
Rnd 4: Repeat Rnd 3. (52 loops: 8 per short side, 16 per long side, 4 corner loops)
Checkpoint: the frame measures 6 x 10 in (15.2 x 25.4 cm). Rnd 1 and the three net rounds together add 1.5 in (3.8 cm) on every side of the window. Don’t fasten off yet; set the frame aside with a live loop on a marker.
Base Fan (Ivory)
Choose one short side to be the bottom. With a separate strand, sl st into the free front V of the 8th ch along that side, which is the center of its 15 chs, working from inside the window.
Row 1: Ch 3 (counts as dc), then 8 dc in the same st. (9 dc)
Row 2: Ch 1, turn. Sc in the first dc, then [ch 3, sc in next dc] 8 times. (9 sc, 8 ch-3 loops)
Fasten off. The fan stands about 1 in (2.5 cm) tall and 1.5 in (3.8 cm) wide.
Bells (Lilac, Make 5)
Work in a continuous spiral and mark the first st of each round.
Rnd 1: 5 sc in a magic ring. (5)
Rnd 2: 2 sc in each st. (10)
Rnds 3–4: BLO sc in each st. (10 each)
Rnd 5: BLO [sc in next st, 2 sc in next st] 5 times. (15)
Rnd 6: [Sc in next st, 5 dc in next st, sc in next st] 5 times, then sl st to the first sc. (5 scallops: 10 sc + 25 dc)
Fasten off with a 6 in (15.2 cm) tail. The BLO rounds make the ridges, and Rnd 6 makes the five-point rim.
Stem (Green)
Ch 50.
Tip: Sl st in the back bump of the 2nd ch from the hook and in each of the next 5 ch. (6 sl st)
Branches: Ch 6. Sl st in the back bump of the 2nd ch from the hook and in each of the next 4 ch (pedicel, 5 sl st). Then sl st in the back bump of each of the next 7 stem ch. Work from * 4 times in total. (4 pedicels; 28 stem sl st)
Base: Sl st in the back bump of each of the remaining 15 stem ch.
Check: 6 + 28 + 15 = 49 stem sts, so the stem is 7 in (17.8 cm) long. Each pedicel is about 0.75 in (1.9 cm). Fasten off with a 6 in (15.2 cm) tail.
Leaves (Green, Make 2)
Ch 31. The first 30 workable chs are numbered from the hook end.
Rnd 1: Sc in the 2nd ch from the hook (ch 1) and in ch 2. Then work [ch 2, sk 1 ch, dc in next ch] 12 times, so the last dc lands in ch 26. Hdc in ch 27, sc in ch 28 and ch 29, and (sc, ch 2, sc) in ch 30 for the tip. Continue along the free loops: sc in ch 29 and ch 28, hdc in ch 27, then work [ch 2, sk 1 ch, dc in next ch] 12 times, so the last dc lands in ch 3. Sc in ch 2 and ch 1, then sl st to the first sc. (24 dc, 24 ch-2 sps, 2 hdc, 10 sc, tip ch-2 sp)
Rnd 2: Ch 1. Sc in each of the first 2 sc, then [ch 3, sc in next dc] 12 times. Ch 3, sk the hdc, and sc in each of the next 2 sc. Sk the tip sc, work (sc, ch 2, sc) in the tip sp, and sk the next tip sc. Sc in each of the next 2 sc, then ch 3, sk the hdc and sc in the next dc. Work [ch 3, sc in next dc] 11 times, then ch 3 and sc in each of the last 2 sc. Sl st to the first sc. (34 sc, 26 ch-3 loops, tip ch-2 sp)
Rnd 3: Ch 1. Sc in each sc, 3 sc in each ch-3 loop, and (2 sc, ch 2, 2 sc) in the tip sp. Sl st to the first sc. (34 sc worked into sts + 78 sc in loops + 4 tip sc = 116 sc)
Fasten off with a 6 in (15.2 cm) tail. The ch-2 spaces and the ch-3 loops form two rows of openings that make the lattice. Flip the second leaf over so it mirrors the first.
Assembling the Spray
- Sew one bell to the stem tip and one to each pedicel tip, threading the lilac tail through the center of the magic ring.
- Pin the frame flat at 6 x 10 in (15.2 x 25.4 cm).
- Place the stem base on the top center loop of the base fan. Curve the stem up the left half of the window and over to the right, so the tip sits 0.5 in (1.3 cm) below the top inner edge.
- Tuck the leaf bases against the stem base. Angle the left leaf tip toward the left edge, about 4 in (10.2 cm) up, and the right leaf tip toward the right edge, about 3.5 in (8.9 cm) up.
- Sew the stem base and both leaf bases to the fan with the green tails.
- Add 8 ivory tie bars. For each one, sl st into the motif edge, chain across the gap and sl st into the nearest free foundation V, then fasten off. Place them at: the left leaf tip and the left leaf midpoint (to the left edge); the right leaf tip and the right leaf midpoint (to the right edge); the top of the stem arch and the stem tip (to the top edge); and the rims of bells 1 and 2 (to the right edge).
Use ch 4 as the standard bar. Use ch 3 for gaps under 0.5 in (1.3 cm) and ch 6 for gaps up to 1 in (2.5 cm). Each bar should lie flat, neither pulling nor sagging.
Border
Border gauge: On the frame’s outer edge, each side loop spans about 0.6 in (1.5 cm). On the top side, 4 sc per loop matches the 6 sc per inch gauge, so the fan band lies flat. On the other three sides, 5 sc per loop packs the loop firmly to support the picots.
Rnd 5: Pick up the live loop and sl st to the center of the nearest corner loop. Ch 1.
– Each corner loop: (2 sc, ch 2, 2 sc).
– Top side: 4 sc in each of the 8 loops. (32 sc)
– Each long side: (2 sc, picot, 3 sc) in each of the 16 loops. (80 sc + 16 picots)
– Bottom side: (2 sc, picot, 3 sc) in each of the 8 loops. (40 sc + 8 picots)
Sl st to the first sc. Total: 32 + 80 + 40 + 80 + 16 corner sc = 248 sc, 40 picots, 4 ch-2 corner sps. Check: (48 side loops: 8 x 4 + 40 x 5 = 232) + (4 corners x 4 = 16) = 248.
Checkpoint: 6.5 x 10.5 in (16.5 x 26.7 cm). Fasten off.
Top fan band. Between the two top corner ch-2 sps there are 2 + 32 + 2 = 36 sc.
Row 1 (RS): Join ivory in the right top corner ch-2 sp. Ch 1 and sc in the sp. Then work [sk 2 sc, 5 dc in next sc, sk 2 sc, sc in next sc] 6 times. (7 sc, 6 fans = 30 dc)
Row 2: Ch 1, turn. Sl st in the first sc, then work sc in each of the next 2 dc, (sc, picot, sc) in the center dc, sc in each of the next 2 dc, sl st in next sc 6 times. (36 sc, 6 picots, 7 sl st)
Fasten off.
Why the math works: Each fan uses exactly 6 sts, and 36 = 6 x 6. Anchoring the first sc in the corner space gives 37 positions, which is 6n + 1, so the last sc lands on the final sc before the left corner. The band adds 0.75 in (1.9 cm) to the height.
Final Blocking
- Weave in all ends, hiding them inside the stem cord, the leaf outlines and the sc rounds.
- Soak the panel in cool water for 10 minutes. Press out the water in a towel without wringing.
- Pin the outer corners to 6.5 x 11.25 in (16.5 x 28.6 cm).
- Pin out each picot and each fan tip along the top.
- Open the net loops evenly. Pin the window edges straight at 3 x 7 in (7.6 x 17.8 cm).
- Shape the bells into rounded cups and pin the tips of both leaves.
- Let the panel dry completely before you unpin it.
Final Quality-Control Checklist
- Panel measures 6.5 x 11.25 in (16.5 x 28.6 cm)
- Window is 3 x 7 in (7.6 x 17.8 cm) with straight edges
- 52 net loops, with no twisted corners
- 248 sc and 40 picots in Rnd 5
- 6 even fans across the top
- 5 bells, each with 5 scallops
- 2 leaves with open lattice and sharp tips
- 8 tie bars lying flat
- All ends secured and hidden
Troubleshooting
Window corners pull in: Check that each corner of Rnd 1 has 3 sc.
Net doesn’t land on the corners: Recount the foundation sides (15 and 39) and the Rnd 1 corner positions.
Edge ruffles in Rnd 5: Your loops are short. Go down to 4 sc per loop on the long sides and keep the picots.
Top band cups: Use a 0.25 mm smaller hook for the band.
Bells flare flat: Work Rnd 6 more tightly, or use 4 dc per scallop.
Leaves curl: Steam them and pin them flat. Check that Rnd 3 has 3 sc per loop, not 4.
Tie bar distorts the frame: Remove it and redo it 1 ch longer.
Care
Hand wash in cool water with a mild detergent, then reshape and dry the panel flat. If needed, steam it lightly from the wrong side. Don’t put a hot iron directly on the bells.
Final Notes
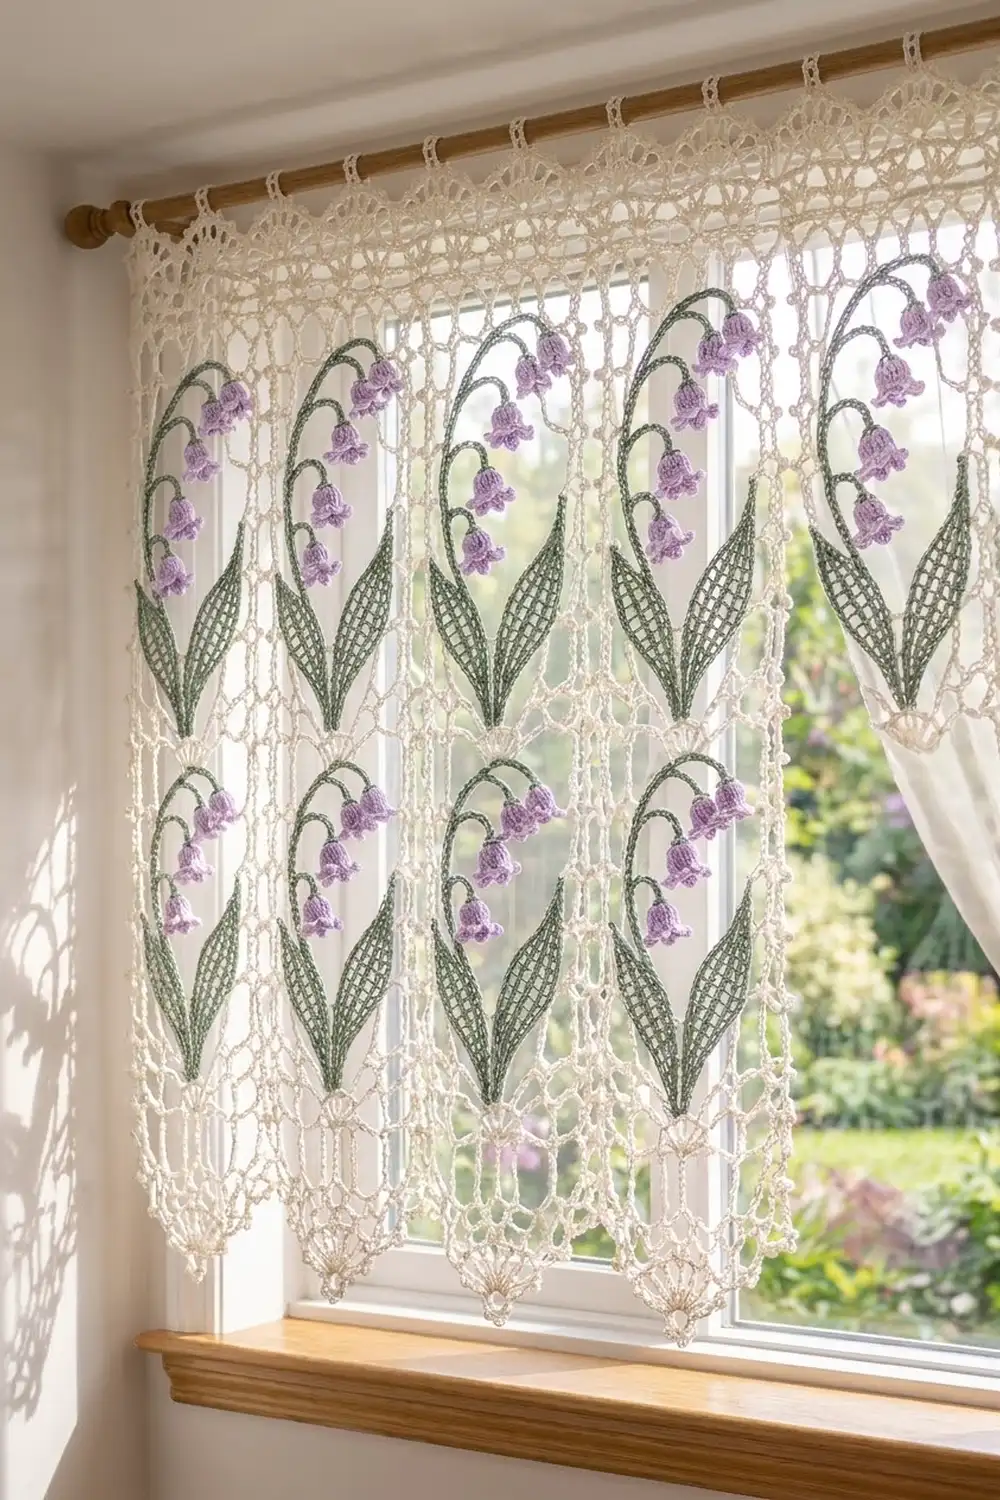
The measurements build on each other. A 3 x 7 in (7.6 x 17.8 cm) window grows to 6 x 10 in (15.2 x 25.4 cm) after the net rounds. The picot trim brings it to 6.5 x 10.5 in (16.5 x 26.7 cm), and the fan band finishes it at 6.5 x 11.25 in (16.5 x 28.6 cm). If each checkpoint matches, the next stage fits. Make one panel to frame, or stitch several for a window, as shown in the photo.
Happy crocheting!